What is Quickly OneOffice?
In the digital age, businesses need more than just software—they need strategic allies that can empower them to succeed in a rapidly evolving marketplace. Enter Quickly OneOffice, the cloud-based software solution designed to revolutionize CRM, Sales, and Expenses management. Let's delve into what makes Quickly OneOffice the go-to choice for businesses seeking efficiency and growth.
Unlocking Efficiency with Quickly OneOffice:
- Efficient CRM: Seamlessly organize interactions, track sales, and uncover valuable insights with Quickly OneOffice's cutting-edge CRM tools. Elevate your business relationships and foster customer loyalty with precision and ease.
- Streamlined Sales and Expense Management: Monitor sales and spending in one centralized location, making transactions more efficient and financial understanding clearer. Quickly OneOffice simplifies expense management, contributing to overall corporate success.
- Cloud-Based Accessibility: Access invoicing data from any device with an internet connection, offering unparalleled flexibility and mobility. Whether you're in the office or on the go, Quickly OneOffice ensures that your business operations are always within reach.
- Cloud-Based Accessibility: Access invoicing data from any device with an internet connection, offering unparalleled flexibility and mobility. Whether you're in the office or on the go, Quickly OneOffice ensures that your business operations are always within reach.
- Valuable Insights: Gain actionable insights on invoices, payments, sales, and revenue to boost cash flow and make informed decisions. Quickly OneOffice empowers businesses to spot opportunities and optimize financial performance with ease.
- Robust Security Measures: Rest assured that your business data is safe and secure with Quickly OneOffice's strong security measures and backups. Stored on the cloud, your information is easily accessible yet protected from unauthorized access.
Quickly OneOffice is more than just software—it's a catalyst for business growth and success. With its intuitive features, cloud-based accessibility, and emphasis on efficiency and security, it's the ultimate solution for modern businesses looking to thrive in today's competitive landscape.
Why Quickly OneOffice?
In today's competitive landscape, businesses need more than just basic tools—they need strategic solutions that deliver real results. That's where Quickly OneOffice shines. With its cloud-based infrastructure, you can access critical invoicing data from any internet-enabled device, providing unparalleled flexibility and mobility.
But the true power of Quickly OneOffice lies in its ability to transform raw data into actionable insights. By analyzing invoice trends, monitoring expenses, and tracking sales performance, our software equips you with the knowledge needed to make informed decisions that drive your business forward.
Key Benefits of Choosing Quickly OneOffice:
- Enhanced Operational Efficiency: Streamline processes and maximize productivity with Quickly OneOffice's intuitive features. Spend less time on administrative tasks and more time on strategic initiatives that drive growth.
- Improved Financial Management: Gain valuable insights into your financial performance and make informed decisions to optimize cash flow and drive profitability. Quickly OneOffice's reporting and analysis tools empower businesses to take control of their finances.
- Flexibility and Mobility: Access your business data anytime, anywhere, with cloud-based accessibility. Whether you're in the office, at home, or on the road, Quickly OneOffice ensures that you're always connected to your business operations.
- Data Security and Compliance: Protect your sensitive business data with industry-leading security measures and backups. Quickly OneOffice prioritizes data security, ensuring that your information is safe from cyber threats and unauthorized access.
Quickly OneOffice is more than just software—it's a strategic ally that empowers businesses to thrive in today's competitive marketplace. With its intuitive features, cloud-based accessibility, and commitment to security and compliance, it's the ultimate solution for businesses looking to elevate their operations and drive growth.
Sign Up Process
If you are new to our system, you don't need to worry about the process. It's very easy. Just follow the instructions and register your business within a few minutes.
Steps to get your business registered:
- Visit our website, Quickly Services (www.quicklyservices.com)
-
Go to the Products Section and select OneOffice.

-
To register your business, click on ‘Sign Up’.

-
Enter a valid email and password in the Create your account page and click on ‘Sign Up’.

-
After Sign Up, you need to verify your email address.

After email verification, your account will be created. Then you can customize your account and create your business or organization profile.
Set your user name & contact info
After registration, your personal info page will appear. You can set your user name & contact info on this page.
- Click on Change beside Name, email and/or Phone field.
- Set Name, email & Phone number.
-
Click on Submit.

Create business(es) under one user account
Before creating any business, you need to verify your email and provide some personal information.
You can add as many businesses as you want.
- Sign In to your Account.
-
From the Your Business / Organization section, click on “Create a business”.

-
Enter your business’s information and click on “Submit”

Your setup is done. Now start your business adventure with Quickly OneOffice!
Manage Your Quickly Account
We understand that it is difficult to remember the individual login IDs and passwords for multiple businesses’ accounts. A Quickly OneOffice account provides access to add unlimited businesses under your single-user account.
With Quickly user account, you can do things like;
- Monitor all your businesses from a single place.
- Easily switch between them.
- Get all mails (for-instance bills, reports) to a particular email address.
- Get all SMS to a particular phone number.
Change your user name & contact info
You can add or update your personal info anytime from the User Account page.
- Go to OneOffice Homepage.
-
Click on Manage Your Account under the user menu from navbar.

-
To add or change name, click Change next to the Name field under Personal Info.

-
Enter your name and click Submit.

- To add or change email address and/or phone number, repeat the same steps.
Change or reset your password
You can change your password for security reasons or reset if you forget it.
Change Password
- Go to your Account.
-
Under "Password", click Change.

- Enter your current password and new password, then click Submit.
Reset Password
-
Click Forgot Password from the Login page.

-
Enter your Login ID and click Send.

- You will receive an email or SMS.
- If you don’t get any email, check your Spam or Bulk Mail folders. Note that you cannot request for password reset more than twice in a row.
- Now click the Reset Password button in the email. You will be redirected to the password reset page.
- Choose a new password, then click Reset Password.
Configure Your Business's Settings
Before commencing your day-to-day operations, take a moment to configure the settings according to your preferences. Doing so will streamline your business processes and enhance your overall experience.
You can do the following things;
- Add or invite users to your business.
- Update Business-related info from Brandings.
- Set Prefix for Invoice, Quotation & Bill.
- Add or Update Tax if applicable.
- Add or Update Discount.
- Add or Update Shipping Charge.
- Change configuration.
Add or invite user to your business
With Quickly OneOffice, you have complete control over what your staff sees. You can define roles for individual users and assign rights for the app.
To add a user;
-
Go to User under Settings and click New User.

-
Enter email address & name, and click Invite.
Note that it will be used as his login ID.

The user will receive an invitation via email. If the invited user does not have a Quickly OneOffice account, he will be taken to the Sign Up page right after he accepts the invitation. Then he will have to set a password for himself. He will be able to access your business once he accepts the invitation.
You can change the user’s access anytime from the User section. You can also deactivate the user if you want.
Update your Branding
From the OneOffice Home page, click on Branding under Settings from the navigation bar to change or update your Branding.
-
Go to Branding under Settings.

- You can change or update your business’s basic information, Upload logo and/or change or update your address from this page.
-
Click Submit once you complete updating your branding.

Prefix Setup
You can set prefixes for your Invoice, Quotation and Bill according to your preference and better user experience. It will be auto-generated by the system. But you can set it manually as you want.
-
Go to Prefix under Settings.
You will find 3 sections; Invoice, Quotation & Bill.

- Setup prefixes as per your preference for each section and click on Submit to save them.
Add or Update Tax
You can add tax for your business if applicable and assign them while creating new products or services. Tax will automatically be applied if the assigned product or service is added to the Quotation or Invoice.
Following steps to be followed to add tax;
-
Go to Tax under Settings and click on New Tax.

-
After entering title and tax rate, click on Submit.

-
You can Edit or Delete any tax after creation from the 3 dot menu.

Add or Update Discount
Offer your customers a fixed value, or percentage discount on products or services in your business.
You can specify;
- The title of the Discount you offer.
- Whether it is a fixed amount or a percentage value.
- Rate of the Discount.
To add a discount:
-
Go to Discount under Settings and click on New Discount.

-
Give a title, select type and enter a rate. After all fields are filled up, click on Submit.

-
You can Edit or Delete any discount after creation from the 3 dot menu.

Add or Update Shipping
You can add different types of shipping charges according to the business, fixed or area wise.
To add shipping;
-
Go to Shipping under Settings and click on New Shipping.

-
Give a title and enter a rate. After all fields are filled up, click on Submit.

-
You can Edit or Delete any shipping after creation from the 3 dot menu.

Change Configuration
You can change or update Timezone and Date Format from the Configuration section.
- Go to Configuration under Settings.
-
Select your preferred Timezone and Date Format and click on Submit.

Customer Relationship Management
Learn how to manage your customer relationships like a pro with our awesome software. Easily keep track of your interactions, sales, and find important insights. Improve your business relationships effortlessly and precisely.
You can add Leads, convert them to Clients and manage all the necessary Contacts in one platform. Just dive into it and you have all the information at the same place.
Manage Leads
In the context of OneOffice, a lead represents an individual who is currently a potential client. This means they have shown interest in your products or services but have not yet become formal clients. You can gather information about potential clients and store it in the Lead section of OneOffice. This information might include contact details, preferences, and any interactions they've had with your business.
The Lead section serves as a repository for managing and tracking potential clients, allowing you to organize and prioritize your efforts to convert them into actual clients. Once a lead progresses through the sales process and shows a commitment to engage further with your business, you have the option to convert them into a client within OneOffice.
To manage Lead, follow the steps;
-
To add a new lead, go to Lead under the CRM section from the Navigation Menu and click on New Lead.

Input all necessary information like Basic Information, Address and Contact Person (if the Lead is an Organization) and click on Submit.
-
You can find the added Leads in the Lead page.

-
You can search for a particular lead with the help of filters.

-
You can Preview, Edit, Delete and/or Convert a lead to a client from the 3 dot menu located in the Actions field.

-
You can import leads with a CSV or Excel file when you have a lot of contacts.

-
You can view the lead's details just by clicking on the Lead’s name.

-
You can Edit or Delete Lead, add Notes, Tasks, Call Log and Email Log & send email from the taskbar of the Lead details page.

These are the steps on how you can manage all your leads from one place.
Manage Clients
In the context of OneOffice, a client refers to an individual or entity that was previously considered a potential customer but has now established a connection with your business. This connection could have been initiated through various interactions, such as inquiries, purchases, or engagements with your products or services. Once a prospective client takes a step to engage with your business, whether by making a purchase or expressing interest, they transition from being a potential client to a client. This transition indicates that they have begun a formal relationship with your business, and you now have the opportunity to nurture and maintain this connection to foster long-term loyalty and satisfaction.
To manage Client, follow the steps;
-
You can Convert a Lead to a Client. Go to the Lead under CRM and from the 3 dot menu of a particular lead, click on “Convert to Client”.

-
To add a new client, go to Client under the CRM section from the Navigation Menu and click on New Client.

Input all necessary information like Basic Information, Address and Contact Person (if the Lead is an Organization) and click on Submit.
-
You can find the added clients in the Client page.

-
You can search for a particular client with the help of filters.

-
You can Preview, Edit, and/or Delete a client from the 3 dot menu located in the Actions field.

-
You can import clients with a CSV or Excel file when you have a lot of contacts.

-
You can view the client's details just by clicking on the Client’s name.

-
You can Edit or Delete Client, add Notes, Tasks, Call Log and Email Log & send email from the taskbar of the Client details page.

These are the steps on how you can manage all your clients from one place.
Manage Contact
Effective contact management is vital for business success, and Quickly OneOffice simplifies this by centralizing all contacts in one location. This ensures accuracy, streamlines communication, and enables personalized interactions. With comprehensive insights and efficient tracking, businesses can make informed decisions and foster stronger customer relationships. Centralized contact management in Quickly OneOffice enhances productivity, collaboration, and overall business efficiency.
When you add any contact person while adding Lead or Client, the contact details will automatically reflect on the Contact page.
To manage Contacts, follow the steps;
-
Go to Contact under the CRM section from the Navigation menu to view all contacts.

-
To add a new contact, go to the Contact page and click on “Create Contact”.

Input all necessary information and click on Submit.
-
Filter contact with Name, Email, Phone No. or Customer with the search filter.

You can view all the contacts on the Contact page.
Inventory
Inventory management is critical for business success, and Quickly OneOffice simplifies this by centralizing inventory control. By managing inventory from one location, businesses ensure accuracy, streamline operations, and improve efficiency. This centralized approach provides better visibility, control, and integration across all aspects of inventory management, from procurement to fulfillment. With Quickly OneOffice, businesses can optimize stock levels, minimize errors, and make informed decisions to drive growth and profitability.
Manage Item
Managing items within Quickly OneOffice's inventory system is crucial for efficient operations. By centralizing item management, businesses ensure consistency, accuracy, and better control over stock movements. This streamlined approach minimizes errors, optimizes inventory levels, and improves overall operational efficiency.
Additionally, centralized item management facilitates seamless integration with other business functions, enhances visibility, and enables proactive decision-making. Ultimately, proper item management from one location empowers businesses to operate more efficiently and competitively in today's dynamic marketplace.
To manage item, follow the steps as described;
-
Go to Item under Inventory section from the navigation menu to view all the items.
It can be either a product or any kind of service.

-
To add a new item, go to Item under the Inventory section from the Navigation Menu and click on Create Product.

Input all necessary information for the Product / Service and click on Submit.
-
You can search for a particular product or service with the help of filters.

-
You can Preview, Edit or Delete an item from the 3 dot menu located in the Actions field.

-
You can also view the item's details just by clicking on the Item’s name.

-
You can Edit or Delete an item from the Item details page.

These are the steps on how you can manage all your items from one place.
Manage Tag
Tag management for products is a vital aspect of organizing and categorizing inventory within Quickly OneOffice's system. Tags serve as labels or identifiers that businesses can assign to products to classify them based on various attributes such as category, brand, size, color, or any other relevant characteristic.
By implementing tag management for products, businesses can streamline inventory organization and retrieval processes. For example, tags allow users to easily filter and search for specific products based on predefined criteria. This simplifies inventory management tasks, improves searchability, and enhances overall efficiency.
Tag management for products in Quickly OneOffice plays a crucial role in organizing, categorizing, and tracking inventory effectively. By leveraging tags, businesses can streamline operations, improve inventory visibility, and enhance the overall management of their products.
To manage Tag, follow the steps;
-
You can create or add a tag while creating an item.

-
You can view product based tags on the Item page.

-
To view all the created product tags, go to Tag under Inventory section from the navigation menu.

Additionally, click on a tag title to view all products assigned to that tag on the item page.
Sales
Sales management in Quickly OneOffice integrates key functions like quotation, invoice, and payment handling into a single, streamlined system. This means sales teams can easily create customized quotes, manage invoicing from generation to payment receipt, and handle payments seamlessly—all within one platform. By centralizing these processes, businesses can respond swiftly to customer inquiries, maintain accurate financial records, and improve cash flow management. This unified approach enhances overall efficiency and customer satisfaction, empowering businesses to focus on driving growth and achieving their sales goals effectively.
Manage Quotation
Managing quotations in Quickly OneOffice is crucial for efficient sales. When done from one location, it ensures consistency and accuracy, making it easier for sales teams to create and track quotes. This efficiency leads to faster response times and better customer satisfaction.
Centralized quotation management also provides visibility and control over the entire process, helping businesses make informed decisions to optimize sales strategies. Ultimately, managing quotations properly from one location improves sales processes and enhances the customer experience.
To manage Quotation, follow the steps;
-
Go to Quotation under Sales section from the navigation menu to view all created quotations.

You can see Quotation creation date, Quotation Number, Customer info, Amount and Quotation owner info from the Quotation page. -
To create a new quotation, go to Quotation under Sales section from the navigation menu and click on Create Quotation.

Input all necessary information for the quotation and click on Save. Besides, you can save and send the quotation via mail at the same time.
All the created quotations can be viewed on the Quotation page under Sales section. -
You can filter quotations with the search filter from the Quotation page using quotation number and customer name.

-
You can Preview, Create Invoice, Duplicate, Edit or Delete a quotation from the 3 dot menu located in the Actions field.

-
You can also preview a particular quotation just by clicking on the Quotation Number.

-
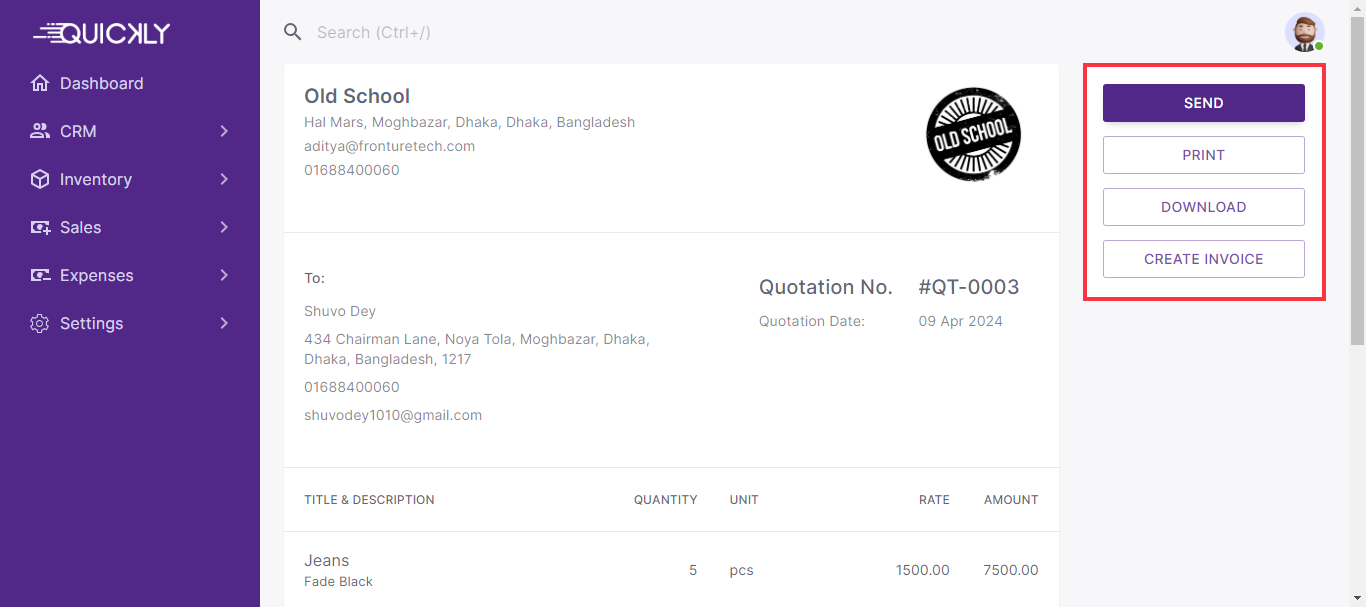
From the Quotation preview page, you can Send Quotation via email, Print & Download quotation and Create Invoice against that quotation.
Manage Invoice
Managing invoices in Quickly OneOffice is essential for smooth sales operations. By handling them from one place, businesses ensure accuracy and efficiency. This centralized approach makes it easier to create, send, and track invoices, leading to faster payments and improved cash flow. It also enhances the customer experience by providing clear and timely billing information. With centralized invoice management, businesses gain better visibility and control over their finances, helping them make informed decisions and maintain financial stability.
To manage Invoices, follow the steps;
-
Go to Invoice under the Sales section from the navigation menu to view all created invoices.
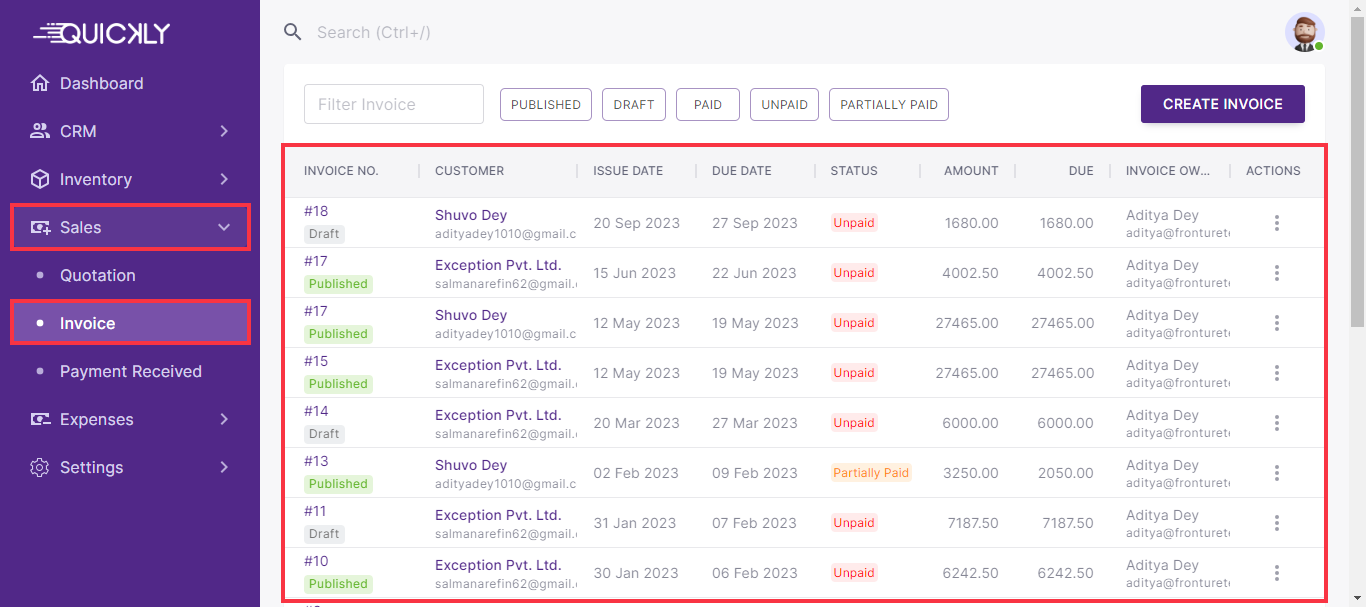
You can see the Invoice Number, Invoice Status, Customer info, Invoice Issue Date, Due Date, Payment Status, Amount to be paid, Due amount, and Invoice owner from the Invoice page. -
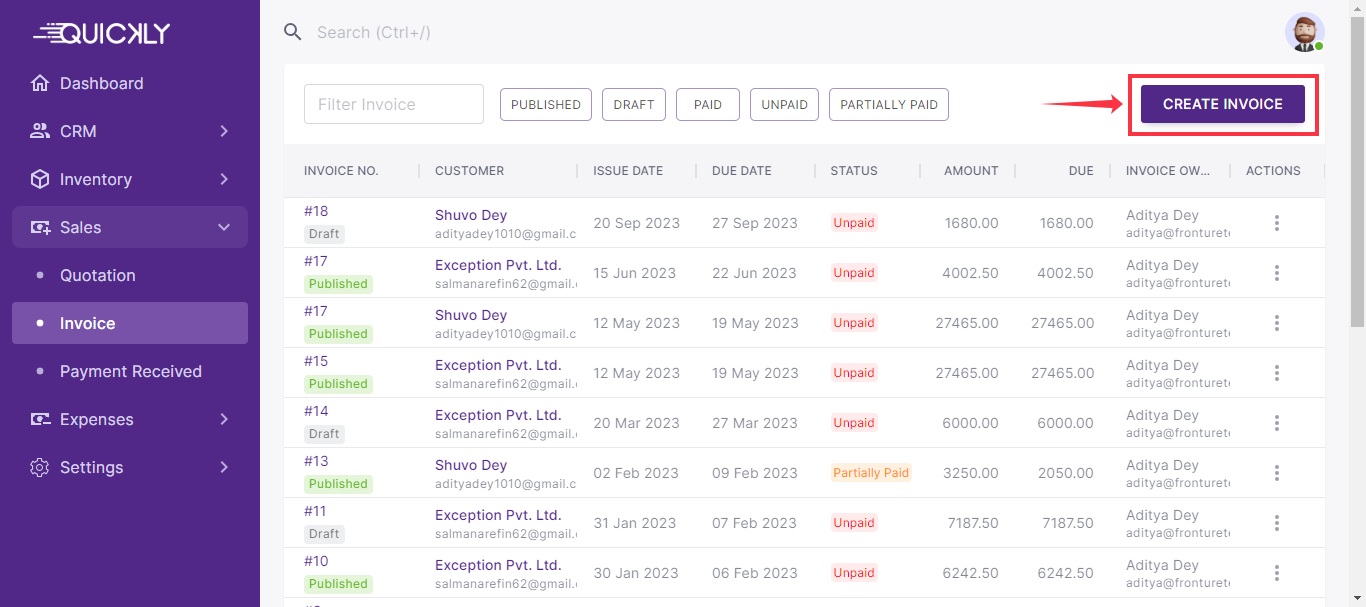
To create a new invoice, go to Invoice under Sales section from the navigation menu and click on Create Invoice.
Input all necessary information for the invoice and click on Save Draft. Besides, you can Publish the invoice at the same time from the invoice creation page.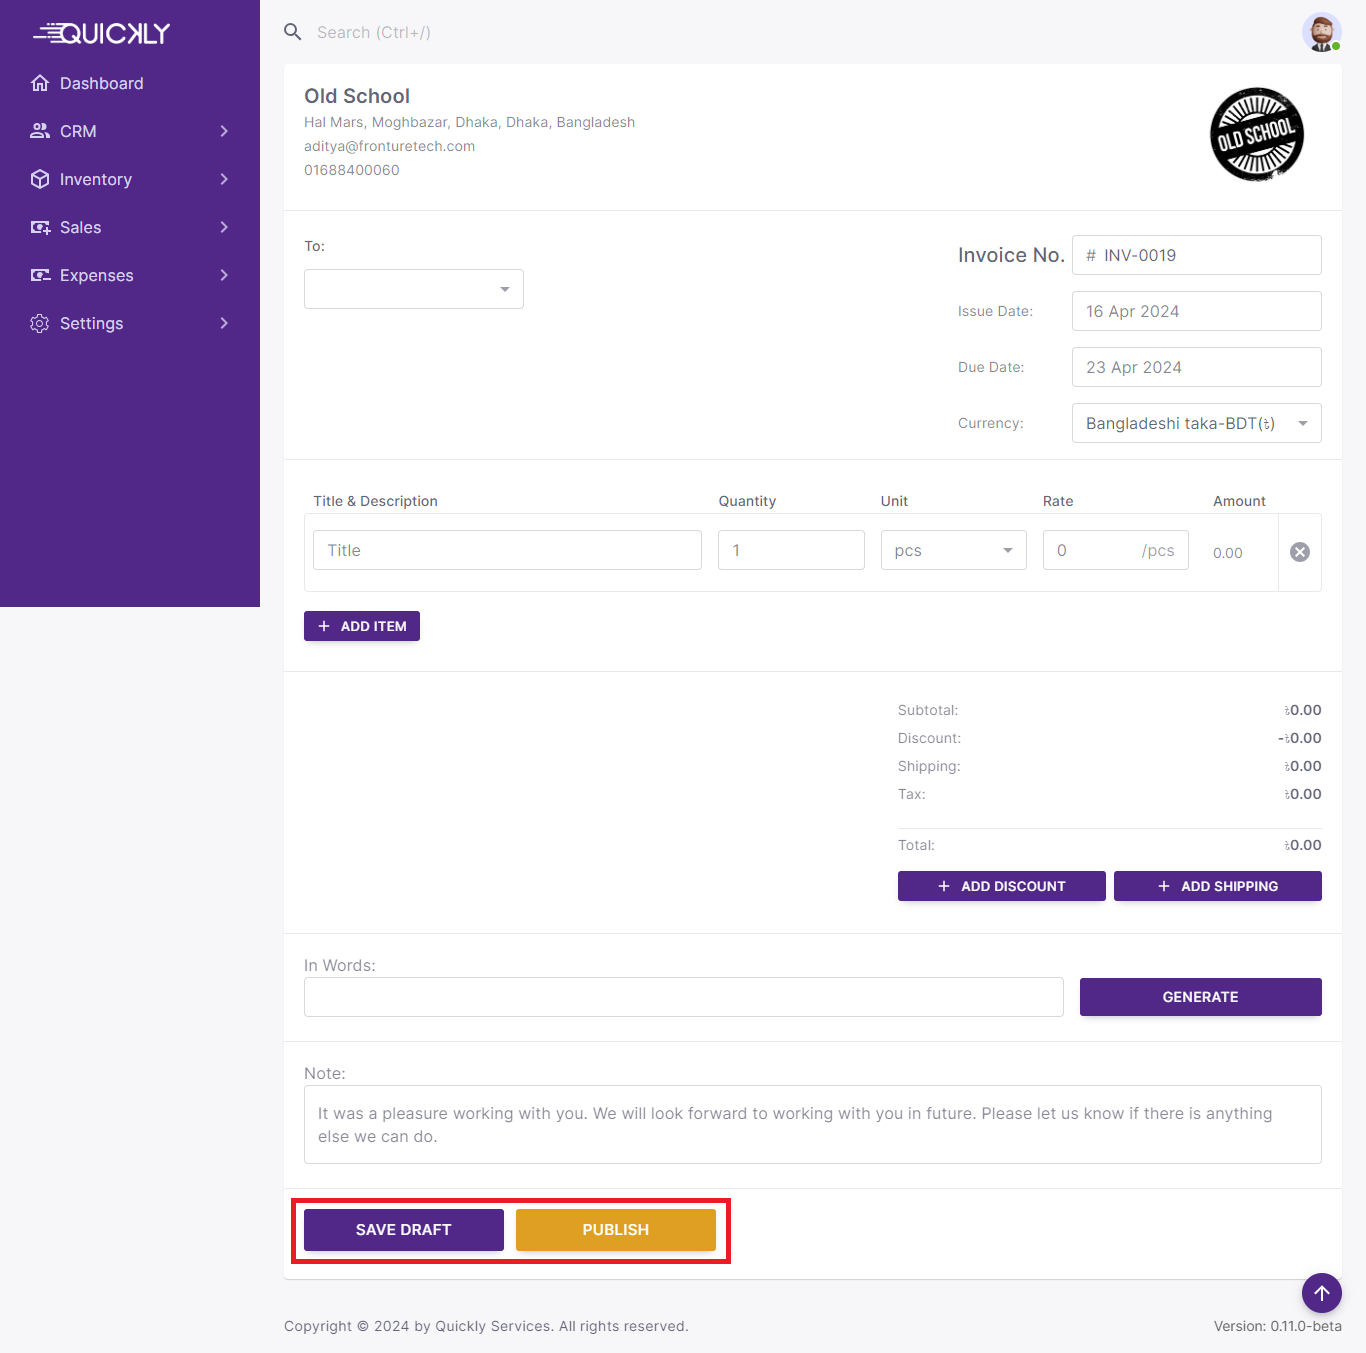
All the created invoices can be viewed on the Invoice page under the Sales section. -
You can filter invoices with the search filter and given filter options from the Invoice page.

-
You can Preview, Download, Edit, Publish, Duplicate, or Delete an invoice from the 3 dot menu located in the Actions field.

-
You can also preview a particular invoice just by clicking on the Invoice Number.

-
From the Invoice preview page, you can Send Invoice via email, Print & Download invoice and Publish invoice.

Payment Received
In Quickly OneOffice, managing received payments is vital for maintaining precise financial records and ensuring smooth cash flow. By consolidating payment handling into one centralized location, businesses can guarantee accuracy, timeliness, and accountability. This streamlined approach not only enables prompt updates to financial records but also enhances customer relationships and ensures compliance with financial regulations. Ultimately, centralized payment management contributes to overall financial stability and business success.
To manage Payment Received, follow the steps;
-
Go to Payment Received under the Sales section from the navigation menu to view all created payments.
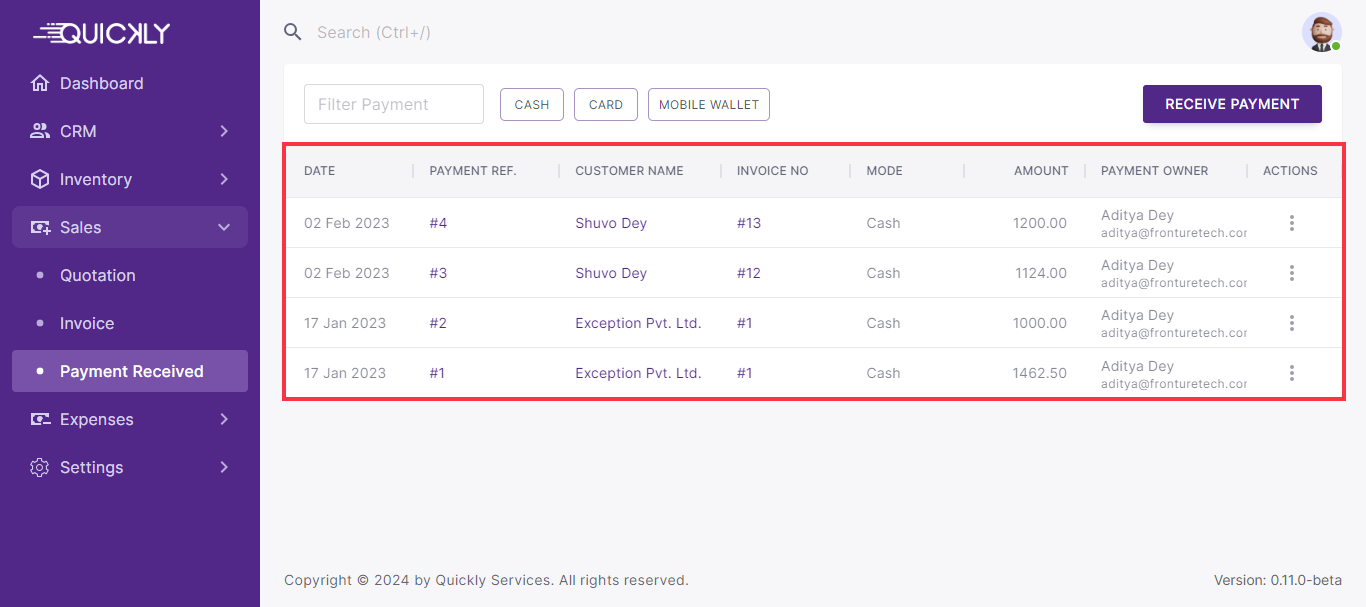
You can see the Payment Date, Payment Reference Number, Customer info, Invoice Number against which the payment is received, Payment Mode, Payment Amount, and Payment Owner from the Payment Received page. -
To create a new payment, go to Payment Received under the Sales section from the navigation menu and click on Receive Payment.
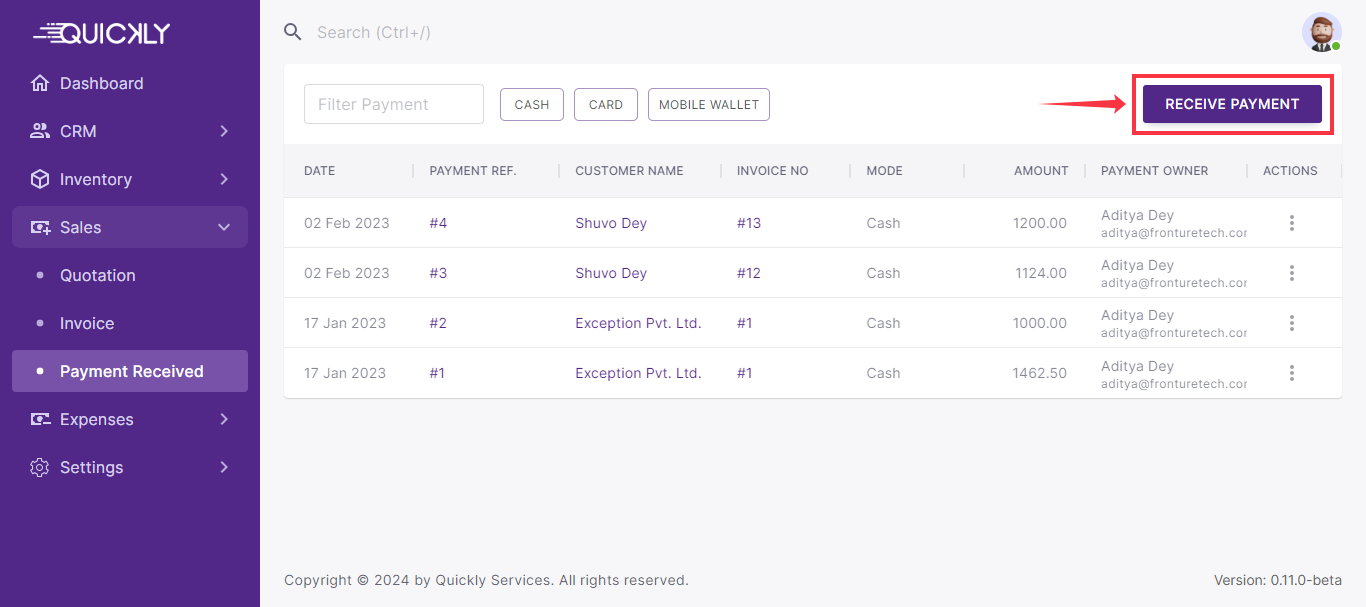
Input all necessary information for the payment and click on Submit.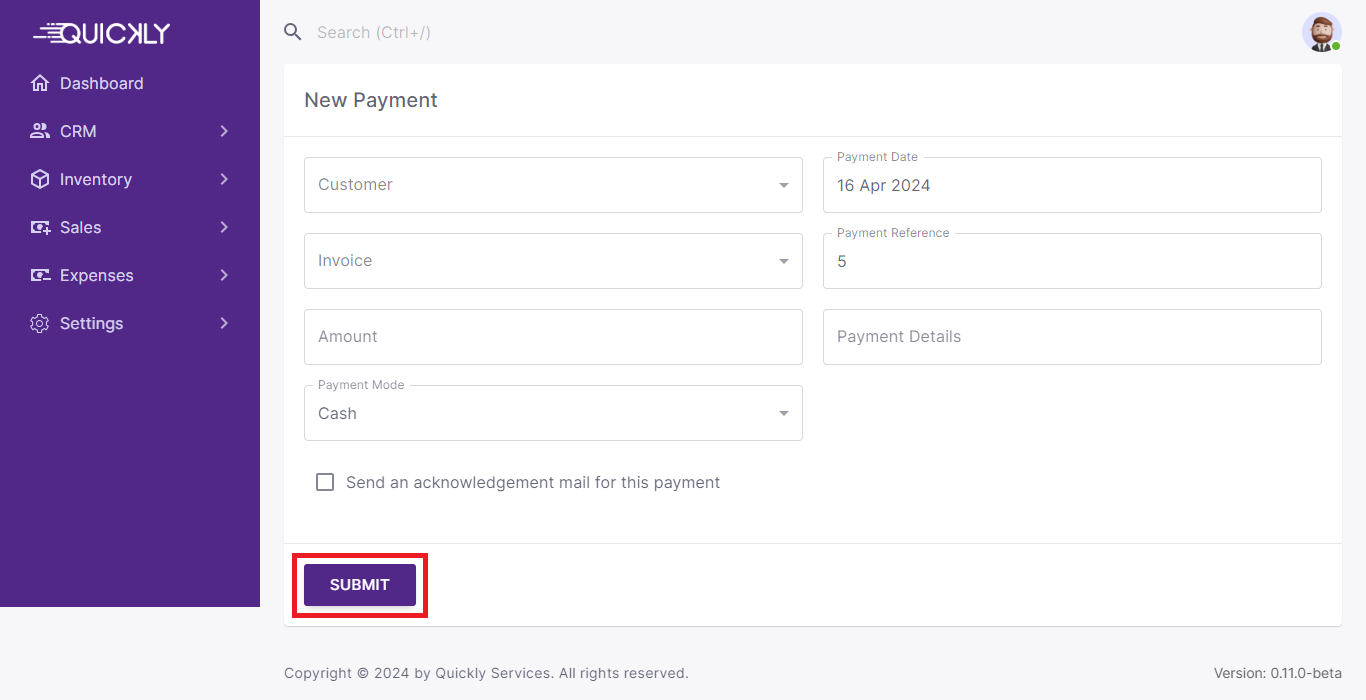
All the created invoices can be viewed on the Payment Received page under the Sales section. -
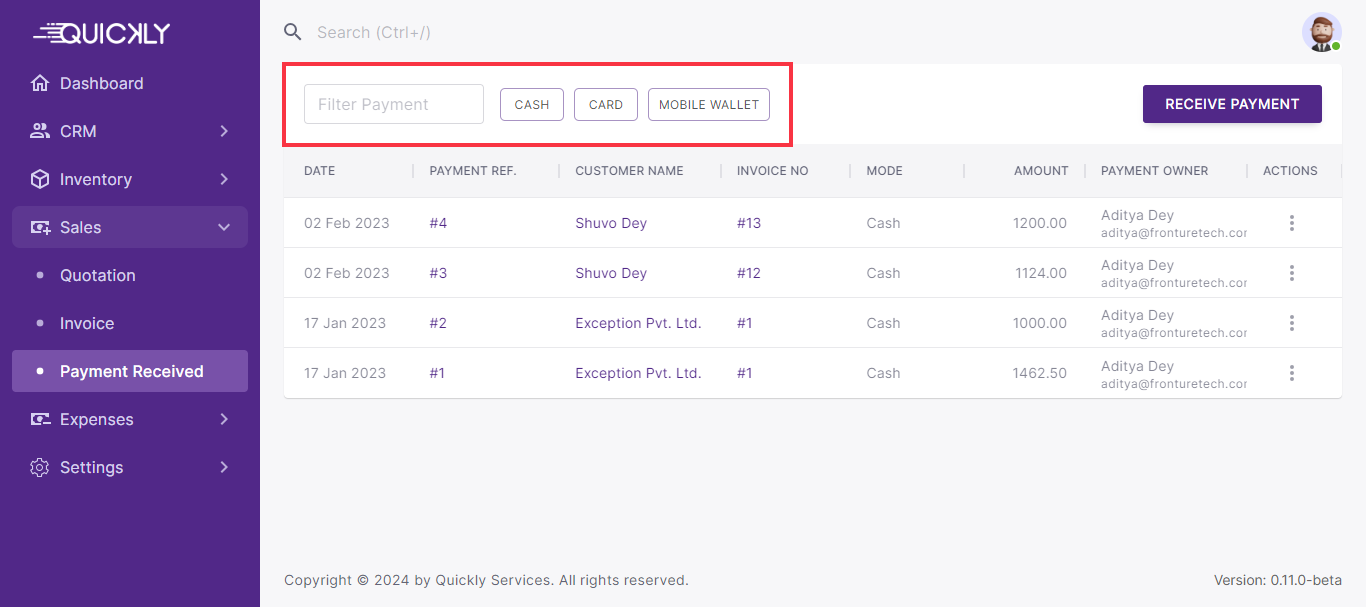
You can filter Payments with the search filter and given filter options from the Payment Received page.
-
You can Preview payment details from the 3 dot menu located in the Actions field.
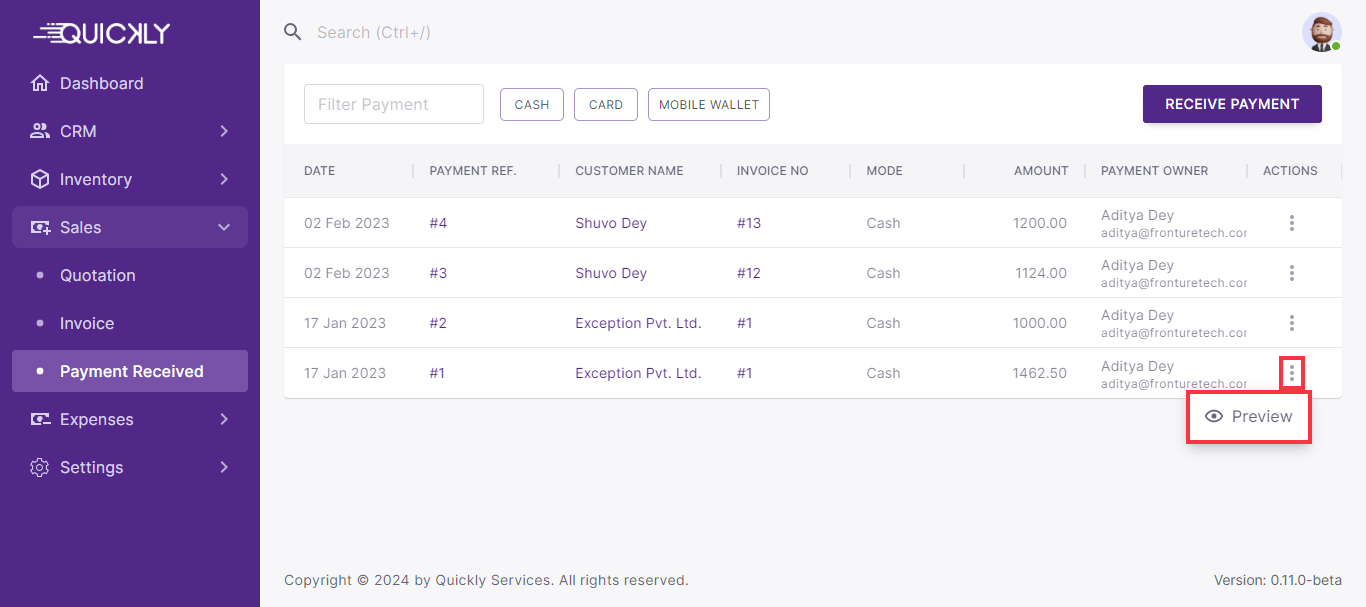
-
You can also preview a particular payment details just by clicking on the Payment reference number.
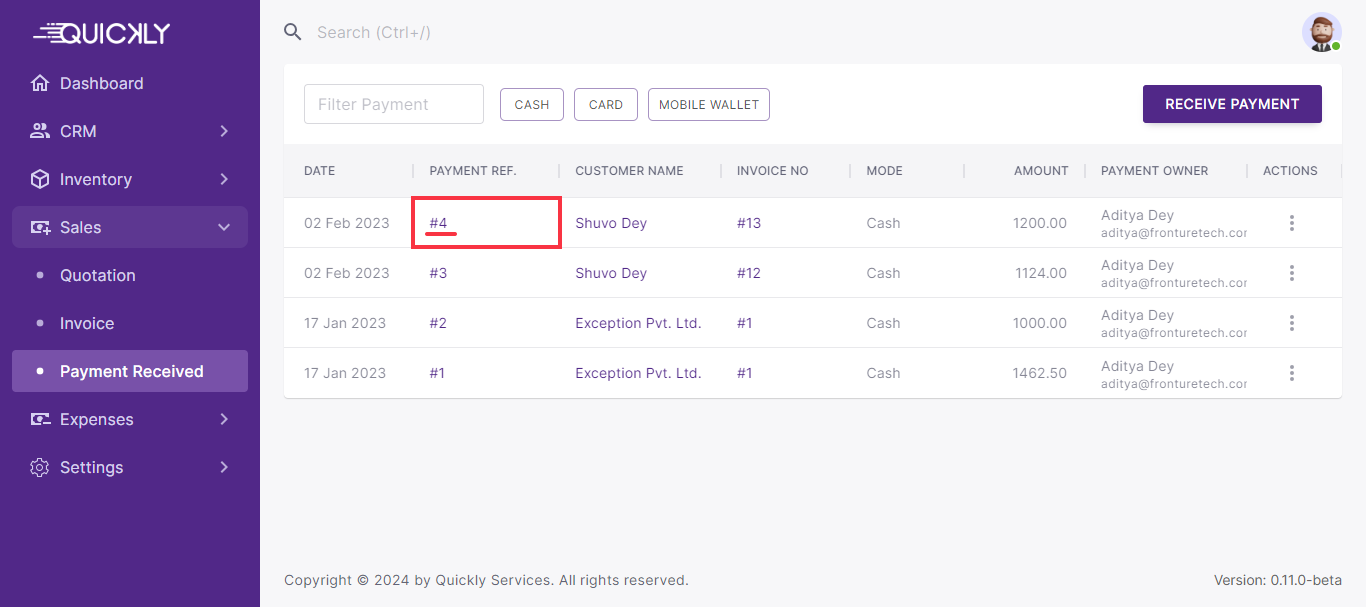
-
From the Payment preview page, you can Print & Download payment receipt.

Expenses
Expense management in Quickly OneOffice streamlines the handling of bills or purchases, payments made, and vendor management. Users can easily input and categorize expenses, schedule payments, and track payment status. Additionally, the platform simplifies vendor management by storing vendor information and tracking payments, enabling businesses to build strong vendor relationships and ensure timely payments. This integrated approach enhances accuracy, improves financial visibility, and drives operational efficiency, ultimately contributing to business success.
Manage Bill / Purchase
In Quickly OneOffice, bill/purchase management simplifies the process of handling expenses. Users can easily input, track, and categorize bills or purchases within the platform. This centralized system allows for efficient management of expenses, including attaching relevant documentation and setting reminders for payment deadlines. By providing a streamlined approach to bill/purchase management, Quickly OneOffice helps businesses maintain accurate financial records and optimize their expense tracking processes.
To manage Bill / Purchase, follow the steps;
-
Go to Bill / Purchase under the Expenses section from the navigation menu to view all created Bills or Purchases.

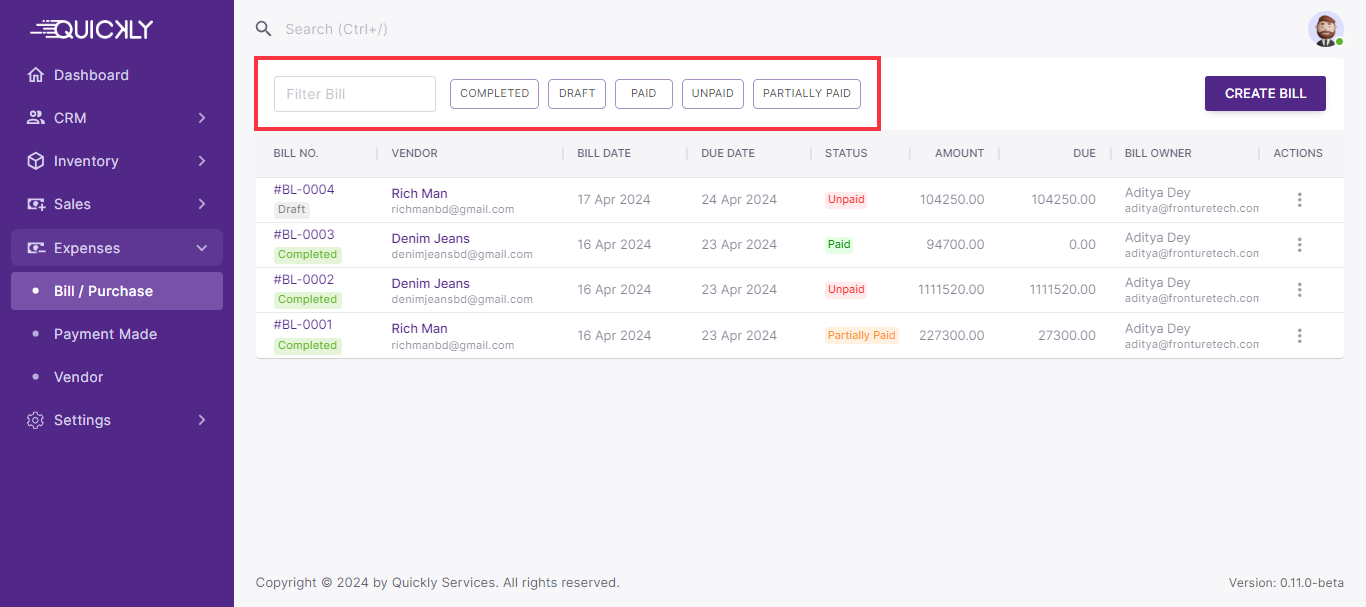
You can see Bill Number, Vendor details, Bill Creation Date, Bill Due Date, Payment Status, Total Amount, Due Amount and Bill Owner info from the Bill / Purchase page. -
To create a new bill, go to Bill / Purchase under Expenses section from the navigation menu and click on Create Bill.
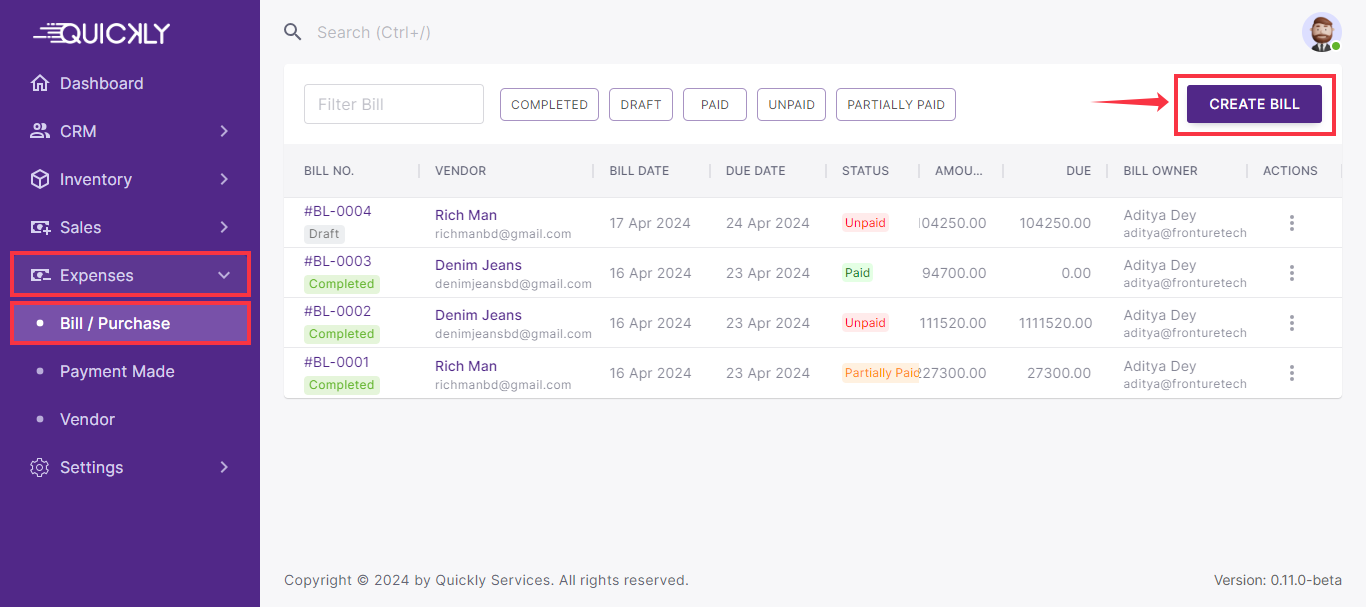
Input all necessary information for the bill and click on Save Draft. Besides, you can save as Complete the bill at the same time.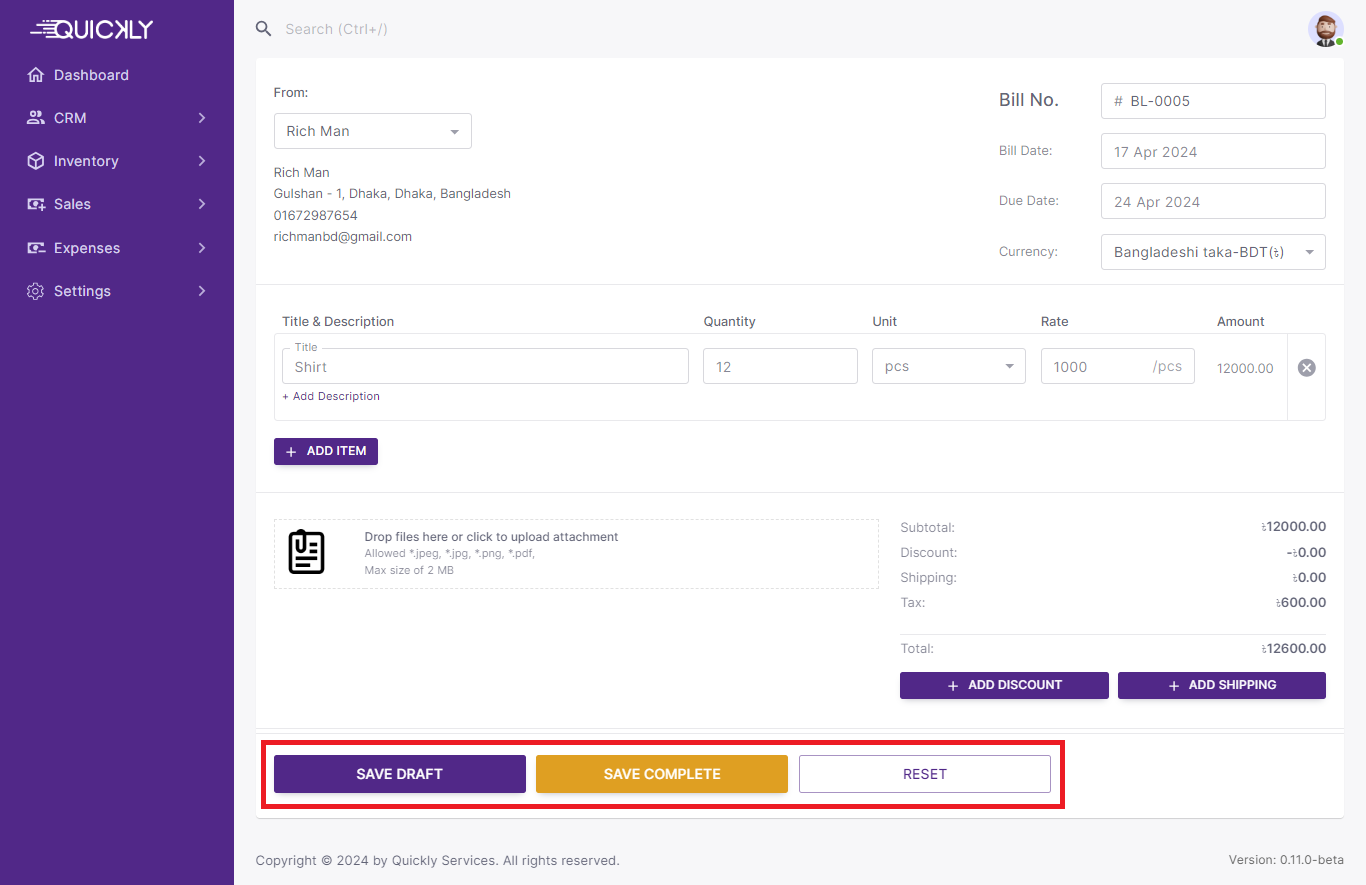
All the created bills can be viewed on the Bill / Purchase page under Expenses section. -
You can filter bills with the search filter and given filter options from the Bill / Purchase page.
-
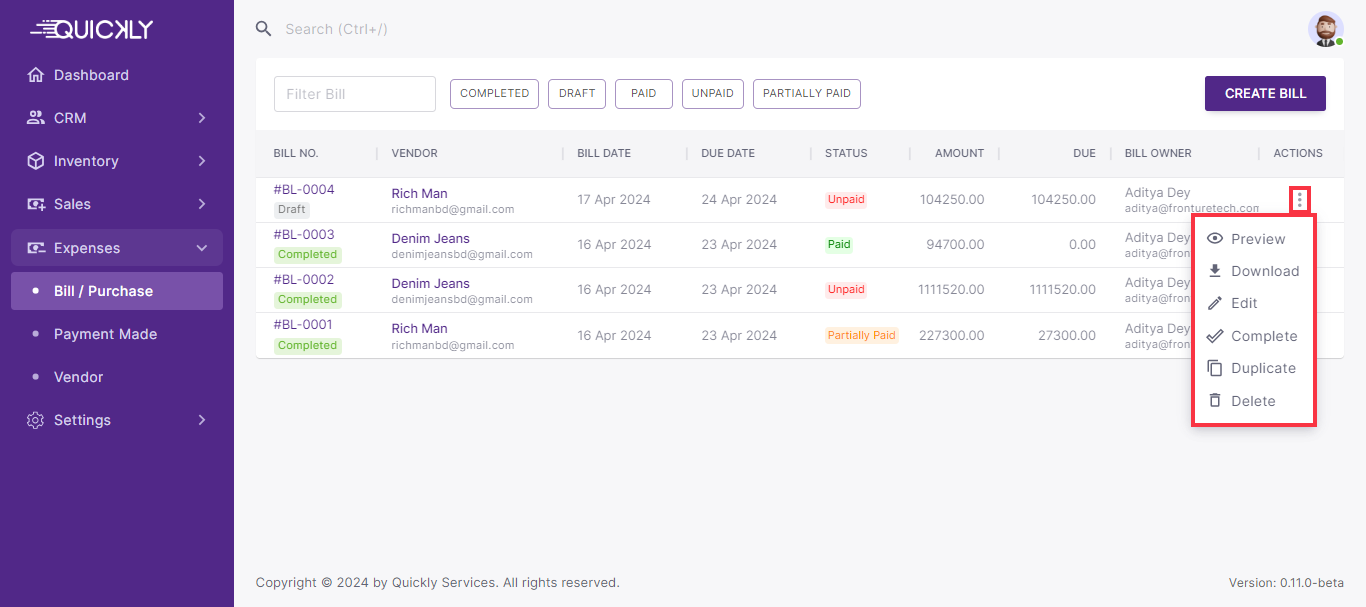
You can Preview, Download, Edit, Complete, Duplicate, or Delete a bill when it is drafted from the 3 dot menu
located in the Actions field. You can also make Payment if it is completed.
-
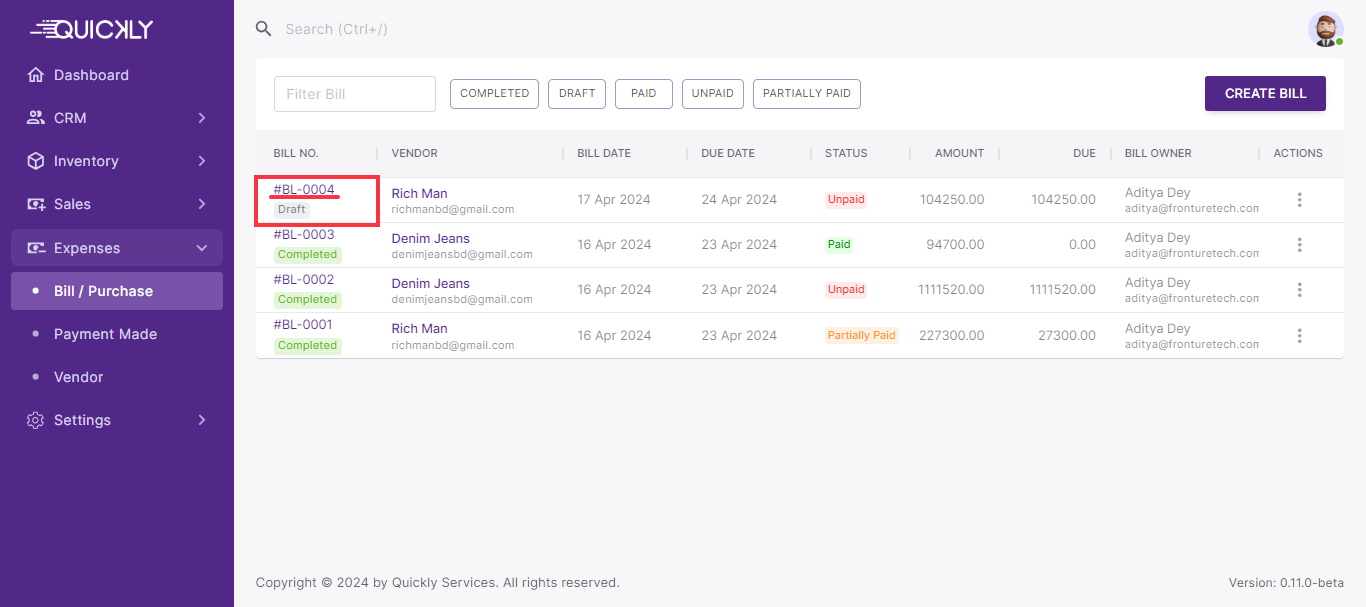
You can also preview a particular bill just by clicking on the Bill Number.
-
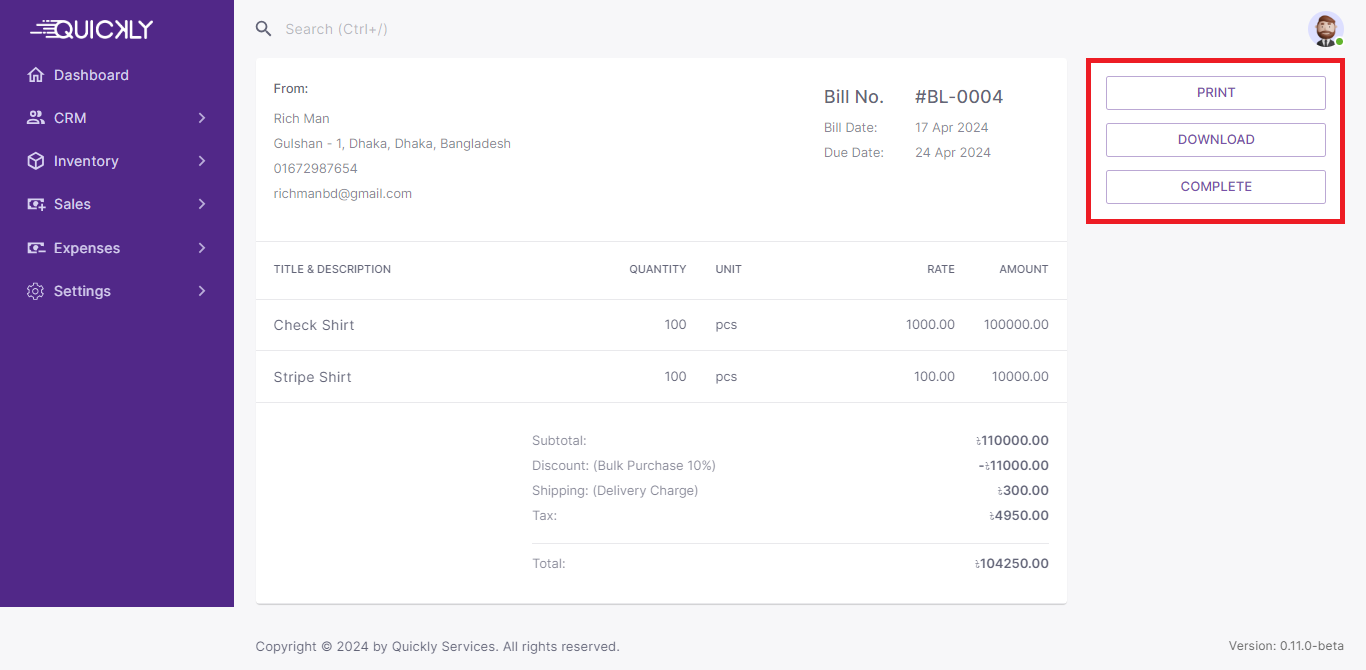
From the Bill preview page, you can Print & Download bill and Complete the bill if it is drafted
or Make Payment if it is completed.
Payment Made
In Quickly OneOffice, payment management streamlines the process of making payments. Users can easily schedule, track, and reconcile payments within the platform. This centralized system allows for efficient payment management, including monitoring payment status and generating reports to analyze spending patterns. By providing a seamless approach to payment management, Quickly OneOffice helps businesses optimize cash flow and ensure timely payments to vendors and suppliers.
To manage Payment Made, follow the steps;
-
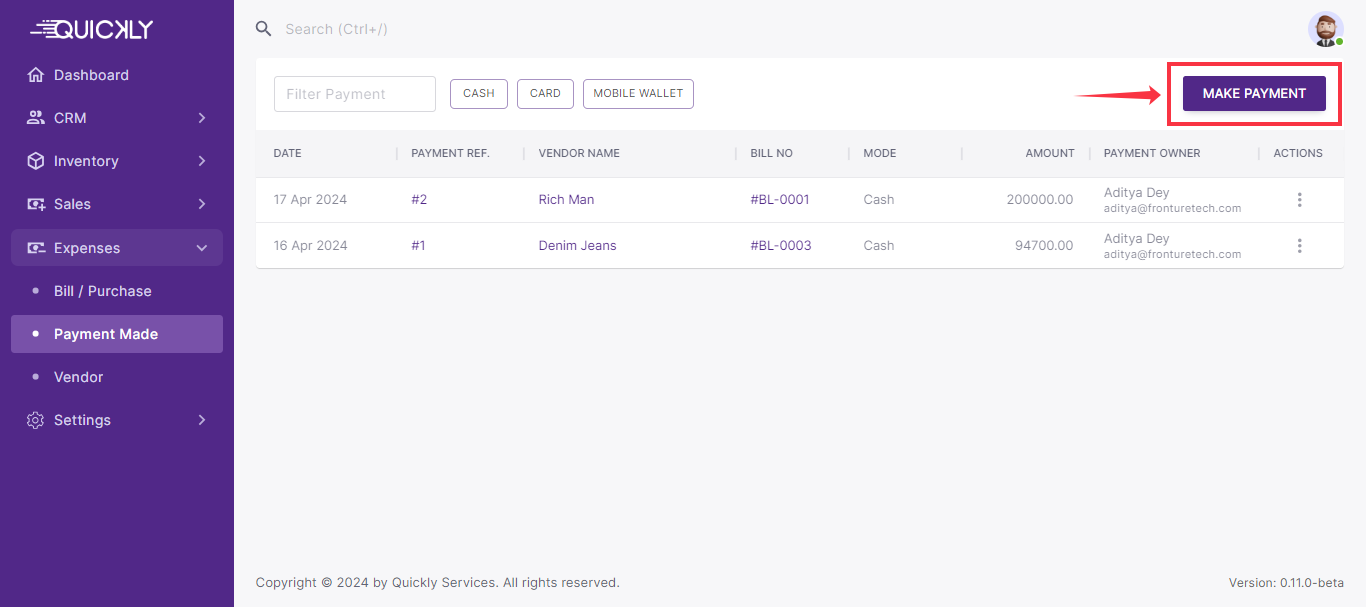
Go to Payment Made under the Expenses section from the navigation menu to view all payments made.

You can see the Payment Date, Payment Reference Number, Vendor info, Bill Number against which the payment is made, Payment Mode, Payment Amount, and Payment Owner from the Payment Made page. -
To create a new bill, go to Payment Made under Expenses section from the navigation menu and click on Make Payment.
Input all necessary information for the payment and click on Submit.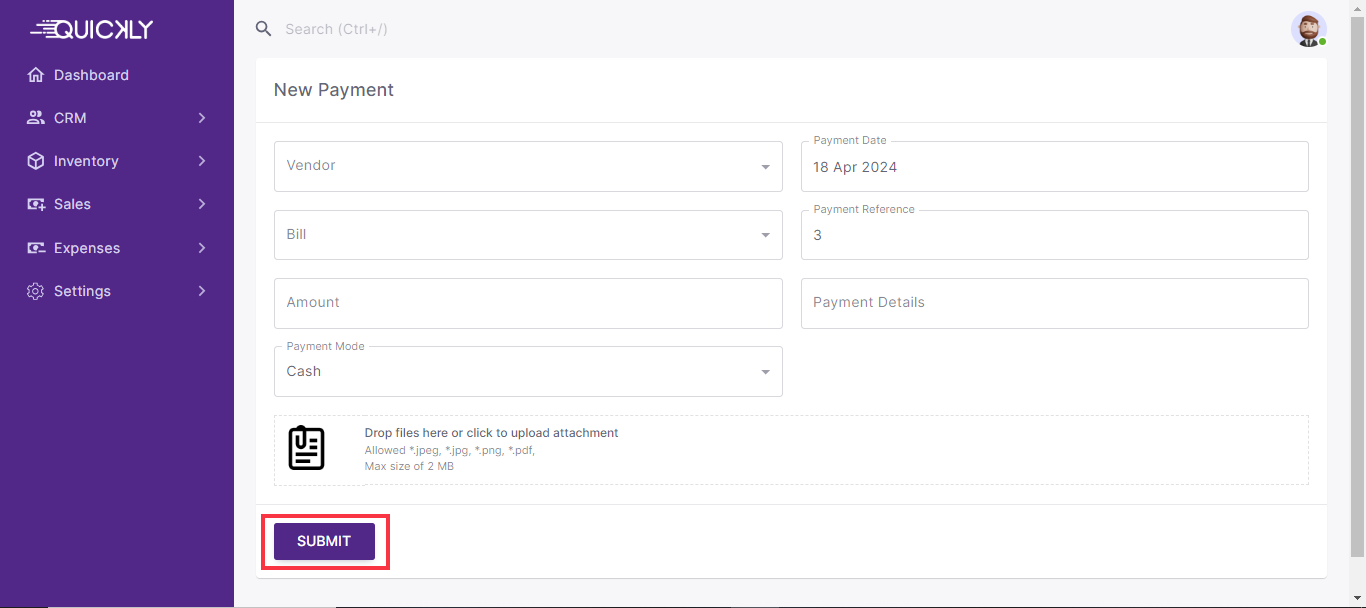
All the created payments can be viewed on the Payment Made page under the Expenses section. -
You can filter Payments with the search filter and given filter options from the Payment Made page.

-
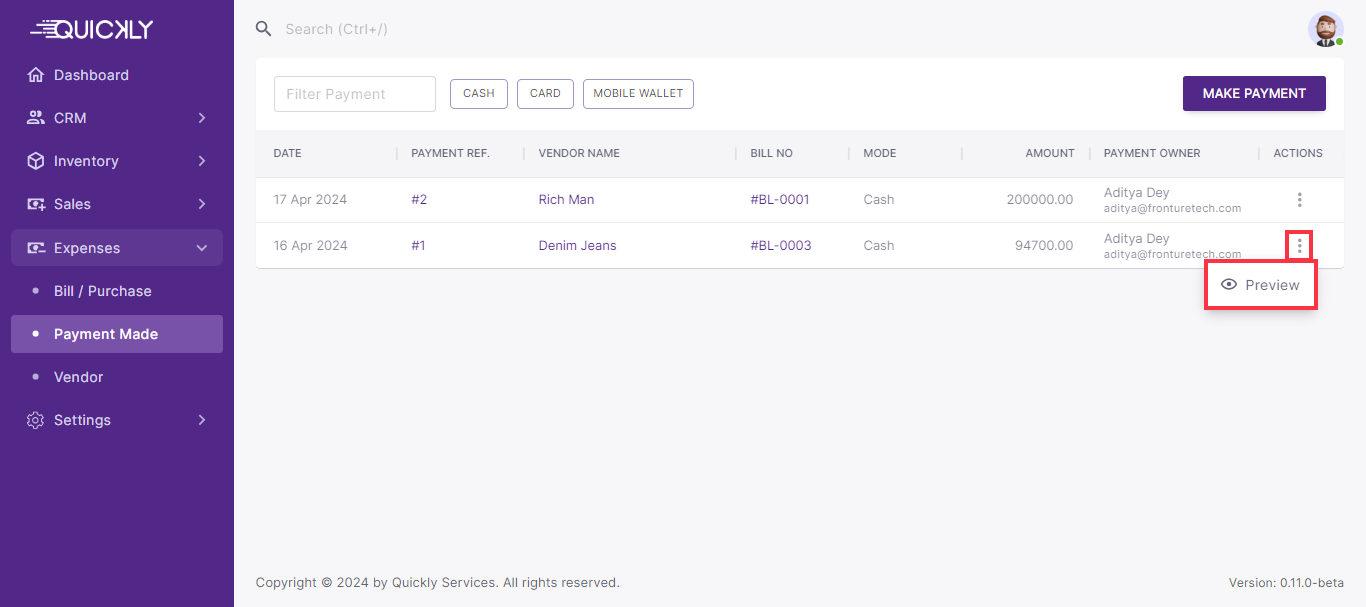
You can Preview payment details from the 3 dot menu located in the Actions field.
-
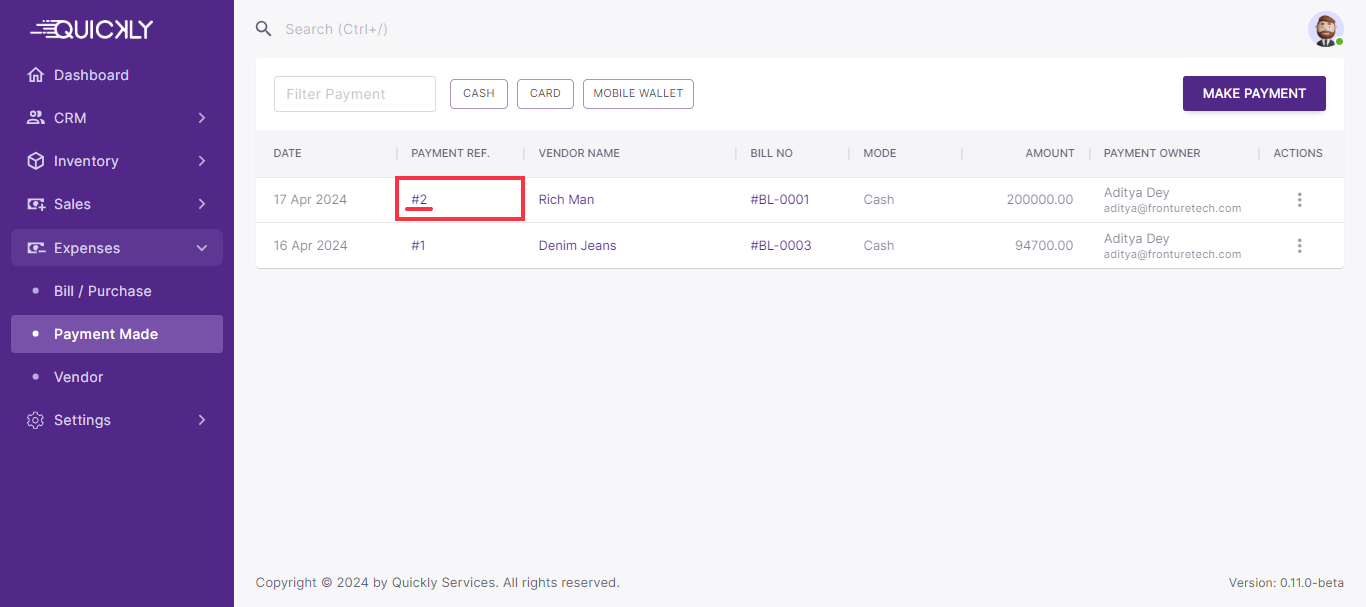
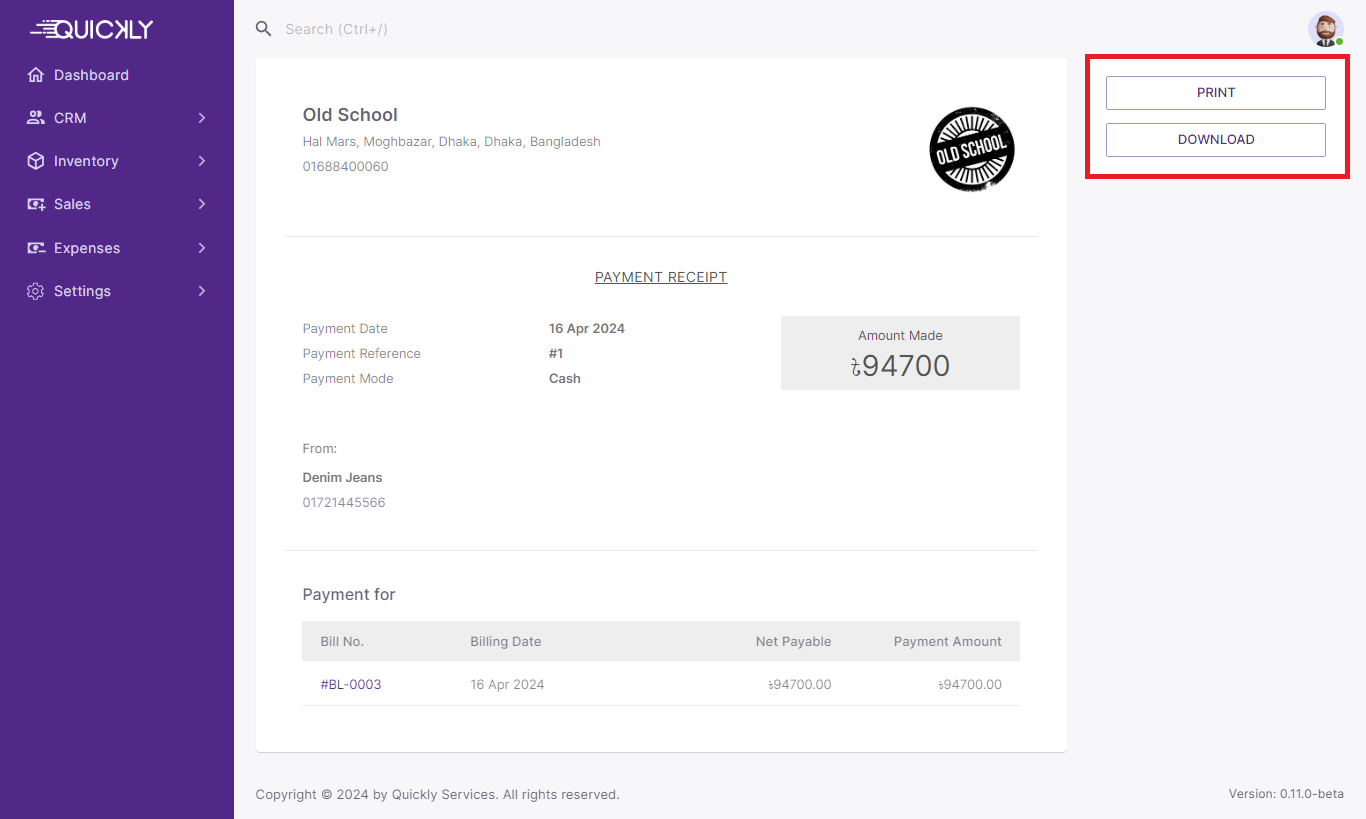
You can also preview a particular payment details just by clicking on the Payment reference number.
-
From the Payment preview page, you can Print & Download payment receipt.
Manage Vendors
In Quickly OneOffice, vendor management simplifies the process of managing relationships with suppliers and service providers. Users can easily store and organize vendor information within the platform, including contact details, payment terms, and transaction history. This centralized system allows for efficient vendor management, including tracking payments and maintaining a comprehensive vendor database. By providing a streamlined approach to vendor management, Quickly OneOffice helps businesses build strong vendor relationships, negotiate favorable terms, and ensure timely payments.
To manage Vendors, follow the steps;
-
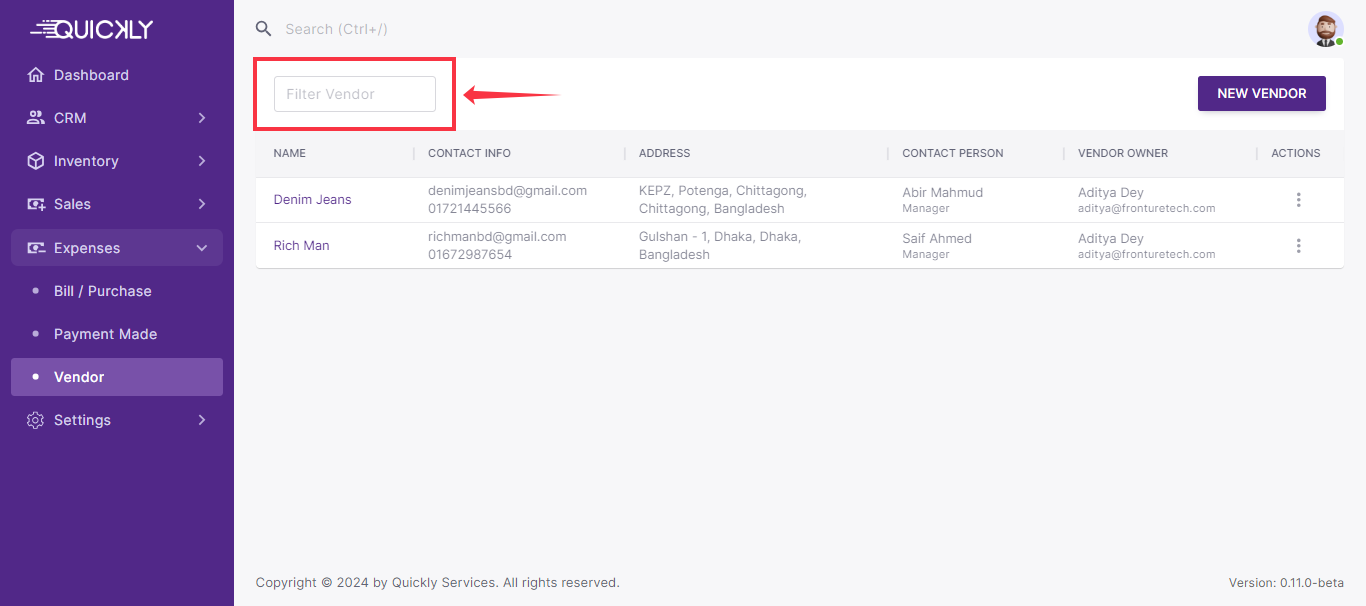
Go to Vendor under the Expenses section from the navigation menu to view all added Vendors.
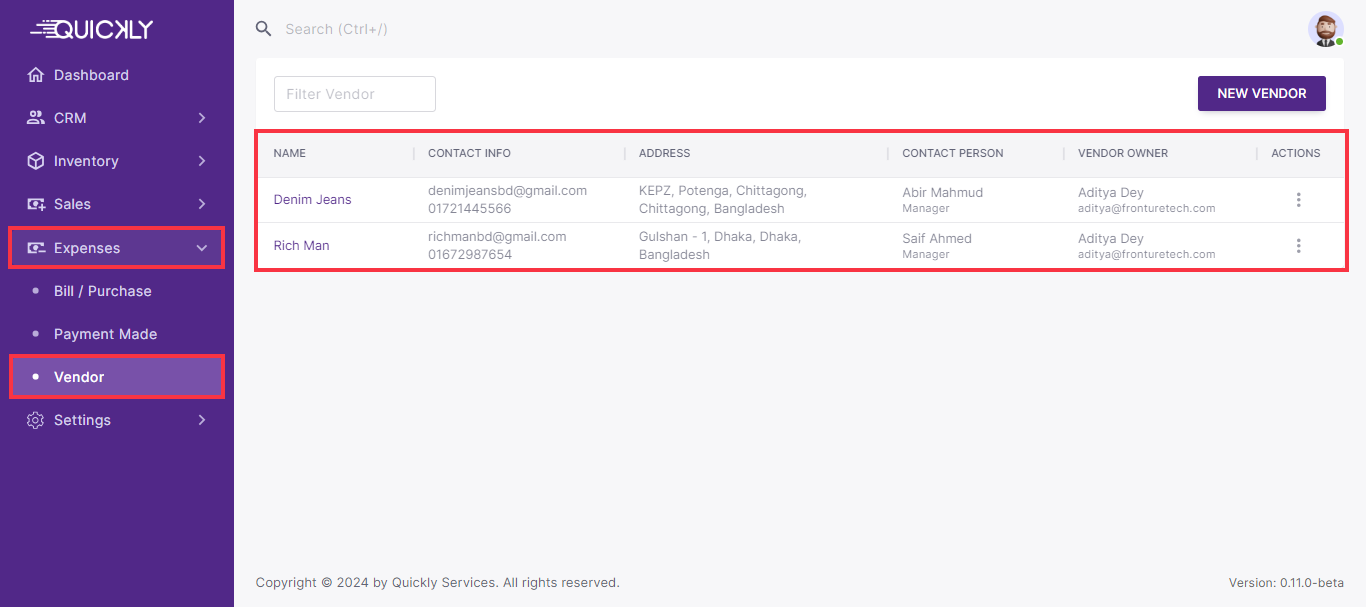
You can see Vendor Name, Contact Info, Address, Contact Person, and Vendor Owner info from the Vendor page. -
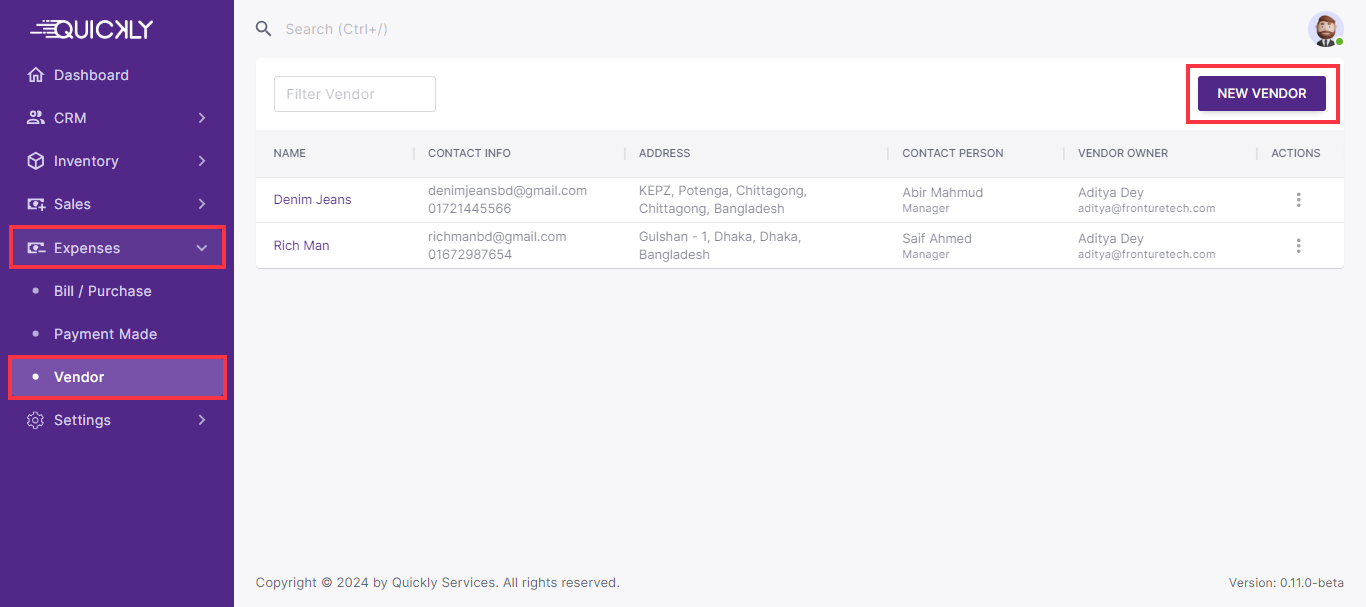
To add a new vendor, go to Vendor under Expenses section from the navigation menu and click on New Vendor.
Input all necessary information for the vendor and click on Submit.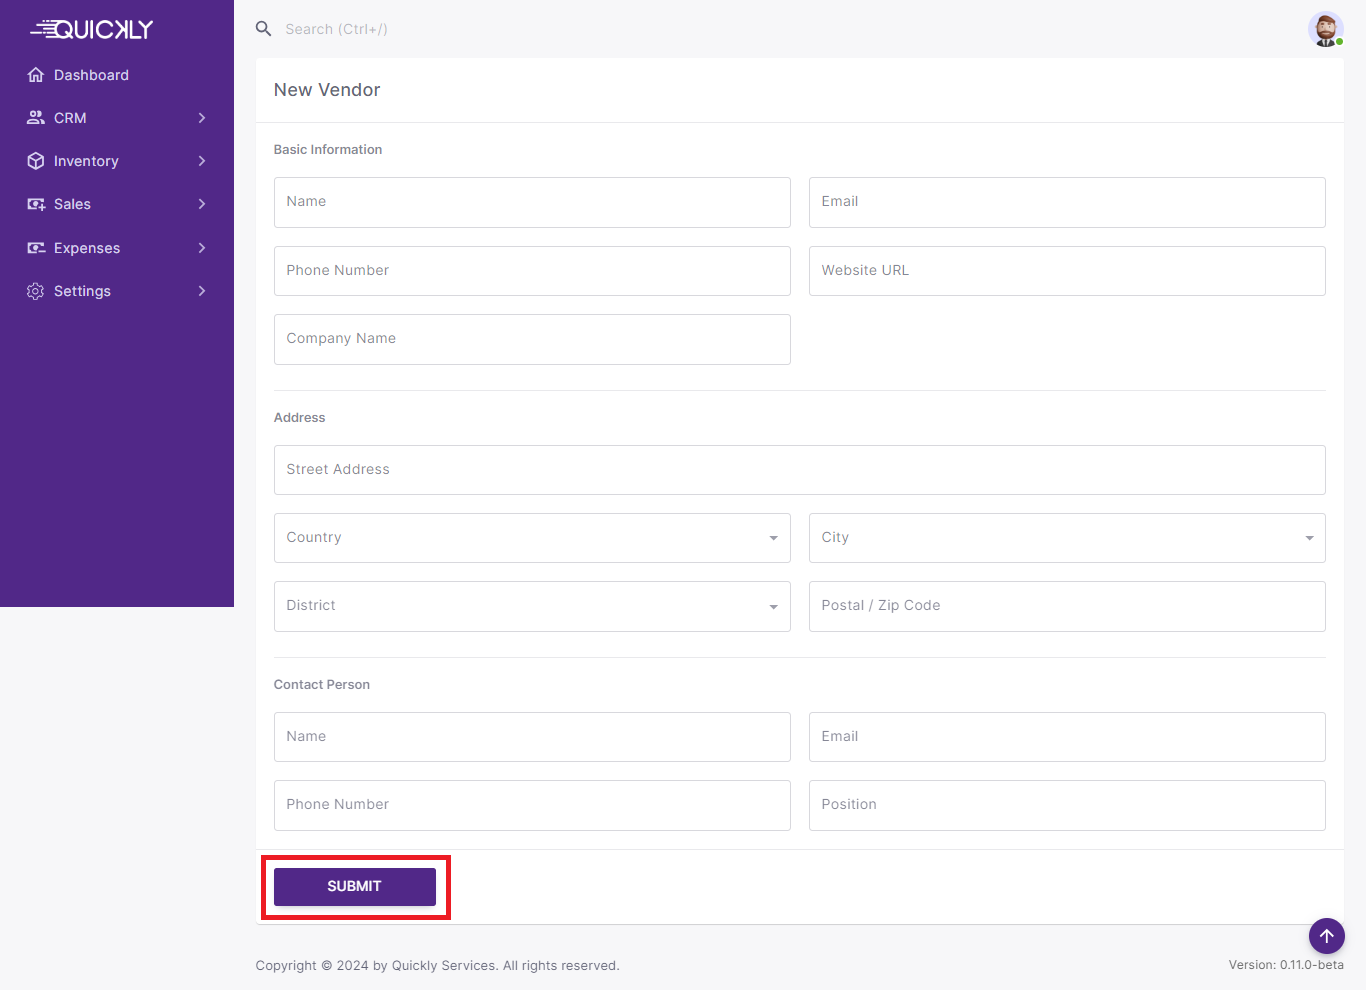
All the added vendors can be viewed on the Vendor page under the Expenses section. -
You can filter Vendors with the search filter from the Vendor page.
-
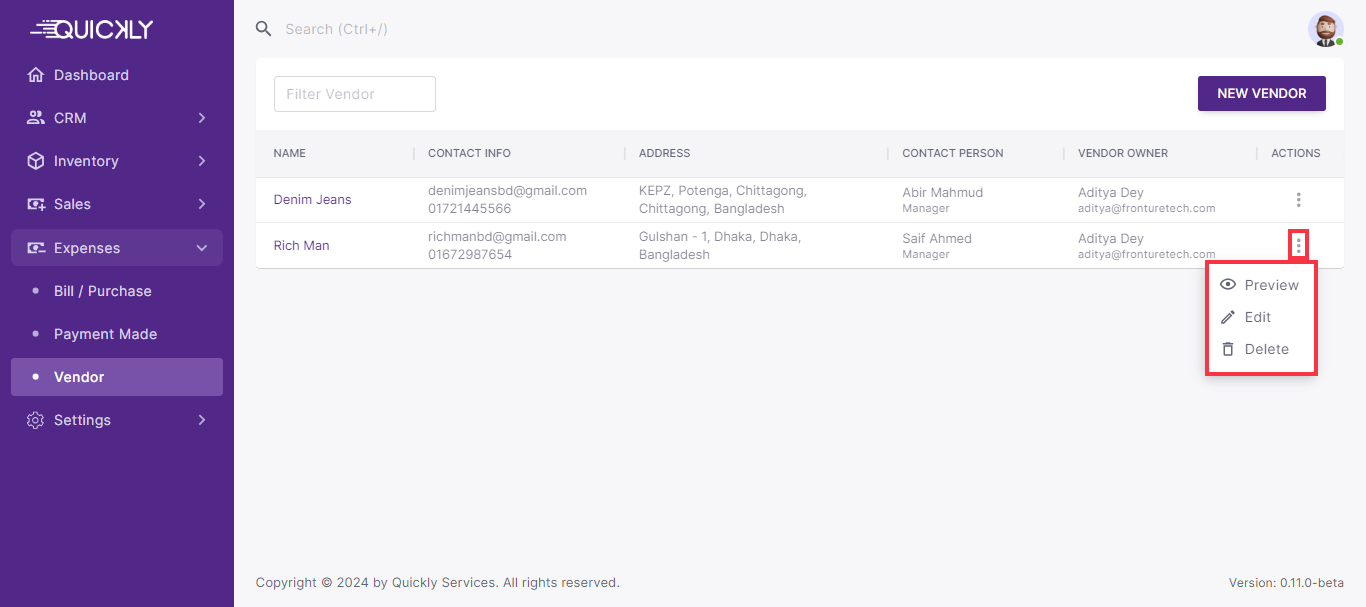
You can Preview, Edit or Delete a vendor from the 3 dot menu located in the Actions field.
-
You can also preview a particular vendor’s details just by clicking on the Vendor Name.

-
From the vendor details page, you can Edit or Delete a vendor. And can also see the Bill and Payment details attached to that vendor.
