What is Quickly RestroGreen?
Admin
Quickly RestroGreen is a fully portable, subscription-based, affordable software solution for restaurants and food shops. It is a Software as a Service (SaaS) solution that helps businesses manage and track their inventory, generate bills, calculate profits, and more.
The business owner portal and application are equipped with all the necessary features you will need to keep yourself up-to-date with your business and configure things your business needs on the fly. The ordering app is designed and built in such a way that it becomes easy for your staff to operate swiftly and conveniently, even for people who are not used to smartphones. It also comes with a portable Bluetooth printer to avoid all the clutter of cables and power supply, so that it takes less space and gives freedom to your staff to operate even from a distance.
Key features of Quickly RestroGreen include:
- Portable and affordable: Quickly RestroGreen is a cloud-based solution, so you can access it from anywhere in the world. It is also very affordable, making it a great option for small businesses.
- Easy to use: The ordering app is designed to be easy to use, even for people who are not familiar with smartphones. The business owner portal is also easy to use, and it provides you with all the information you need to manage your business.
- Secure and reliable: Your data is stored in a highly secure Google Cloud server, and you can access it at any time. Quickly RestroGreen also provides excellent customer support.
If you are looking for a reliable and affordable restaurant management software solution, then Quickly RestroGreen is a great option. It is easy to use, secure, and reliable, and it provides you with all the features you need to manage your business.
Related Video Support
How to setup account, create employee profile & user role
In this video, you will see how to sign up for Quickly RestroGreen, how to update your restaurant’s details, how to add your restaurant’s employee profiles to the software and set roles for them.
Why Quickly RestroGreen?
Admin
Welcome to Quickly RestroGreen, a game-changer for restaurant owners like you. We understand that your time is precious, and managing your restaurant can be challenging, especially when you're not physically present. That's why we've designed our software to empower you to run your business smoothly from anywhere in the world.
Key Benefits of Choosing Quickly RestroGreen-
- Hassle-free Setup: Unlike traditional POS software, our service-based solution eliminates the need for expensive setups and hardware. No more worrying about hefty installation and maintenance costs.
- Real-time Analytics: Stay on top of your business with our intuitive graphs and charts. Easily track order growth, revenue, and inventory trends, enabling you to make informed decisions right when you need to.
- Access Anytime, Anywhere: Your data is essential, and we value that. With our cloud-based system, you can access your restaurant's information 24/7 from any Android device, all you need is a reliable internet connection.
- Simple and Convenient: No need for expensive gadgets; our app works seamlessly on any smartphone. From the moment you start using it, you can bid farewell to pen and paper.
- Affordable Pricing: We offer competitive pricing with a one-month trial period. Experience the ease and efficiency of our software at your convenience.
- Comprehensive Support: Our Support Portal provides step-by-step tutorials for our business portal and mobile app. And don't worry about IT challenges; our dedicated customer support team is available 24/7 to assist you over the phone.
Experience the freedom of running your restaurant business without constraints. Choose Quickly RestroGreen and take control of your success.
Related Video Support
How to setup account, create employee profile & user role
In this video, you will see how to sign up for Quickly RestroGreen, how to update your restaurant’s details, how to add your restaurant’s employee profiles to the software and set roles for them.
Manage Your Quickly Account
Admin
We understand that it is difficult to remember the individual login IDs and passwords for multiple restaurants’ accounts. A Quickly RestroGreen account provides access to add unlimited restaurants under your single-user account.
With Quickly user account, you can do things like
- Monitor all your restaurants from a single place
- Easily switch between them
- Get aggregated reports of all the restaurants you have
- Get all mails (for-instance bills, reports) to a particular email address
- Get all SMS to a particular phone number
Change your profile picture, user name & contact info
Admin
You can add or update your personal info anytime from the User Account page.
Add or change profile picture
- Go to RestroGreen Home
- Click Manage Your Account under the user menu from
navbar.
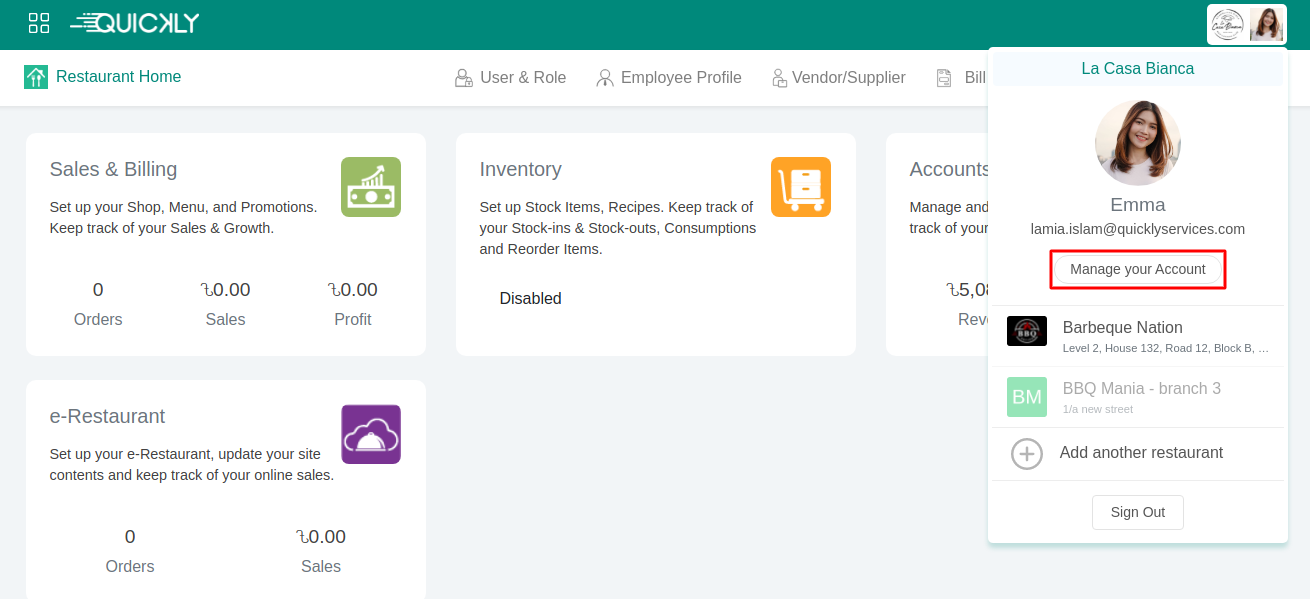
- On your profile picture, click the Camera Icon.
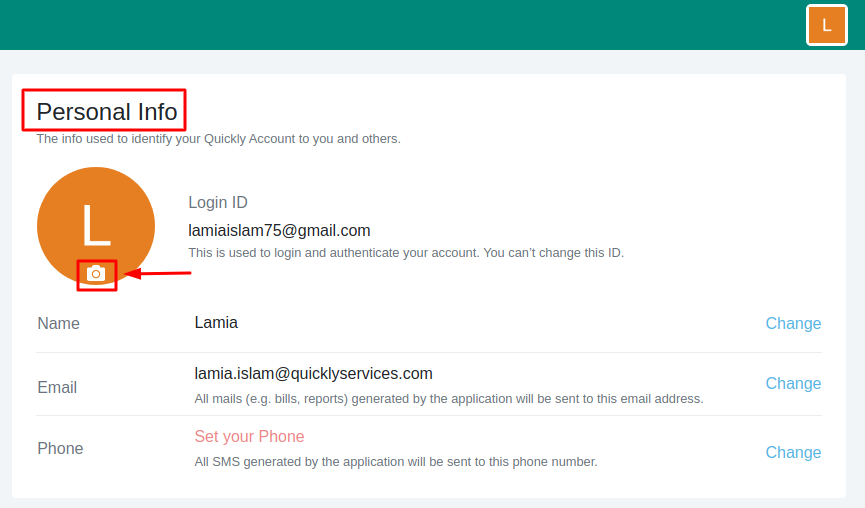
- Select and upload your image.
- Crop your photo as required and click Save Profile Picture.
Change name & contact info
- Go to your Account
- To add or change name, click Change next to the Name
field under Personal Info.
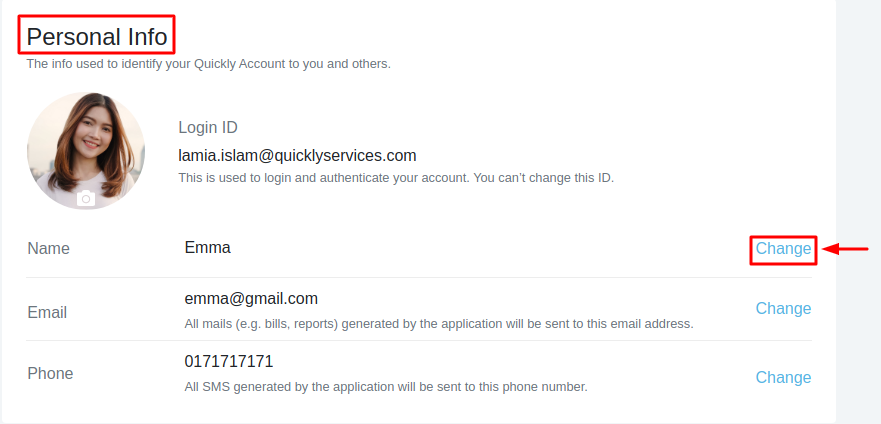
- Enter your name and click Save.
- To add or change email address and/or phone number, repeat the same steps.
Reset your password
Admin
You can change your password for security reasons or reset if you forget it.
Change password
- Go to your Account
- Under "Password", click Change
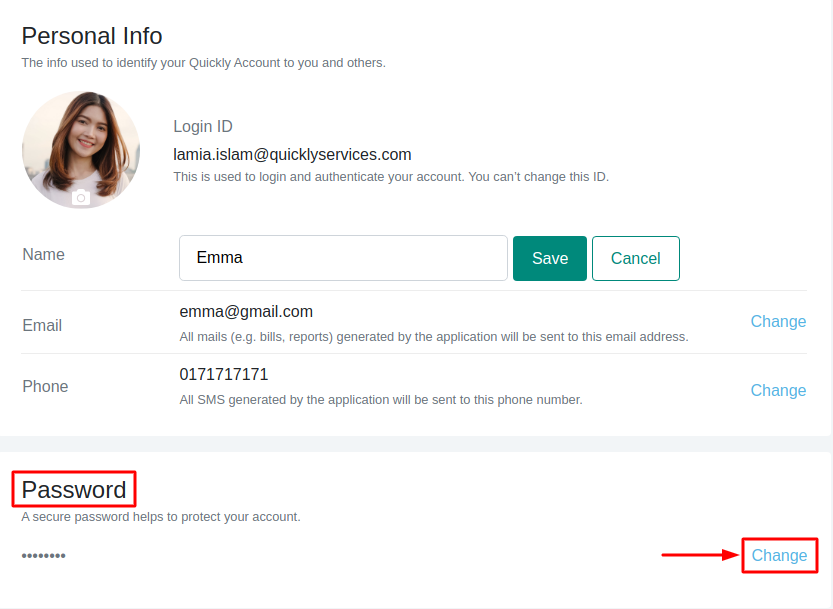
- Enter your current password and new password, then click Save.
Reset your password
- Click Forgot Password from the Login page.
- Enter your Login ID and click Send.
- You will receive an email or SMS.
If you don’t get any email, check your Spam or Bulk Mail folders. Note that you cannot request for password reset more than twice in a row. - Now click the Reset Password button in the email. You will be redirected to the password reset page.
- Choose a new password, then click Reset Password.
Disable any module
Admin
You can disable the Inventory, Accounts & Expenses, and e-Restaurant module from the Modules section in Branding & Settings.
- Click Disable next to the module you want to disable.
It will take you to the module's disable request page.
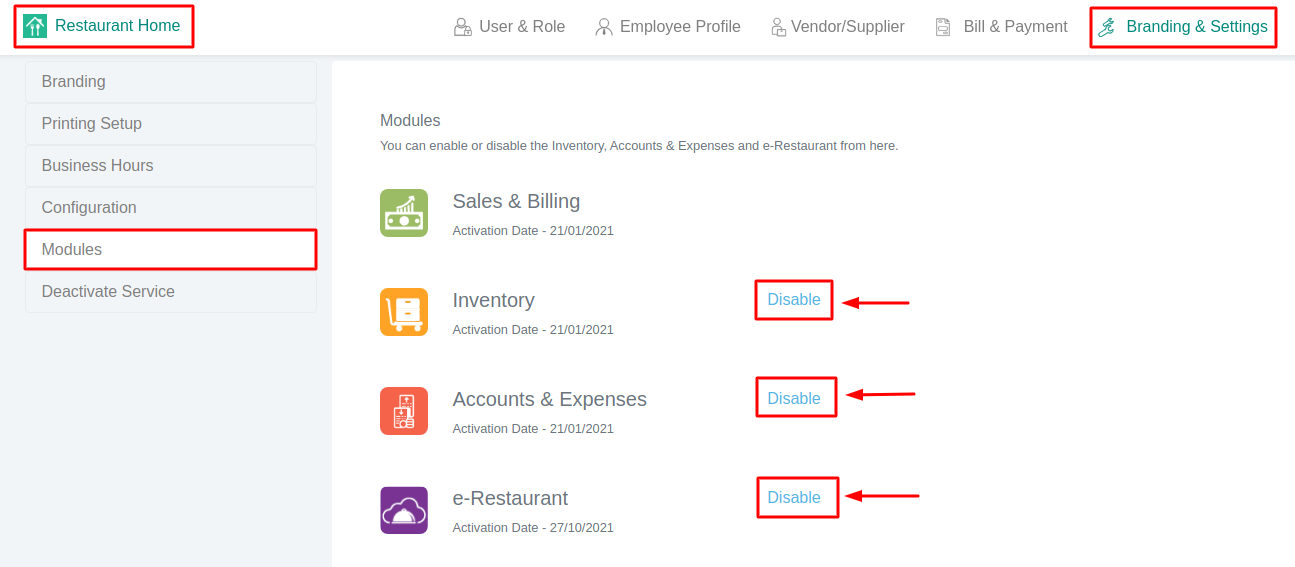
- Select the reason for disabling. We recommend you to provide your feedback, but it is optional. Note that you cannot enable it again before 72 hours.
- Click Disable
Unless you are on a free period, you will be charged for the use of this module until the disabled date.
Deactivate Quickly RestroGreen
Admin
If you have closed a restaurant or want to deactivate the service temporarily/permanently for other reasons,
- Go to Deactivate Service in Branding & Settings.
- Click Request to Deactivate

- Select the reason for deactivating. We recommend you to provide your feedback, but it is optional.
- Click Confirm
If you have any due bill, you must pay it before deactivating. You will be charged for the usage until the deactivation date unless you are on a free period.
You will be notified via email once your request has been processed. Note that if your restaurant remains deactivated for 1 year, we may permanently remove all the data.
You can re-activate your restaurant anytime by creating a Support Ticket or contacting us.
Add restaurant(s) under one user account
Admin
Before adding any restaurant, you need to verify your email and provide some personal information.
You can add as many restaurants as you want.
- Go to your Account
- From the Your Restaurants section, click Proceed.
If you have previously added restaurants, click Add another restaurant under your restaurant list.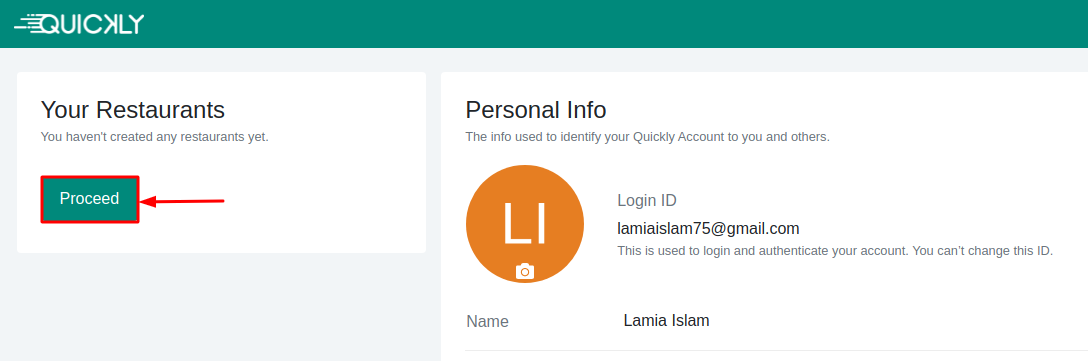
- Enter your restaurant’s information and click Add Restaurant
Now select your preferred module(s) and start your business adventure with Quickly!
Updating Business-related info & Receipt Design
Admin
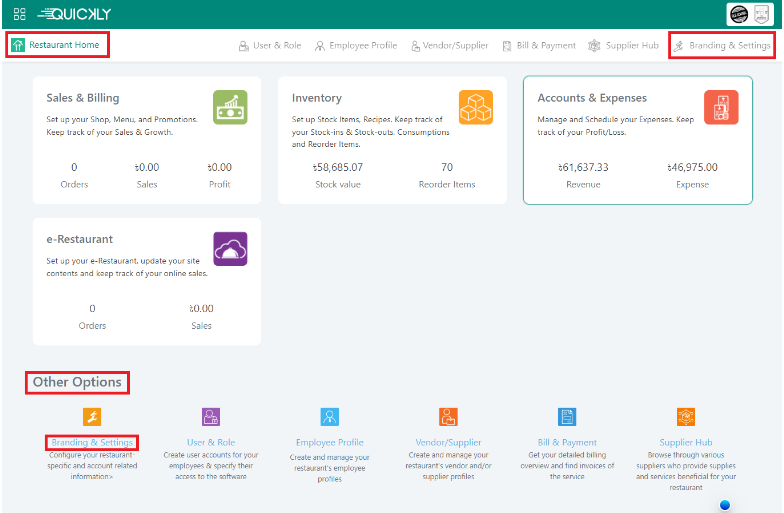
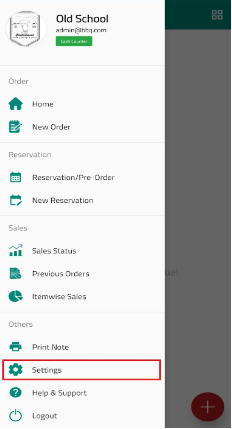
From the Restaurant Home page, click on Branding & Settings from the navigation bar, or Click on Branding & Settings under the Other Options at the bottom of the Home page.
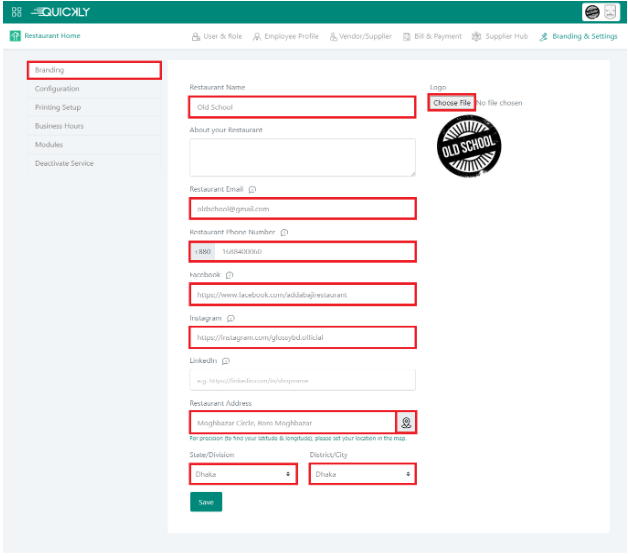
On the Branding page, the restaurant name, email, and phone number are there as you sign up on our portal. You can put down some related descriptions and address details if you want but defining the country, state/division, and district/city of your business is mandatory. You can also select your business type (restaurant, cafe, food shop, catering, etc) and upload your business logo and click on the Save button to update all the details.
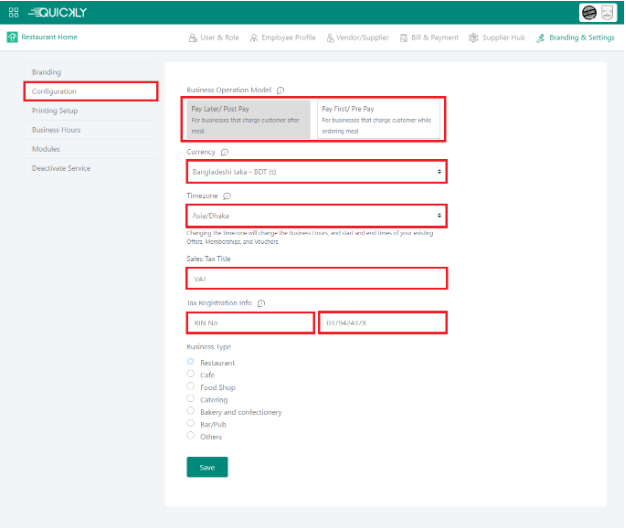
Customize your configuration
From the Configuration section under Branding & Settings, you can choose your Business Operation Model, set currency and timezone, set your preferred Sales Tax Title and Tax Registration Info. You can also select your business type (restaurant, cafe, food shop, catering, etc).
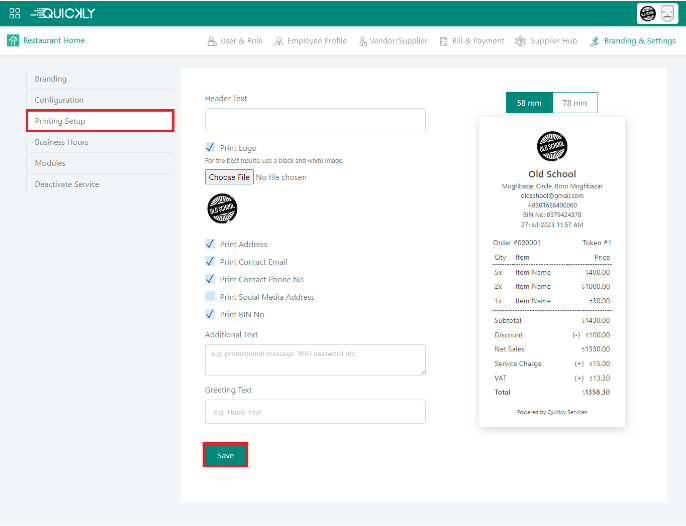
Customize your receipt’s design
You can personalize the template for your printed receipts just the way you want. For example, you can include your restaurant's logo and social media addresses, as well as choose whether to display the sales tax as Tax, VAT, or BIN. Additionally, you can include restaurant information or a promotional message in the header and footer of your receipts. The template is viewable in both 58mm and 78mm formats.
- Go to Printing Setup from Account
- Customize your receipt, and click Save.
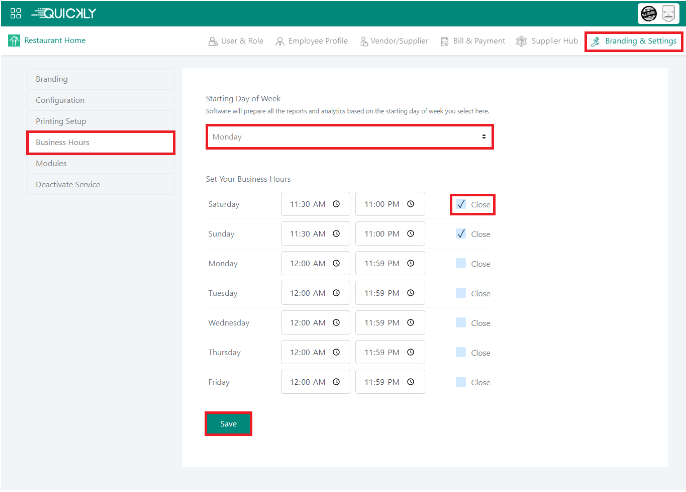
Setup your business hours
Setting business hours are vital because you will have your everyday revenue summary according to the business hours. Just like the staff members you hire, the equipment you buy, and the location you choose, your hours can be an asset or an obstacle for your business.
On the Business Hours page, you can set up the starting day of the week with your operating hours according to your business activity. Tick on the close button if your business is closed for a certain period and click on the Save button.
Previous Tutorial
Add restaurant(s) under one user account
Next Tutorial
Invite users and control their access
Related Video Support
How to setup account, create employee profile & user role
In this video, you will see how to sign up for Quickly RestroGreen, how to update your restaurant’s details, how to add your restaurant’s employee profiles to the software and set roles for them.
Invite users and control their access
Admin
With Quickly, you have complete control over what your staff sees. You can define roles for individual users and assign rights for the modules and apps.
To add a user,
- Go to User & Role and click Invite
User.
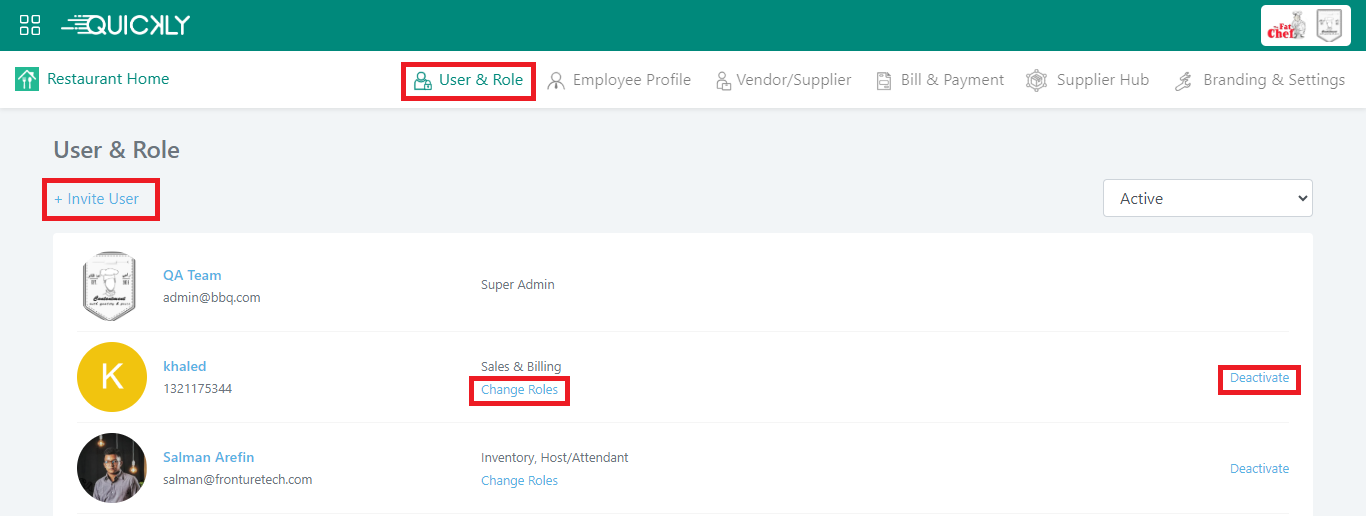
- Enter the email address or phone number of that user.
Note that it will be used as his login ID. - Assign roles, and click Save.
The user will receive an invitation via email/SMS (depending on which one you have provided). If the invited user does not have a Quickly RestroGreen account, he will be taken to the Sign Up page right after he accepts the invitation. Then he will have to set a password for himself. He will be able to access your restaurant once he accepts the invitation.
You can change the user’s access anytime from User & Role. You can also deactivate the user if you want.
Keep records of your employees’ info
Admin
You will find an employee profile for each of your users in the employee profile page. To keep records of your employee’s information (e.g. position, department, address, emergency contact, national ID card etc.),
- Go to Employee Profile.
- Click New Employee or Edit
- Add information, and click Update
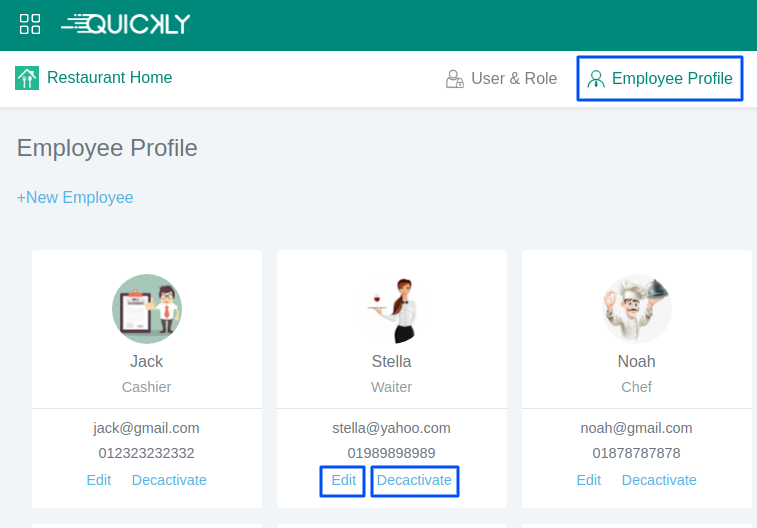
To remove an employee from your restaurant, click Deactivate.
Upload an excel file to import your menu at once
Admin
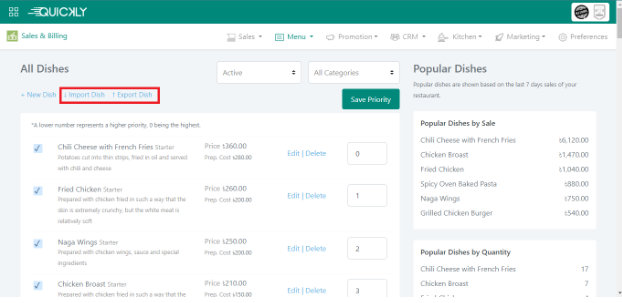
If you are in a restaurant business, the most important thing you need to have is a well-organized menu and that is why Quickly RestroGreen eases the integration of dishes into our platform by categorizing dishes. It's effortless to add dishes and categories from your business portal.
Import your menu
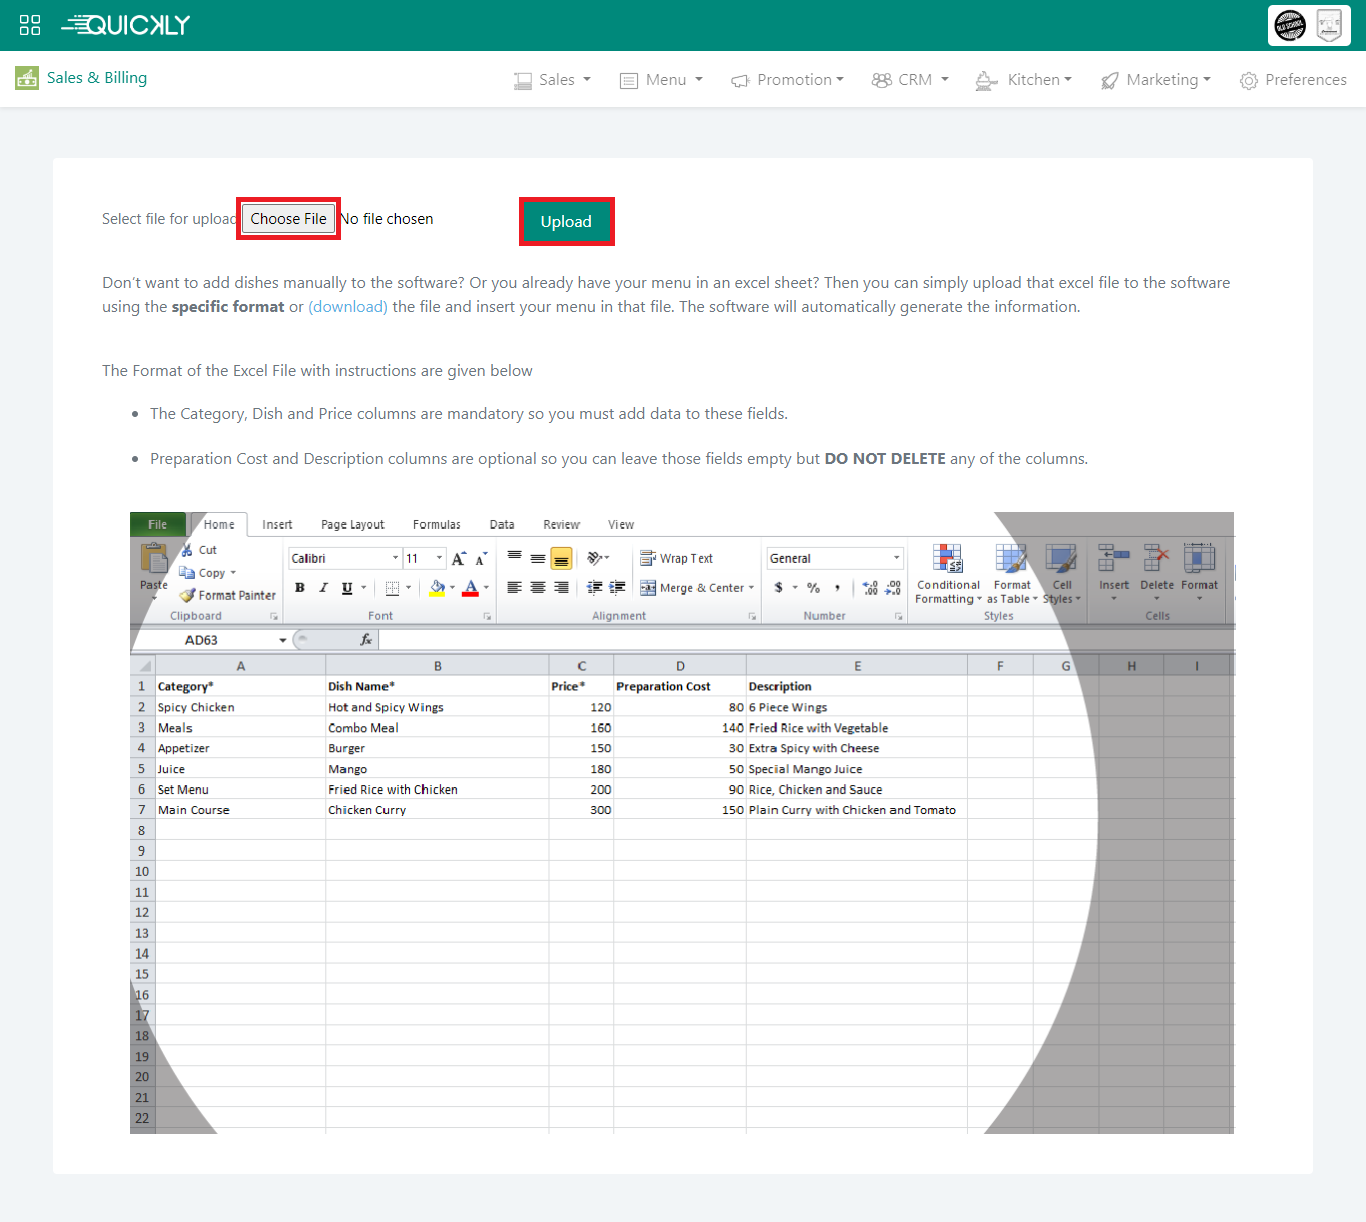
- Go to Menu > Dish in the Sales & Billing module.
- Click Import Dish
- Download the sample file and insert your dishes to the excel.
- Note that you must add category, dish and price for every dish.
- Choose the file and click Upload.
- You will be redirected to the Review & Import page. Click Review & Import after checking the dishes.
If you don't want to import the entire menu, you can pause and resume where you left off.
Manually enter your menu to Quickly
Admin
Add or update a category
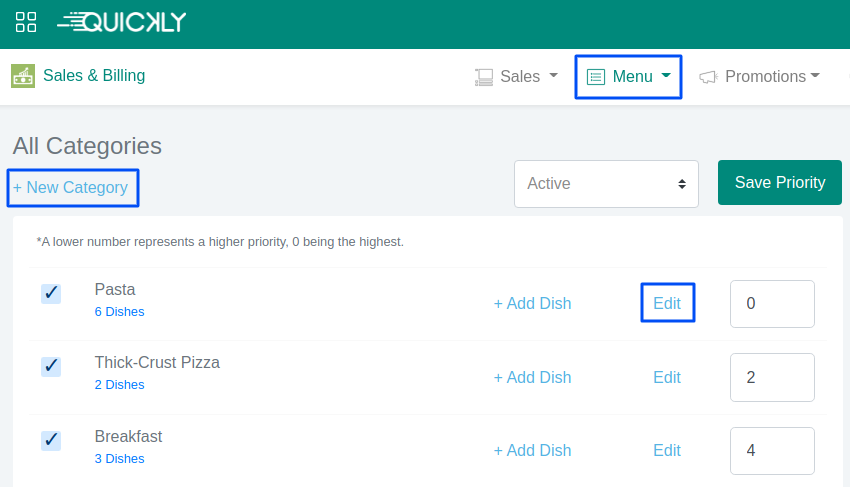
- Go to Menu > Category in the Sales & Billing module
- Click New Category.
- Add category details and click Create.
- To update a category, click the Edit link next to it.
Add or update a dish
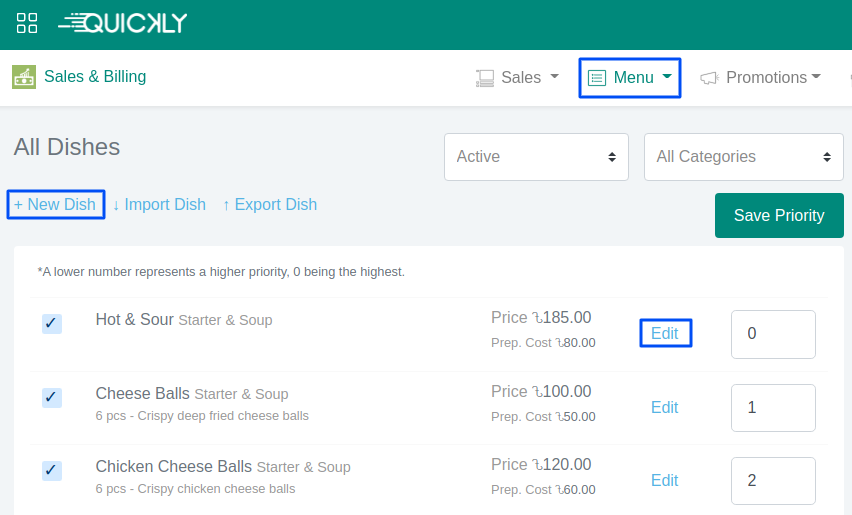
- Go to Menu > Dish in the Sales & Billing module.
- Click New Dish
- Add dish details and click Create.
- To update a dish, click the Edit link next to it.
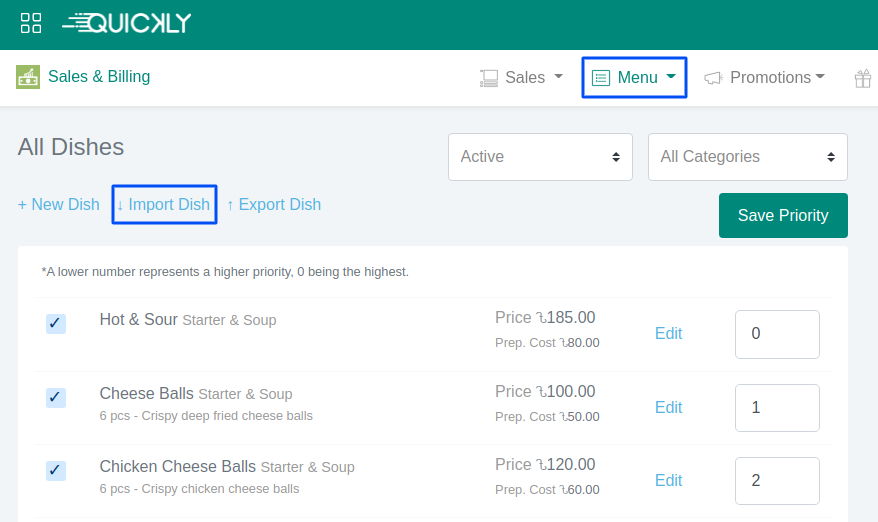
Save priority of the categories and dishes to set the order of displaying them on the order taking app or your e-Restaurant website.
To stop accepting orders for a specific dish/category, uncheck the box next to it. You can reactivate it at any time from the inactive dish/category list.
Add images to your menu
- Go to All Dishes from Menu.
- Click Edit
- Go the Image section under Pricing, and click Choose Image.
- Crop image and Update.
Replicate one restaurant’s menu for other restaurants
Admin
If you also want to replicate the menu of any restaurant, go to that restaurant's Menu > Dish and click on the "Export Dish" button. The menu will be exported as a PDF file. To upload the menu to another restaurant, go to that restaurant's "Import Dish" section and upload the PDF file. The menu will be imported successfully.
Provide contactless menu to your customers (QR-Menu)
Admin
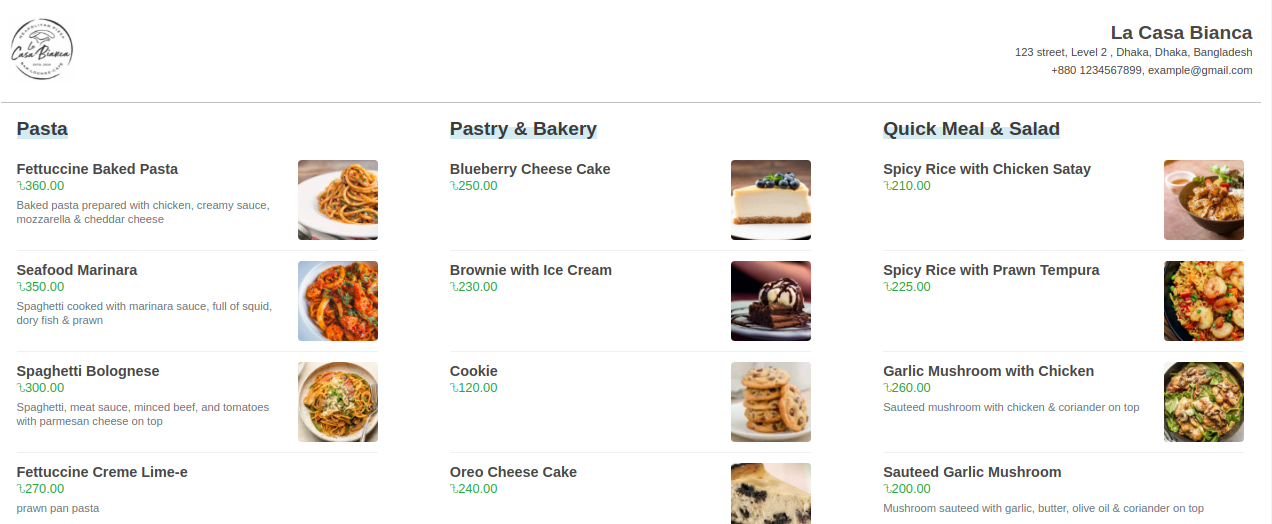
Let your diners scan a QR code to view your restaurant's menus on their own devices. Then they can place their order with the waiter, keeping the dining experience personal, like it was before but safer & smarter.
- Enable e-Menu from the Sales & Billing Module
- Add images to your dishes to make them look attractive.
- To edit the e-Menu URL, click Change next to it.
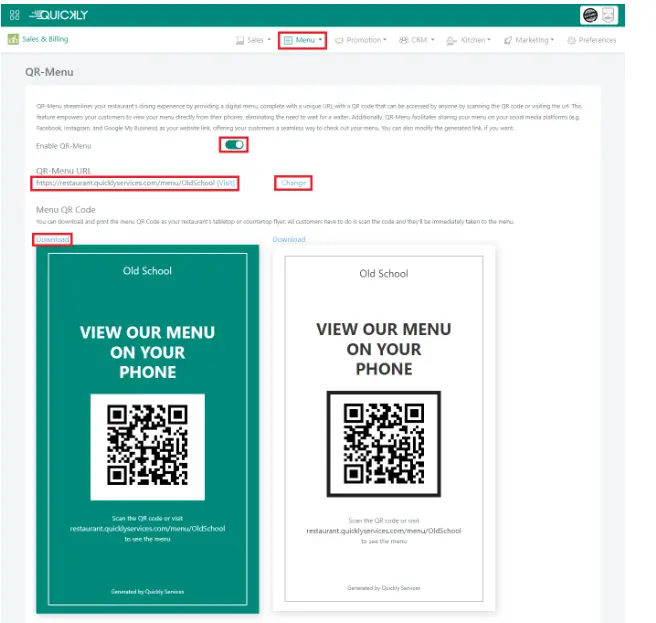
- Download and print the QR code.
Now place them on your restaurant tables and let diners scan code and see your menu on their own device.
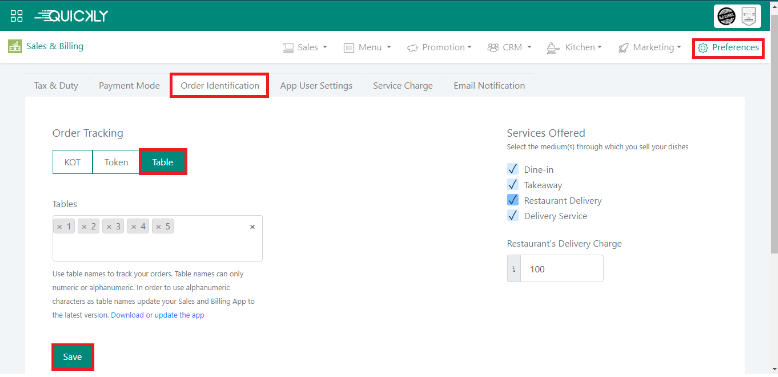
Diners can order by themselves using Table Ordering System
Admin
Create digital menus for your restaurant with a QR-Code. Customers will be able to easily see your menu and place orders directly from their phones! You can download and print the menu QR Code as your restaurant's tabletop or counter top flyer. All customers have to do is scan the code and they'll be immediately taken to the menu from where they can start ordering. They can also view cart, view recent orders and call an attendant.
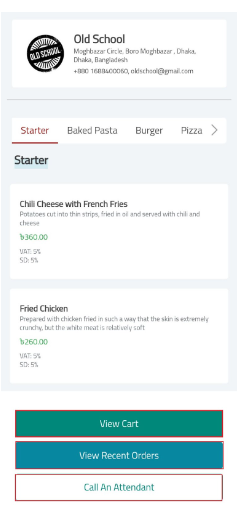
All you need to do is,
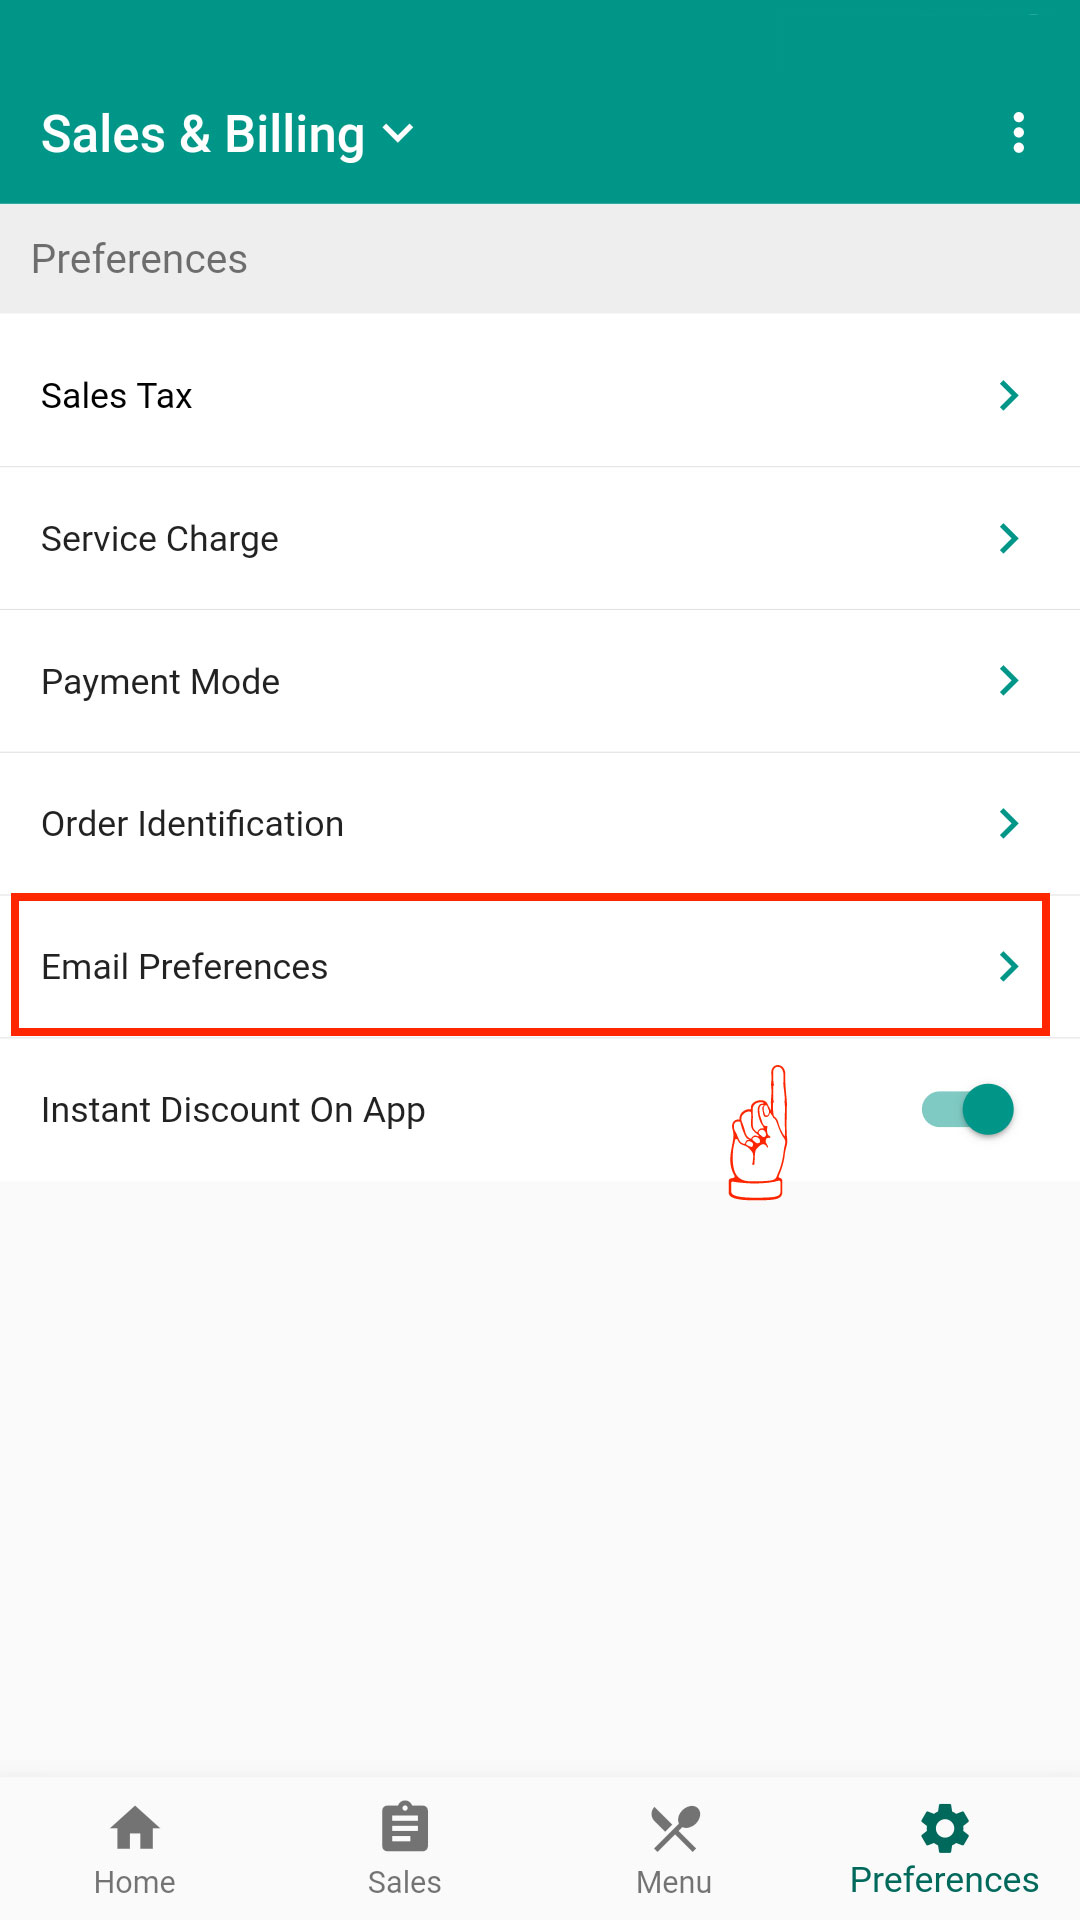
- Go to Preferences of Sales & Billing module.
-
Go to Order Identification, select Table, input table numbers & click on Save.
- Go to Menu > Table Ordering System
-
Enable Table Ordering System
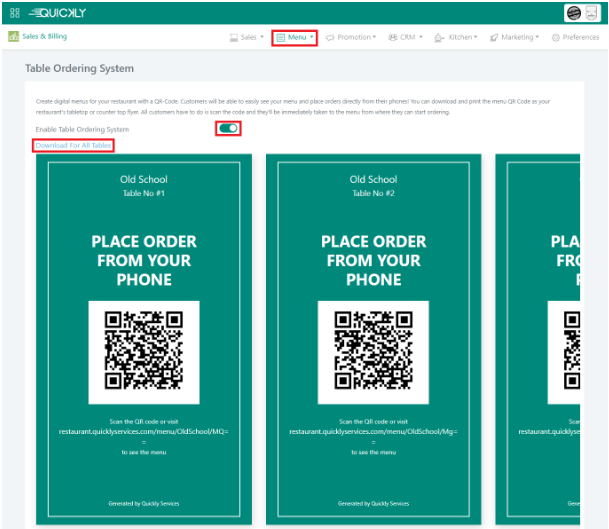
- Download and print the menu QR Code for each table. Place the QR code on the tabletop or counter as a flier.
You can print the QR code for every table generated by Table Ordering System and have customers scan it with their devices. Once they scan the QR code, the QR Menu specific to that table will open on their device, allowing customers to easily place their orders directly from their own devices.
Set your Sales Tax and Supplementary Duty (SD)
Admin
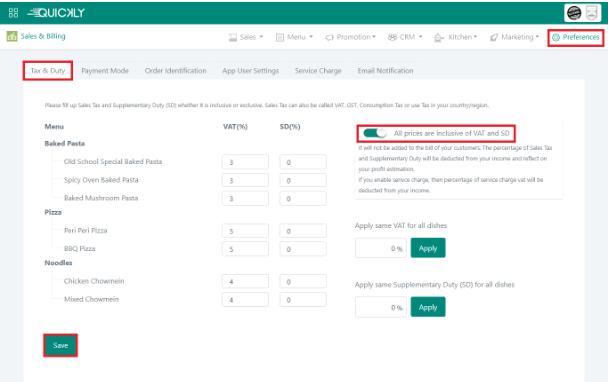
If you click on preferences, a list of categories will appear in the Preferences page, from where you can add/edit Sales-Tax and Supplementary Duty (SD) as you want. The updated Sales Tax & SD will be applicable to the Quickly RestroGreen app while placing orders.
Taxes for different food items can be different, and you can set the SalesTax and Supplementary Duty (SD) according to each Category. For example, Sales Tax for Pasta is set here 3% whereas, for Pizza and Noodles it is 5% and 4% respectively.
Again, you can set same Sales Tax and SD for all the dishes simply by putting a fixed Sales Tax and fixed SD in the “Apply same Sales Tax for all dishes” & “Apply same Supplementary Duty (SD) for all dishes” fields.
After setting the sales tax, click on the Save button to update your settings.
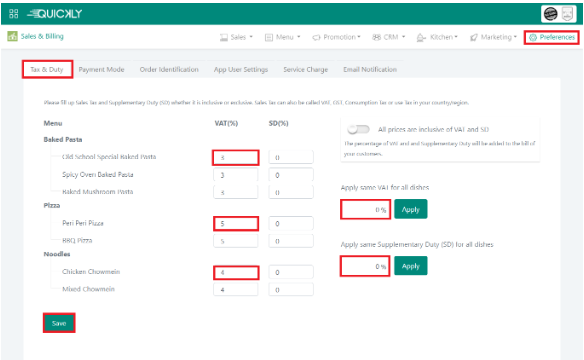
Or,
If you want to include the Sales Tax & SD with the food prices for all the categories,
then click on the switch button of “All prices are inclusive of Sales Tax & SD” and Save.
List down the payment modes you offer
Admin
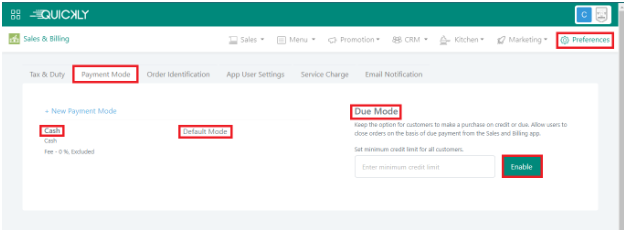
Under the Payment Mode tab in the preferences page, you can create different payment modes to provide flexibility and convenience to your customers while they are making payment. Generally, the payment mode is set to Cash by default.
You can also enable Due Mode for customers to make a purchase on credit or due.
- Go to Payment Mode Page.
- Enter the minimum credit limit and click on Enable.
Click on the +New Payment Mode and simply select the type from the list, i.e. Cash, Card POS, Mobile Banking or Delivery Service.
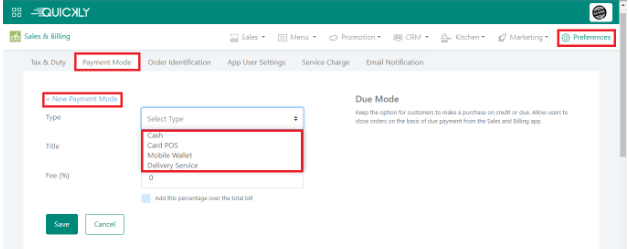
After selecting the type, write the title of the mode in the Title field and click on the Save button.
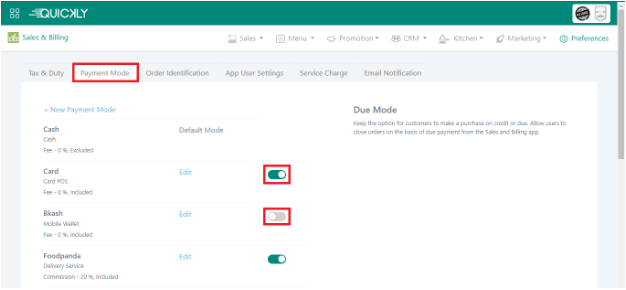
If you want the customer to pay the fee/commission, mark the checkbox below the fee/commission box. If the checkbox remains unmarked, the fee/commission will be automatically included with the restaurant's total bill amount.
Alternatively, if you want to set the fee/commission to zero, you can do so, and in that case, no extra charge will be applicable for the customer.

You can activate or deactivate any payment mode for the Sales & Billing app whenever you want to.
Previous Tutorial
Set your sales tax and service charge
Next Tutorial
Track your orders by table/token and the services you offer
Related Video Support
How to upload your menu, take orders and generate bills
In this video, we will look at how to upload your restaurant’s menu to the software, how to take orders from your customers and generate bills for them using Quickly RestroGreen - Sales & Billing App.
Track your orders by table/token and the services you offer
Admin
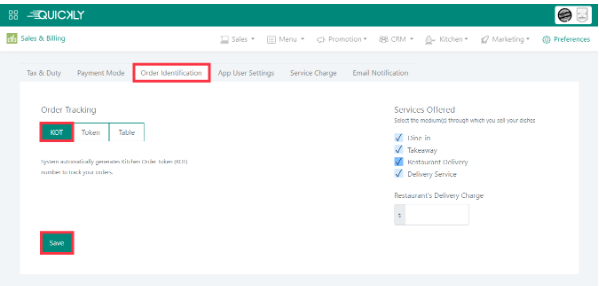
Under the Order Identification tab, you will find the options to track your restaurant orders using table or token numbers.
If the KOT is selected, then the software will automatically input the token numbers with each order in the app. Every day the token number will start with 1 and it will increase with each order and there is no limit.
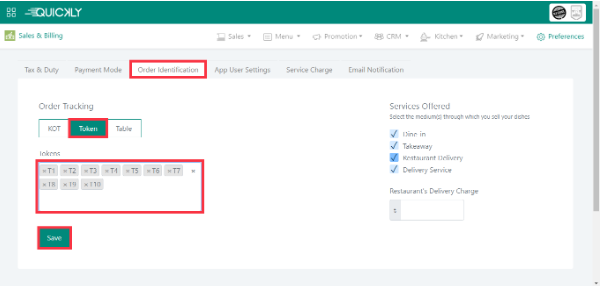
If you want to track your orders manually, select the Token option and write down the names or numbers of the token and finally, click on the Save button. A layout will be shown in the Sales & Billing app containing those token numbers while placing orders using the app.
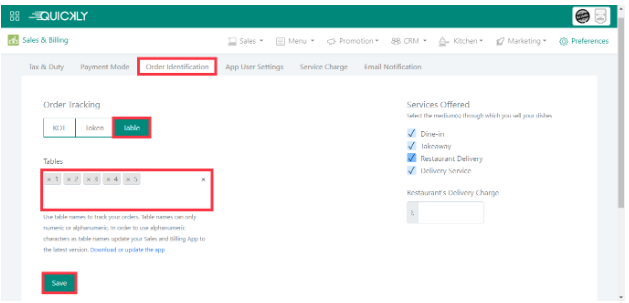
If you want to track your orders using the table numbers, select the Table option and write down the number of tables you have in your restaurant. Next click on the Save button. A layout will be shown in the app containing the table numbers while placing orders using the app.
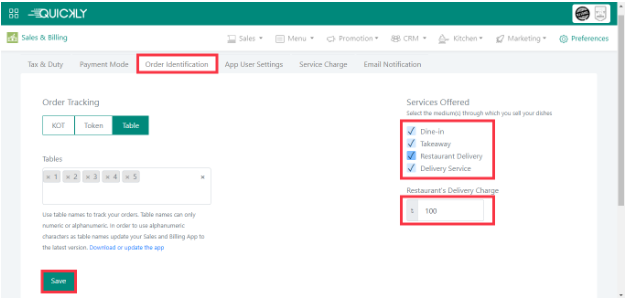
You can identify orders based on the services provided to your customers such as, Dine-in, Takeaway, Restaurant Delivery and Delivery Service. At the right column of the Order Identification page, you will find the list of services you can provide to your customers. You can set the restaurant’s delivery charge as well and finally update your preferences by clicking on the Save button.
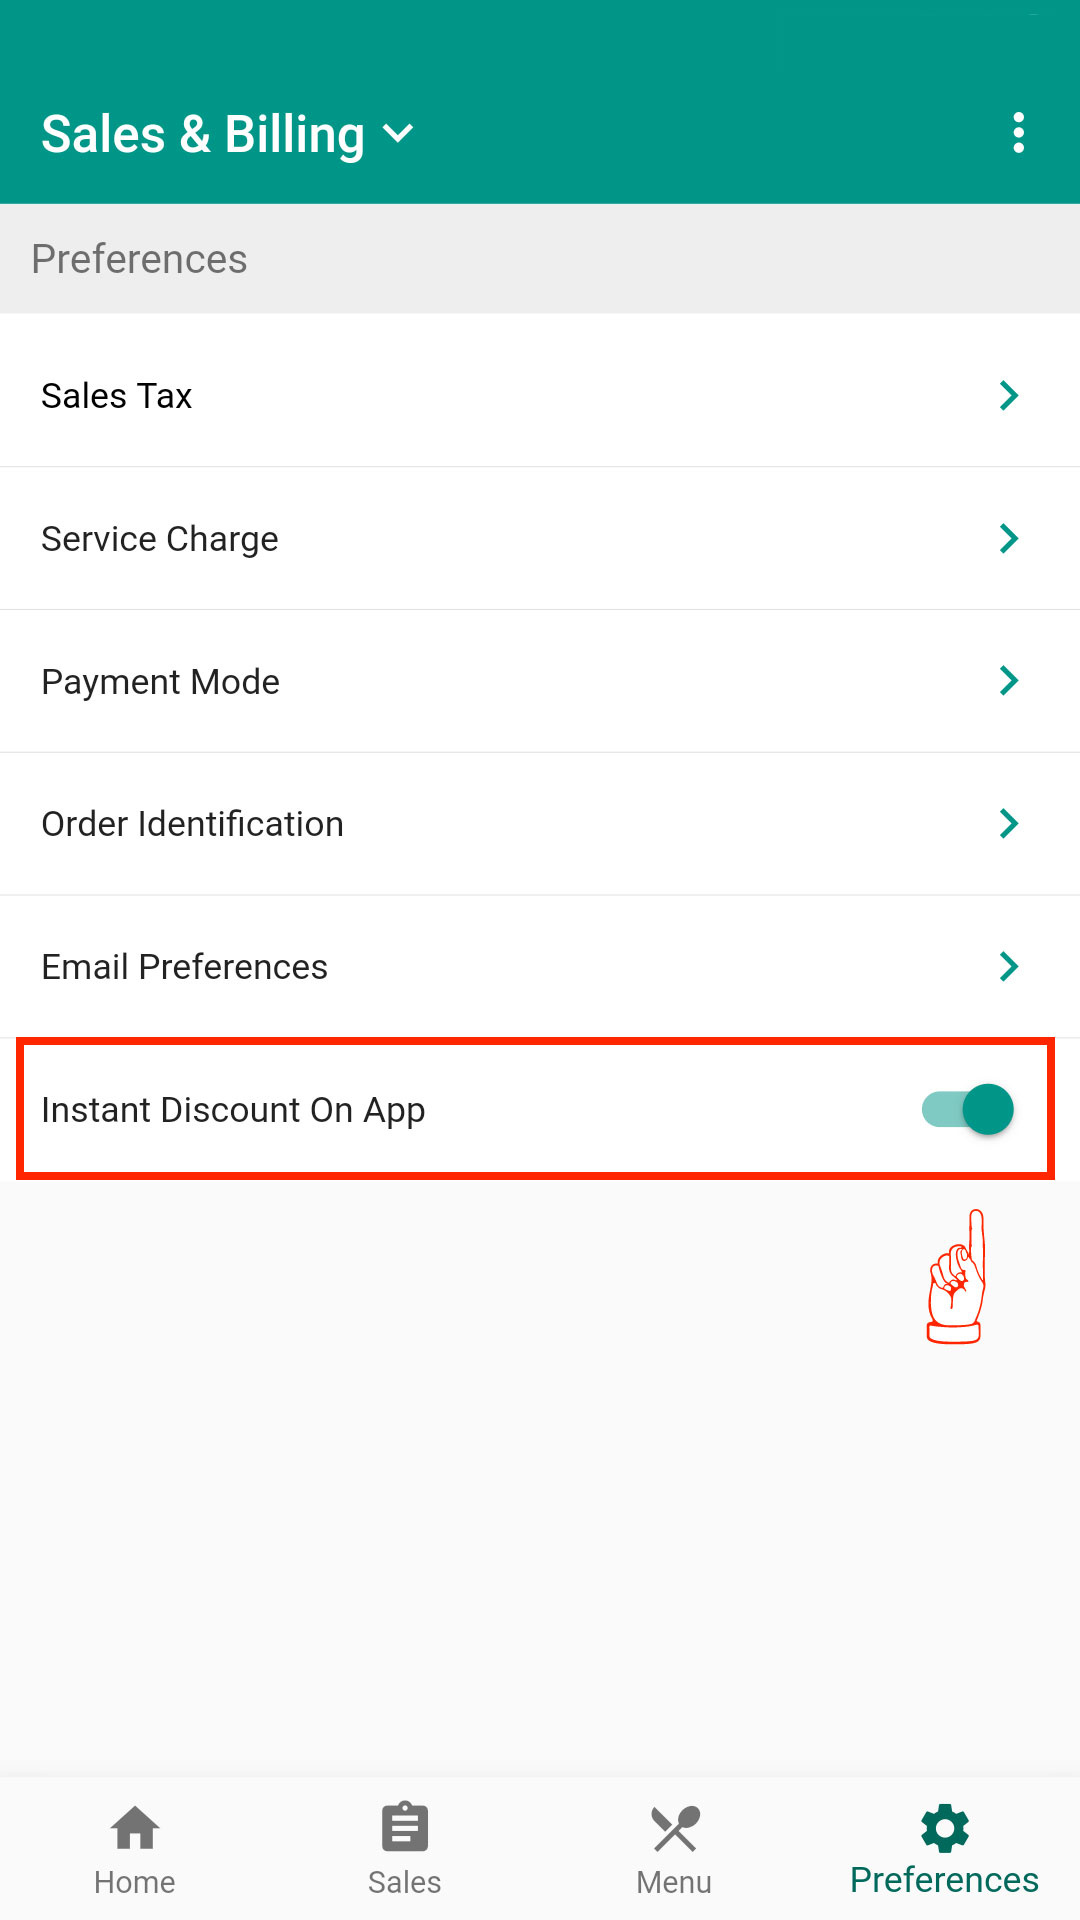
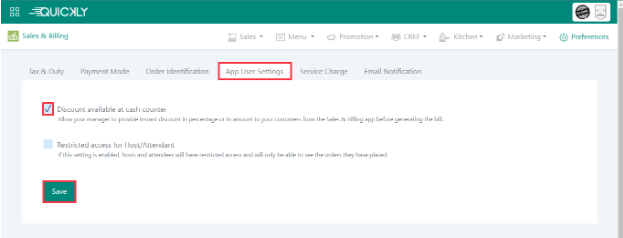
Customize your app user settings
Admin
If you want your Restaurant manager to be able to give instant discounts to any customer in the restaurant before generating a bill, you need to check the Discount available at the cash counter option and Save, which you will find under the App User Settings tab in the Preference page. Manager is allowed to give the discounts in two (Cash or Percentage) modes.
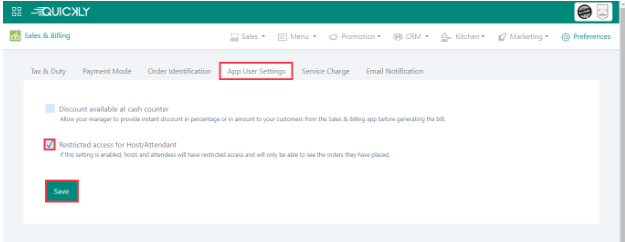
You can also restrict the access of Host or Attendant by checking the Restricted access for Host/Attendant option. By enabling this option hosts and attendees will have restricted access and will only be able to see the orders they have placed.
Setup your restaurant’s service charge
Admin
You can set a specific service charge and VAT on service charge for your restaurant from the Service Charge section in Preferences.
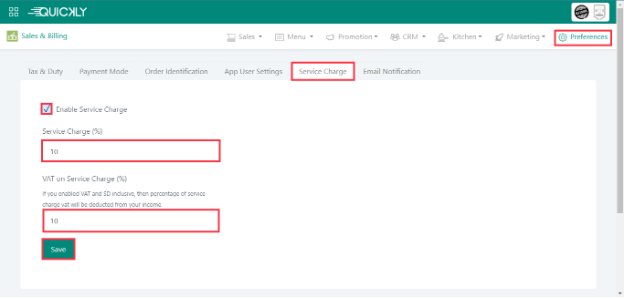
To set service charge,
- Go to Preferences > Service Charge in the Sales & Billing module.
- Enable Service Charge.
- Add the service charge amount in percentage.
- Add VAT on service charge. If there are none, enter 0.
- Click Save.
Note that the service charge will be calculated based on an order's net sales.
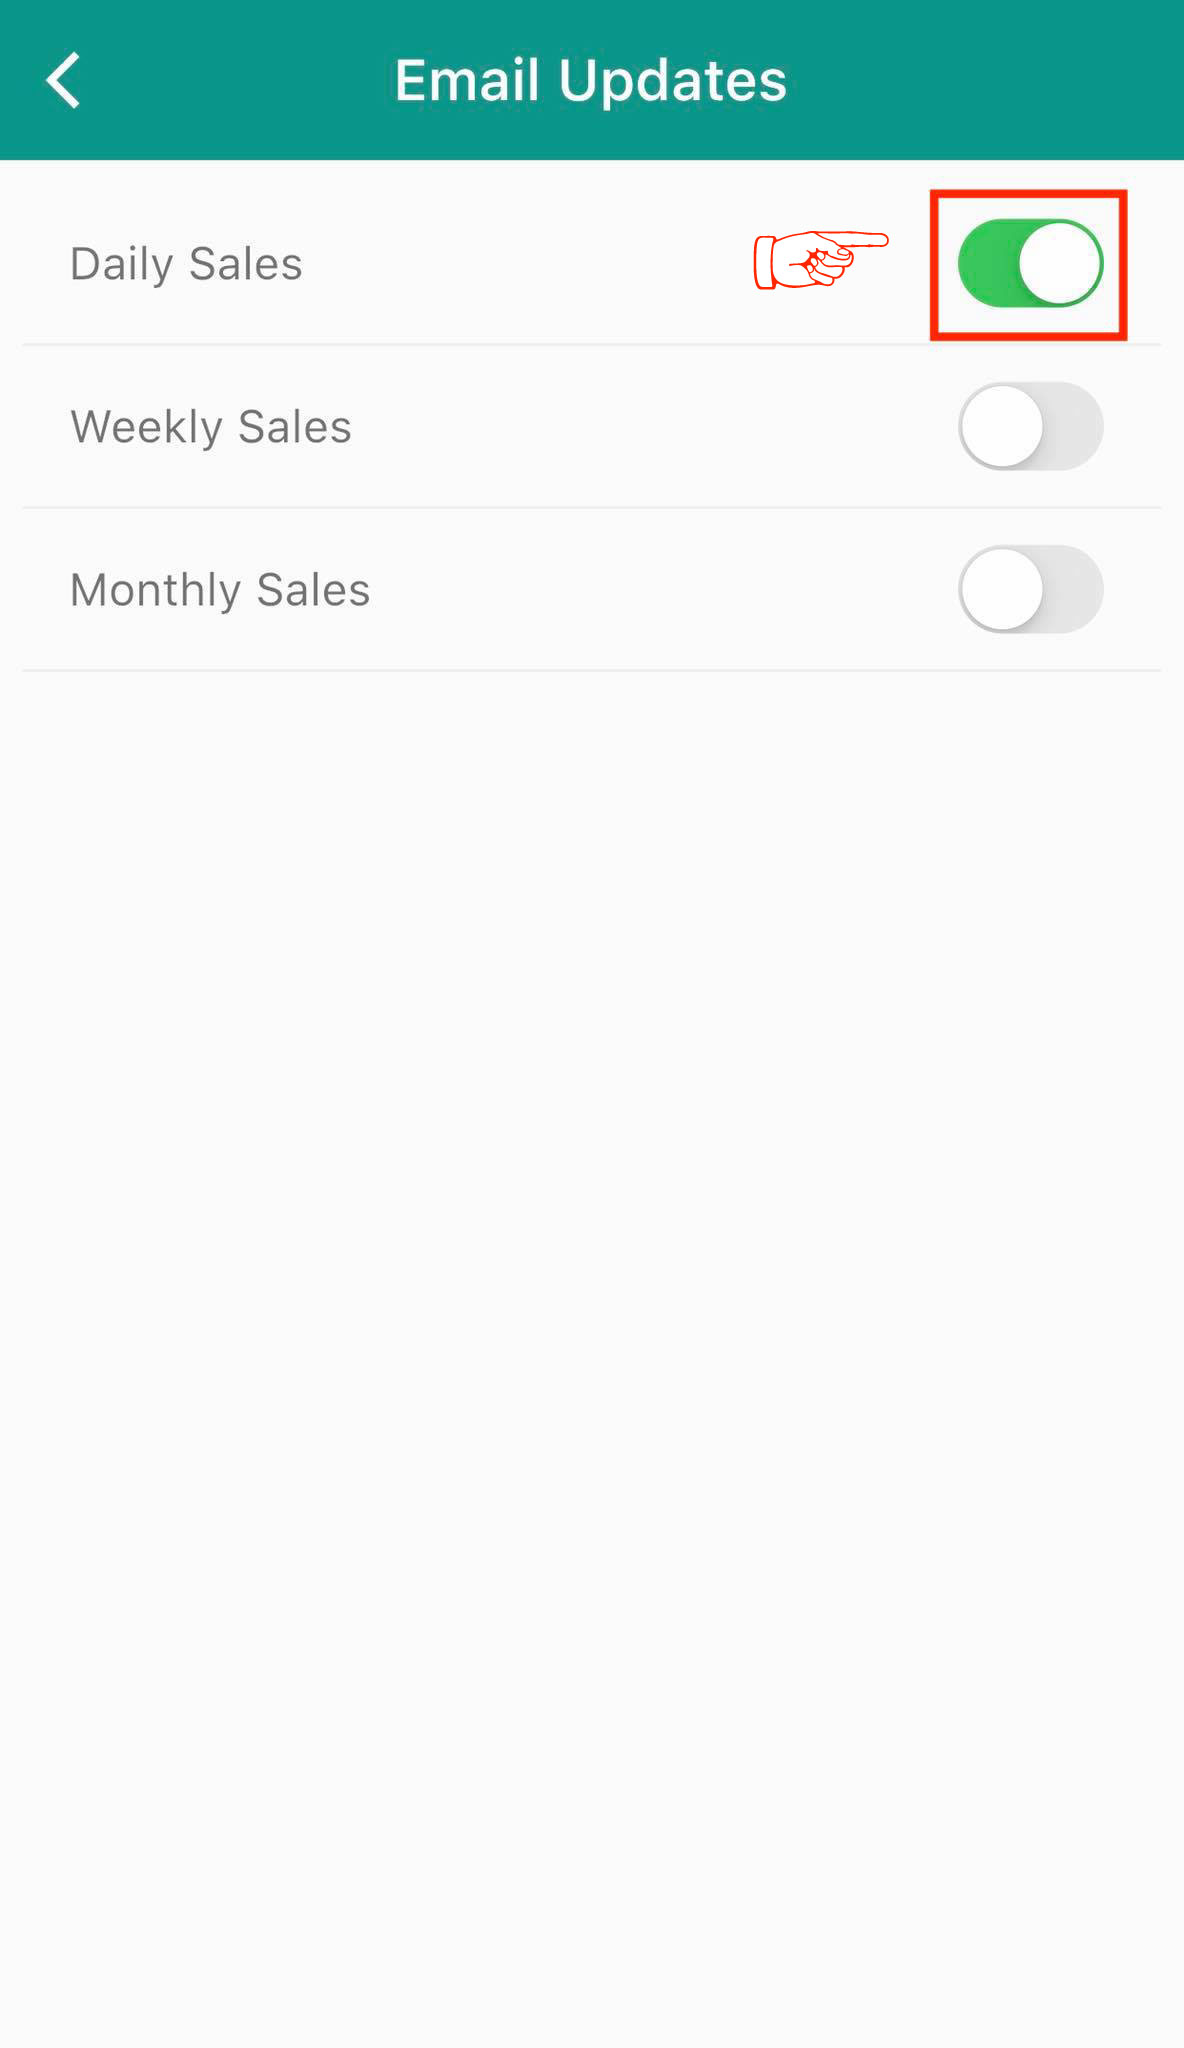
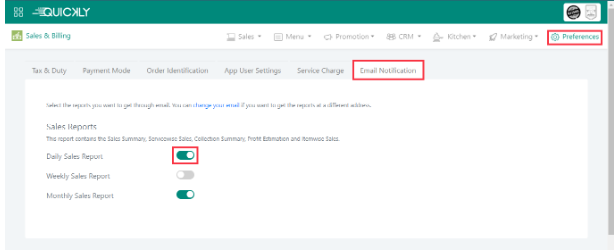
Receive sales reports via email
Admin
To help you to trace your business’s data in a more convenient way, we will send you the daily, weekly, and/or monthly sales reports to your mailbox. Under the Email Notification tab, switch on the type of reports you want to get via email.
Create offers and memberships to attract customers
Admin
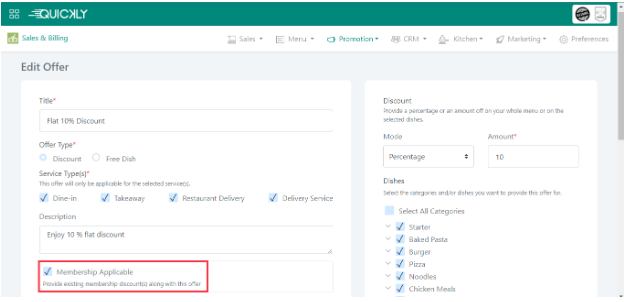
Offer your customers a fixed value, or percentage discount on items in your restaurant. You can create free item offers (e.g. Buy 2 get 1 Free) to attract more customers.
You can specify
- The date and time for which the offer is valid.
- Service types, for example if you want to set an offer only for online orders, you can choose restaurant delivery service.
- A minimum order amount to avail the discount.
- The categories and dishes the discount can be applied to.
Add an offer
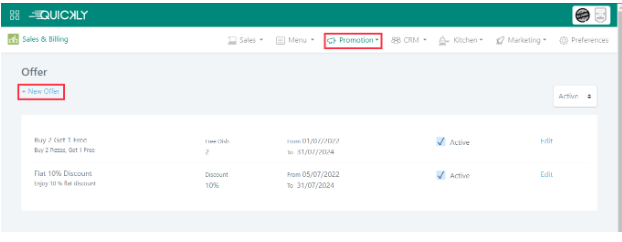
- Go to Promotions > Offer in the Sales & Billing Module.
- Click New Offer.
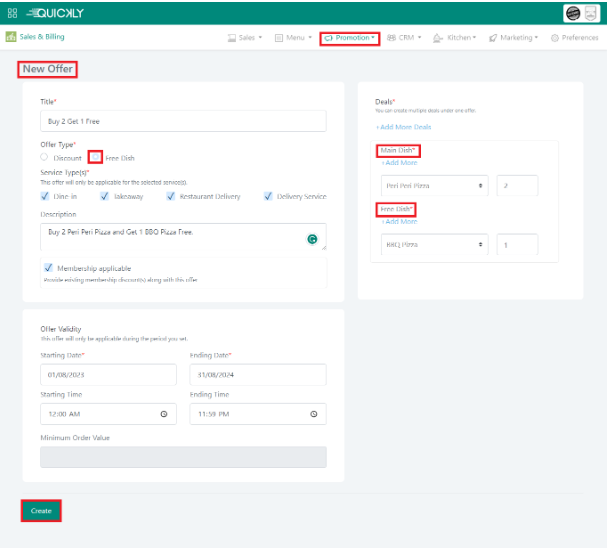
- Enter offer details.
- For Discount offers, select the dishes from the Dishes section on the right. You can give a discount in both Percentage or Amount.

-
For Free Dish offers, add Deals.
For example, if you want to buy 2 Peri Peri Pizza and get 1 BBQ Pizza free, add Peri Peri Pizza as Main Dish, and BBQ Pizza as Free Dish. You can change the items’ quantity and add multiple items to a single deal. Also you can create multiple deals.
- To update an offer, click the Edit link next to the offer.
Add a membership
You can create Membership if you want to offer discounts to a specific group of customers.
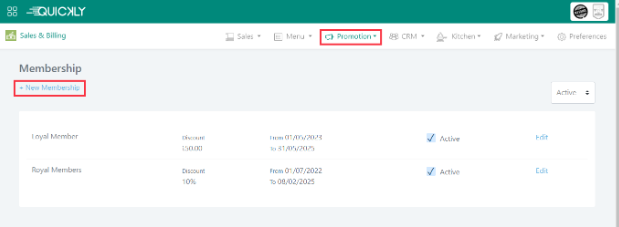
- Go to Promotions > Membership in the Sales & Billing Module.
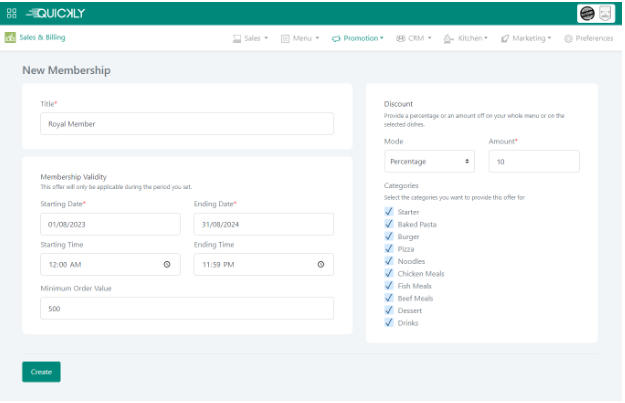
- Click New Membership.
- Enter membership details and click Create.
- To update a membership, click the Edit link next to the offer.
Note that if you have any ongoing offer, you must check Membership Applicable from the offer to provide membership.
After creating the membership, you can apply for it from the order taking app.
Collect Customer Information & Give reward points to your loyal customers
Admin
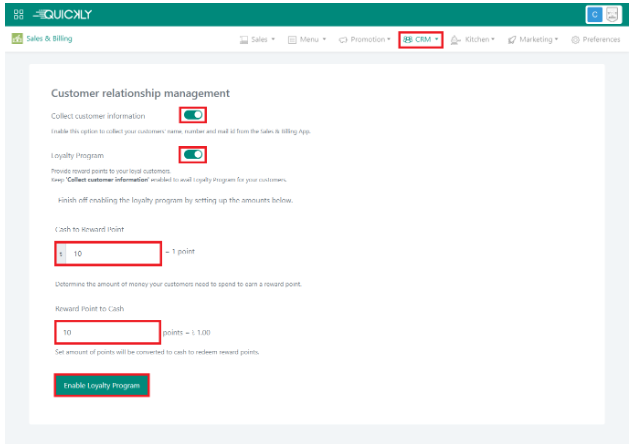
You can collect your customers' name, number and mail id from the Sales & Billing App and can provide reward points to your loyal customers.
Quickly’s Loyalty program lets you allocate reward points to your customers based on their purchases. Later on, customers can redeem these reward points and avail discounts at your restaurant.
To enable Loyalty Program,
- Go to CRM > Settings in the Sales & Billing Module.
- Enable Collect Customer Information & Loyalty Program.
- Set Cash to Reward Point & Reward Point to Cash fields.
- Click on Enable Loyalty Program button.
View Customer Details & Make Payment of remaining due
After enabling the Loyalty Program, Customer Information page will be available where you will find all your customers’ details and order informations.
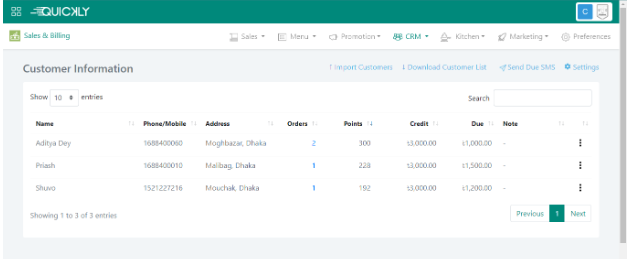
In the customer information page, you can Import Customer, Download Customer List, Send Due SMS.
You can view the order details of a particular customer by clicking on the customer’s name.
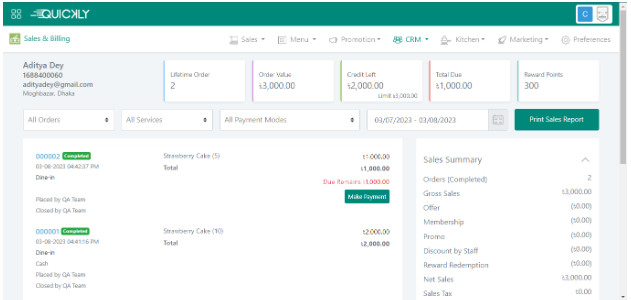
You can also make payment of the remaining due amount clicking on Make Payment button from the Customer details page.

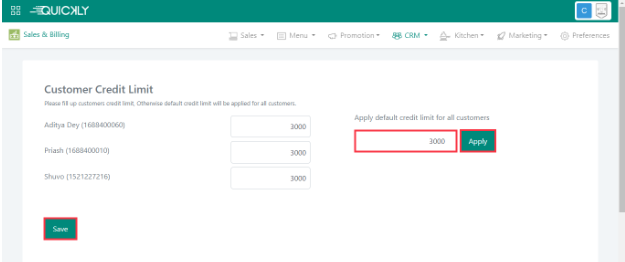
Set Customer Credit Limit
You can set credit limit for your customers from Credit Limit page under CRM. Input credit amount for different customers as you want and click Save.

Or, you can apply a default credit limit for all users by simply setting an amount in the Apply default credit limit for all customers field. Click on Apply and Save after setting the amount.
Maintain your customers’ contact list
Admin
A great customer experience is not limited to just your food services but also depends on how you engage with your audience. Quickly Marketing helps you to maintain a contact list of your customers and reach out to them with no effort.
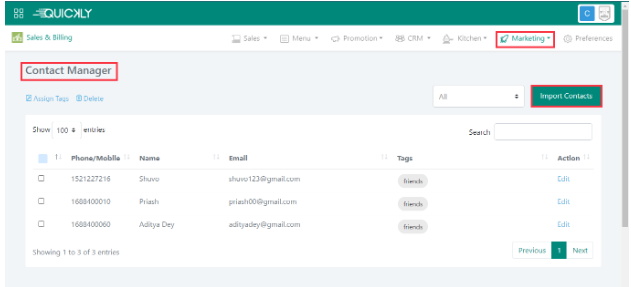
- Go to Marketing > Contact Manager.
- Click Import Contacts.
- Download the given format and update the excel file with your customer information. Note that you must provide a phone number for each contact.
- Select the file and assign a tag for the contact list (e.g. friends), it will help you to filter the contacts, and then import.
You can now find the contacts in Contact Manager and assign tags, delete, or edit any information right away.
Run email or SMS campaigns
Admin
Send personalized SMS and email to your customers with the latest offers, menu updates, event invites and congratulatory wishes on any occasion.
Marketing helps you to directly reach out to your customers, create and manage SMS and email campaigns, all from within the familiar Quickly platform. No experience needed.
Before you start, make sure you have enough marketing credit available.
SMS Campaign
SMS campaign is only available for the Bangladeshi restaurants. First, create a campaign.
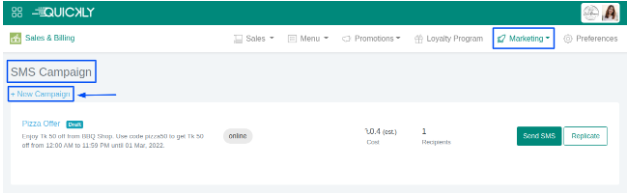
- Go to Marketing > SMS Campaign.
- Click New Campaign.
- Enter the campaign name, text message, and select contacts. If you don’t have any available contact groups, import the contact list and assign tags from the Contact Manager.
- Click Create.
You will find the created campaign with its estimated cost and recipients in the SMS Campaign list.
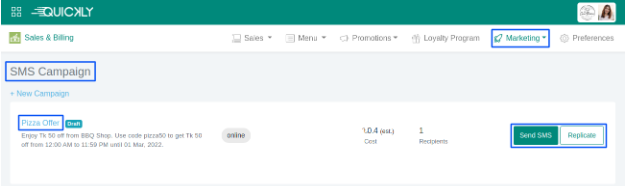
To change any information, click on the campaign name, and Edit. To execute the campaign, click Send SMS. To create another campaign same as this, click Replicate Campaign.
After a campaign has been executed, you can see an overview and the contact log by clicking on its title.
SMS Campaign
Create beautifully branded emails in minutes with in-line editing, easily configurable content blocks and all the customization you need to make your brand shine.
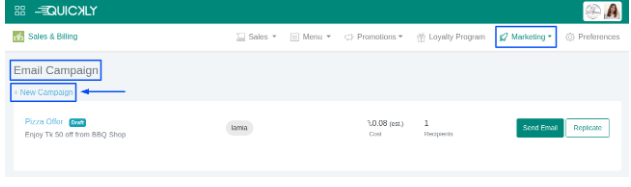
To change any information, click on the campaign name, and Edit.
To execute the campaign, click Send Email.
To create another campaign same as this, click Replicate Campaign.
Add credits to run campaigns
Admin
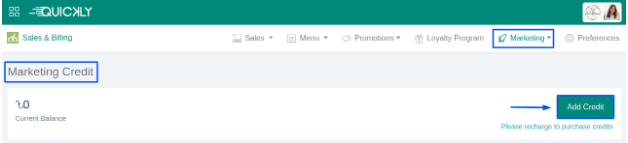
- Go to Marketing Credit.
- Click Add Credit.
-
Enter an amount, and click Recharge.
If you don’t have any available contact groups, import the contact list and assign tags from the Contact Manager.
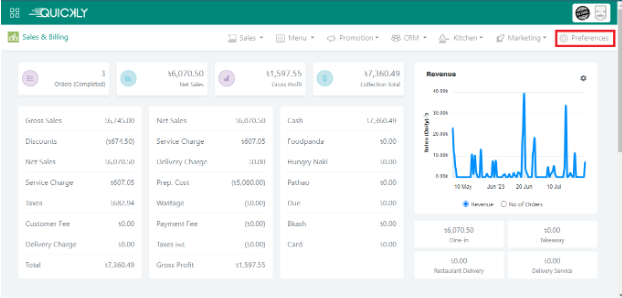
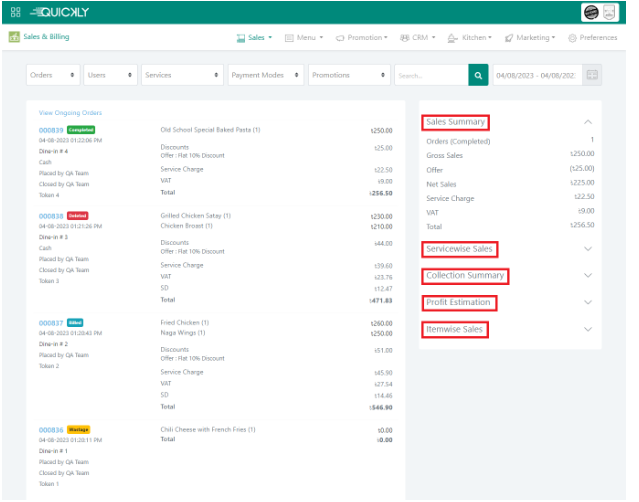
See your order details and summarized sales reports
Admin
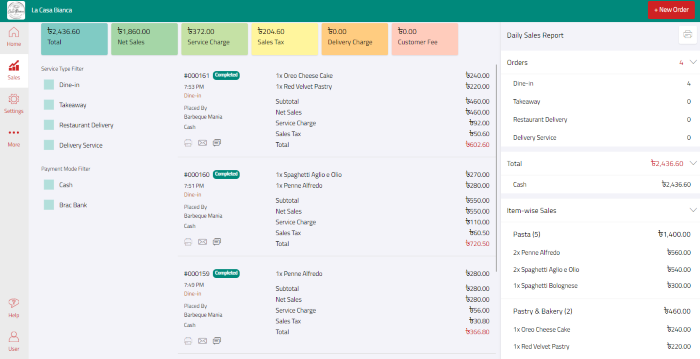
When you start taking orders through the Quickly Sales & Billing App, all the orders’ (billed, completed, deleted, and wastage) summary will be updated to the business portal. From the Sales & Billing module, click on the Sales Summary under the Sales dropdown menu in order to see the order summary of your restaurant.

All the orders placed through the app will be shown here with details. Orders can be filtered by Orders (i.e. All Order, Billed, Completed, Deleted, and Wastage), Users (i.e. Order Places By and Order Closed By), Services (Dine-in, Takeaway, Deliver, Food Delivery Service), Payment Mode (Cash by default), Order No, Note, Dish name, and Date (Today, Yesterday, Last 7 Days, Last 30 Days, This Month, Last Month, Custom Range).
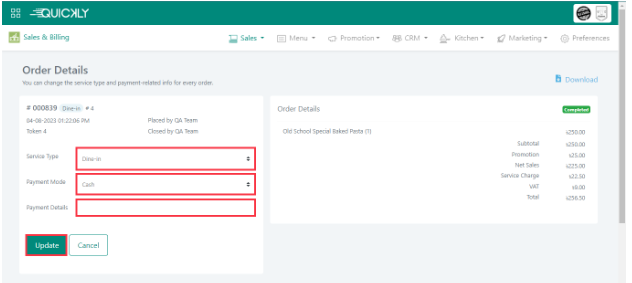
On the right side of the page, you will find the order details broken down in four sections: Sales Summary, Collection Summary, Profit Estimation, and Item Sales. You can expand each section to see the details. However, not only checking your order details, you can download, edit payment mode and reference in a very simple way. Clicking on the reference number of any order will show you the order details.
There is a download option at the right side of the Order Details page. To edit payment mode and reference, click on the Edit button. You can also delete the order from the Order Details page.
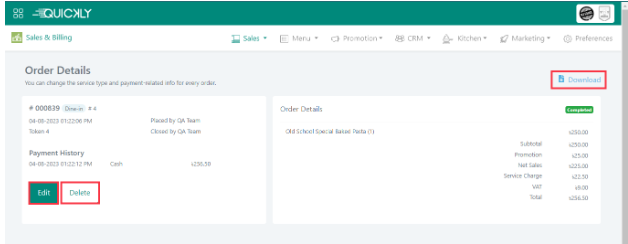
You can easily change or add reference against the order by editing the order. Finally, update the page with all the given or changed data.
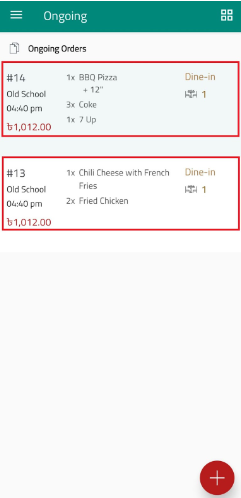
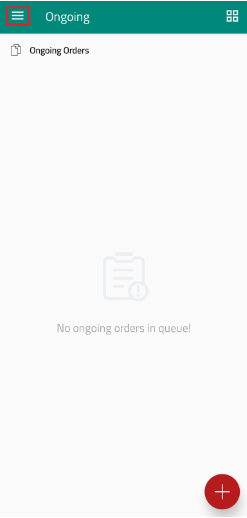
See all the Ongoing Orders for your Restaurant
Admin
All the ongoing orders placed through the Sales & Billing app will be displayed on the Ongoing Orders page, along with their details. To access this page, navigate to the Sales & Billing module, and click on 'Ongoing Orders' under the Sales dropdown menu to view the ongoing orders for your restaurant.

So you don’t need to open multiple reports to know how your items are selling. With Quickly Product Performance Report, you can compare the sales of your restaurant’s items at a single glance.
Compare the performance of your restaurant's items
Admin
Product Performance Report can help you understand an item's demand and how all items have been selling over time.
You can get a daily, monthly or weekly item wise sales report for any date and time frame.
Moreover, you can view items’ performance for a specific day of a week.
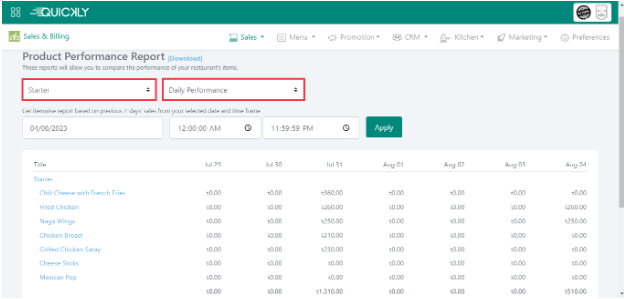
So you don’t need to open multiple reports to know how your items are selling. With Quickly Product Performance Report, you can compare the sales of your restaurant’s items at a single glance.
Download your tax/vat and sales report
Admin
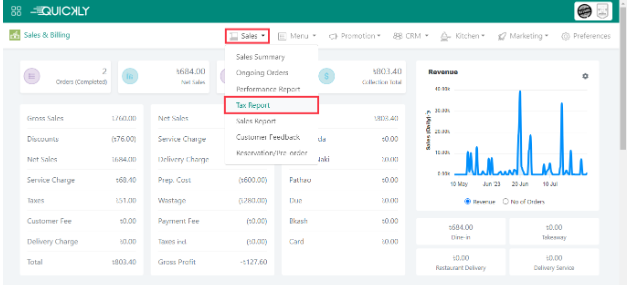
Tax/Vat Report
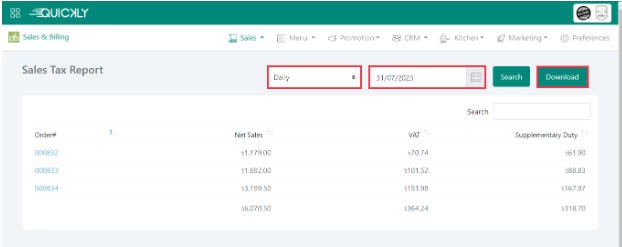
In order to check the daily or monthly Sales Tax Report, click on the Tax Report, from the Sales dropdown list.
Select Daily or Monthly from the dropdown list and search for the Sales Tax Report according to your preference.
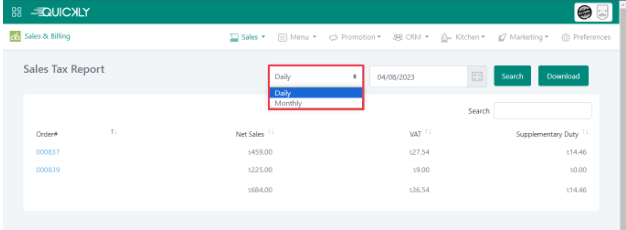
If you want to search for the Sales Tax report for any specific date, select Daily from the dropdown and click on the date picker to pick a date and finally, click on the Search button. You can download the report by simply clicking on the Download button at the right corner.
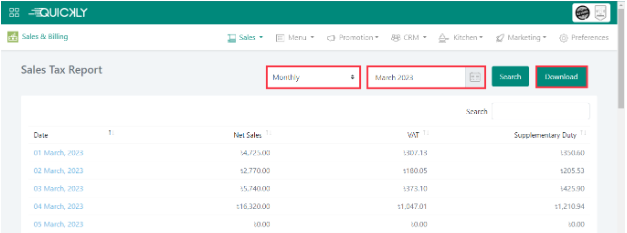
If you want to search for the Sales Tax report for any specific month of any year, select Monthly from the dropdown and click on the date picker to pick a month and year; finally, click on the Search button. You can download the report by simply clicking on the Download button at the right corner.
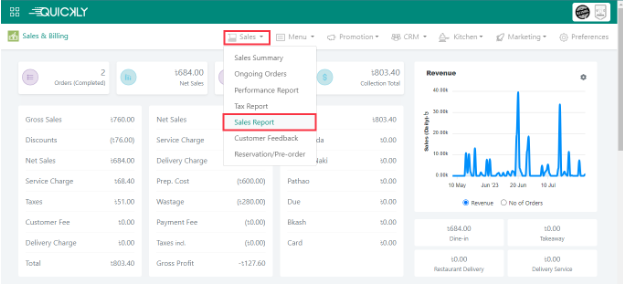
Sales Report
In order to check the Sales Report, click on the Sales Report, from the Sales dropdown list.
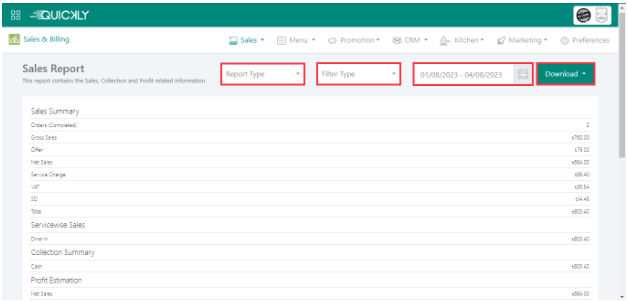
Sales Report can be filtered with Report Type (Servicewise Sales, Collection Summary, Profit Estimation and/or Itemwise Sales) and Filter Type (Dine-in, Takeaway, Restaurant Delivery and/or Delivery Service). You can also select a date range from the date picker (Current date as default) and the sales report will be displayed as your filtered preference. You can also download the report in PDF or Excel format by simply clicking on the Download button at the right corner.
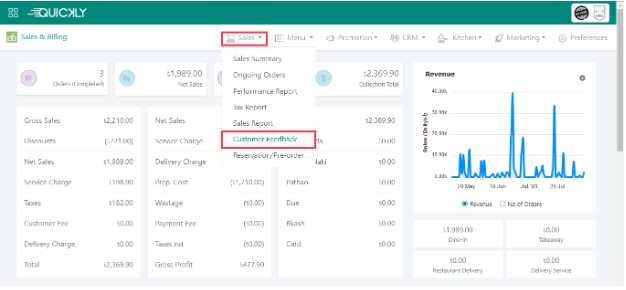
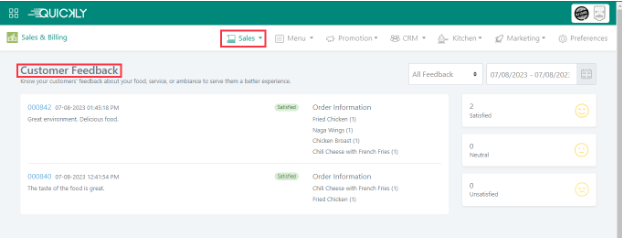
Know your Customers' feedback
Admin
Know your customers' feedback about your food, service, or ambiance to serve them a better experience. Customer feedback is essential for a restaurant as it helps to grow, improve, and continue providing memorable dining experiences to the guests.
You can view all customer feedback collected from the Sales & Billing app when closing an order on the Customer Feedback page.
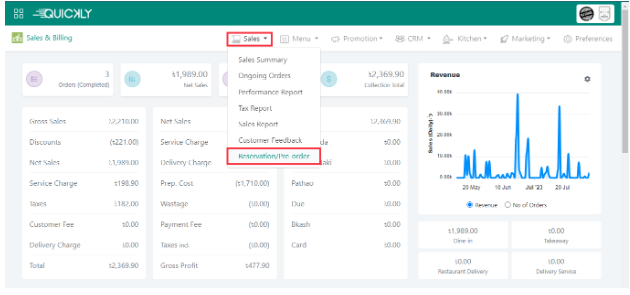
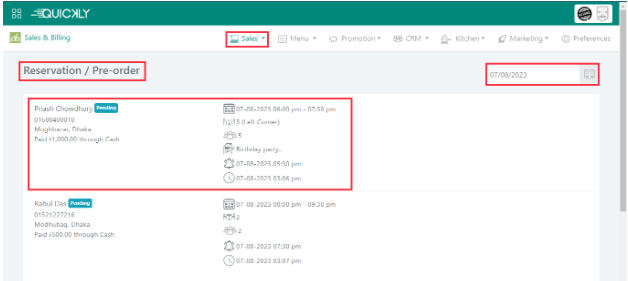
View all your Reservations/Pre-Orders at the same place
Admin
Restaurant reservations are a common practice in the hospitality industry and are beneficial for both customers and restaurant owners. You can create Reservation/Pre-order through your Restaurant Billing App and can view them on the Reservation/Pre-Order page under Sales & Billing module in the Business Portal. The date picker will be showing the current date. You can search any date to see the reservations of that day by selecting that date from the date picker.
KOT Settings
Admin
KOT settings are the preferences for how you want to send Kitchen Order Tickets (KOTs) to your kitchen. You can send KOTs to the kitchen in two ways: First, using the Kitchen Display System (Kitchen Display App), and second, through Kitchen Print (Printing KOT).
Kitchen Display System
The Kitchen Display System is often preferred for its real-time updates and efficient communication between the front-of-house and back-of-house staff. It reduces the reliance on paper tickets, minimizes the risk of misplaced orders, and helps streamline the kitchen workflow.
If you select Kitchen Display System, you can send your order taken from the Sales & Billing app to the Quickly Kitchen Display (App) and your kitchen staff will get a notification about the order. He can also see the detailed order in the Kitchen Display, accept the order and mark the order as done when the dishes are ready.
To enable Kitchen Display System,
- Go to Kitchen > KOT Settings under the Sales & Billing module.
- Select Kitchen Display System (Quickly Kitchen Display)
- Select the user/s you want to receive the notifications in the Sales & Billing app.
- Click on Save.
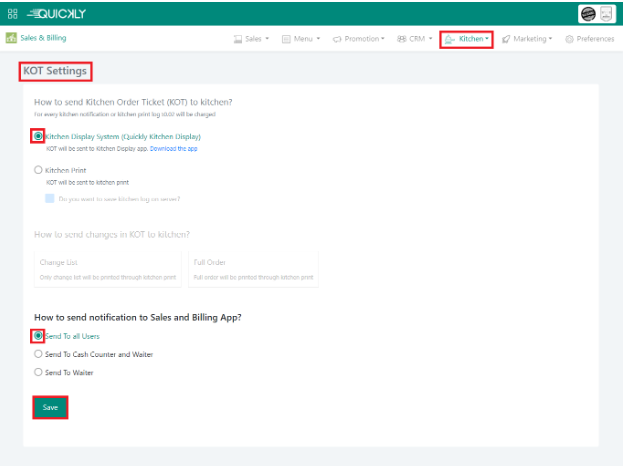
Note that you have to download the Quickly Kitchen Display app to use the Kitchen Display System.
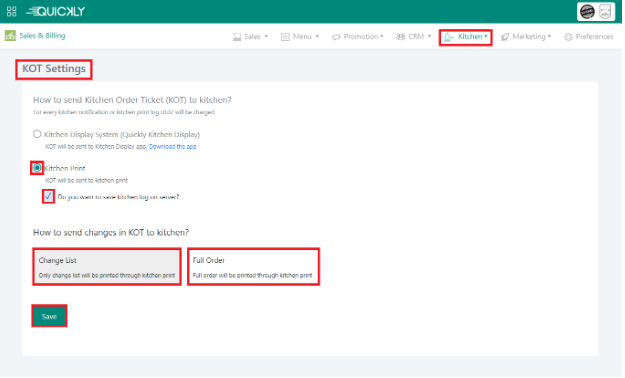
Kitchen Print
Kitchen printing is a traditional and time-tested method used by many establishments to manage orders in their kitchen. In this approach, when an order is placed, a physical Kitchen Order Ticket (KOT) is automatically/manually printed in the kitchen area. The printed ticket contains all the relevant details of the order, such as the items, quantities, modifications, and any special requests.
This tangible format allows kitchen staff to have a physical copy of the order, which they can refer to and work with as they prepare the dishes. The printed KOTs might be attached to the corresponding plates or cooking stations, or they could be placed on a designated board for easy visibility and organization.
If you select Kitchen Print, you can print your order’s taken from the Sales & Billing app through a printer connected to the app and send the physical copy of the print to the kitchen. The kitchen staff will see the ordered items containing all relevant details and make the dish ready.
To enable Kitchen Print,
- Go to Kitchen > KOT Settings under the Sales & Billing module.
- Select Kitchen Print.
- Mark the check box if you want to see the kitchen logs.
- Select one of the options (Change List or Full Order) how you want to print any changes in KOT.
- Click on Save.
Monitor your kitchen activities with Kitchen Log
Admin
Maintaining a kitchen log can promote better communication, organization, and compliance with food safety regulations. It provides a historical record that can be valuable for audits, quality control, and continuous improvement in the kitchen's operations.
As a restaurant owner, you cannot oversee your kitchen all the time. Quickly allows you to monitor your restaurant’s kitchen activities from Kitchen History in real time.
You can see ongoing kitchen orders, prepared dishes, and track any mismatched orders that are prepared but not served, for any date range.
Note that you can see the orders in Kitchen Log that are sent to the Kitchen Display App and printed through Kitchen print if the log is enabled.

Customize kitchen configuration
Admin
You can customize kitchen configuration to optimize the kitchen's performance and deliver exceptional dining experiences to its customers.
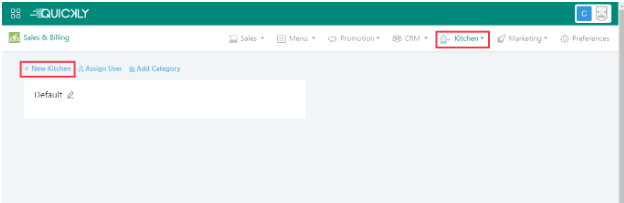
Add New Kitchen
There will be a default kitchen created by the system. You can edit the default kitchen’s title or add a new kitchen for
your restaurant as you want. You can also add multiple kitchens.
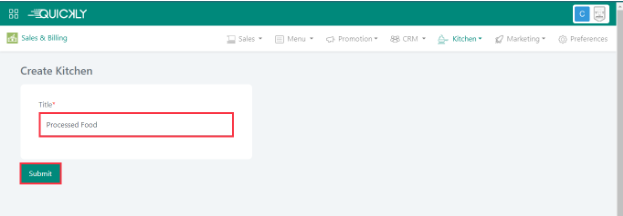
To add new kitchen,
- Go to Kitchen > Configuration under your Sales & Billing module.
- Click on +New Kitchento add a kitchen.
- Give it a title as you want and click on Submit.
Attach Category
You can attach categories to the kitchens you create. By attaching categories to the kitchens you create, you can better classify and organize them based on their specific attributes and functions. These categories help provide a clear understanding of the purpose and characteristics of each kitchen, making it easier for you to identify and select the most suitable kitchen for your needs.
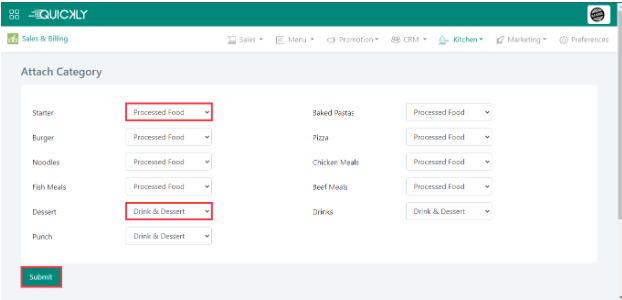
To attach categories,
- Go to Kitchen > Configuration under your Sales & Billing module.
- Click on Attach Category.
- Select kitchen from the dropdown boxes for each category available.
- Click on Submit.
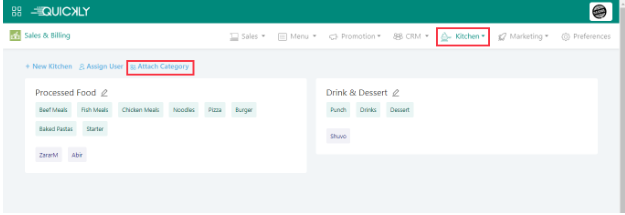
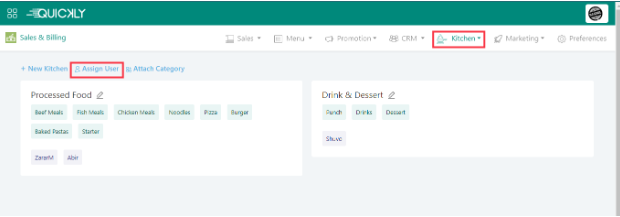
Assign User
Assigning a user to the kitchen typically refers to designating specific roles or responsibilities to individuals who work in the kitchen. Each staff member is assigned to different positions based on their skills, expertise, and the needs of the kitchen. The assignment of roles in the kitchen is essential to maintain order, efficiency, and effective teamwork. Each staff member plays a crucial role in contributing to the overall success of the kitchen and ensuring that dishes are prepared and served to meet quality standards and customer expectations.
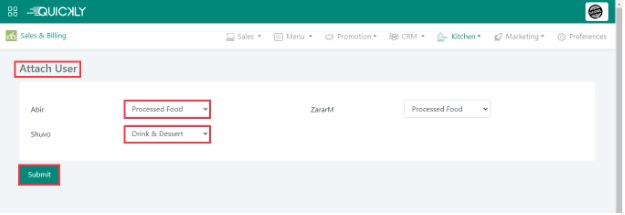
To assign users to specific kitchen,
- Go to Kitchen > Configuration under your Sales & Billing module.
- Click on Attach Category.
- Select kitchen from the dropdown boxes for each category available.
- Click on Submit.
Admin
To use the Quickly Sales & Billing app all you need is a smartphone or tablet, no technical knowledge needed. Simply install the app on your device and log in with your login ID & password.
Take orders from your customers
Admin
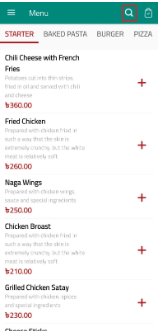
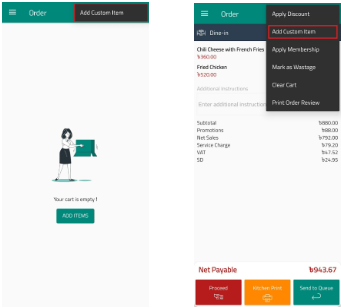
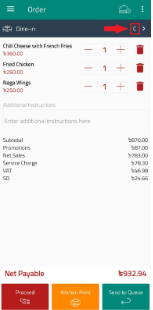
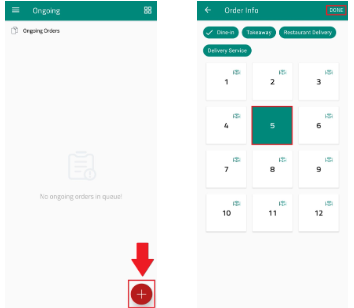
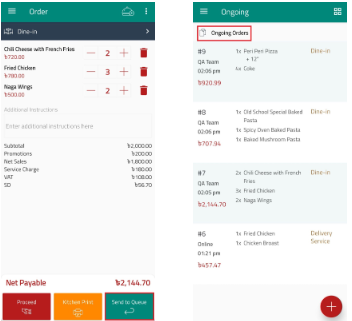
After logging into the app, you will see the ongoing orders screen. To take orders, click on the ( + ) button at the bottom right corner and it will take you to the menu you have already created from your business portal.
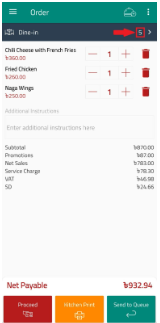
Just click on the plus ( + ) button beside each dish from the menu and it will be added to the cart. You can also search the dishes by their names from the search bar.
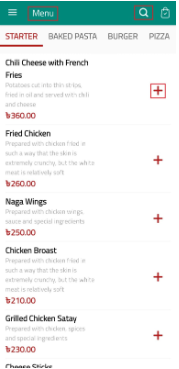
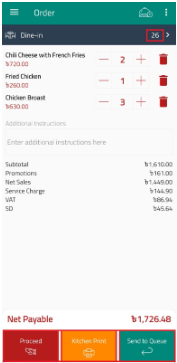
You can easily increase or decrease the quantity of the dish(es) by clicking on the plus ( + ) & minus ( - ) buttons.
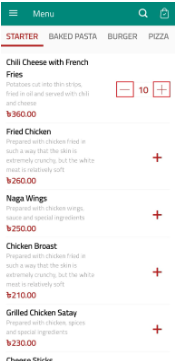
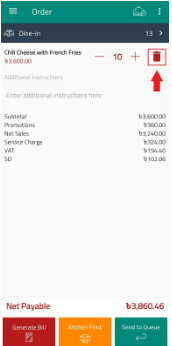
You can delete the added item by clicking on the delete button right next to that item in the cart.
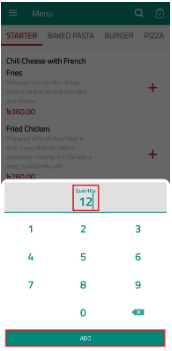
If you need to add a big quantity of any dish to the cart then long press over the + button and there will be a keyboard appearing on the screen to directly insert the quantity. Finally, click on the Add button and the inserted quantity for the item will be added to the cart.
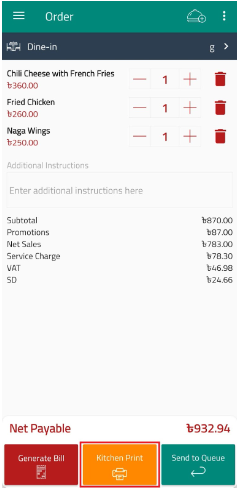
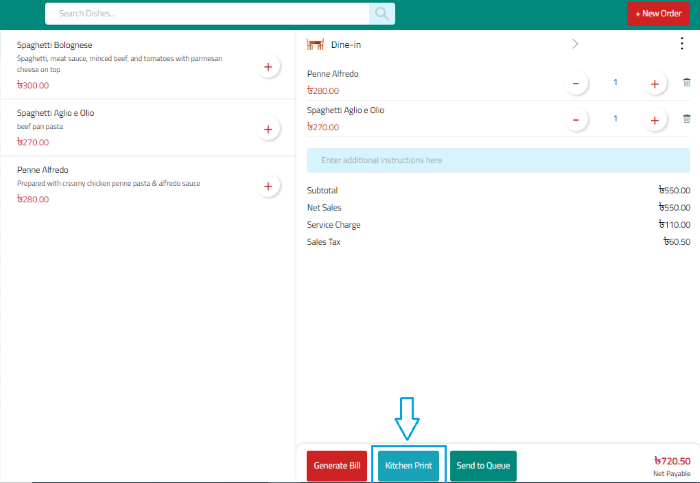
After adding the items to the cart, you can print a copy for your kitchen by clicking on the kitchen print button. If your customer is not done with all the orders and may place some orders later, click on the send to queue button and the order will be placed in the ongoing orders section of your app. To complete the order, long press over the generate bill button. After clicking on the generate bill button, the order will be locked and you cannot change anything from your order.
The token numbers for orders will be auto generated if the order tracking mode under Order Identification tab is set in your business portal to KOT. You can send the order details to kitchen print or to queue as well. You will find a token has been generated automatically against the order. We will discuss more in the next section about how you can generate tables or tokens manually.
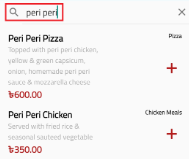
If you are looking for a dish you’re not sure about the category of, you can directly search by the name from the search bar.
After tapping on the search button, type the name of your desired dish on the search bar and it will be filtered out.
Place order for on demand requested dishes using Custom Item
Admin
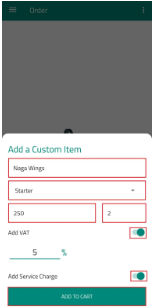
You can generate a bill for custom items (e.g. requested item that is not your menu) from the order taking app using Custom Item option.
To make a custom item,
-
From New Cart, tap Three Dot ( ⋮ ) and select Custom Item.
- Enter the item name, select a category, enter price and quantity.
- If there is sales tax or service charge for the item, toggle the switches next to them and tap Add to cart.
Assign table/token number
Admin
Assign Token
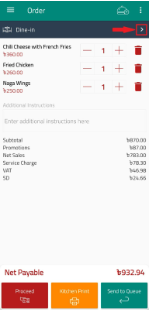
If the order tracking mode under the Order Identification tab is set to Tokens in your business portal then you need to manually select the token. Tap on arrow sign (>) right next to the service type (for example: Dine-in) in order to assign Token for any order.
You will find a layout containing the tokens you have set to your business portal. You can select only one token for one order and finally click on the Done button.
Your cart will show the assigned token number/name as follows:
Assign Table
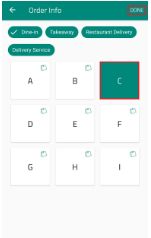
If the order tracking mode under the Order Identification tab is set to Table in your business portal then you need to manually select the tables. When placing a table order, clicking the ( + ) button on the ongoing order page to add an item from the menu initiates a process. Initially, you will encounter a layout displaying the table numbers you have already set to your business portal. From there, you have the option to choose one or more unoccupied tables for a single order. Once selections are made, you can proceed by clicking the "Done" button.
Your cart will show the assigned table numbers/names as follows:
Assign service type (dine-in, takeaway, restaurant delivery, delivery service)
Admin
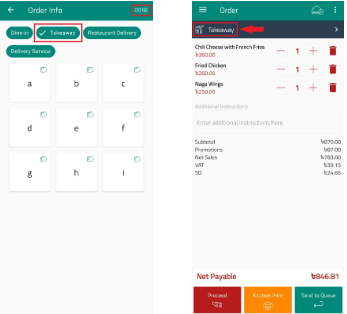
After adding dishes to the cart, you can assign the type of service you’re going to provide to your customers for each and every order. If your restaurant is providing dine-in, takeaway, restaurant delivery, and food delivery service all together, you need to check them all from the Order Identification page of your business portal. You can set your preferences according to your restaurant’s policy of providing service.
By default Dine-in is going to be selected for any order. Tap on the arrow sign ( > ) right next to the Dine-in option in the cart page in order to change the service type.
If the customer does not want to sit and eat at the restaurant then select Takeaway from the order info page and click on Done.
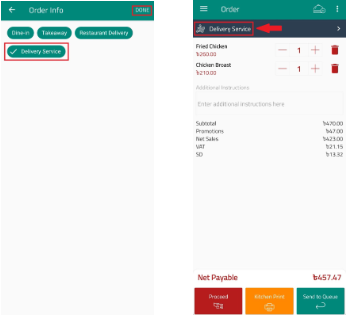
If your customer calls you and wants food to deliver to them using the restaurant’s own delivery service, then select Restaurant Delivery from the Order Info page. You can set the delivery charge from the business portal or you can set it from the Sales & Billing app after selecting the service type “Restaurant Delivery”. You have to enter the customer's phone number, name & delivery address in the details. Finally click on Done to save the changes.
Note that if the order originates from e-Restaurant, the order type will be automatically set as "Restaurant Delivery," and the customer's details will be populated based on the information provided by the customer while ordering. Moreover, the delivery charge will be included according to your e-Restaurant preferences set by you.

If your customer prefers food delivery through other food delivery services, please choose the "Delivery Service" option on the Order Info page.
Send incomplete orders to the queue
Admin
If you want to bill an order later, you can send it to the queue and will find it in the Ongoing Orders list in the home page.
Connect bluetooth printer to print bill, receipt or kitchen copy
Admin
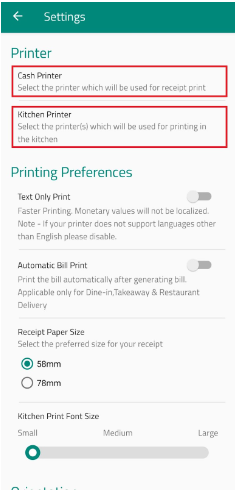
To pair your device with your printer in order to print a bill, receipt or kitchen copy, click on the sidebar of the app and go to settings. You will see 2 printer options: cash printer & kitchen printer.
Tap on the Cash Printer and/or Kitchen Printer to select which printer will be used to print the bill and receipt to cash and/or kitchen copy to kitchen.
After adding the dishes to the cart, tap on the Kitchen Print button to forward the order details to the kitchen.
Set Your Printing Preferences
Admin
Under the Branding & Settings section in your Business Portal, you have the option to configure two distinct Business Operation Models: "Pay First" and "Pay Later." It's important to note that these two models come with different printing preferences in the settings of the Sales & Billing app.
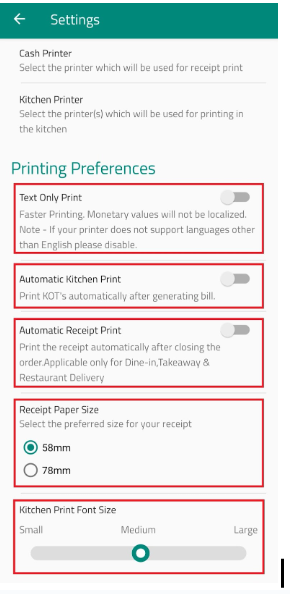
Printing preference for Pay First model
-
Text Only Print
For faster printing, you can choose Text Only Print. But in this case no image will be printed. Moreover, if your printer doesn’t support languages other than English, you can’t print other languages in your prints. -
Automatic Kitchen Print
Print KOTs automatically after generating a bill. -
Automatic Receipt Print
Print the receipt automatically after closing the order. -
Receipt Paper Size
Select the preferred size for your receipt. You can choose 58 mm or 78 mm according to your printer’s features. -
Kitchen Print Font Size
You can set preferred font size as you want from the printing preferences. The size you set will be reflected in the KOTs.
All you need to toggle the switches to enable these features.
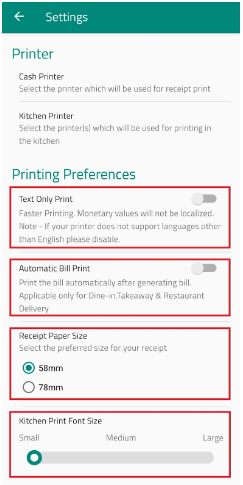
Printing preference for Pay Later model
-
Text Only Print
For faster printing, you can choose Text Only Print. But in this case no image will be printed. Moreover, if your printer doesn’t support languages other than English, you can’t print other languages in your prints. -
Automatic Bill Print
You can print the bill automatically after generating the bill. -
Receipt Paper Size
Select the preferred size for your receipt. You can choose 58 mm or 78 mm according to your printer’s features. -
Kitchen Print Font Size
You can set preferred font size as you want from the printing preferences. The size you set will be reflected in the KOTs.
All you need to toggle the switches to enable these features.
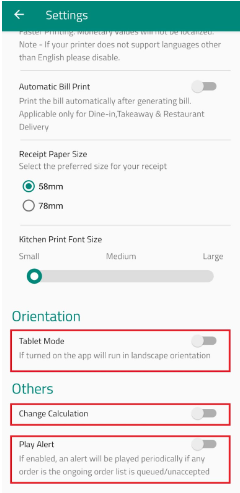
Orientation & Other Settings
Admin
You can activate landscape orientation by enabling the Tablet Mode. Furthermore, you have the option to enable the change calculation mode, which calculates payments after generating a bill and proceeding to the payment method. Additionally, the Play Alert button can be turned on, which will trigger periodic alerts if any order in the ongoing order list remains queued or unaccepted.
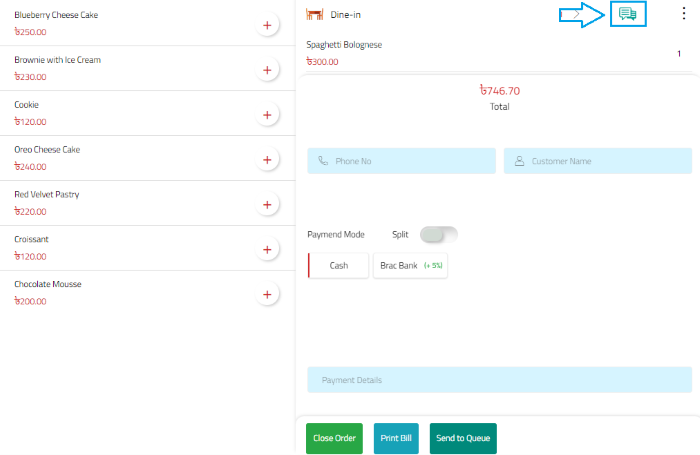
Generate bill, close order and print receipt
Admin
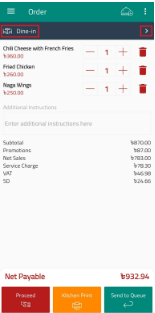
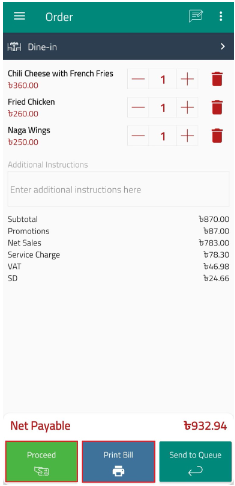
After adding the dishes to the cart, long press over the Generate Bill button in order to lock your order.
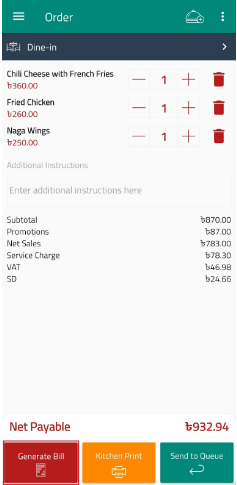
If the Automatic Bill Print option is enabled in the printing preferences, the bill will be printed automatically. Otherwise click on the Print Bill button if you want to print the bill for your customer and/or click on Proceed.
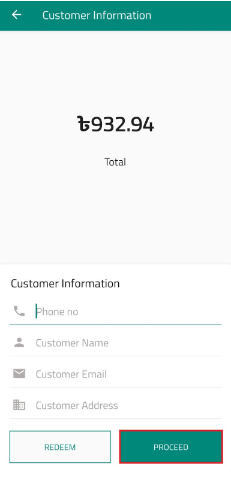
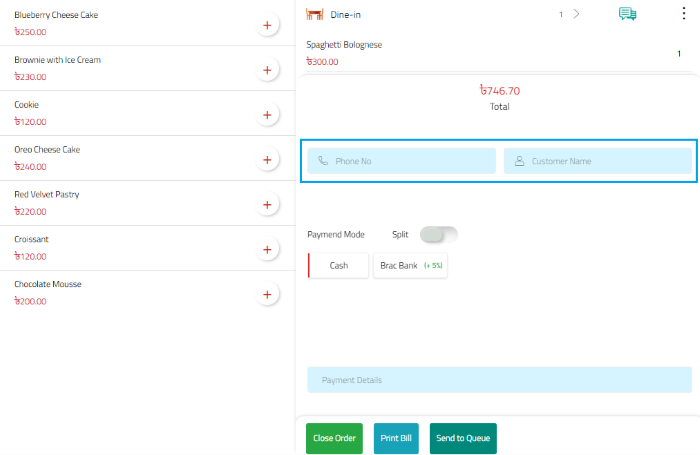
After proceeding from the cart page, the Customer Information page will appear. Collect customer information or directly click on the Proceed button.
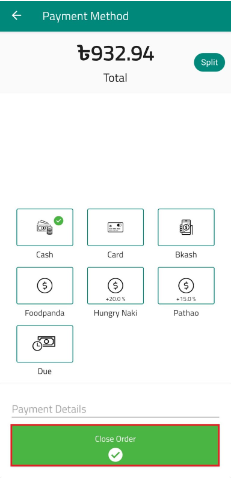
Proceeding from the customer information page, Payment Method page will appear. Select a payment method (Primarilly Cash will be selected) and click on the Close Order button.
Select Print Receipt if you want to print the receipt for your customer and click on Done.

This is how you can complete a full order cycle.
Calculate changes with built-in calculator
Admin
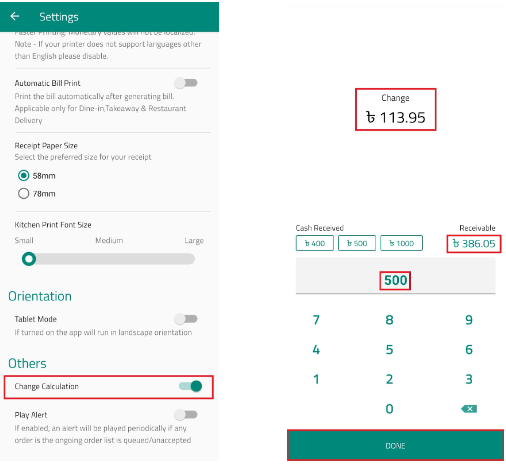
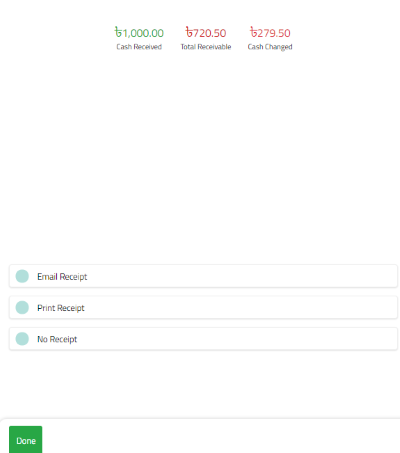
Quickly Sales & Billing App helps you to know the remaining to a customer after closing an order. For example, if the net payable is 16.25 and the customer gives you 20, the app calculates the change and shows that you have to give the customer 3.75 back.
- Go to Settings
- Turn on Change Calculation, you will find under “Others”.
Now after closing an order the change calculation page will appear after the payment method page. Enter the amount you received, and you will see the Customer Change.
Take money through multiple payment methods (Split bills)
Admin
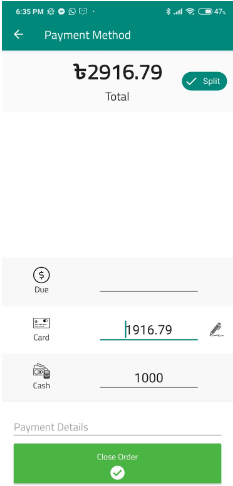
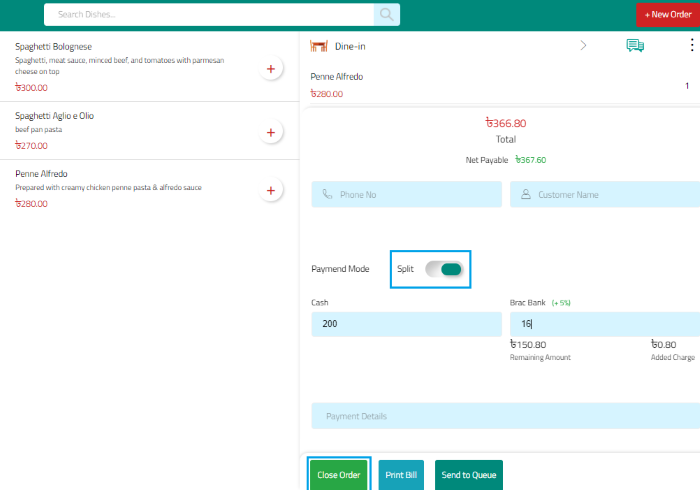
If the customer wants to use multiple payment modes to pay the bill then, click on the Split button in order to split up the total payable amount in multiple modes.
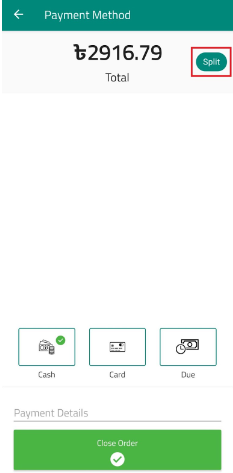
The list of all the available payment modes will be showing up from where you need to select the modes and the amounts to pay the total bill (including/excluding the payment charge).
Collect and redeem reward points
Admin
If you set your Loyalty Program in the business portal, then customers can benefit from the program when placing orders through the sales & billing app. The customers need to put their contact details when placing the order and reward points for that order will be added to the portal against those unique contact numbers. You can check the reward points at the business portal’s Loyalty Program page.
After generating the bill, click on the Proceed button to move forward.
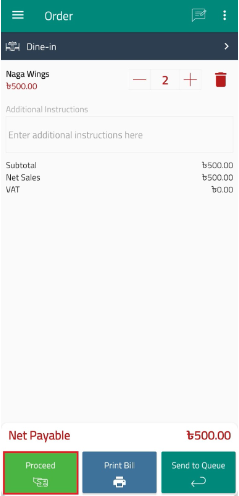
At this stage, provide the contact number to the customer information section.
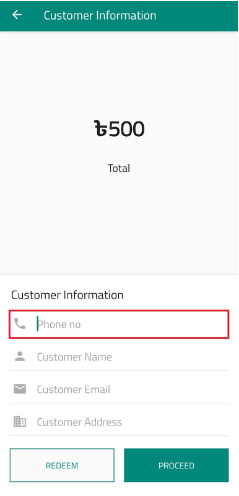
If the customer contact details have been already added for any earlier order, the name, email, address and the available reward points will be updated automatically. If the customer wishes to use the loyalty points, then click on the Redeem button.
For example, the total payable amount is showing ৳500 for an order and the available loyalty points for that contact is 260, which is equivalent to ৳26. If the customer wants to proceed without using the loyalty points, then he/she has to pay ৳500. On the other hand, if he/she wants to use the reward points, click on the Redeem button.

After redemption of the reward points, the total payable amount is now ৳474 ( ৳500 - ৳26). Now select the payment mode and close the order.
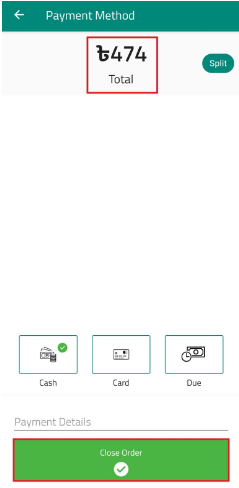
The reward points for the current order will again be added to the system and will be available to use for the next order.
Apply instant discount over an order
Admin
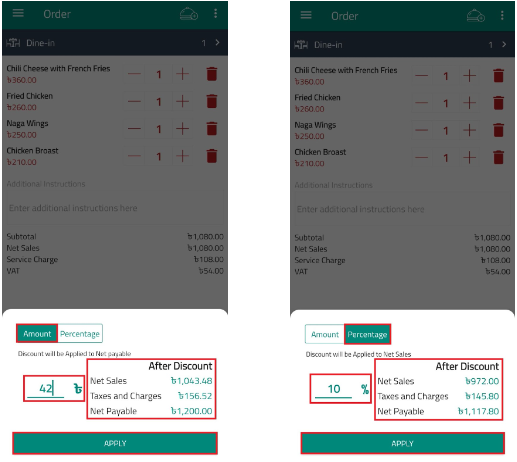
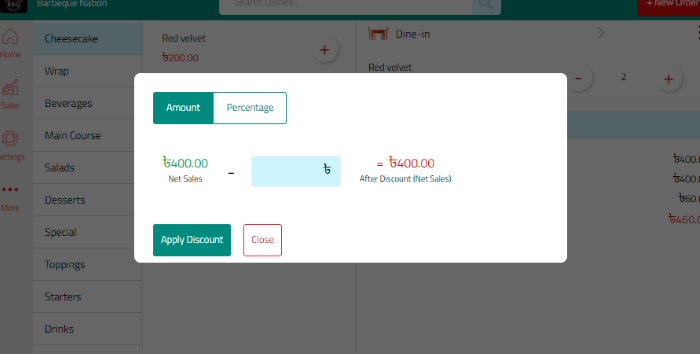
Tap on the Three Dot ( ⋮ ) icon at the top right corner of the screen in the cart page and select Apply Discount to provide a discount to your customers. Only the admin and users having access to the cash counter can give this discount to the customers.
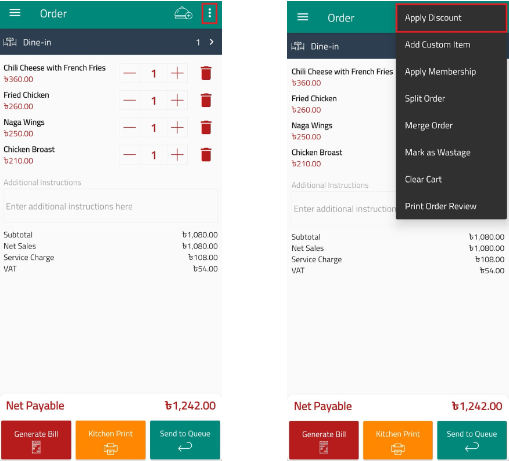
A bottom sheet will appear with two options: Amount and Percentage. Enter the discount amount in the corresponding field, based on whether it's in amount or percentage, and then tap the Apply button. If you select 'Amount,' the discount will be deducted from the Net Payable. Alternatively, if you choose 'Percentage,' the discount will be subtracted from the Net Sales. As you input an amount in the appropriate field, you can also view the post-discount calculations. After adding a discount click on Apply.
Apply membership over an order
Admin
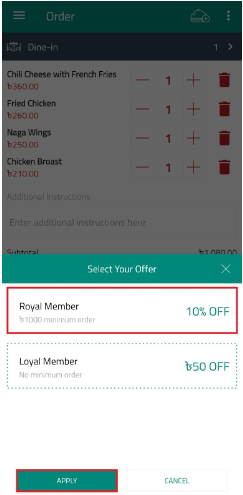
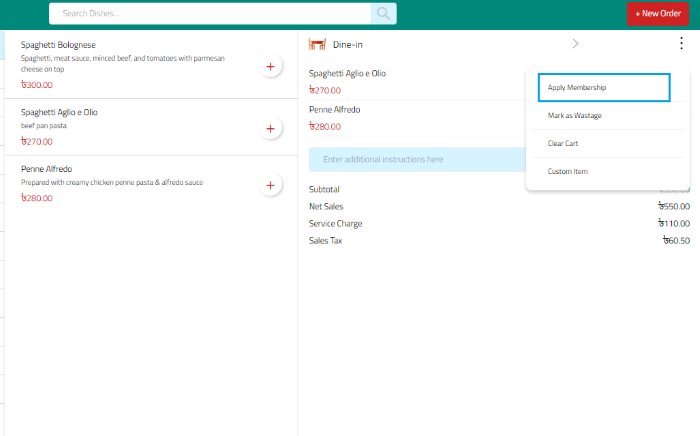
After adding the items to the cart, tap on the Three Dot ( ⋮ ) icon at the top right corner of the screen which will bring up a dropdown list. Select Apply Membership from the dropdown list.
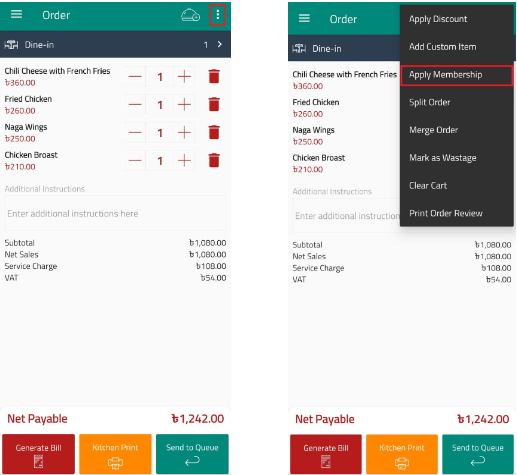
If there is any membership which is currently active in the business portal, it will bring up a window to apply the membership discount. A list of Active membership (if more than one) will be shown from where you need to tap on the offer name to select it and tap on the Apply button to apply the discount.
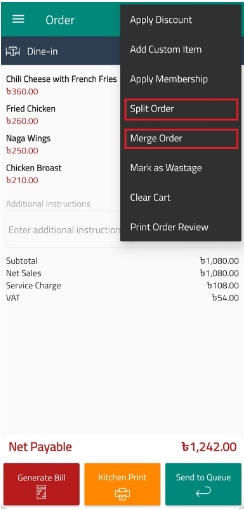
Merge and Split orders
Admin
In a restaurant's sales and billing app, the concepts of merging and splitting orders are essential for handling customer orders accurately and efficiently. These features help manage group dining situations, where multiple customers might want to pay separately or share items. Here's how the merge and split order functionalities might work:
Merge Orders
Merging orders is useful when customers from separate tables or groups want to combine their orders into a single bill. This can streamline the billing process and make it more convenient for the customers. Here's how the merge order feature could work:
-
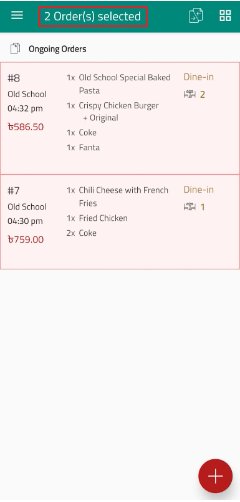
Select Orders: The manager or cashier can begin the process by selecting the orders to be merged from the queue on the home page.
This can be achieved by long-pressing on one order and then tapping on another order that needs to be merged. Remember,
more than two orders can not be selected at a time.
-
Merge: After selecting the orders, there would be an option to "Merge" them on the top right corner of the action bar.
Clicking on this option would combine the selected orders into a single order.
Note that a billed order can’t be merged with an unbilled order. Only two billed orders or two unbilled orders can be merged.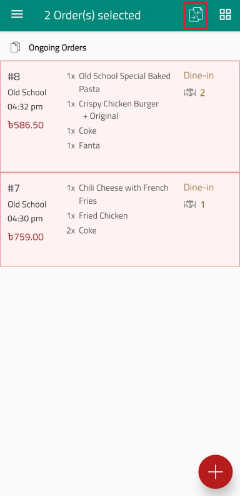
-
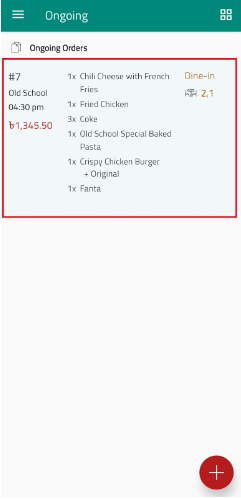
Items Consolidation: All the items from the merged orders would be grouped together under a single order.
The items' quantities, special requests, and modifications would be retained.
-
Re-calculate Total: The app would automatically recalculate the total amount based on the merged order.
Any discounts, taxes, or service charges would be applied accordingly.
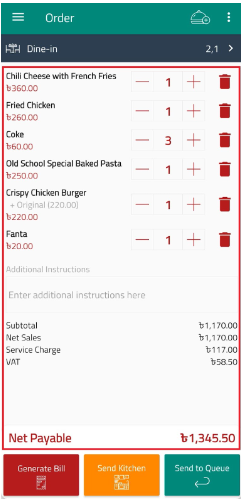
- Print New Bill: If the merged orders were not previously billed, a new bill can be generated for the merged order. Conversely, if the orders that are being merged had already been billed, you can directly print the bill for the merged order.
Split Orders
Splitting orders is useful when customers in a group want to pay separately for their individual portions of the bill. Here's how the split order feature could work:
-
Select Items to Split: The manager or cashier would select the order that needs to be split among different customers.
This can be achieved by long-pressing on the order that needs to be split.

-
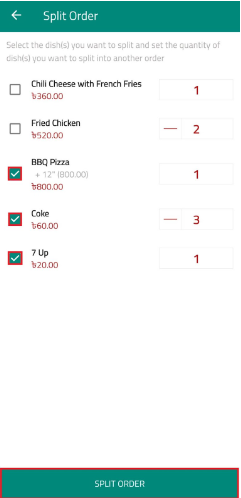
Split: Once you've chosen the order, you'll find a "Split" option on the top right corner of the action bar.
Upon clicking this option, an item list will appear. From here, you can select the items and specify quantities that you wish to
separate from the rest. Select the items and click on “Split Order”. This is a way to create distinct sub-orders for individual customers or groups.
-
Allocate Items: The selected items would be divided into the sub-order. The app might provide options for evenly
splitting costs, manually allocating quantities, or designating specific items to certain sub-orders.
- Assign Customers: Each sub-order might be associated with a specific customer or table. This helps in tracking which customer is responsible for which portion of the bill.
- Print New Bill: If the merged orders were not previously billed, a new bill can be generated for the merged order. Conversely, if the orders that are being merged had already been billed, you can directly print the bill for the merged order.
Note that Merge and Split order options are also available in the Three Dot ( ⋮ ) icon of the cart page. You can merge orders or split an order directly from the cart page following the same process.
Both merging and splitting orders enhance the flexibility of the restaurant's billing system and improve the dining experience for customers in various group scenarios. These features require careful implementation to ensure accuracy in calculations, tracking, and communication with the kitchen staff.
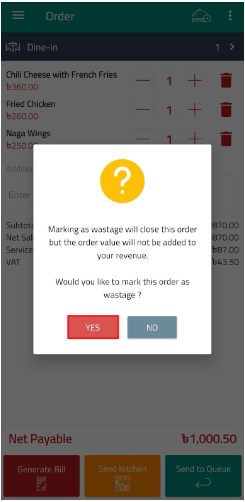
Track your food waste
Admin
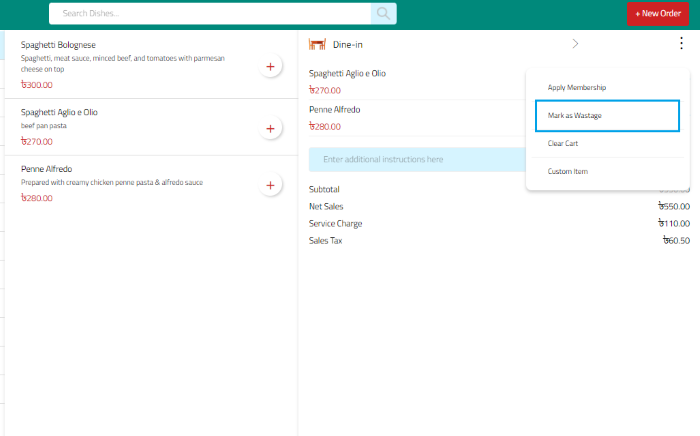
Sometimes your dishes may go wasted for various reasons (i.e customer returned the dish, the dish got burnt in the kitchen etc.). You can now mark those orders as wastage and find the list of wasted foods on the previous order page of the android app and sales summary page of the business portal.
Tap on the Three Dot ( ⋮ ) icon on the top right corner of the screen in the cart page. You’ll see a dropdown menu. Tap on Mark as Wastage.

Selecting Mark as Wastage will bring up a window with a warning message, tap on Yes button to mark the food as wastage.
You can clear the whole cart
Admin
Clearing the cart in the restaurant's sales and billing app refers to the process of removing all items that a customer has added to their order before finalizing the purchase. This could be necessary if the customer decides to cancel or modify their order, or if they accidentally added items they no longer want.
Tap on the Three Dot ( ⋮ ) icon on the top right corner of the screen in the cart page. You’ll see a dropdown menu. Tap on Clear Cart.
Selecting Clear Cart will bring up a window with a confirmation message, tap on Yes button to clear the cart.
You can print order preview
Admin
In a restaurant sales and billing app, incorporating an order preview is highly advantageous. This feature enables customers to review their selected items and ensure accuracy before confirming their order. It builds confidence in their choices and minimizes errors. For the restaurant, an order preview streamlines kitchen operations and helps avoid mistakes. It also meets regulatory requirements for clear billing information. Additionally, suggesting add-ons or specials can boost sales. In summary, an order preview elevates the dining experience, accuracy, and transparency in restaurant sales and billing apps, leading to customer satisfaction and streamlined operations.
Tap on the Three Dot ( ⋮ ) icon on the top right corner of the screen in the cart page. You’ll see a dropdown menu. Tap on Print Order Preview. An order preview will be printed through your thermal printer and you can show it to your customer to reassure the order.

Make reservation for your customers
Admin
Reservation is essential in restaurant management as it ensures smooth operations, optimal resource allocation, and enhanced customer satisfaction. It prevents overcrowding, reduces wait times, and allows efficient staff planning. For customers, it offers convenience and a better dining experience by allowing them to secure preferred dining times in advance. Ultimately, reservations contribute to a well-organized and revenue-maximizing dining environment.
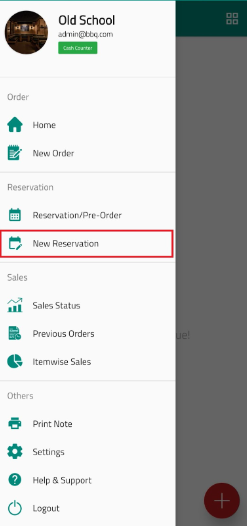
You can make reservation for your customers through your Android Sales & Billing app in the following way;
-
Tap ☰ from the top left corner, and go to the navigation menu.
-
Go to New Reservation, under the “Reservation” section.
-
To enter reservation details, use the provided customer information and include an advance payment amount if applicable.
Also, specify the payment mode if any payment has been made for the reservation or pre-order. After completing the reservation
form, click on the "Save Reservation" button to confirm and save the reservation or pre-order.
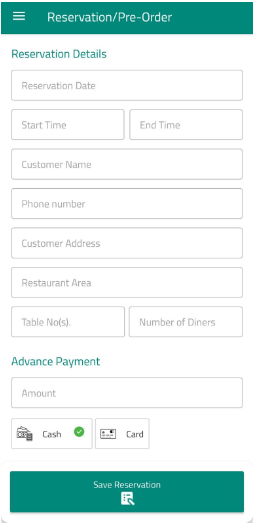
Note that when you input the start and end times for the reservation, an additional field called "Notify Me" will become visible. In this field, you can set a specific time to receive a notification before the reservation start time.
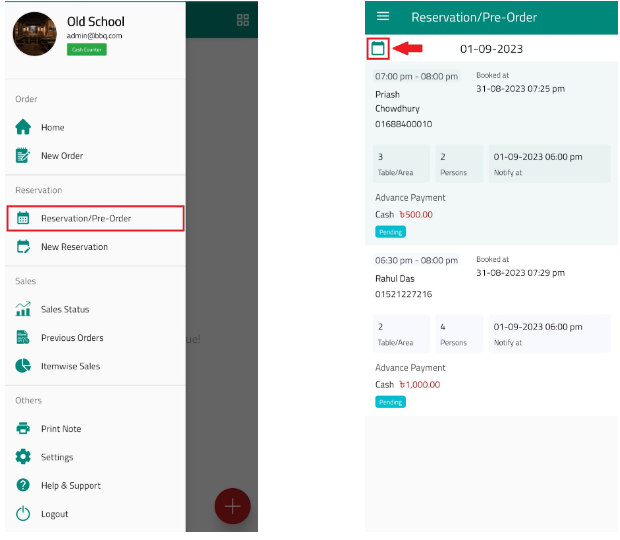
All your created reservations will be stored in the Reservation/Pre-Order page under the “Reservation” section. You can find a particular day’s reservation list by filtering that day from the date picker.
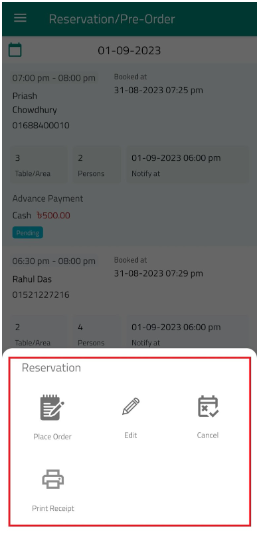
If you click on a particular reservation, a bottom sheet will appear where you will find options to place an order against that reservation, edit or cancel that reservation and print a reservation receipt for your customer.
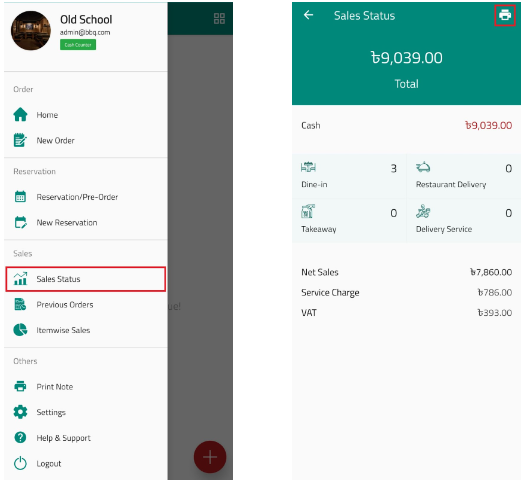
View & print user-specific sales status
Admin
You can monitor your sales from the app. Get a detailed breakdown of your overall collection for today, along with their payment methods and the number of orders placed through each service (i.e. Dine-in, Takeaway, Restaurant Delivery and Delivery Service).
- Tap ☰ from the top left corner, and go to the navigation menu.
- Go to Sales Status, under “Sales” section
-
Tap on the printer icon from the top right corner to print it as a report via your thermal printer.
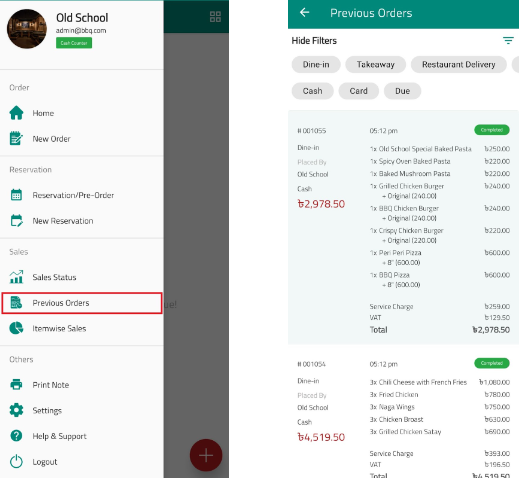
Look at the completed orders
Admin
You can view the user-specific completed orders of each day from the app and filter them based on their service types (i.e. Dine-in, Takeaway, Restaurant Delivery and Delivery Service) and payment modes (i.e. cash, card, due etc.).
- Tap ☰ from the top left corner, and go to the navigation menu.
- Go to Previous Orders, under the “Sales” section.
-
Tap Show Filters to filter the orders.
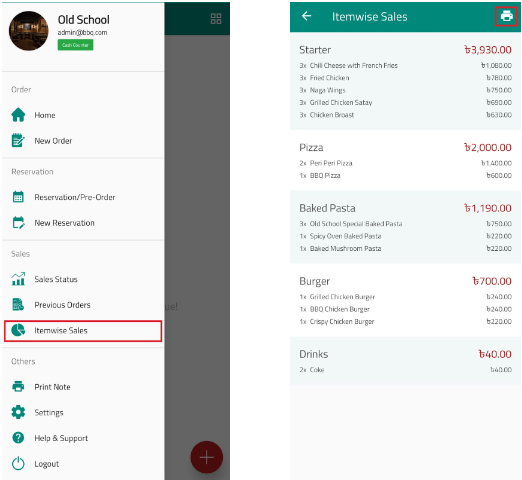
Get itemwise sales
Admin
Quickly Sales & Billing App helps you understand an item's demand and how all items have been selling today.
- Tap ☰ from the top left corner, and go to the navigation menu.
- Go to Itemwise Sales, under “Sales” section.
-
Tap on the printer icon from the top right corner to print it as a report via your thermal printer.
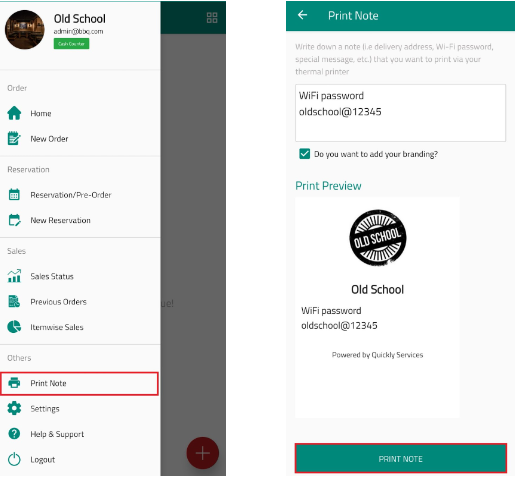
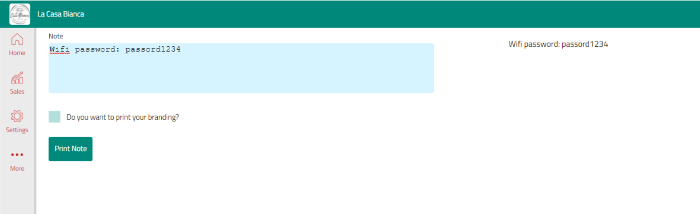
Print a note and share with your customer
Admin
You can print and share any information, such as a Wi-Fi password or a special message, with your customers.
- Tap ☰ from the top left corner, and go to the navigation menu.
- Go to Print Note, under "Others" section.
-
Add your note, check from the preview and print via your thermal printer.
Get feedback from your customer
Admin
Know your customers' feedback about your food, service, or ambiance to serve them a better experience.
You can receive feedback from your customers after generating a bill for an order or from the Previous Orders page.
-
Click on the feedback icon after generating the bill.
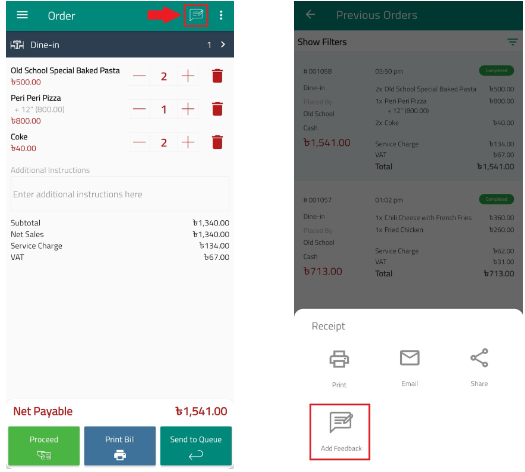
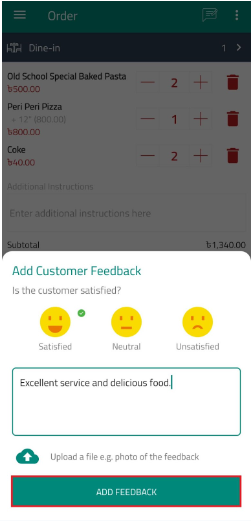
-
To add feedback, select satisfied/neutral/dissatisfied and add text or attach a photo (optional).
You can view all customer feedback from the Business Portal.
Use Windows App (POS) to Manage Your Orders
Admin
You can take orders from your customers from your windows laptop or desktop as well with. Quickly Windows App.
- Download the app
- Extract the downloaded .zip file. It is typically saved to your Downloads folder.
- You will find an .exe file, double click the .exe file.
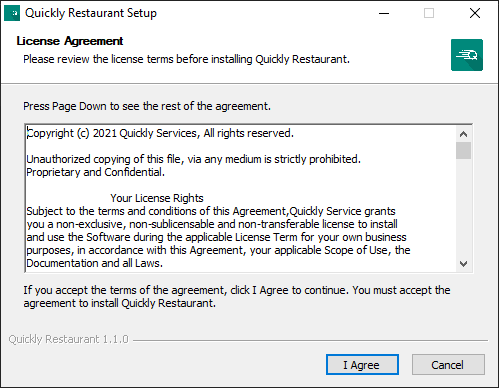
- Once the installer opens, read the terms and conditions and click
I Agree.
- Choose the users who will be able to access this app, then click Next.
- (Optional) If you want to change the destination for installation, click Browse under the destination folder.
- Click Install.
- Once the installation is complete, click Finish.
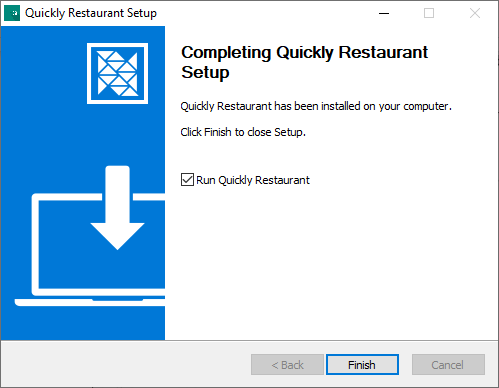
In your desktop screen, you will see a shortcut of the Windows app. So, start taking orders from your Windows device right away.
Take orders from your customers
Admin
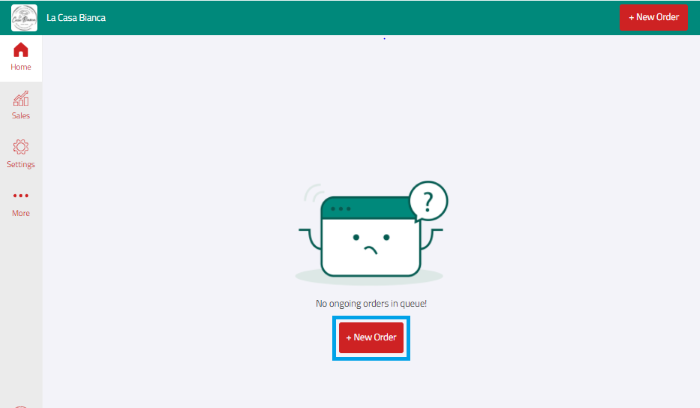
Quickly Restaurant Windows App helps you to give your customers an easier and faster purchasing experience at your restaurant. No more waiting queues in front of the cashier.
- After login, click + New Order
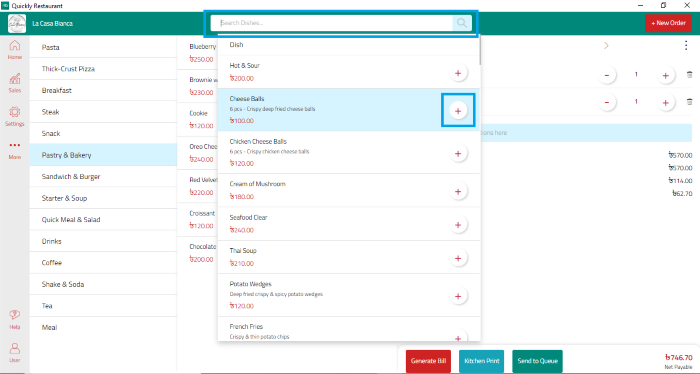
- Click + next to the dish that you want to add from the
menu. You can also search for a dish from the navbar at the top.
- Your cart will be on the right. You can assign tables or tokens, change the service type (i.e. dine-in, takeaway, restaurant delivery or delivery service), update the quantity of an item, delete an item, and add instructions from there.
- To print a copy of the order for your kitchen, click Kitchen Print.
- Click Send to Queue if your customer may change it later.
- To complete the order, long press Generate Bill.
Note that after generating a bill, the order will be locked and you cannot change anything from your order.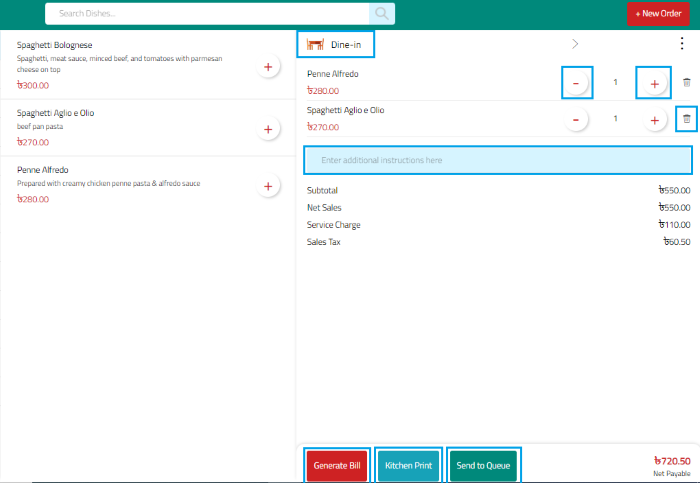
- Click Close Order.
- Choose whether you want to print or email your order receipt, then click Done.
Go to Sales from the left menu and view completed orders.
Place order for on demand requested dishes, reservation fee, etc using custom item
Admin
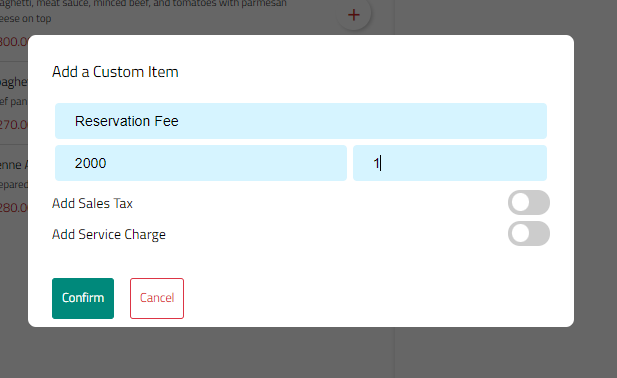
You can generate a bill for custom items (e.g. reservation fee, damage, or a requested item that is not your menu etc.) from the Windows App.
- From new or existing Cart, click Add Custom Item.
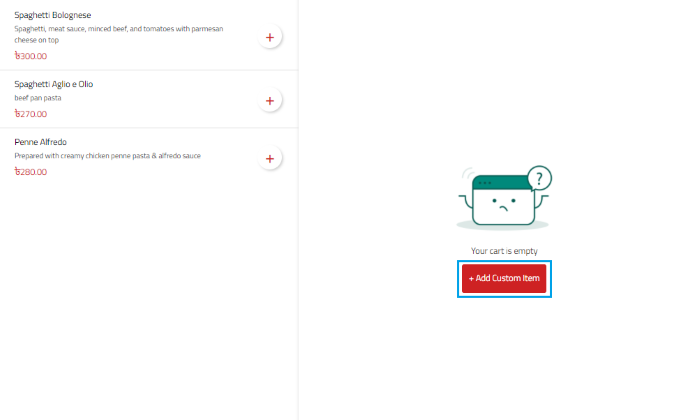
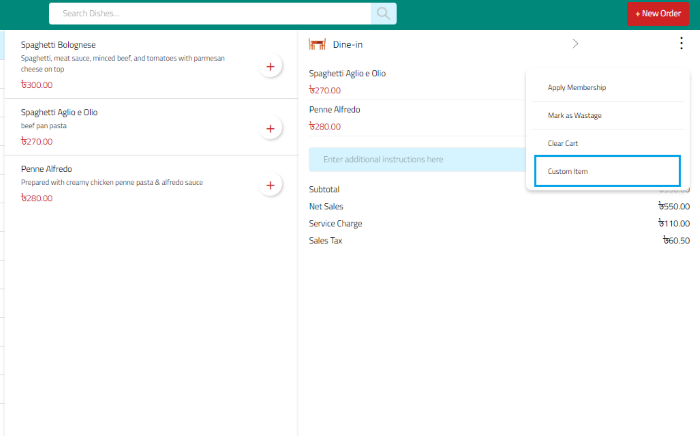
- Enter the item name, price and quantity.
- If there is sales tax or service charge for the item, toggle the
switches next to them and click Confirm.
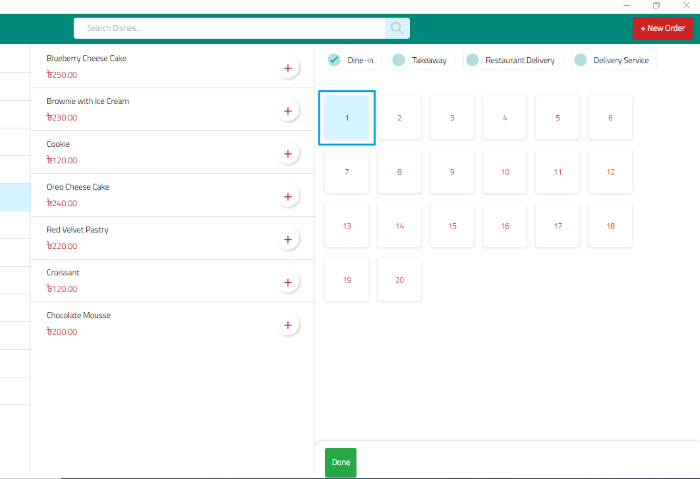
Assign table/token number
Admin
You can track your orders by assigning tables or tokens for them.
Learn how to change the order identification.
- From the cart, click > next to the service type (e.g. Dine-in) on the
top.

- You will see a layout with the tables or tokens you have set from the
business portal. Choose the tables/tokens, and click Done.
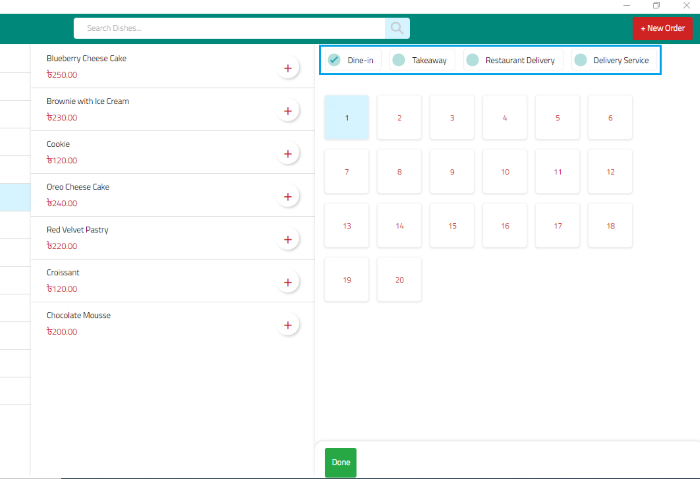
Assign service type (dine-in, takeaway, restaurant delivery, delivery service)
Admin
After adding dishes to the cart, you can assign the type of service (i.e. Dine-in, Takeaway, Restaurant Delivery, or Delivery Service) you are going to provide to your customer for an order.
Learn how to setup different services for your restaurant.
- From the cart, click > next to the service type (e.g. Dine-in) on the
top.
- Choose a service, and click Done.
Connect printer to the app
Admin
- Connect your printer with a USB cable to your laptop or desktop.
- Unzip the Driver_Install_Receipt_Label_GBEN.zip folder.
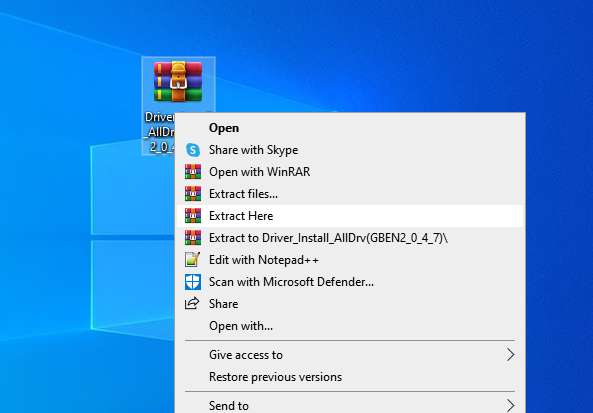
- Double click on the Driver_Install_Receipt_Label_GBEN.exe to start installing.
- Now choose your printer from the Driver Name list.
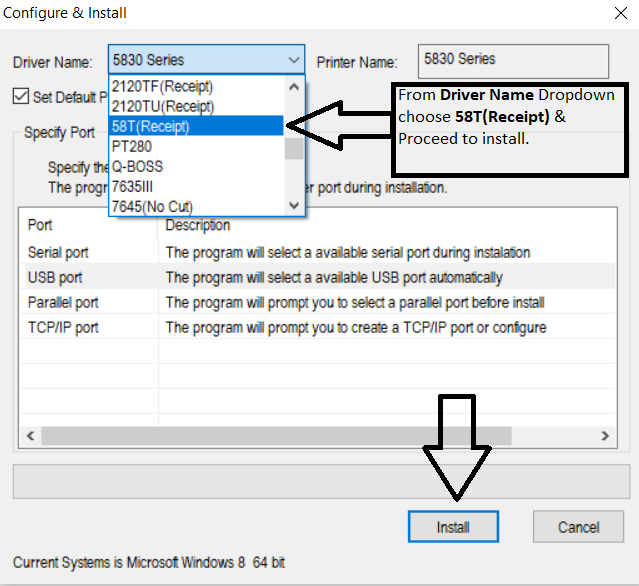
- Click on install and after installing click on Finish.
- Go to the Settings of Windows app and choose paper
type.
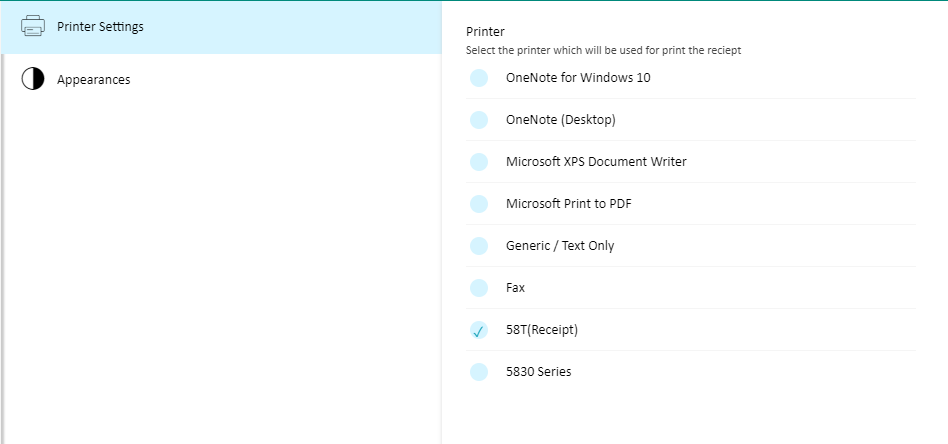
You have successfully connected your printer. Now you can print from the app.
Choose KOT font size, print KOT or send order to Kitchen Display App
Admin
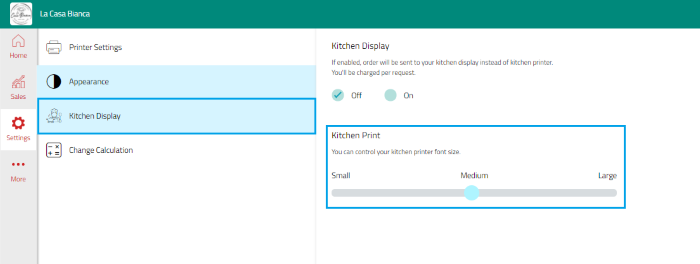
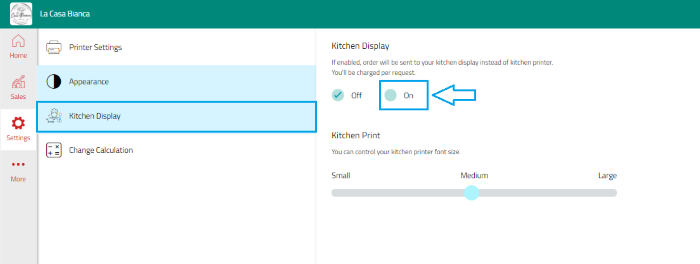
- Go to Settings > Kitchen Display
- From Kitchen Print, choose font size.
Learn how to set up a printer with the app.
Forward order details to the kitchen
Admin
You can print an order and send it to your kitchen from the cart.
You can also use the KDS App to send the orders
right in front of your kitchen staffs' eyes, no time wasted.
For that you must enable the Kitchen Display from the Settings menu.
Calculate changes with built-in calculator
Admin
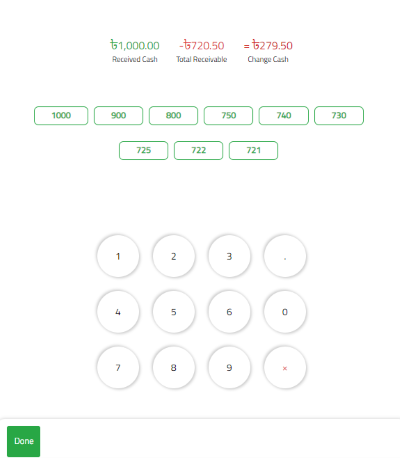
Quickly Windows App helps you to know the remaining to a customer after closing an order. For example, if the net payable is 16.25 and the customer gives you 20, the app calculates the change and shows that you have to give the customer 3.75 back.
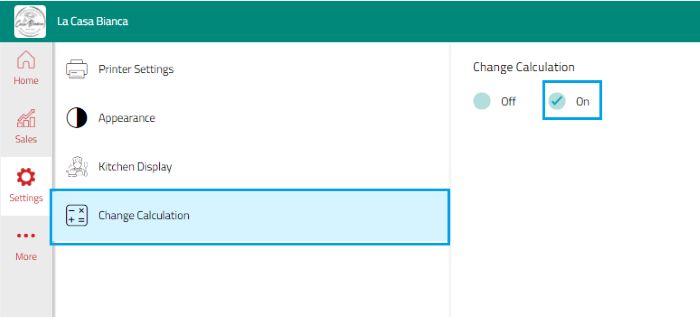
- Go to Settings
- Turn on Change Calculation
Now after closing an order, enter the amount you received, and you will see the Customer Change.
Take money through multiple payment methods (Split bills)
Admin
If the customer wants to use multiple payment modes,
- After closing the order, click Split.
- Enter the amounts for the preferred payment methods and click Close Order.
Collect and redeem reward points
Admin
To offer reward points to your customers, you must enable the Loyalty Program from the Business Portal.
To learn more about the Customer Loyalty Program, read how to give reward points to your loyal customers.
- After closing an order, enter the customer information (i.e. name and phone).
- If the customer has any available reward points, it will be displayed.
If you want to provide a discount to your customer, click Redeem.
Otherwise, click Proceed. In this case, the customer's new reward points for this order will be added, but no discount will be offered.
Apply membership over an order
Admin
You can provide discounts to a specific group of customers. Before applying
membership to an order, you need to create one first.
Learn
how to create a membership, read manage discounts for your customers.
- Click ⋮ from the top right corner of the cart.
- Choose Apply Membership
- Select a membership, and click Apply
Apply instant discount over an order
Admin
- Click ⋮ from the top right corner of the cart.
- Choose Apply Discount

- Enter the discount in amount or percentage, and click Apply
Discount
Track your food waste
Admin
Sometimes your dishes may go wasted for various reasons (e.g. customer returned the dish, the dish got burnt in the kitchen etc.). You can now mark those orders as wastage from the Windows App.
- Click ⋮ from the top right corner of the cart.
- Select Mark as Wastage
You will find the list of wasted foods on the Sales page.
View & print user-specific sales status
Admin
You can monitor your sales from the app. Click Sales from the left menu and view the previous orders placed by you from the app and filter them based on their service types (i.e. Dine-in, Takeaway, Restaurant Delivery and Delivery Service) and payment modes (i.e. cash, bkash, card etc.).
Get a detailed breakdown of your overall collection for today, along with
their payment methods and the number of orders placed through each service
(i.e. Dine-in, Takeaway, Restaurant Delivery and Delivery Service).
You will find item-wise sales that helps you to understand an item's demand
and how all items have been selling today.
From this page, you can also print the sales report and bills for specific
orders, as well as send them via email.
If you have not set up your printer with the app yet, Learn how to connect a printer to the app.
Print a note and share with your customer
Admin
You can print and share any information, such as a Wi-Fi password or a special message, with your customers.
- Click More from the top left menu
- Go to Print Note
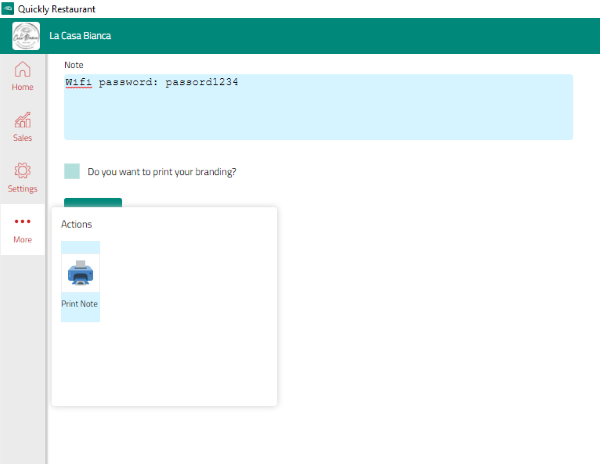
- Add your note, check from the preview and print via
your printer.
Learn how to connect a printer to the app.
Get feedback from your customer
Admin
Know your customers' feedback about your food, service, or ambiance to serve them a better experience.
You can receive feedback from your customers after generating a bill for an order or from the Previous Orders page.
- Click the feedback icon.
- To add feedback, select satisfied/neutral/unsatisfied and add text or
attach a photo (optional).

You can view all customer feedback from the Business Portal.
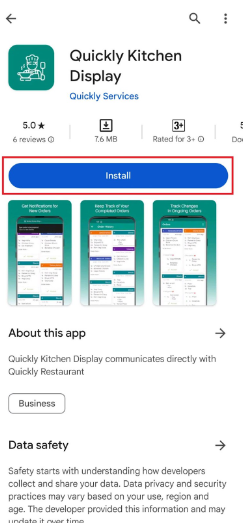
Use Kitchen Display System (KDS) App To Manage KOTs
Admin
You can simply download the Kitchen Display System (KDS) app from the Play Store and install it on your android phone or tablet to manage the orders in the kitchen of your restaurant.
Previous Tutorial
Get feedback from your customer
Next Tutorial
Configure your apps layout, font size and number of orders
Related Video Support
How to manage restaurant's KOT using Quickly Kitchen Display
In this video, we will see how you can easily organize the orders sent to your restaurant kitchen using Quickly Kitchen Display.
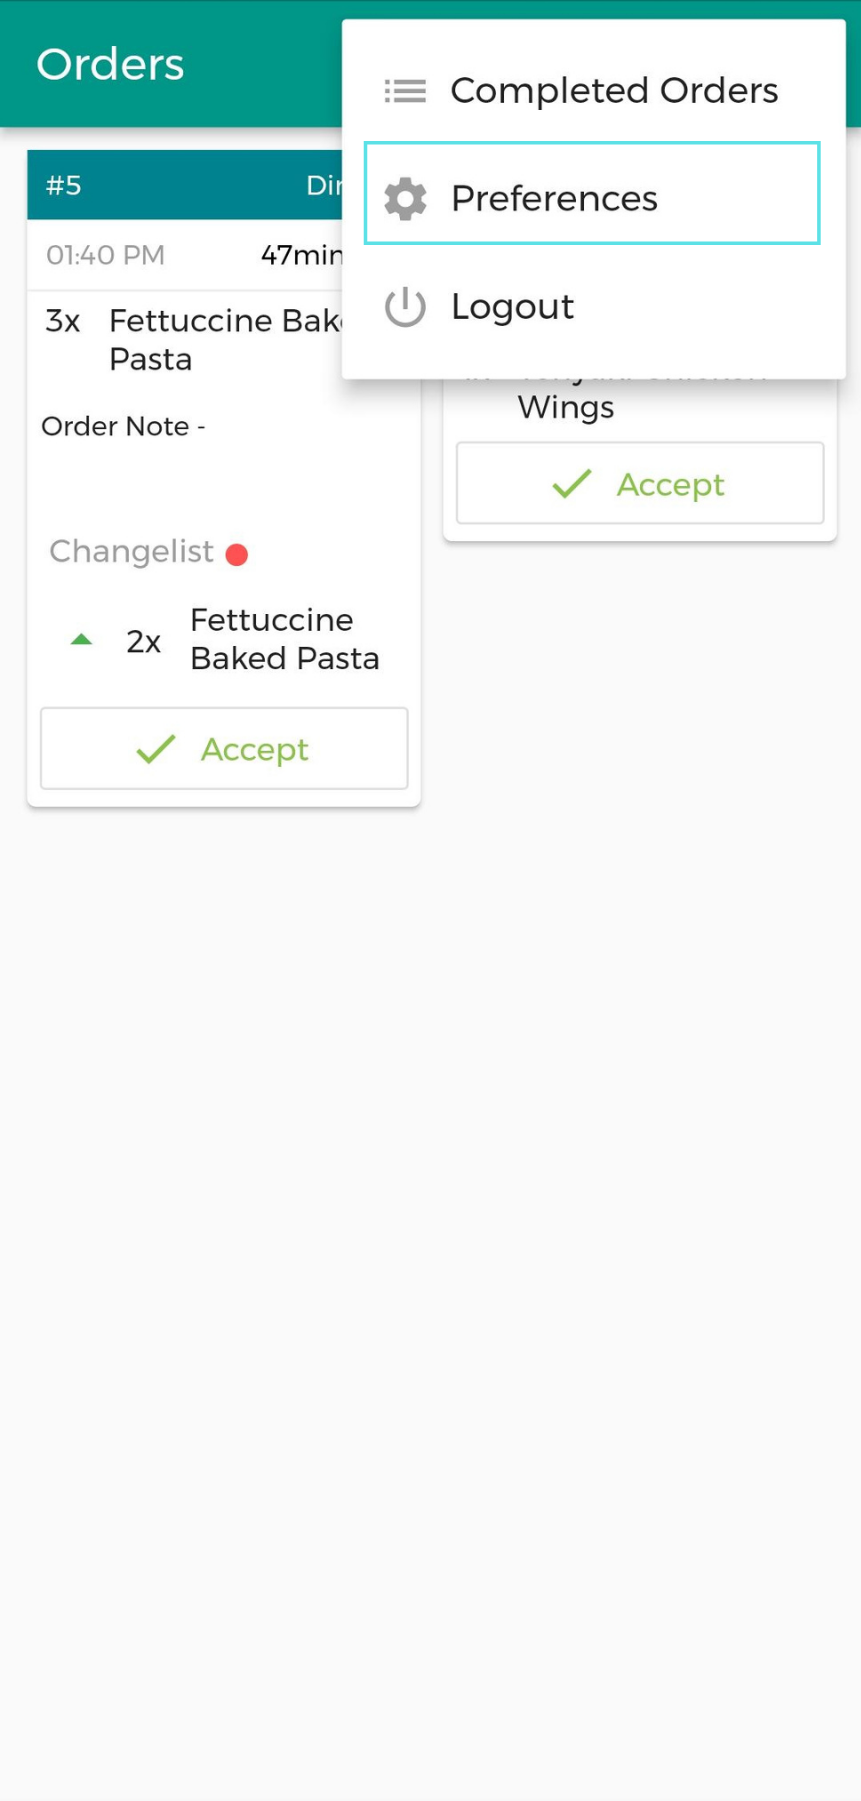
Configure your apps layout, font size and number of orders
Admin
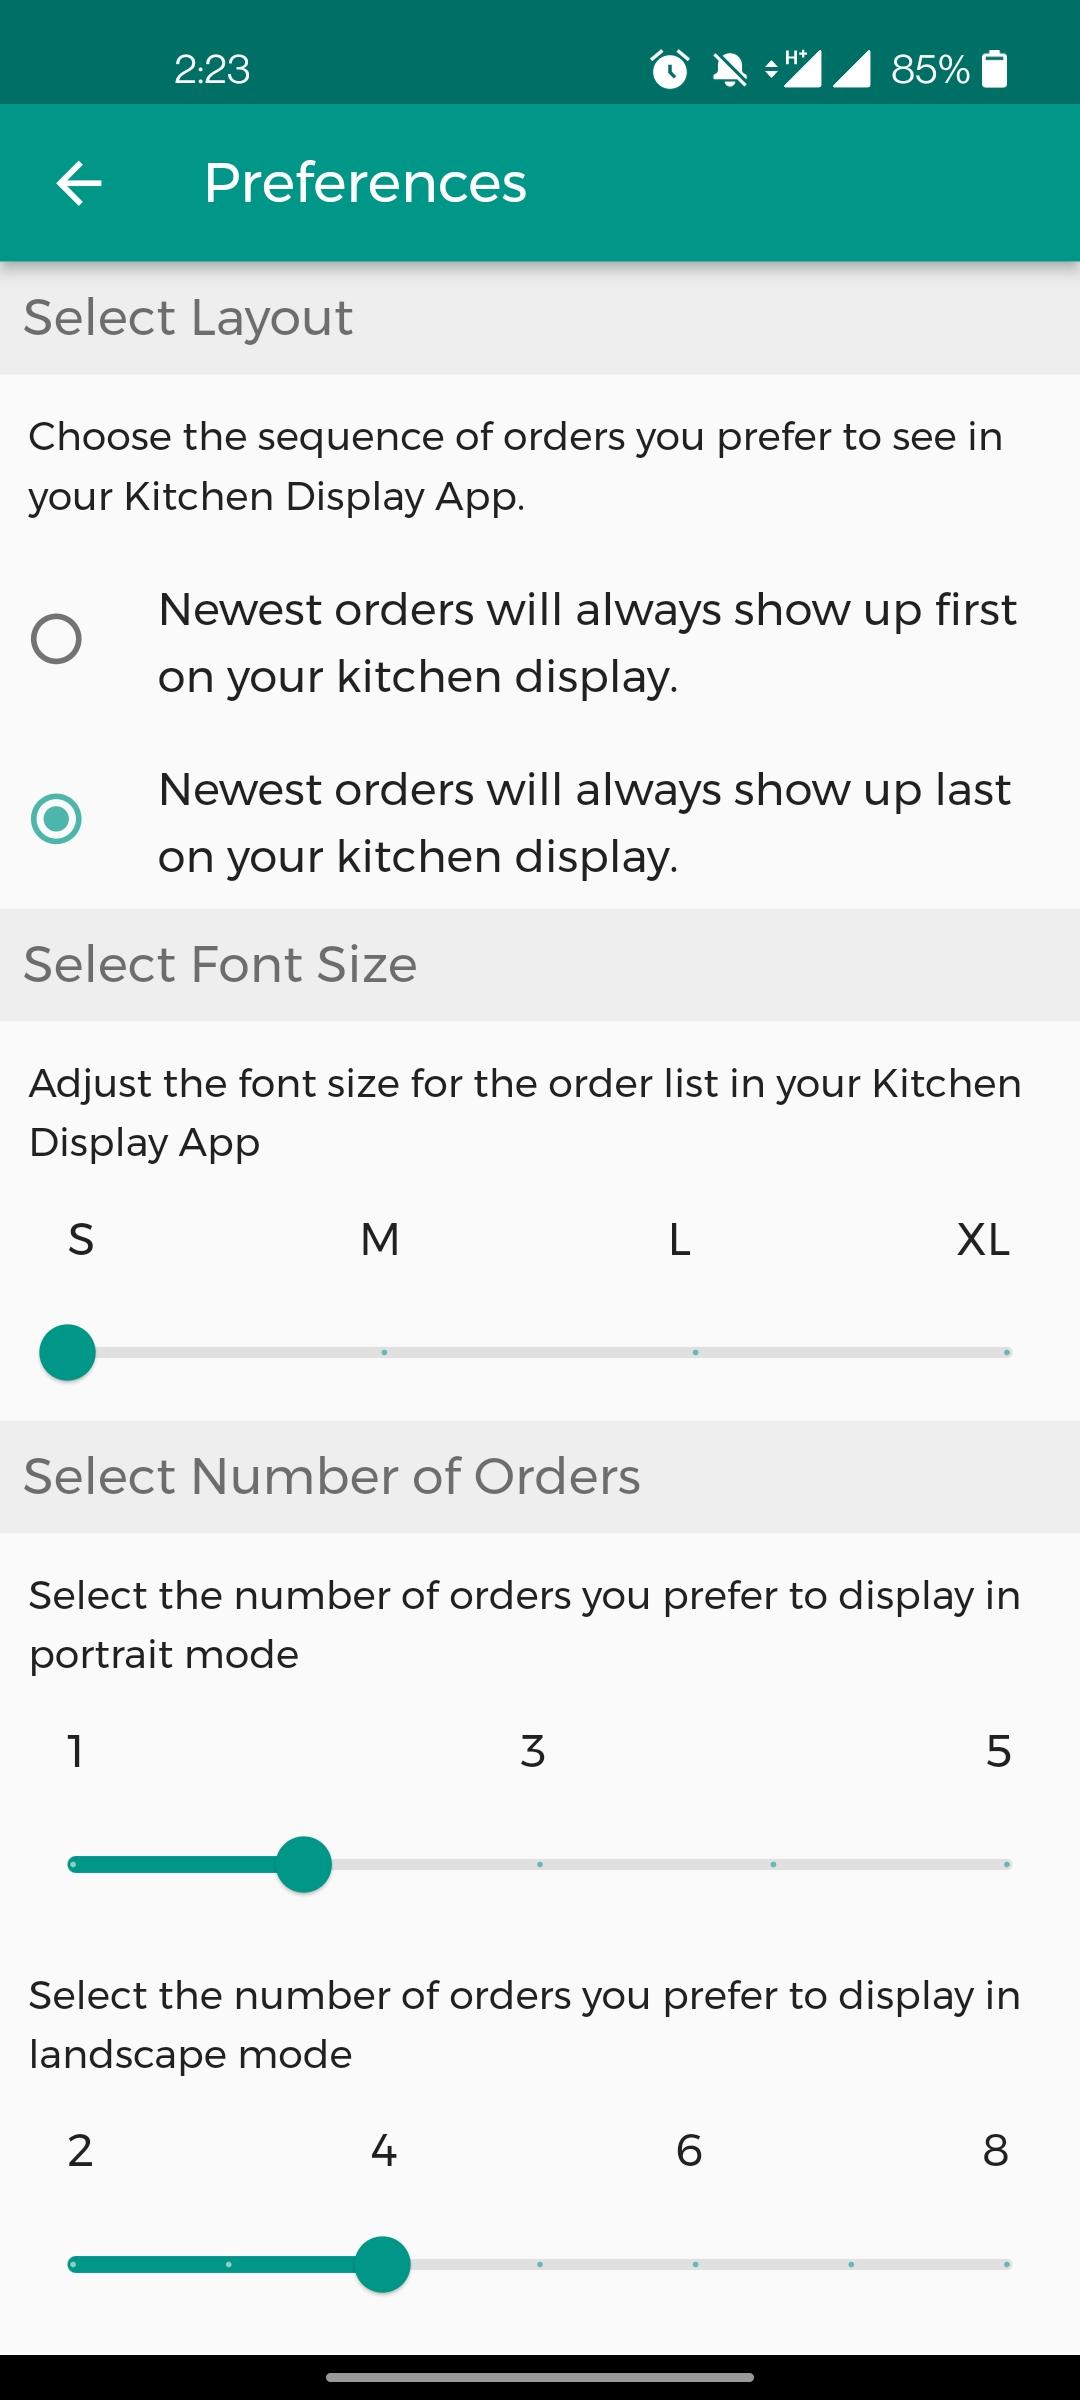
You can change the appearance of your KDS app to suit your needs.
Select the font size, the number of orders displayed in a single row,
and the order sequence you want to see at the top of the list.
Go to the menu at the right top corner (three dots) and tap Preferences.
Mark orders as accepted or done
Admin
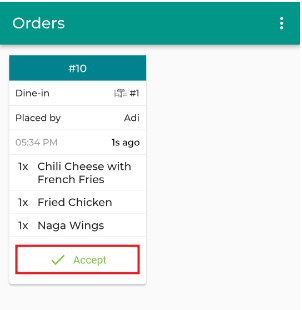
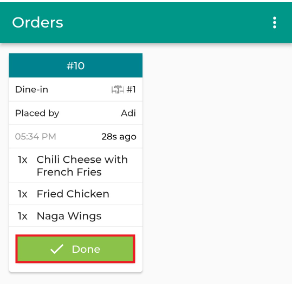
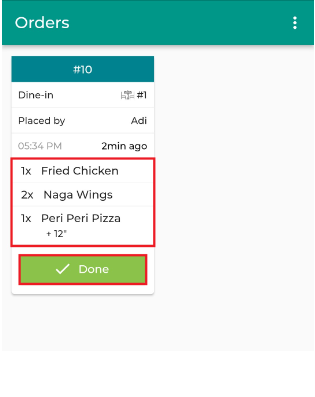
When an order comes to the KDS app, the first action you need to take is to accept the order. Simply click on the “Accept” button to confirm the order. After the food is prepared, the kitchen operator needs to inform the host/attendant that it is ready. Long press on the “Done” button to let the restaurant's staff know that the food for any specific order has been prepared and is ready to serve. A notification will be sent to the order taking app as, “Your dish is ready to be served” and the order will be gone from the Kitchen Display System. You can mark an individual item as well by selecting a particular item and long pressing “Done”.
Finally, the bill should be generated to close the order through the order placing app.
Previous Tutorial
Configure your apps layout, font size and number of orders
Next Tutorial
Check food status from Sales & Billing (order taking) app
Related Video Support
How to manage restaurant's KOT using Quickly Kitchen Display
In this video, we will see how you can easily organize the orders sent to your restaurant kitchen using Quickly Kitchen Display.
Check food status from Sales & Billing (order taking) app
Admin
You can see the food status from your order taking app’s ongoing order list.

View changes (Changelist) made after starting to prepare an order
Admin
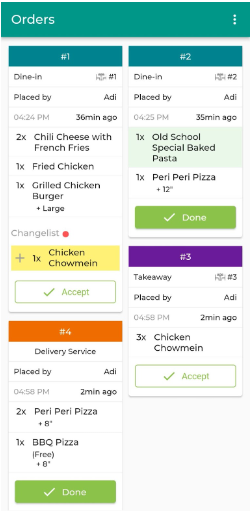
After placing an order, the customers may like to add new dishes, remove any dish from the cart, and increase or decrease the quantities of any dishes. To handle this type of scenario, KDS app is really very helpful and time saving without any hassle.
When the order details show up in the kitchen display system, the kitchen operator accepts the order and starts preparing the food.
If you tap on the Accept button, a Done button will appear at the bottom of the list.
After accepting any order and before tapping on the Done button, if new items are added to the cart or the quantities are increased or decreased for any dish, and forwarded the order to the KDS, then a Changelist will appear with the previously added items.
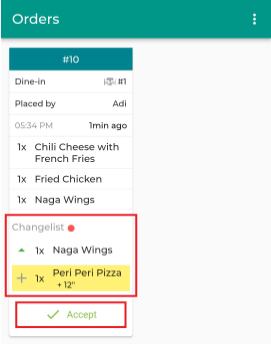
Tap on the Accept button and prepare food according to the updated list. After accepting the order a Done button will appear on the screen.
If the customer removes any dish from the cart, after sending that updated order to the kitchen through the order taking app, the order will be updated to the KDS too. The removed dish will be marked as removed under the Changelist.

After removing the dish, if you tap on the Accept button, the order will be updated with current list and a done button will appear.
Previous Tutorial
Check food status from Sales & Billing (order taking) app
Next Tutorial
View today’s completed orders
Related Video Support
How to manage restaurant's KOT using Quickly Kitchen Display
In this video, we will see how you can easily organize the orders sent to your restaurant kitchen using Quickly Kitchen Display.
View today’s completed orders
Admin
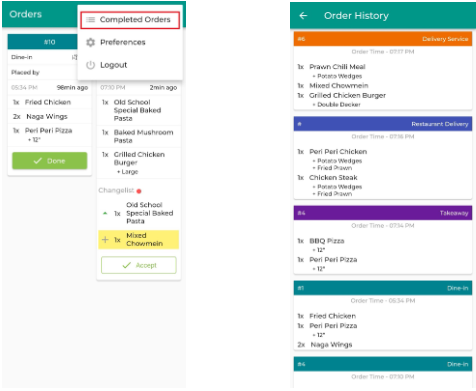
You can see the order history sent to the kitchen from the KDS app.
Go to the menu at the right top corner (three dots) and tap Completed Orders.
Previous Tutorial
View changes (Changelist) made after starting to prepare an order
Next Tutorial
Inventory
Related Video Support
How to manage restaurant's KOT using Quickly Kitchen Display
In this video, we will see how you can easily organize the orders sent to your restaurant kitchen using Quickly Kitchen Display.
Inventory
Admin
Most of the time, restaurants face two problems with their inventory management system- overstock & out of stock. So having a balanced stock item in the inventory is very important for a restaurant business.
Now let’s get started with the Inventory module to explore all the exciting features available.
How to get real time stock update
Admin
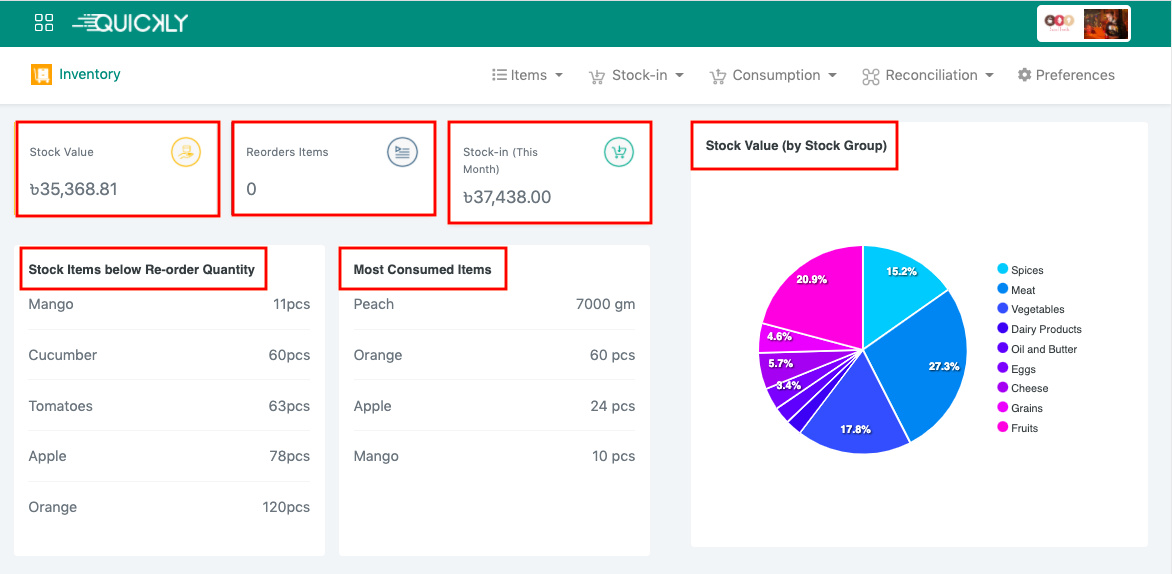
You can get the real time stock update at any time from the inventory dashboard. You will find the total stock value, stock-in value for the current month, and if there are any items which need to be reordered. You will get some very useful real time data about the stock items below the reorder quantity and most consumed items according to the orders placed on any date. There is a pie chart showing the stock value in percentage according to the stock group.
How to add new items to your stock?
Admin
In order to add new items to your stock, you need to create some categories first, so that the items could be organised well. For a restaurant, we need to stock so many things and here I’m giving you an example about how you can stock some grocery items in your inventory. Suppose, you want to stock some spices (turmeric powder, chilli powder, garam masala, and so on), all of which can be added in one category “Spices”. This is because, whenever you need to re-stock some specific items, you can easily find them searching by categories.
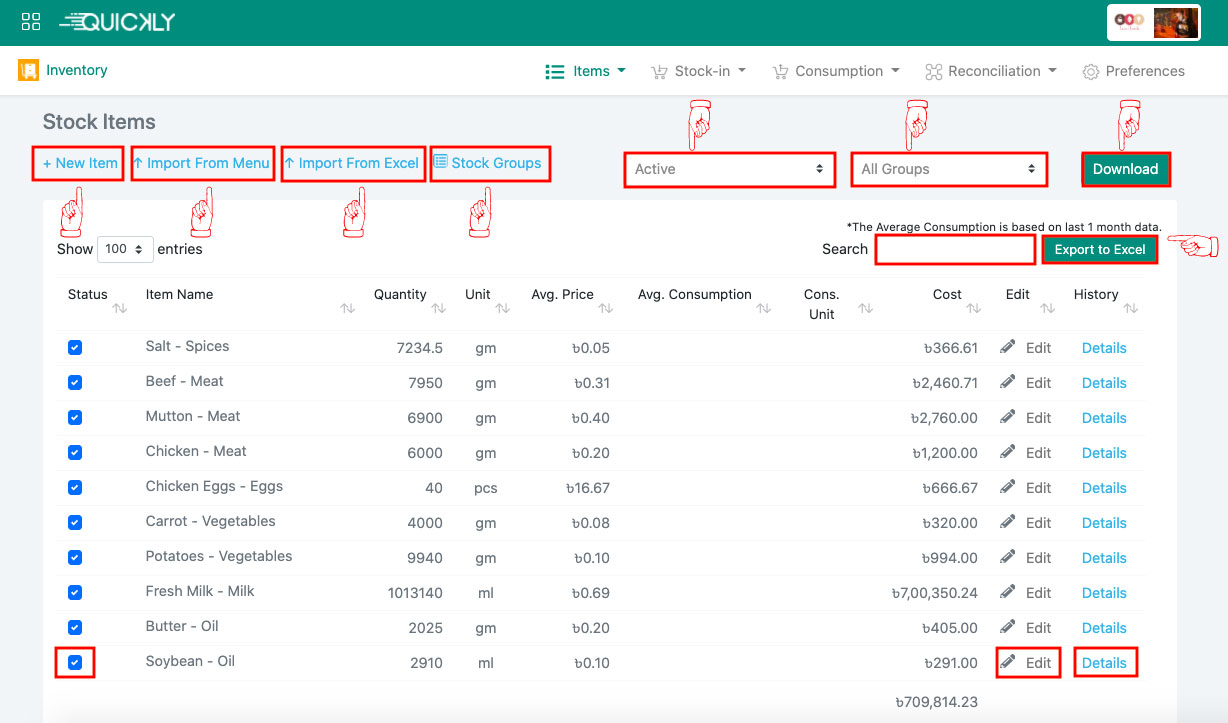
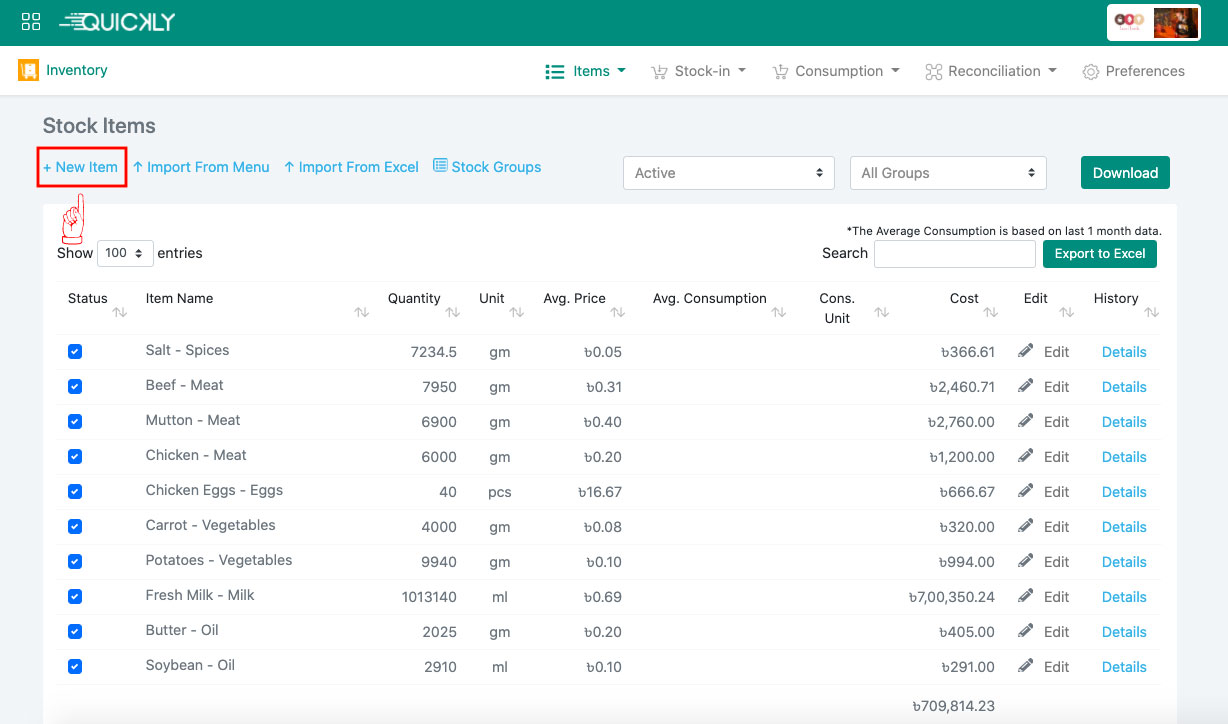
👉 Click on Stock Items from the Items dropdown list which will bring up a page containing all the items already created for different categories.
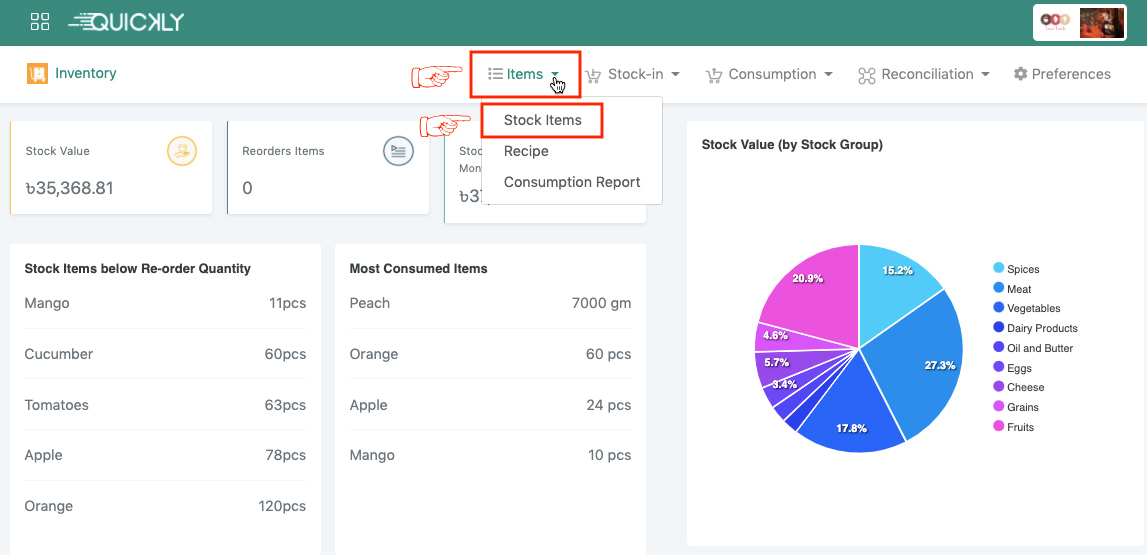
👉 The items written in red are not stocked yet or need to restock. Created items’ details can be viewed clicking on the Details button right next to that item and can be edited as well. If you don’t want any item to stock anymore, then uncheck the checkbox and it will be moved to the inactive mode. Stock items can be filtered by status (active/inactive) and stock groups. You can search the items by its name, quantity, unit, avg price, and so on. If you wish to keep your stock details in an excel sheet, simply click on the Export to Excel button. If you want to download the stock report, simply click on the download button from the right corner of the page.
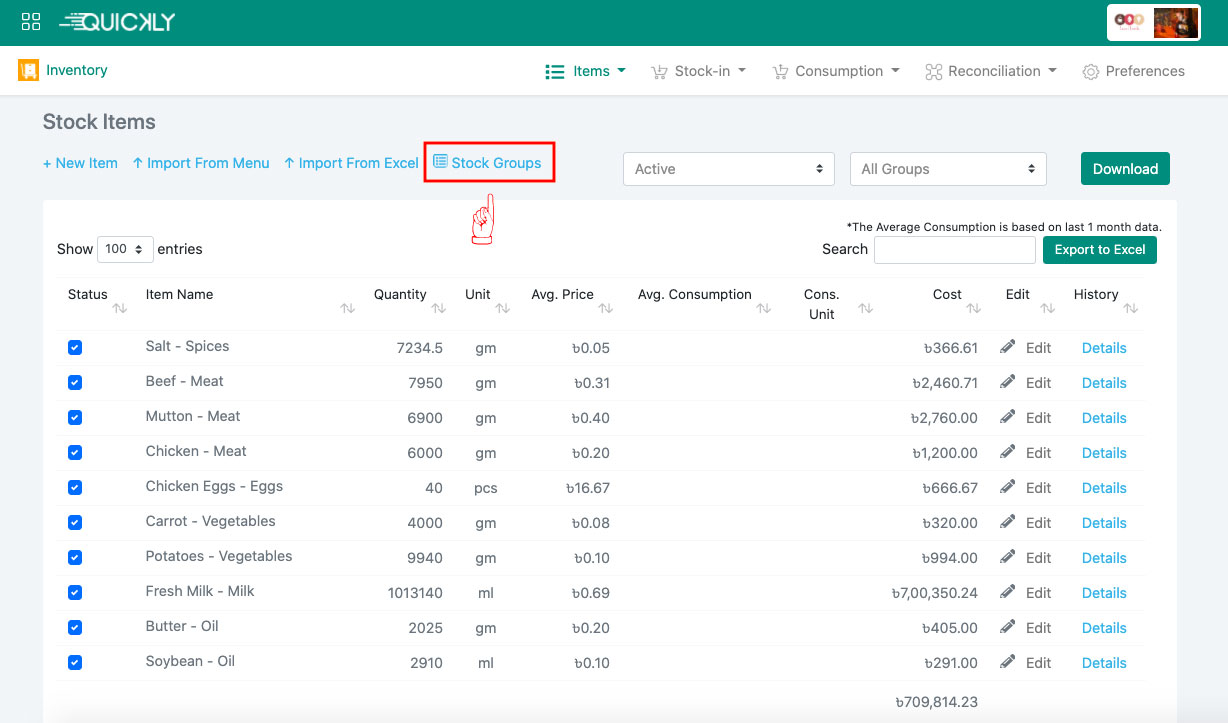
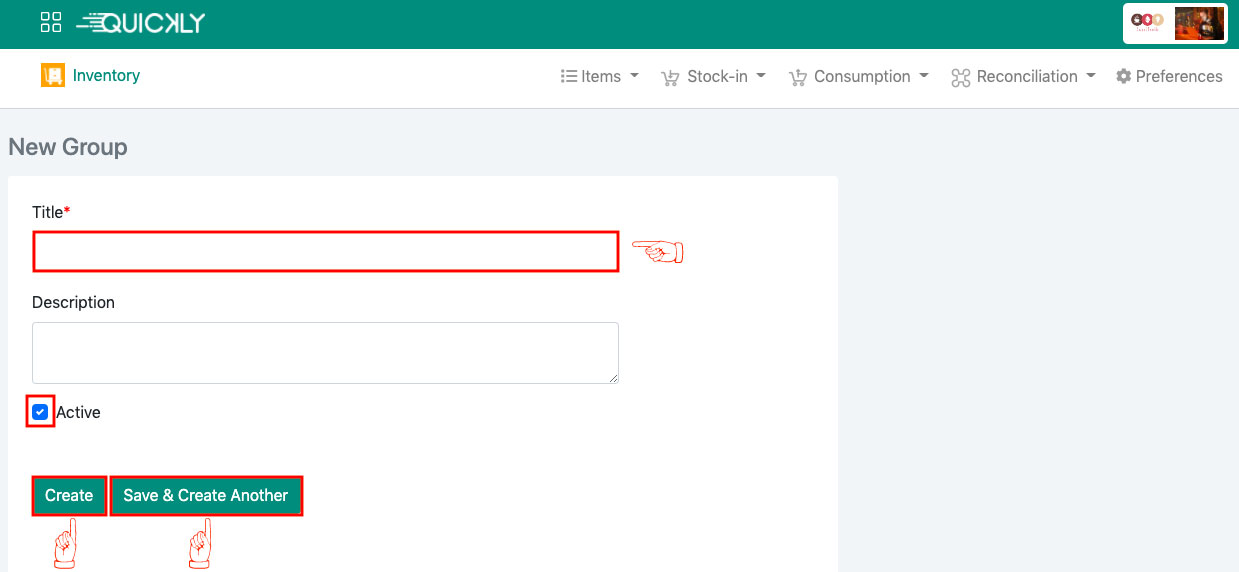
Now, let’s create a new category to stock items in your inventory. Click on Stock Groups from the stock items page which will bring up a page with a list of stock groups if you have created any.
Stock group details can be edited and if you don’t want any group to be active, then uncheck that stock group. Click on +New Group to create a new stock group.
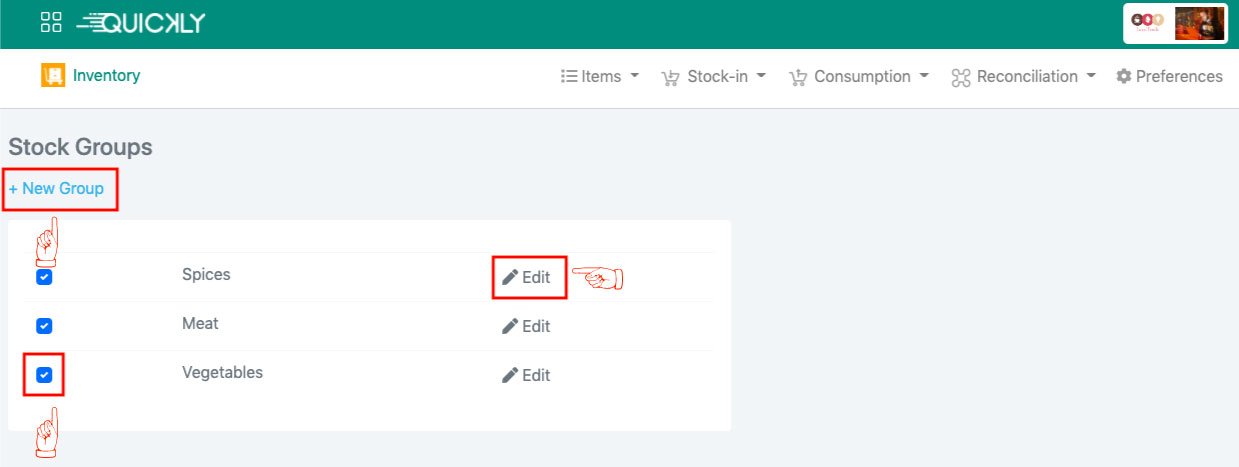
👉 Provide a meaningful group name and description, and make sure the active checkbox is ticked. Finally, click on the Create or Save and Create Another button.
👉 Now, as your stock group is created, let’s create some items for the group. Click on the +New Item button to create a new item for a group.
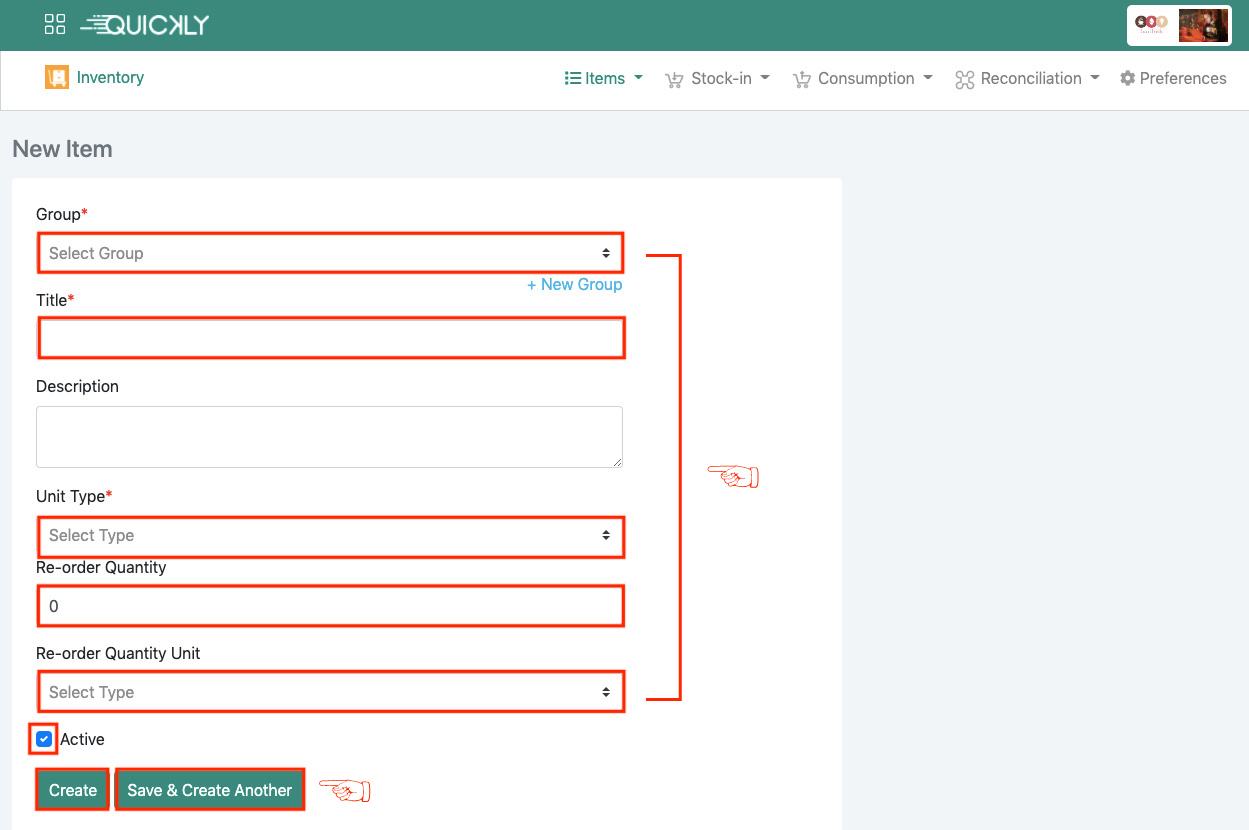
👉 To create an item, at first you need to select the group in which you want your item to be, then provide a name, select the unit type (quantity/weight/length/volume), check the active checkbox and click on the Create or Save and Create Another button. Set the reorder quantity if you want to get updated about your stock at any time.
How to set reorder stock value?
Admin
If you want to get updated about the quantity of any item at any time, then set the reorder quantity and unit to the item details. Click on the Edit button to edit any item from the stock items.
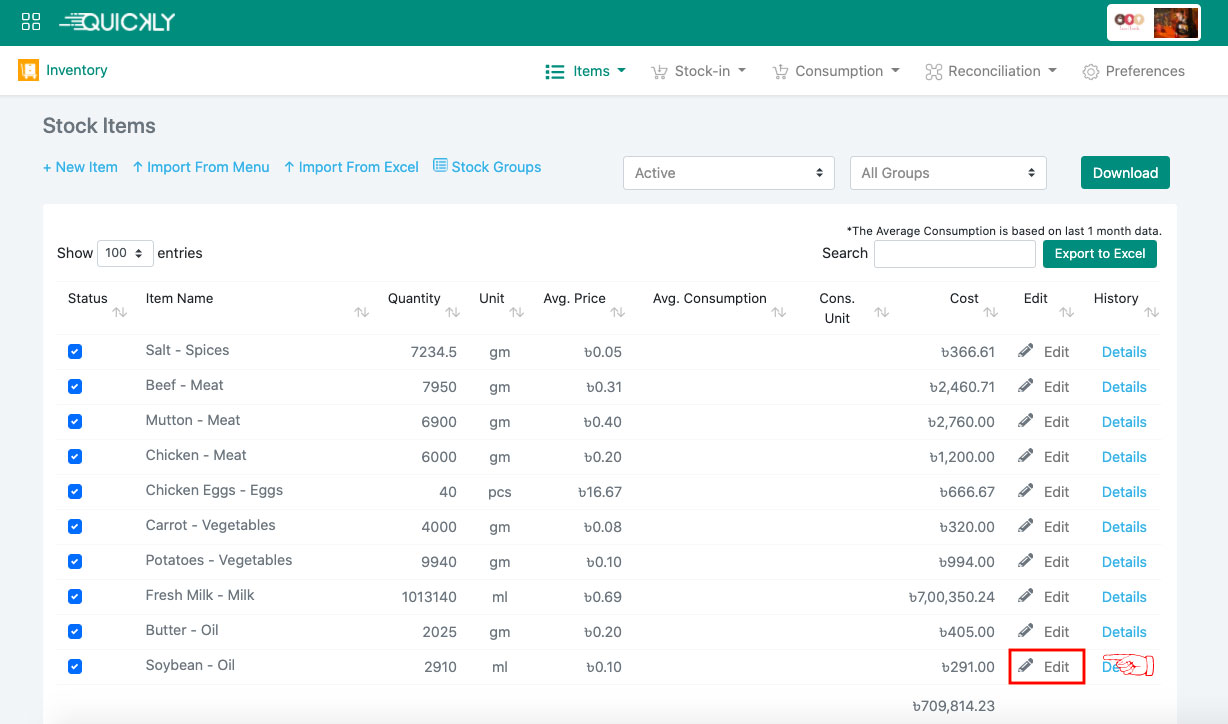
👉 Now set the reorder quantity and unit, click on the update button. However, you can set the reorder quantity while creating a new item for any stock group as well.
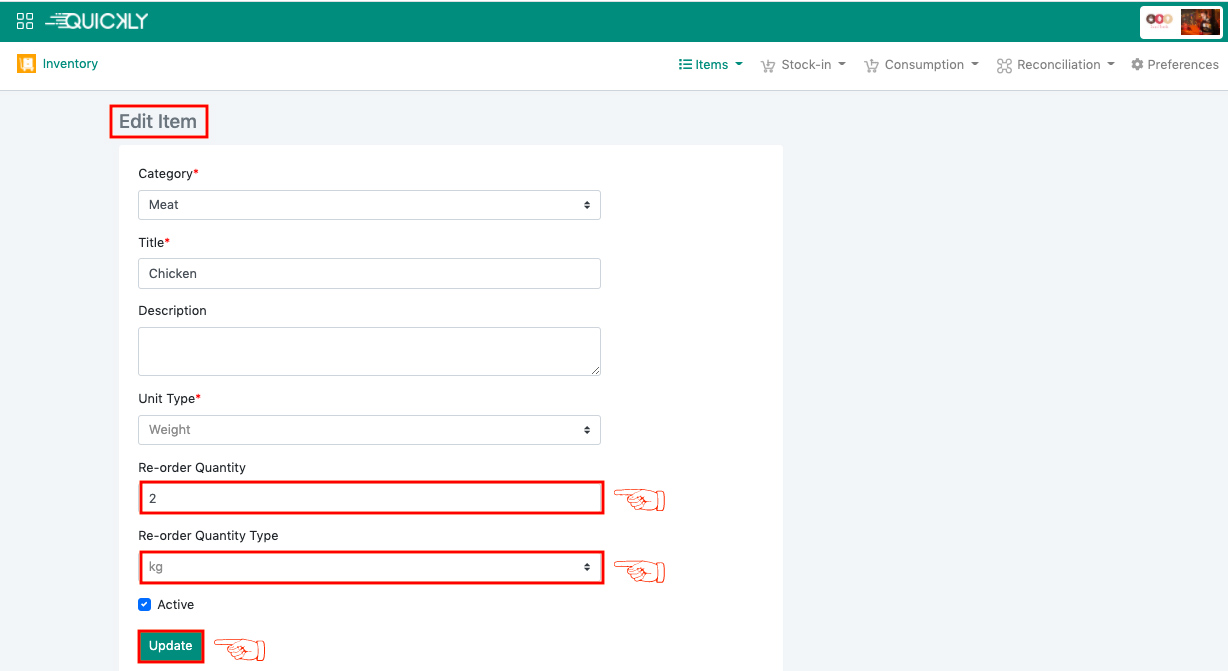
How to stock-in items to the inventory?
Admin
If you have already created some items for categories, then the next step is stocking in products to the inventory. Select New Stock-in from the Stock-in dropdown list.
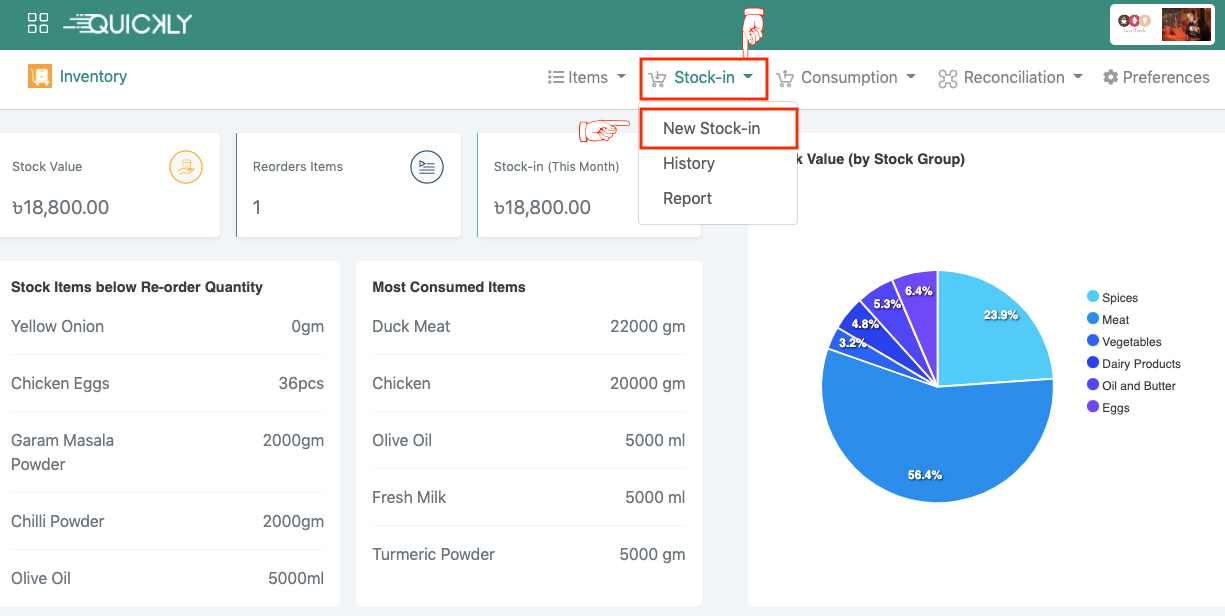
👉 Provide the reference number/name, supplier name, select stock-in type (initial stock/manufacturer/purchase/others), and date of stocking-in. Now from the Item search section, select the group you want to stock-in for, or you can directly type the item name in the item search box.
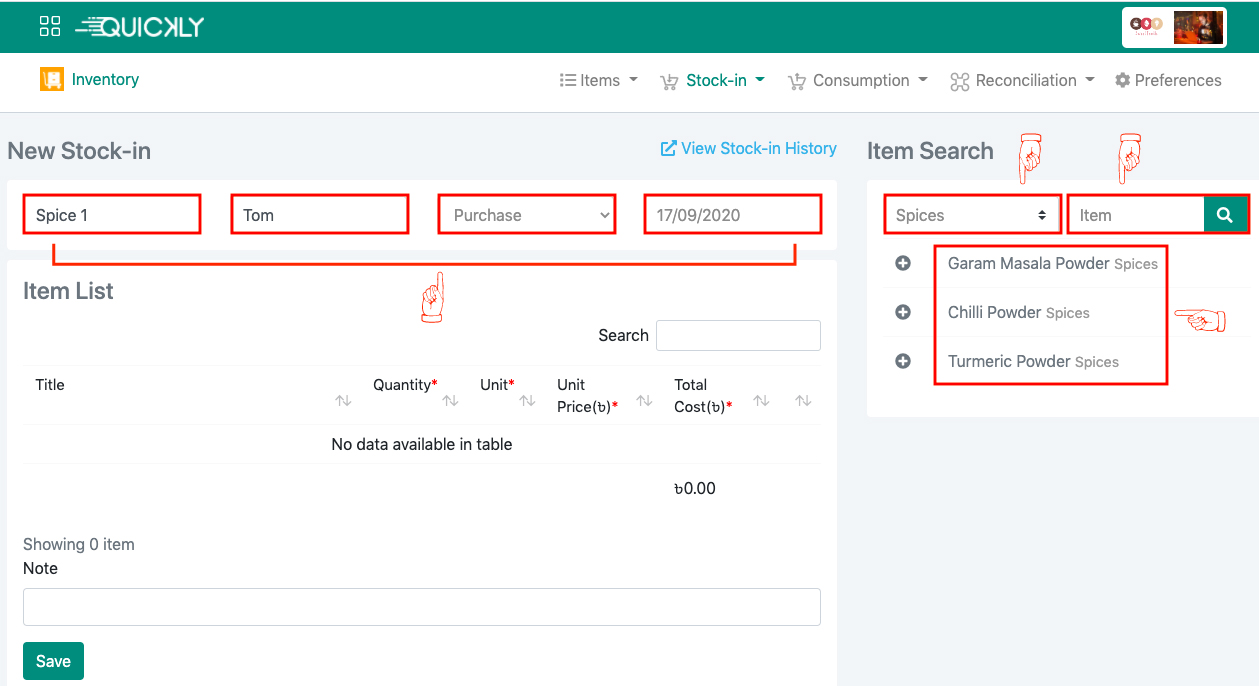
👉 Click on the Add button (+) for each item you want to stock-in and it will be added to the Item List. Now set the quantity, unit, and unit price for each added item and the total cost will be auto-calculated by the system. Finally, click on the Save button to complete the stock-in process.
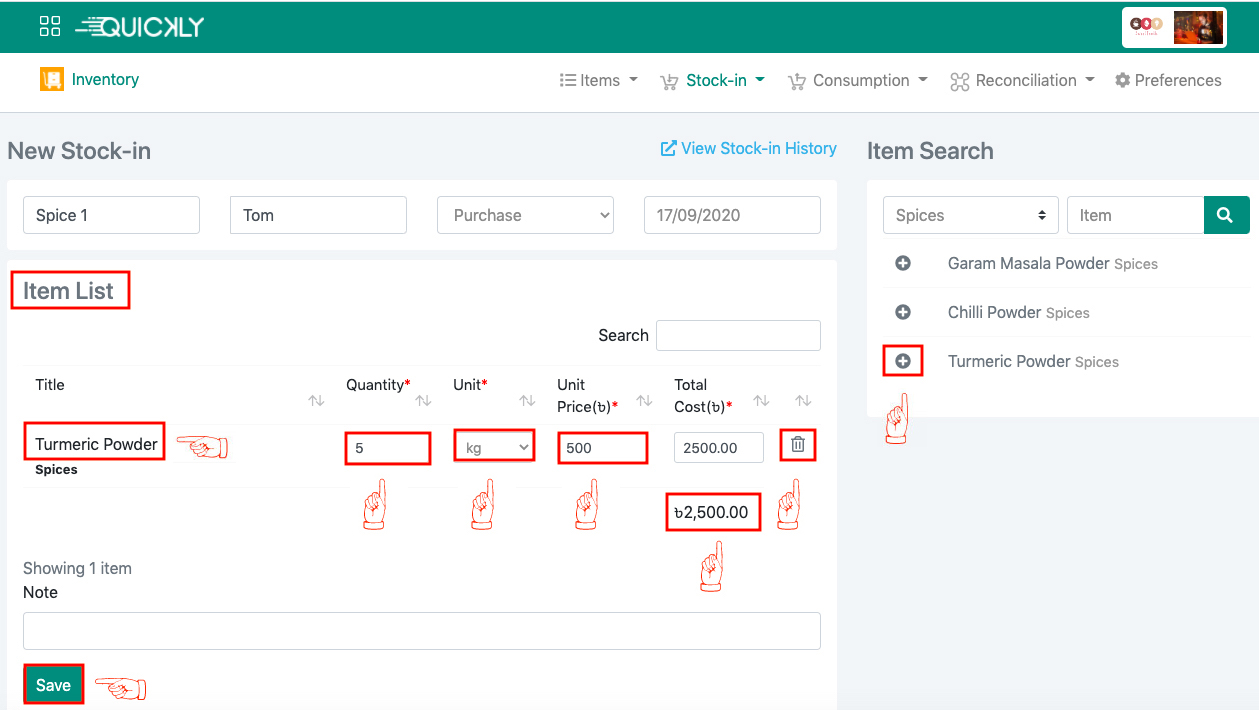
How does the preparation cost auto calculation for any dish work?
Admin
If you have subscribed to both the Sales & Billing and Inventory modules, then you don’t need to provide the preparation cost manually each time and you can leave the calculation of preparation cost for any dish on the Quickly Service. You need to create a recipe for the dish using our Inventory module and select the “Calculate preparation cost based on a recipe” option from the dish page of our Sales & Billing module. Update the reference and get benefited by the exact calculation of preparation cost when placing order.
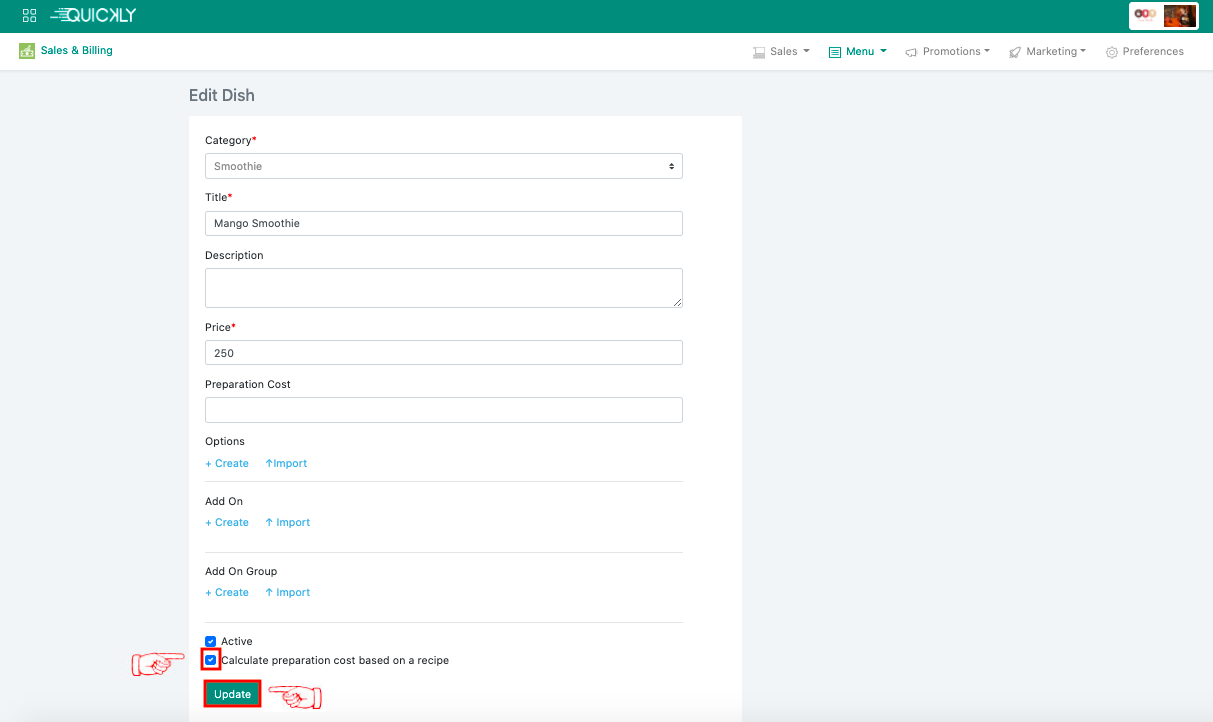
How to create Recipes?
Admin
Adding the list of items used to prepare a dish is really important because whenever you will sell a dish, the items with the used amount you listed down in the recipe of the dish will be automatically cut down from your stock items. Hence, you will be able to keep track of your stock in inventory.
👉 To set up the recipe, you need to click on the Item tab and then on Recipe.
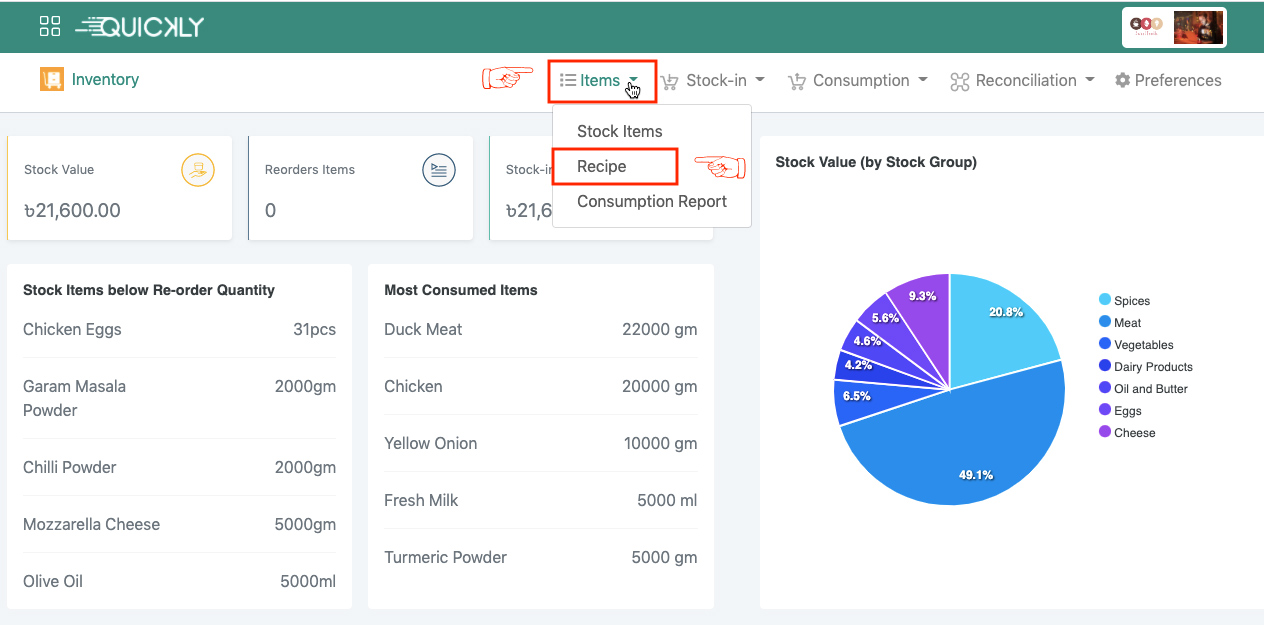
👉 You will find all your dishes with a Recipe icon at the right side of each item. Click on the +Recipe button to add a new recipe for any dish.
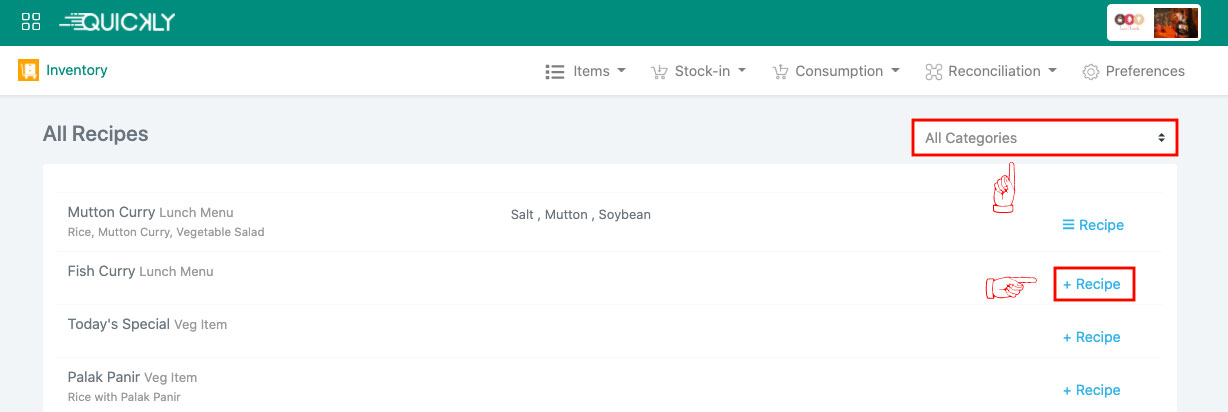
👉 Now click on the “+Add item” button to write down the name of the items needed to prepare the dish along with their quantity and unit. Then click on the create button and your recipe for the dish will be ready. You can import recipes as well from other existing recipes by simply clicking on +Import Recipe.
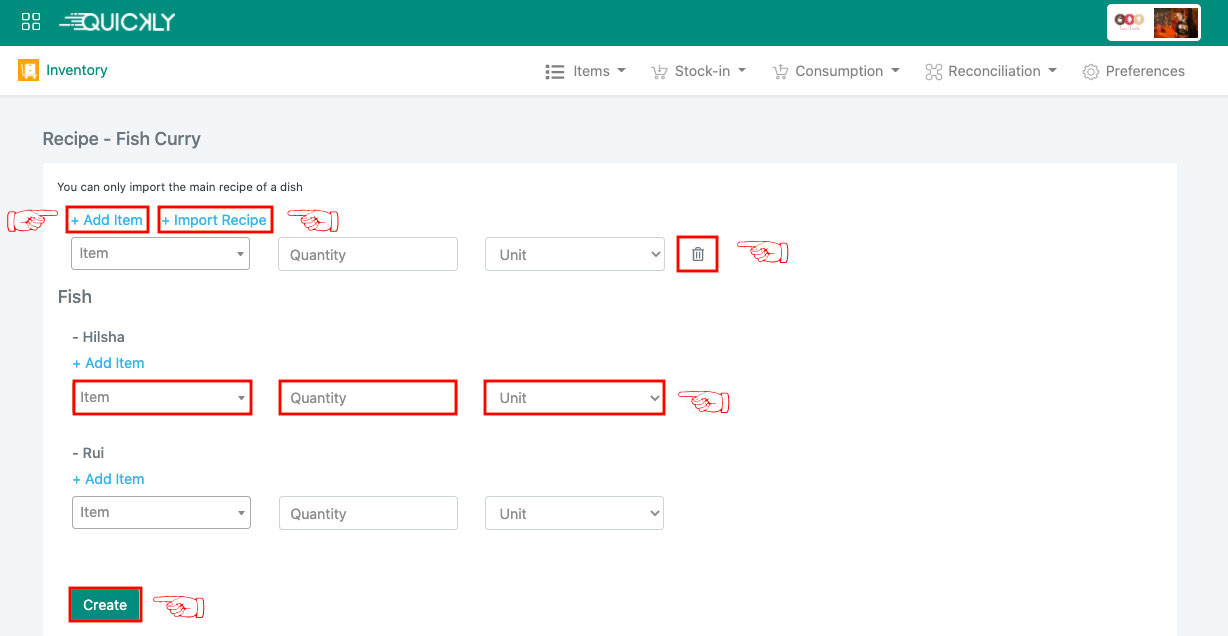
👉 You need to select a dish and then click on the Import button to import it’s recipe and all the items will be added to the current dish.
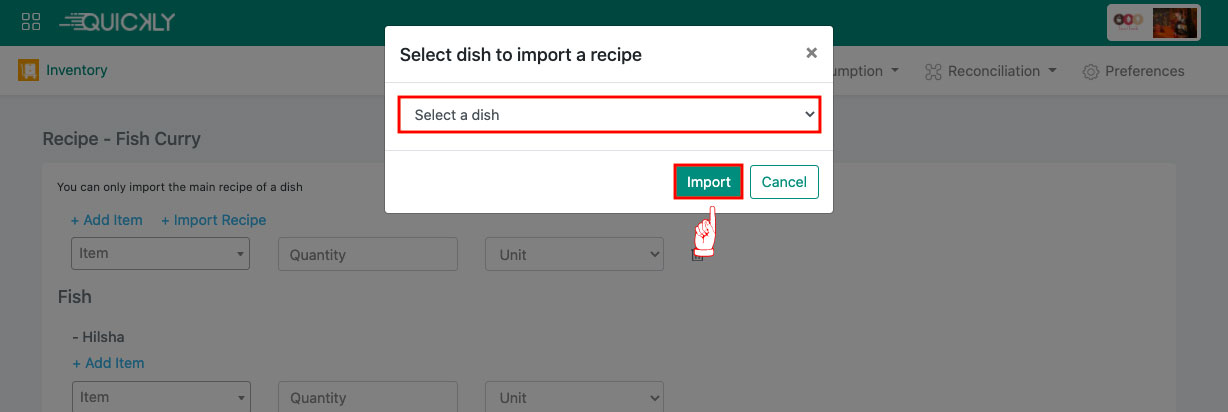
How to monitor stock transactions?
Admin
In order to know your stock transactions, simply select Stock Items from the Items dropdown list.
In the Stock Items page, all the items created and stocked-in will be showing up. Click on the Details button from the rightmost column for any item which will bring up a page to see the stock transaction history for that specific item.
You can check all the stock-in and stock-out transactions for any item and finally the current quantity of the item in your inventory is updated as well.
How to know the total stock-in value for any date?
Admin
You can track the total stock-in value based on the reference number in your inventory from the stock-in history page. Simply select History from the stock-in dropdown list.
You can check the stock-in details against any reference number from this page and the date picker will help you to find the stocked-in items at any specific duration of time. There is a search box to filter the item by it’s reference number, date, supplier name, type, amount, and note. There is a date picker available to make your stock-up filter easier than ever, you can filter your stocking up by any date or any duration of time.
For example, if you click on the reference number called “Bashmati Rice”, it will bring up a page where you will find the stock-in details for that specific reference number. The item stocked-in with quantity, unit, unit price, and cost will be showing as well.

You can track the item wise total stock-in value at any date in your inventory from the Stock-in Report page. Select Report from the stock-in dropdown list.
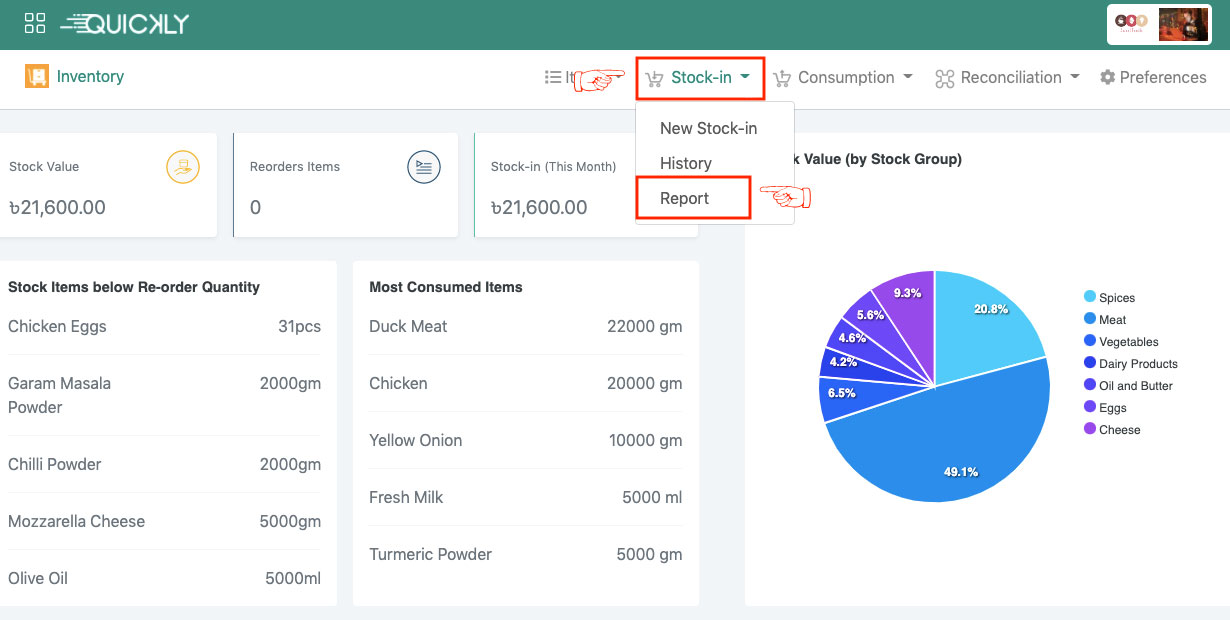
You can filter the stock-in items by suppliers and stock-in groups; pick a date and search by the item name, quantity, unit, unit price, and total cost. Download the stock-in report if needed.
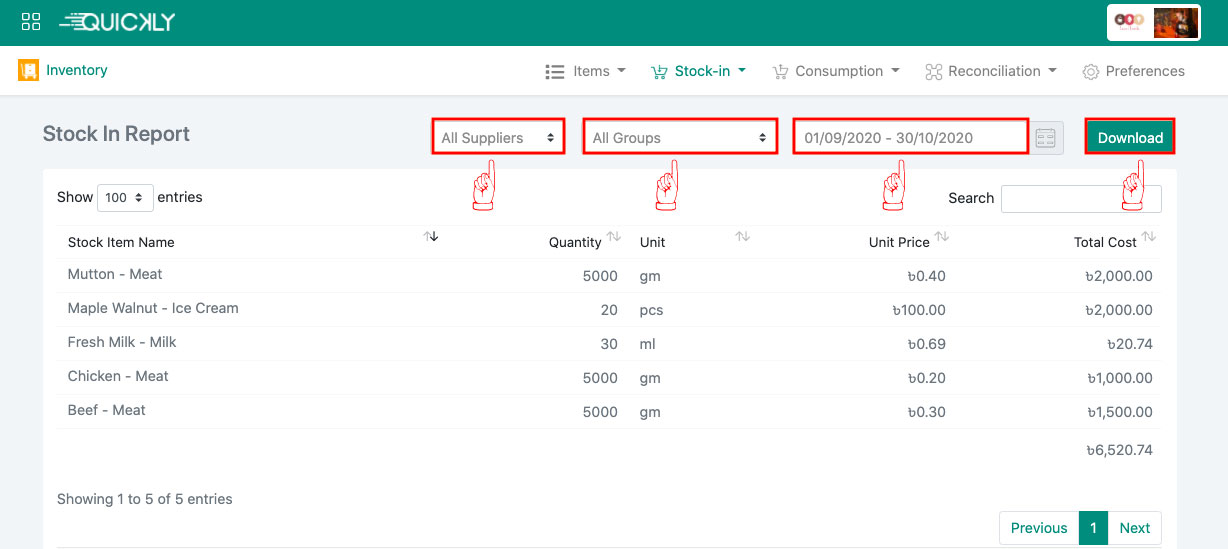
How to track the consumption?
Admin
👉 You can simply monitor the consumption details for your inventory items by selecting the consumption report from the Items dropdown list.
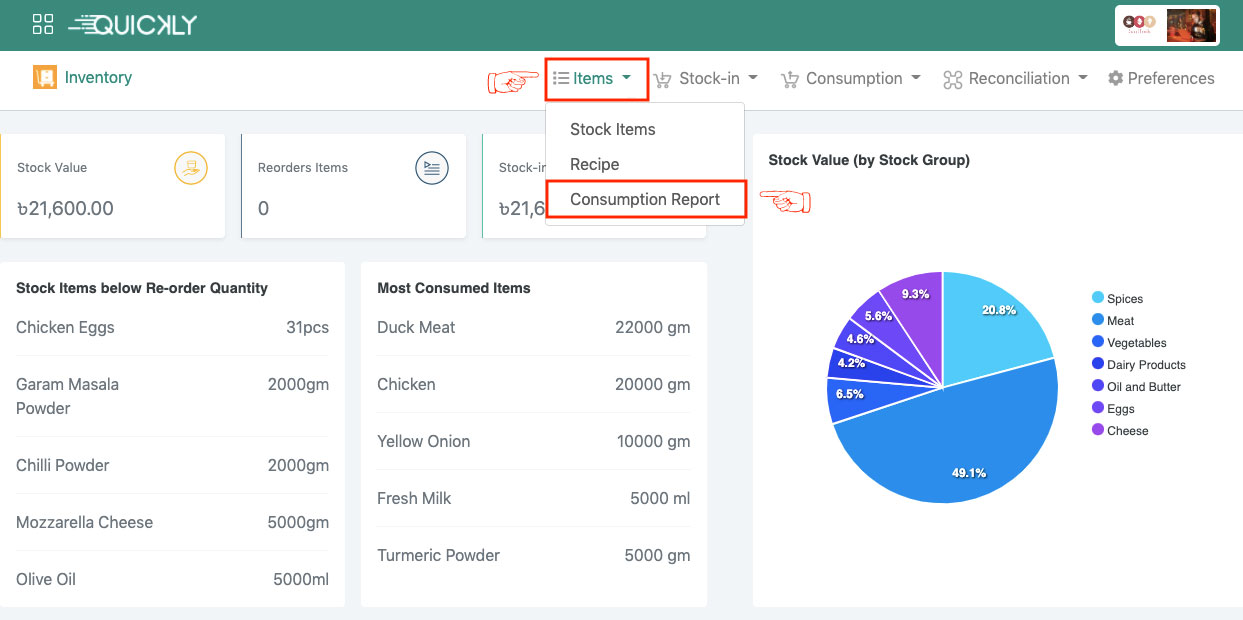
On this page, you can see two types of consumption report- manually stocked-out items and auto-generated stocked-out items from the recipes. You can filter the stock-out details of items by different stock groups and there is a date picker available to see the consumption details at any specific date or may be any duration of time. You can search any item by the item name, quantity or unit as well.
👉 You will also get the details of all the reconciled items which are damaged/theft/lost etc. from your inventory by simply clicking on the checkbox of Include Reconciled Data. Download the stock consumption report by clicking on the Download button.
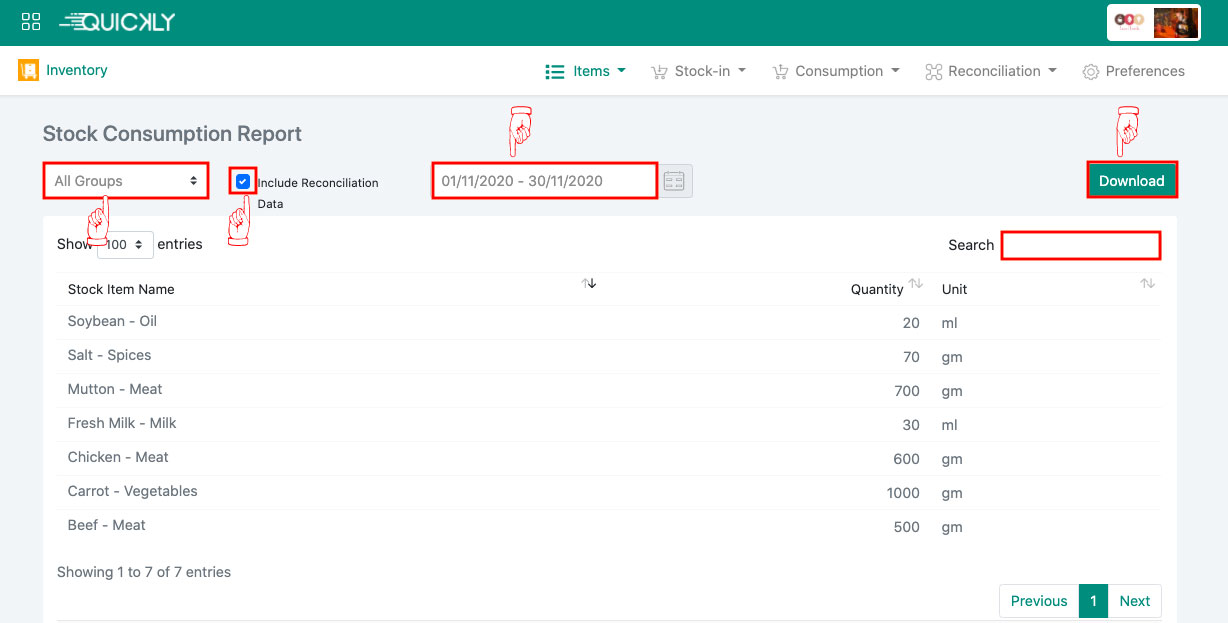
Handle stocking out items manually, where needed
Admin
If you want to manually stock-out your consumed items then select New Consumption from the Consumption dropdown list.
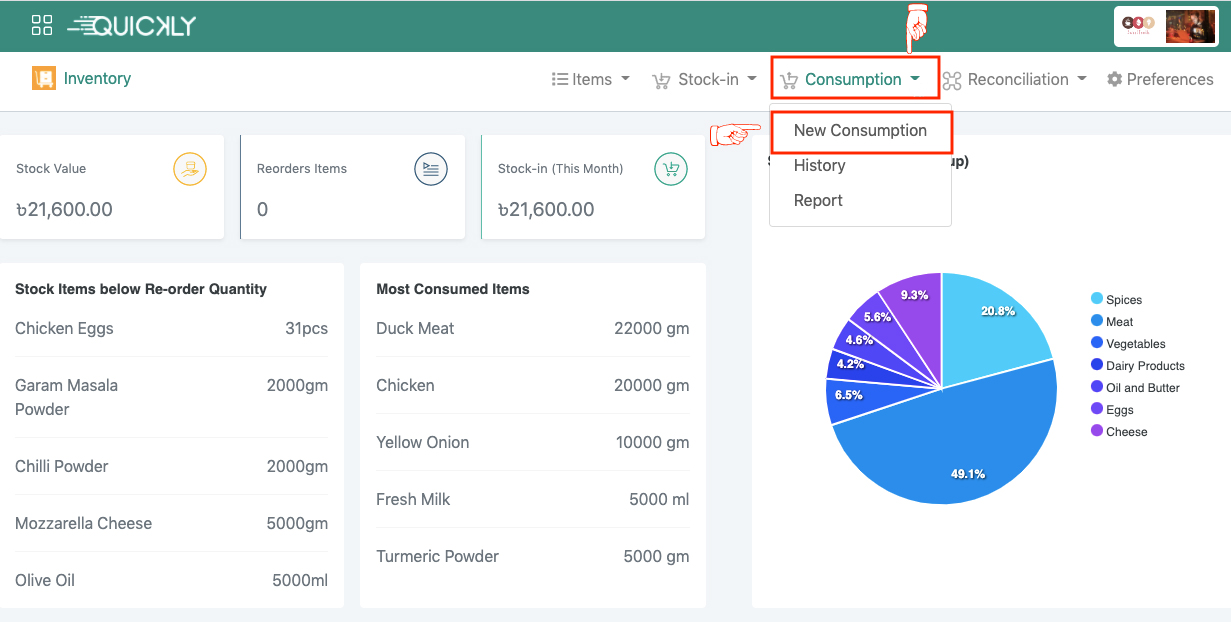
👉 In the New Consumption page, write down a Ref. no., you can write any code or number in this section which will help you to find the item in the stock-out history page. These items will be added as consumed. Also, select the date when you are adding the item(s).
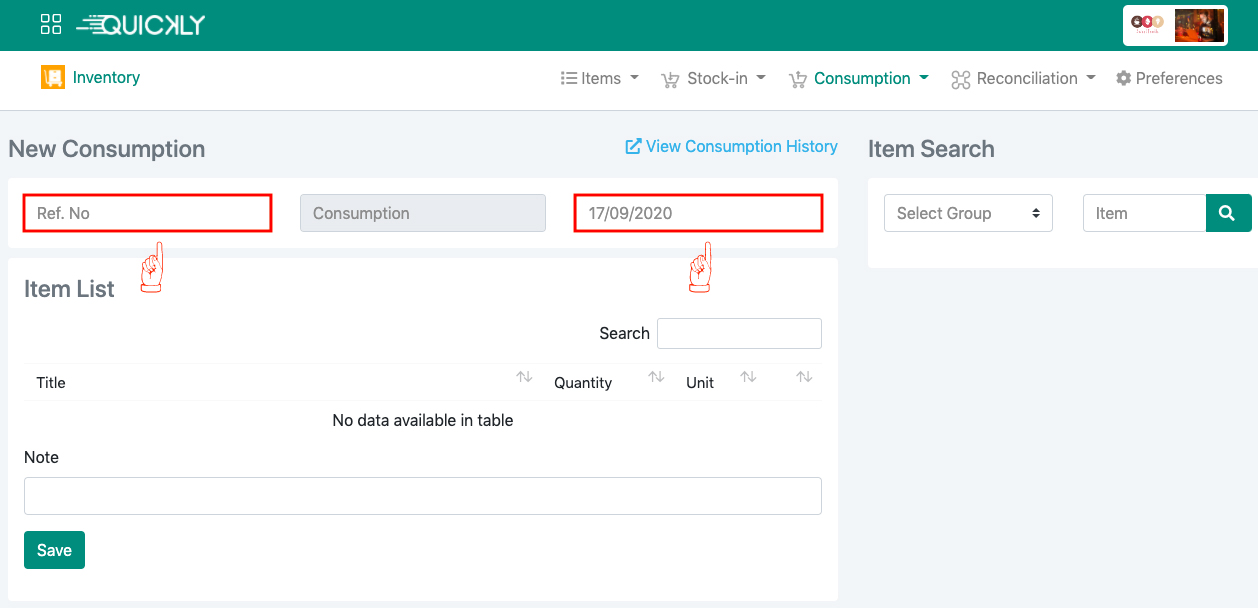
👉 On the right side of the page, there is a section called Item Search. You can select a group (ex: Oil and Butter) from the dropdown which will bring up all the items (ex: Olive Oil) from that group.You can directly search the items by name in the search box.
Now click on the add (+) button to add the item to the item list. Then write down the quantity as much as you need to stock-out selecting the unit. You can also write a note if you want to. At last, click on the save button to finish this step.
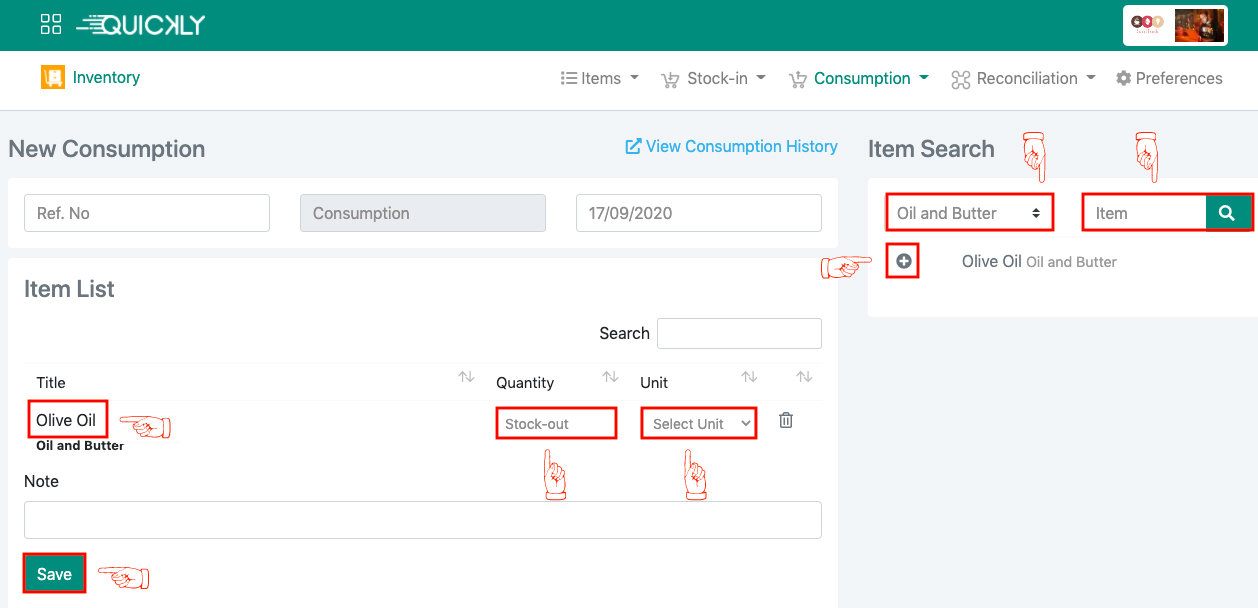
How to adjust damaged or refundable items to the inventory?
Admin
While running your restaurant business, some of the items might get damaged, some of the items get lost or wasted or some of them might get stolen! As you are not generating revenue out of these items, you can add them to stock reconciliation.
👉 Select New Reconciliation from the Reconciliation dropdown list which will bring up a form to save your entry for damaged or refundable items.
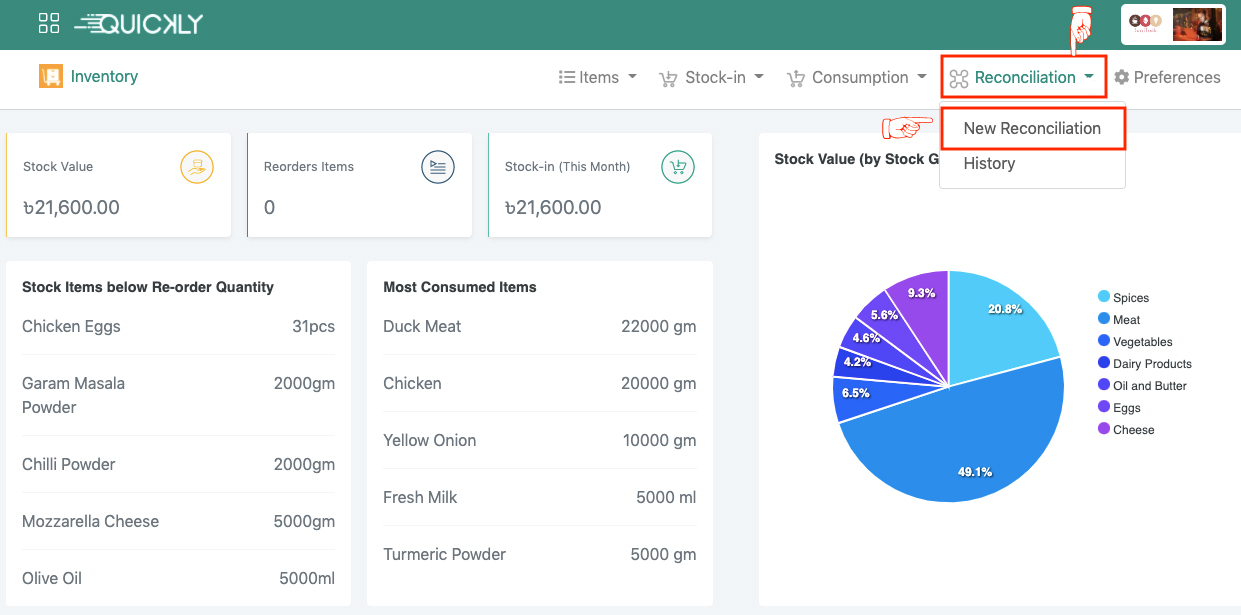
👉 In the stock reconciliation page, write down a reference number (ex: broken egg). You can write any code or number in this section which will help you to find the item in the stock reconciliation page. After that, you need to choose a stock-in type (damage/theft/lost, or others, or return) from the options given in the dropdown menu. Also, select the date when you are adding the item(s) in stock reconciliation.
On the right side of the page, there is a section called item search. You can select a group (ex: eggs) from the dropdown which will bring up all the items (ex: chicken eggs) from that group.You can directly search the items by name in the search box.
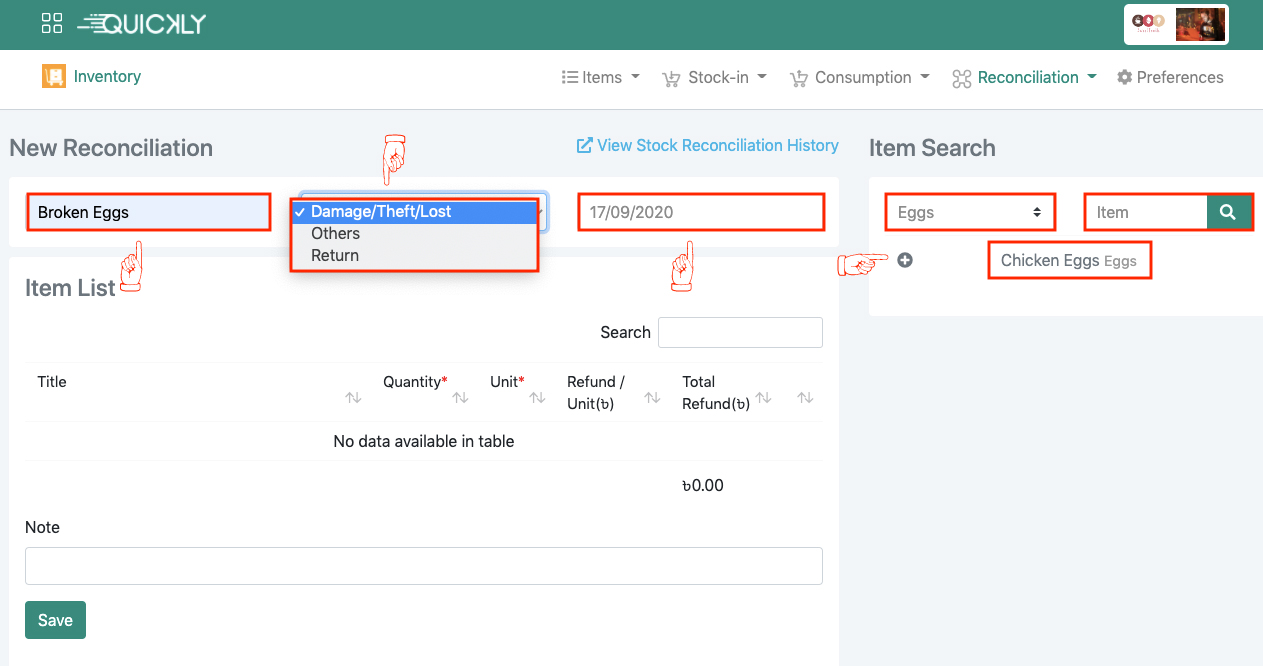
👉 To add the items to the Item List, click on the add (+) button. Then write down the quantity and select the unit.
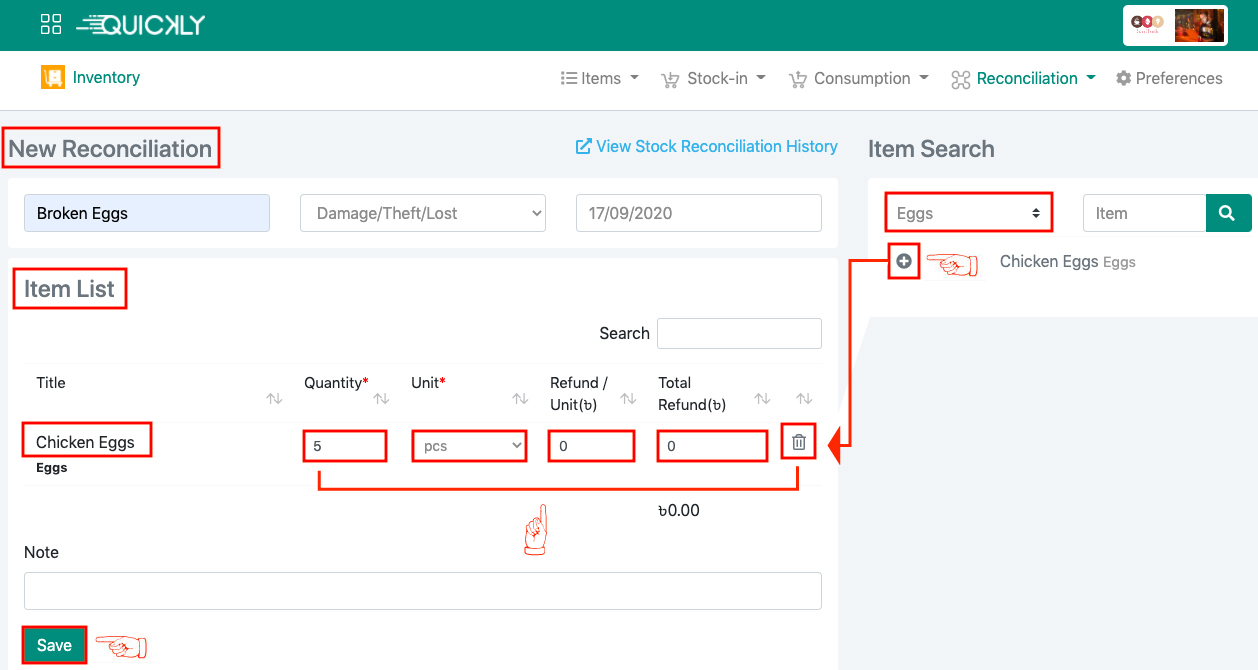
In case you have returned the item, write down the refund amount in the refund/unit section. Our software will automatically calculate the total amount refunded for the item and if you write down the total amount refunded, it will automatically calculate the refund/unit for the item. You can also write a note if you want to. Click on the remove button if you want to remove any item from the list. Lastly, click on the save button to finish this step.
Keep track of your food waste
Admin
👉 There might be some items in your inventory which got damaged/lost/stolen, or you might need to return to the manufacturer; in other words, it got wasted. If you want to track your wastage of food, simply navigate to the Reconciliation option of the portal and select the History to go to the stock reconciliation page.
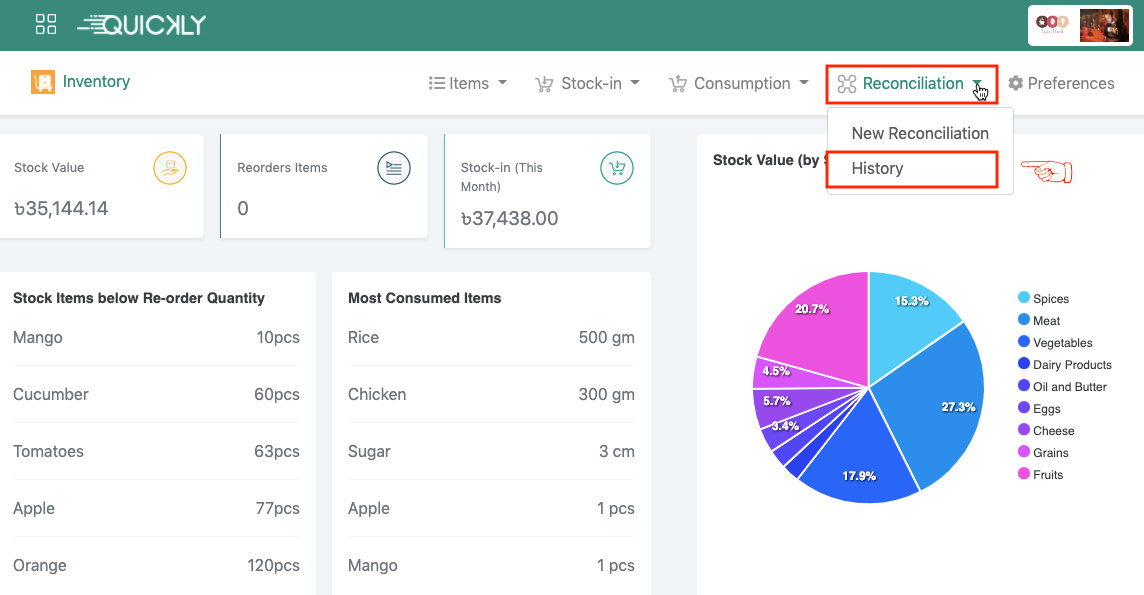
In the stock reconciliation page, you will find the list of all reconciled items by reference number. You can pick a date to filter and search by the reference number, date, type, and note.
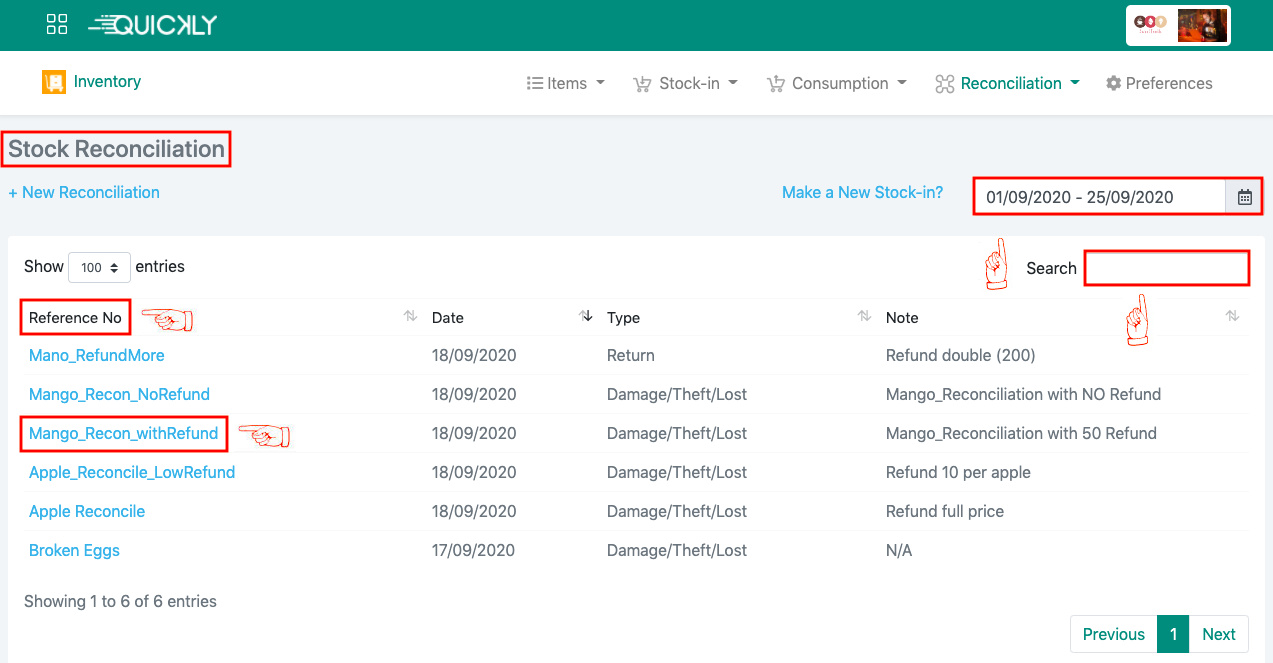
👉 For example, if you want to see the stock reconciliation details click on the reference number which will bring up a page where you will get the items’ names, quantity, unit, unit price, cost (after refund, if any), date, type of reconciliation, and note.
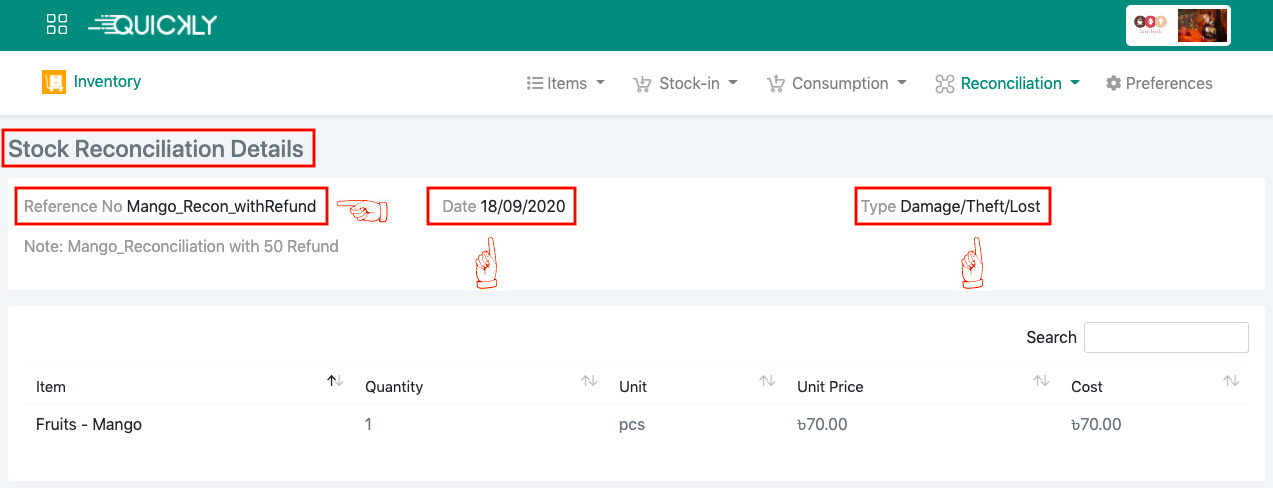
How to manage your supplier details?
Admin
You can manage your supplier contact details in a very organised way. Click on Supplier from the menu bar which will bring up the list of all suppliers with their contact details. You can edit supplier details at any time and create new suppliers.
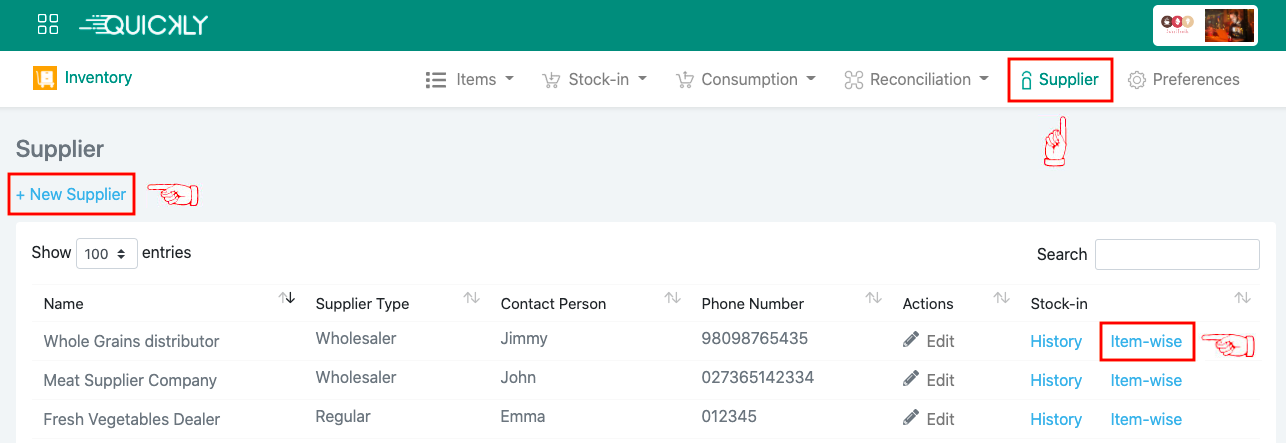
You can see the item wise stock-in report for any item by clicking on the Item-Wise. The stock-in report can be filtered by the suppliers, groups, and there is a date picker to choose any date or any duration of time; the report can be downloaded too. You can see the stock-in history and edit the details as well.
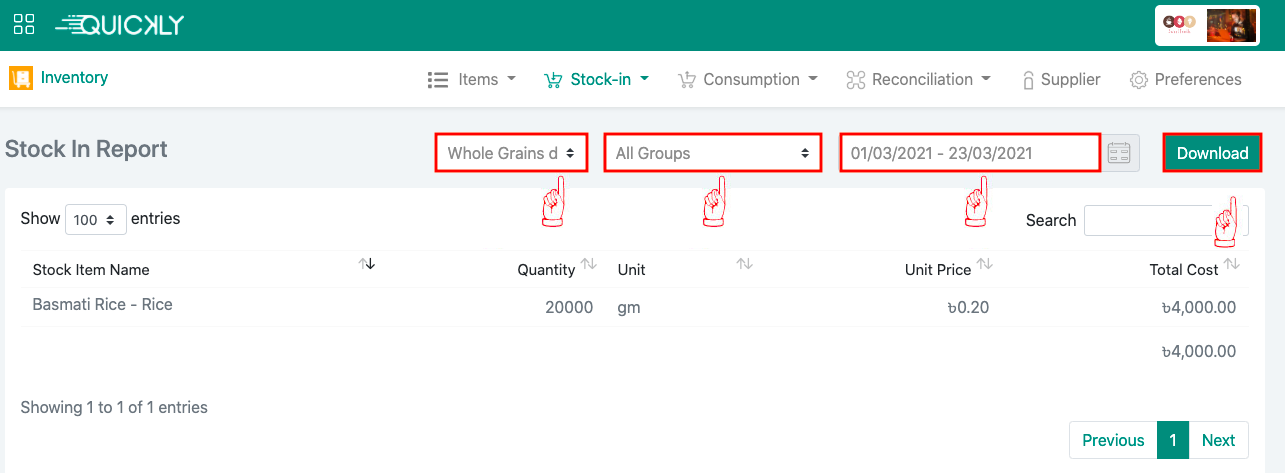
In order to create a new supplier, click on the +New Supplier button and fill out the form with required information. Please provide the supplier details and contact details from any supplier, finally click on the Create button to update the data.
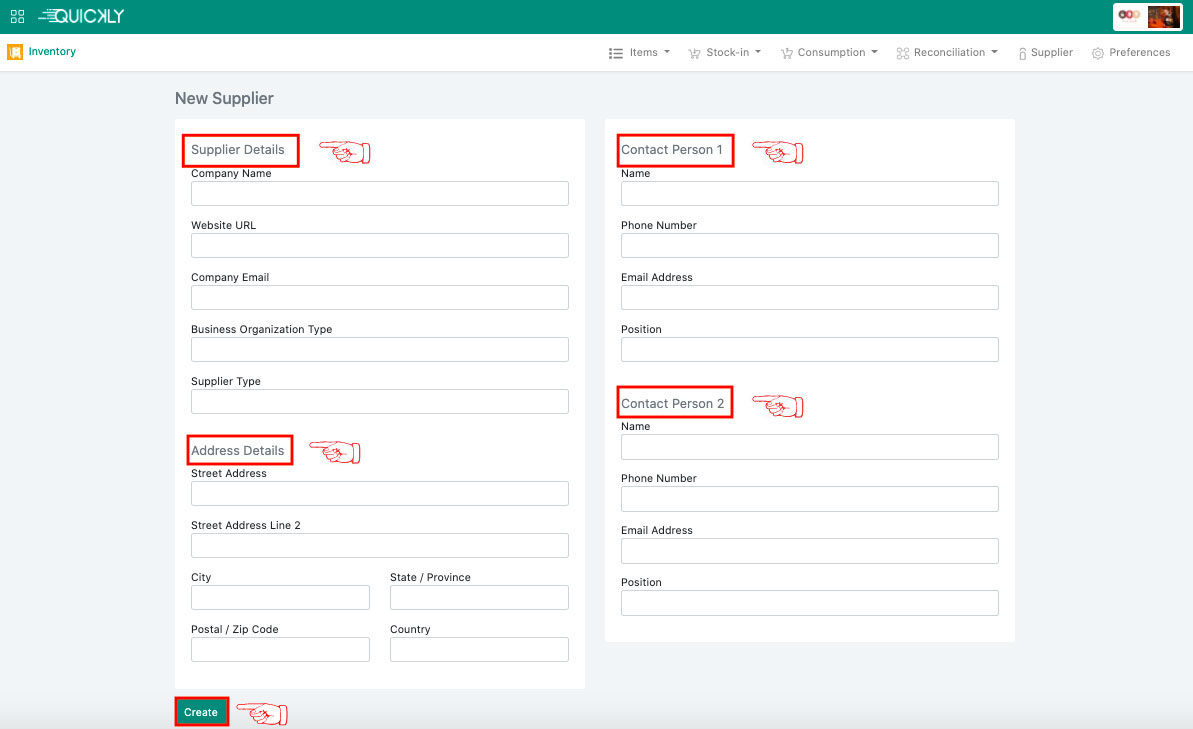
Set your preferences to notified by email to receive stock-in and stock-out reports
Admin
👉 To help you trace your stock-in and out data in a more convenient way we will send you the daily, weekly and monthly consumption reports as well as daily stock reports to your mailbox.
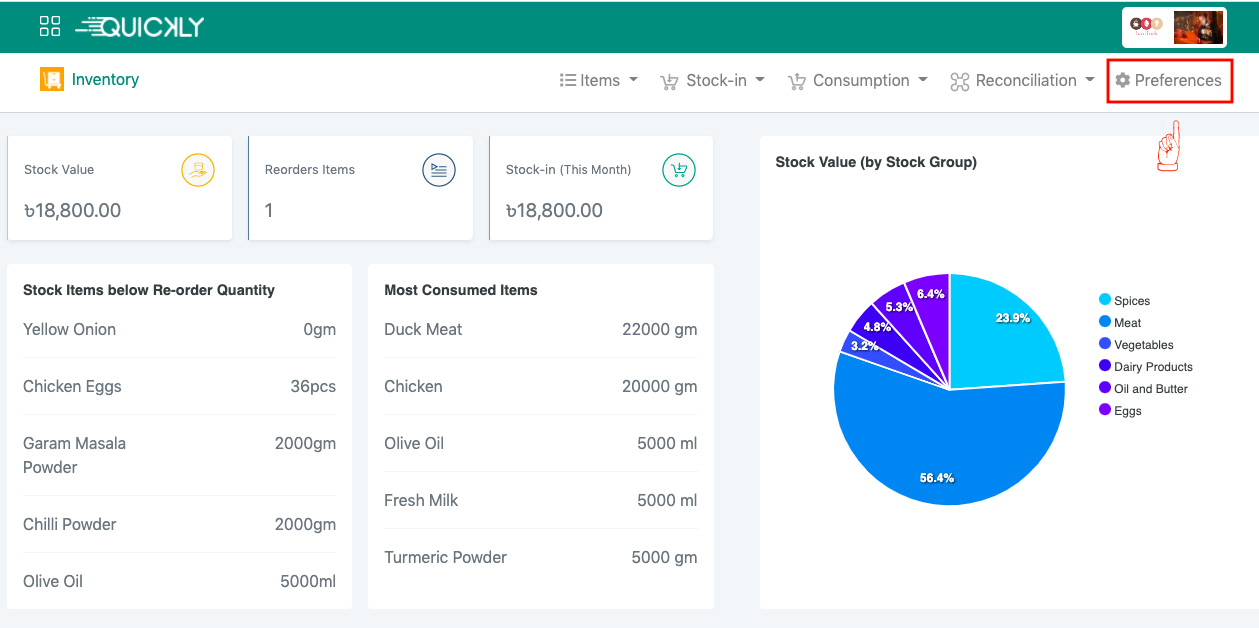
With our software, you can now easily track your inventory even if you are away from your restaurant. You will know if you're being ripped off by customers or employees before it's too late. Simply turn the switches on for the reports you want to get via email from the email notification page.
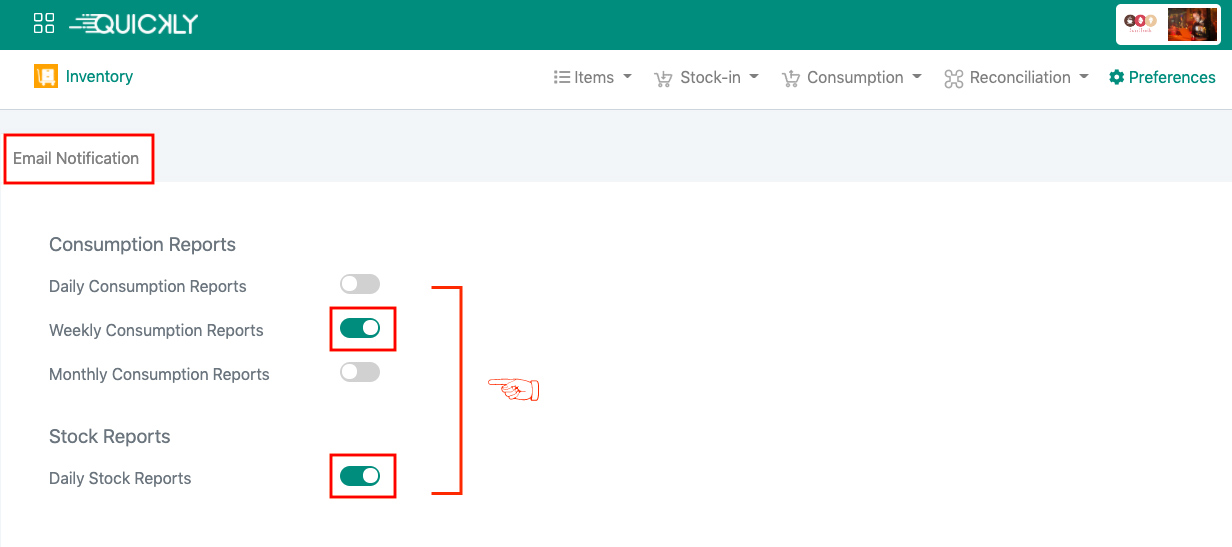
Replicate one restaurant’s stock items for other restaurants
Admin
If you have multiple restaurants having the same stock items, you can easily import them from one restaurant to another, along with their cost, and reorder quantity.
- Go to Aggregated Dashboard.
- Click Import Items for the restaurant to which you want
to add stock items.
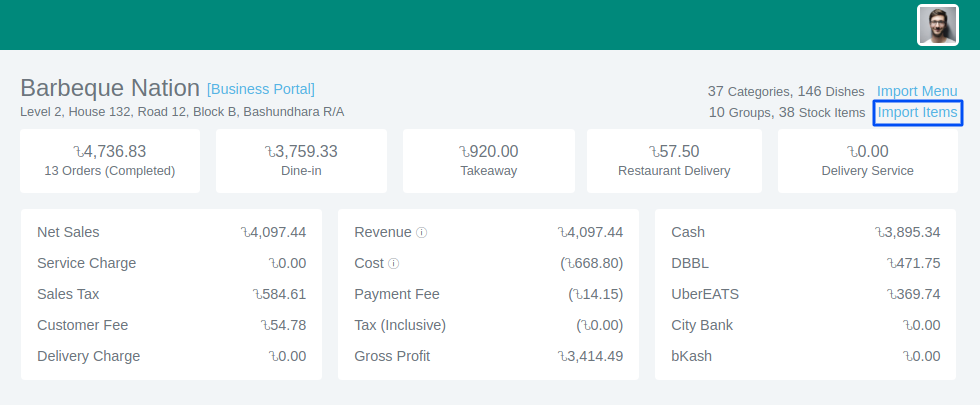
- Choose a restaurant from which to import the items.
Note that only the currently active stock groups and items will be shown here. - Check the box next to the group/item that you want to import. To import
all items, select all groups.
If you already have a stock group/item with the same name, it will not be imported. - Click Import Items
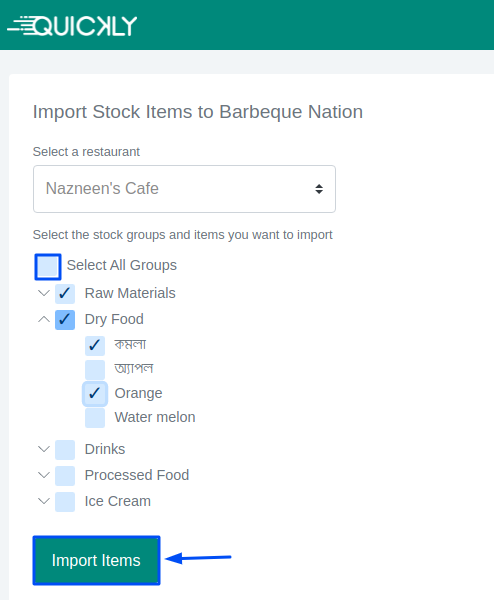
Accounts & Expenses
Admin
Quickly Accounts & Expenses module is designed in such a simplified way that anyone and everyone can use it. Where traditional accounting software requires hands-on expirtize in accounting or finance, Quickly Accounts & Expenses module will allow you to manage your company’s complete income stream without having an accounting or finance background!
You will be able to track your restaurant’s revenues, expenses, and estimated profits on a monthly and yearly basis. Besides, you will get a graphical representation based on monthly expenses and build better business insights.
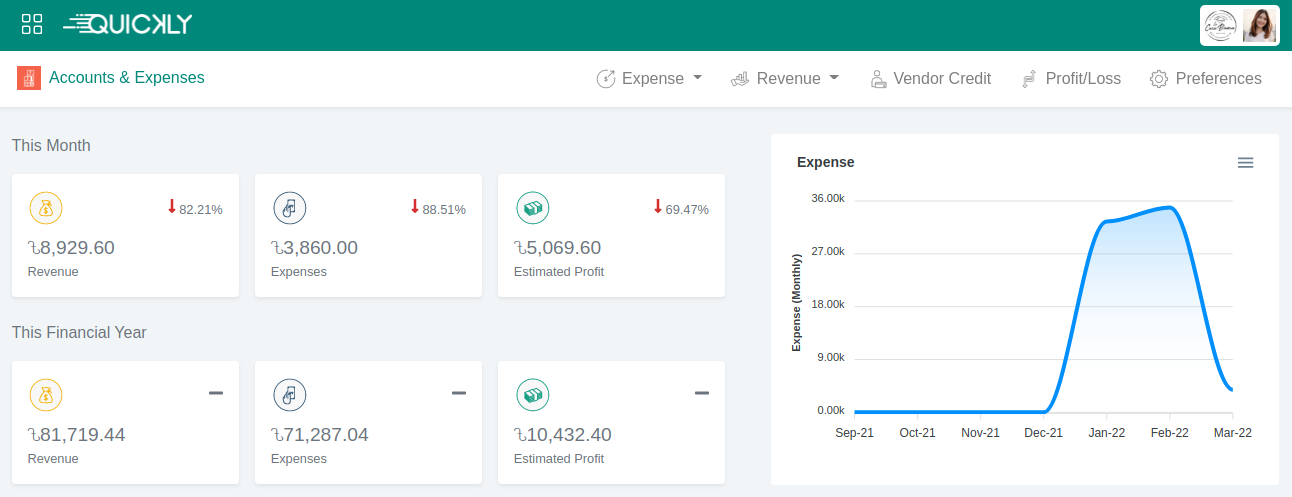
Previous Tutorial
Set your preferences to notified by email to receive stock-in and stock out reports
Next Tutorial
Keep track of your expenses
Related Video Support
How to manage revenue, expense, vendor credit & profit/loss
In this video we will see how to keep track of your received or receivable revenue and paid or unpaid expenses using Quickly Restaurant and how to manage the credit and due of your vendors and how to get profit/loss calculation of your restaurant.
Keep track of your expenses
Admin
👉 Hover mouse over Expense, where you will see all the features (Expense List, Recurring Expense Plan, Generate Expense, and Accounts Payable) available to manage your expenses with ease.
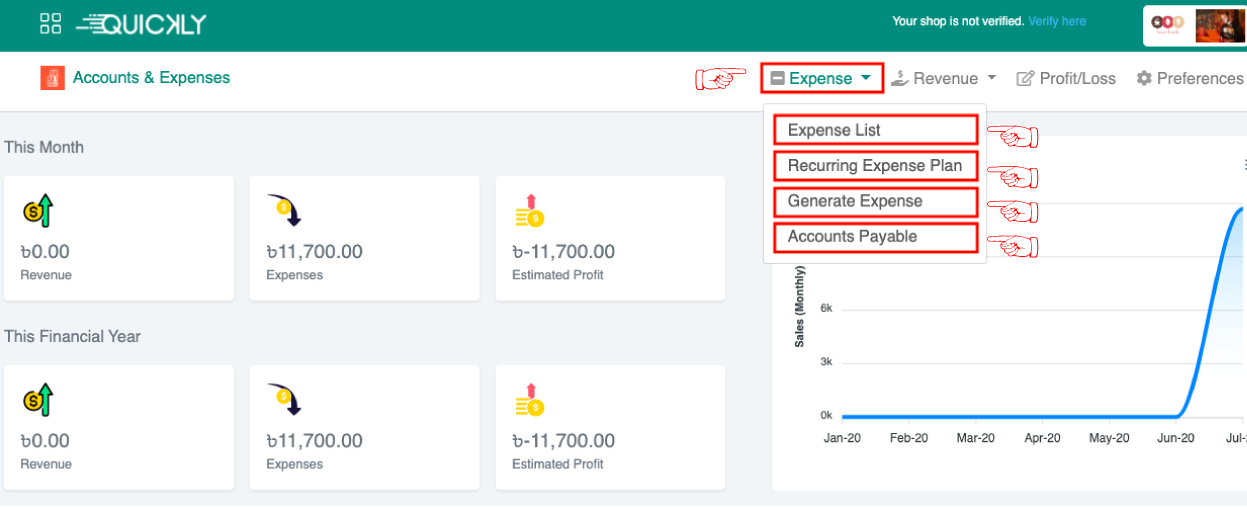
👉 From the Accounts & Expenses page, Click on Expense List under the Expense drop-down menu.

👉 You will find the list of all the expenses created along with some very important features such as, bill date, payment date, payment status, amount, etc. You can create new expenses, new categories, recurring expense plans, generate expenses, and expenses could be edited too from this page. There is a search box to filter any expense out from the list. You can download the list of created expenses by simply clicking on the Download button at the right corner of the page.
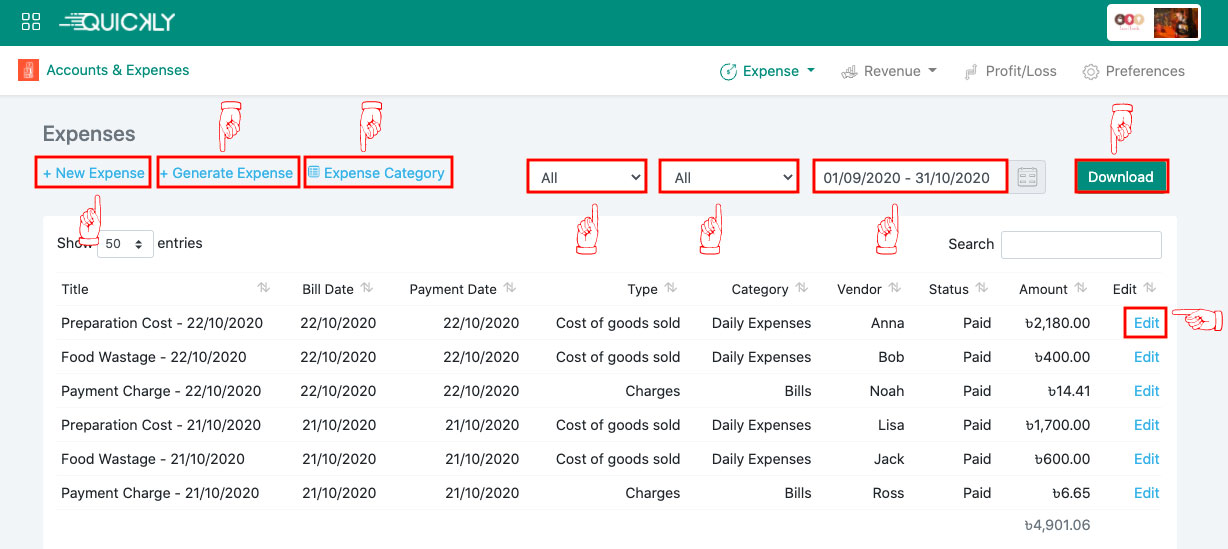
👉 If you want to keep track of your expenses, you need to divide them into different categories and then add the expenses under the categories. From the Accounts & Expenses page, Click on Expense List under the Expense drop-down menu.

👉 From the Expenses page, click on Expense Category which will bring up the expense category page.
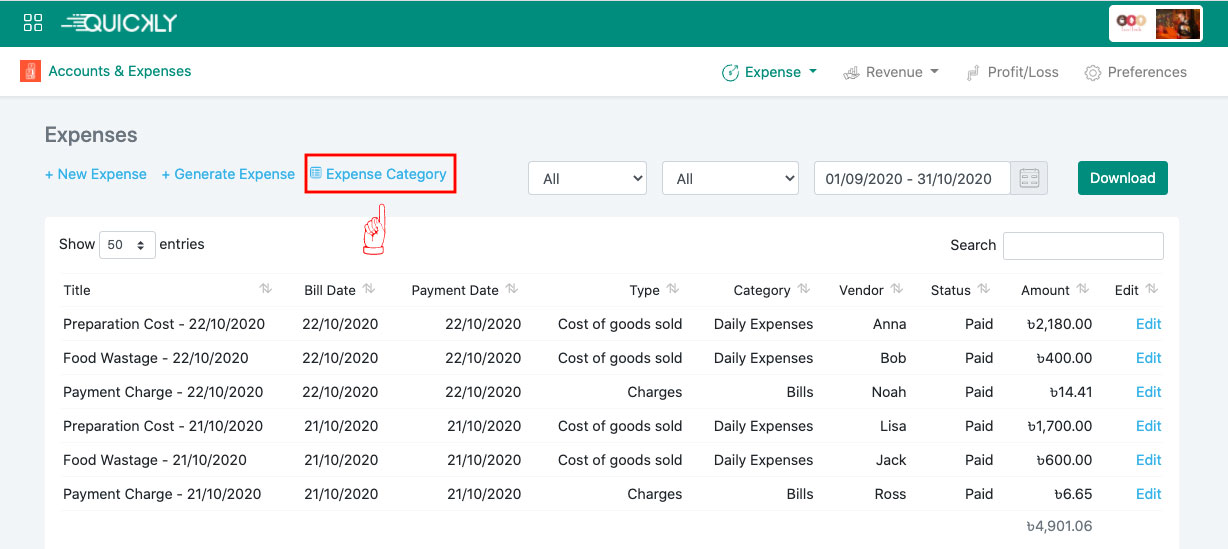
👉 In the Expense Category page, you will find the list of all expense categories created so far. Click on +New Category from the Expense Category page to create a new category.
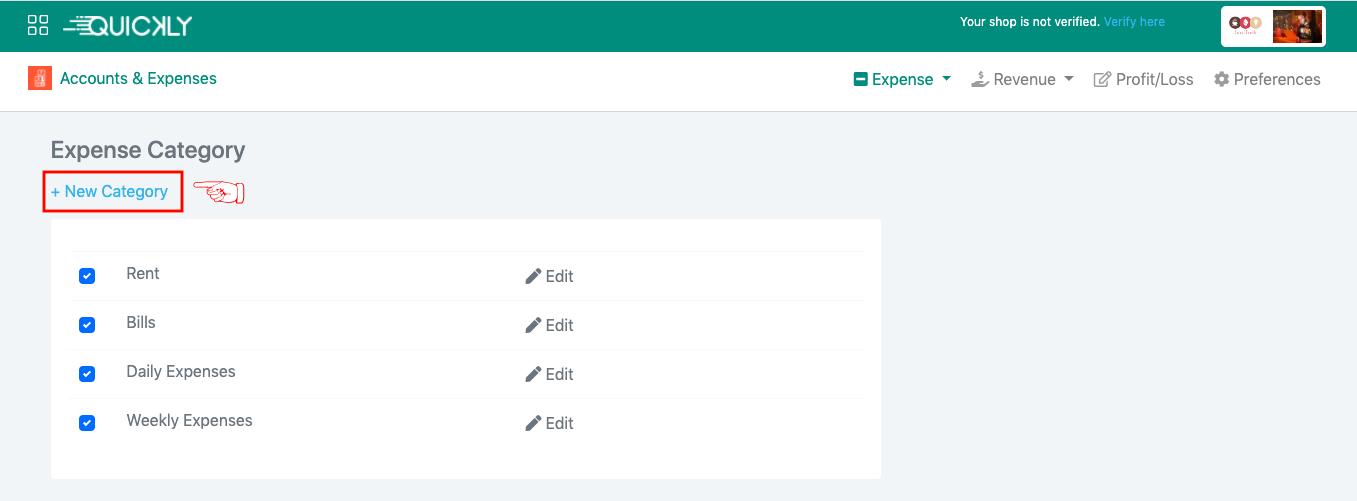
👉 Provide the Title and/or Description and click on the Create button. If you want to create more categories staying in the same page, then click on the Save & Create Another button.
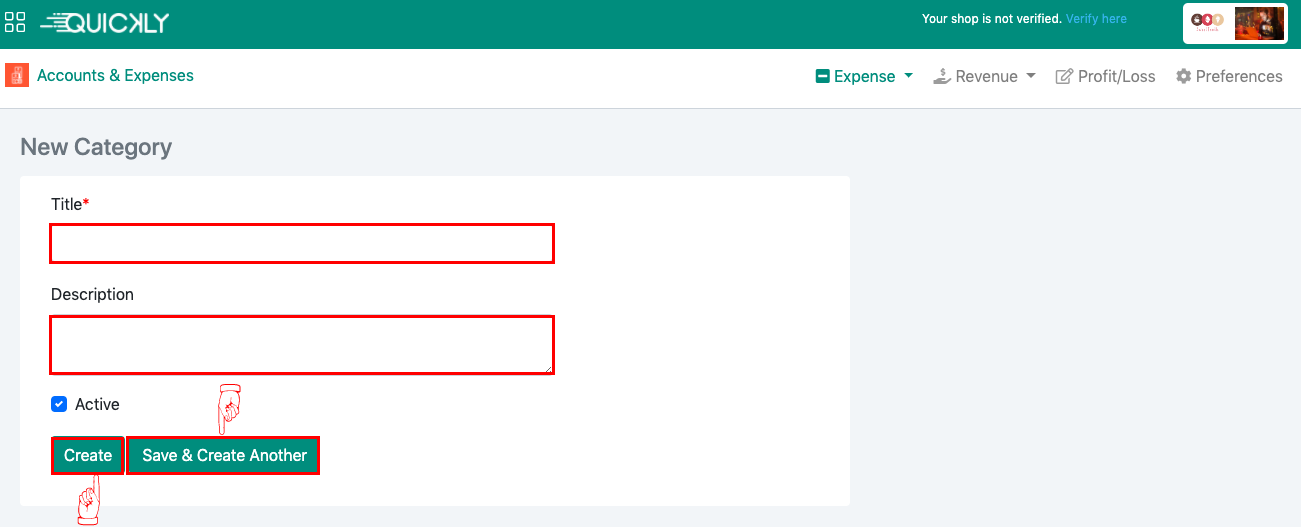
👉 You can manage your expenses in a very easy way by listing them under categories. From the Accounts & Expenses page, Click on Expense List under the Expense drop-down menu which will bring up the expenses page.

👉 From the Expenses page, click on + New Expense to create a new expense.
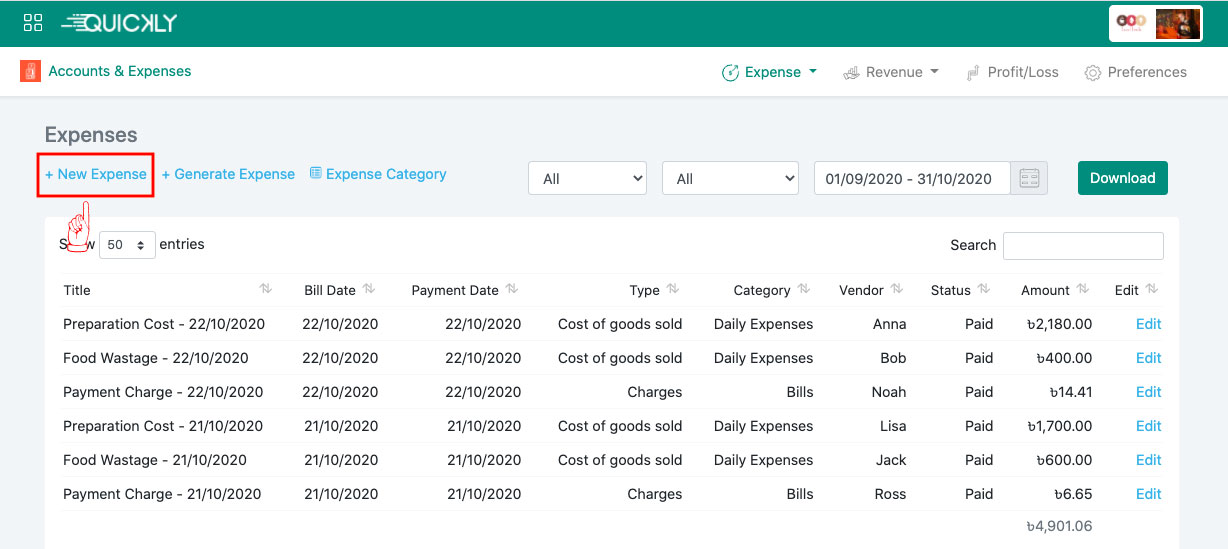
👉 Provide all the necessary data to the respective fields in the form; select the category, expense type and click on the Create button. You can update the Payment Status (Paid/Unpaid) and upload images or pdf files.
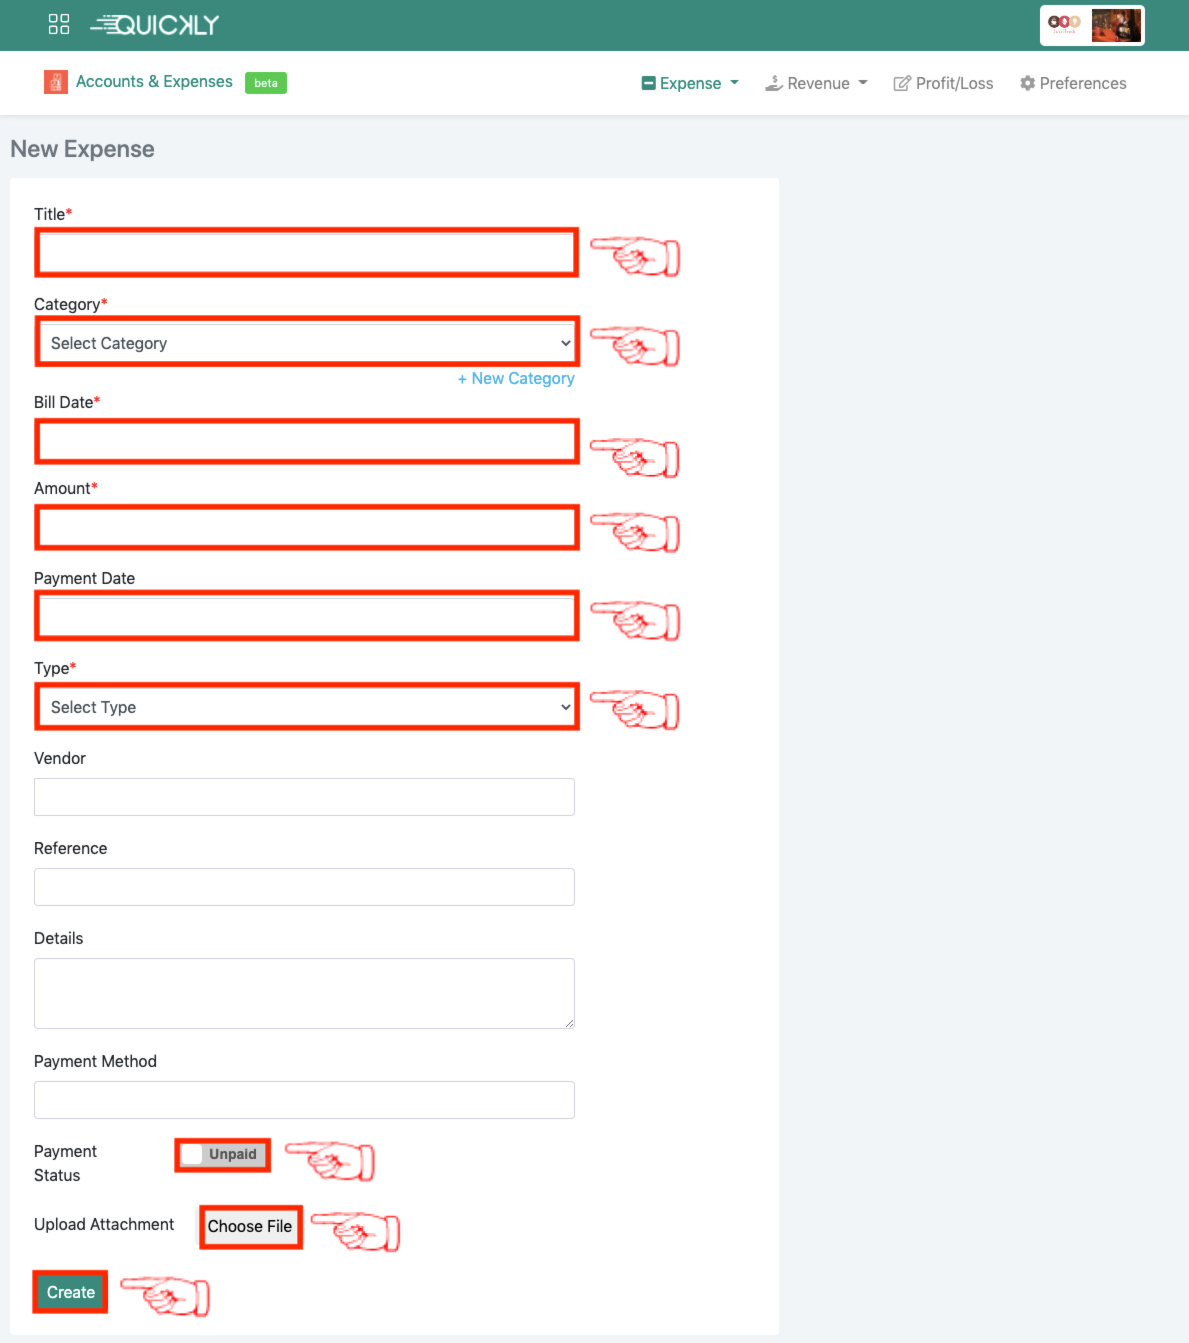
Related Video Support
How to manage revenue, expense, vendor credit & profit/loss
In this video we will see how to keep track of your received or receivable revenue and paid or unpaid expenses using Quickly Restaurant and how to manage the credit and due of your vendors and how to get profit/loss calculation of your restaurant.
Manage your usual expenses occurring at regular intervals
Admin
👉 From the Accounts & Expenses page, click on Recurring Expense Plan under the Expense drop-down menu.
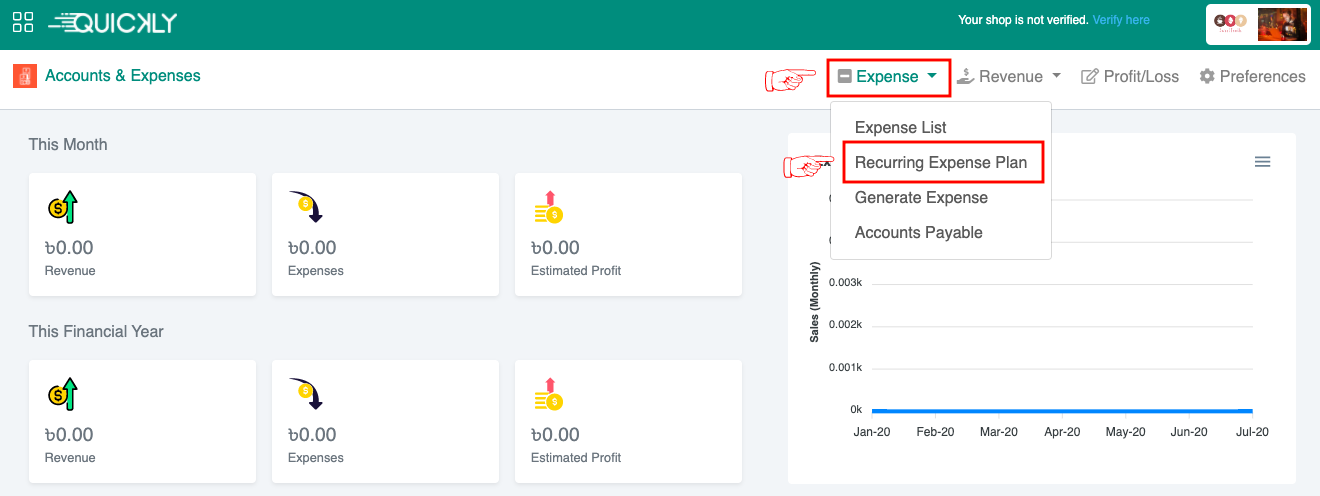
Or, from the Expenses page, click on Recurring Expense Plan which will bring up the recurring expense plan page.
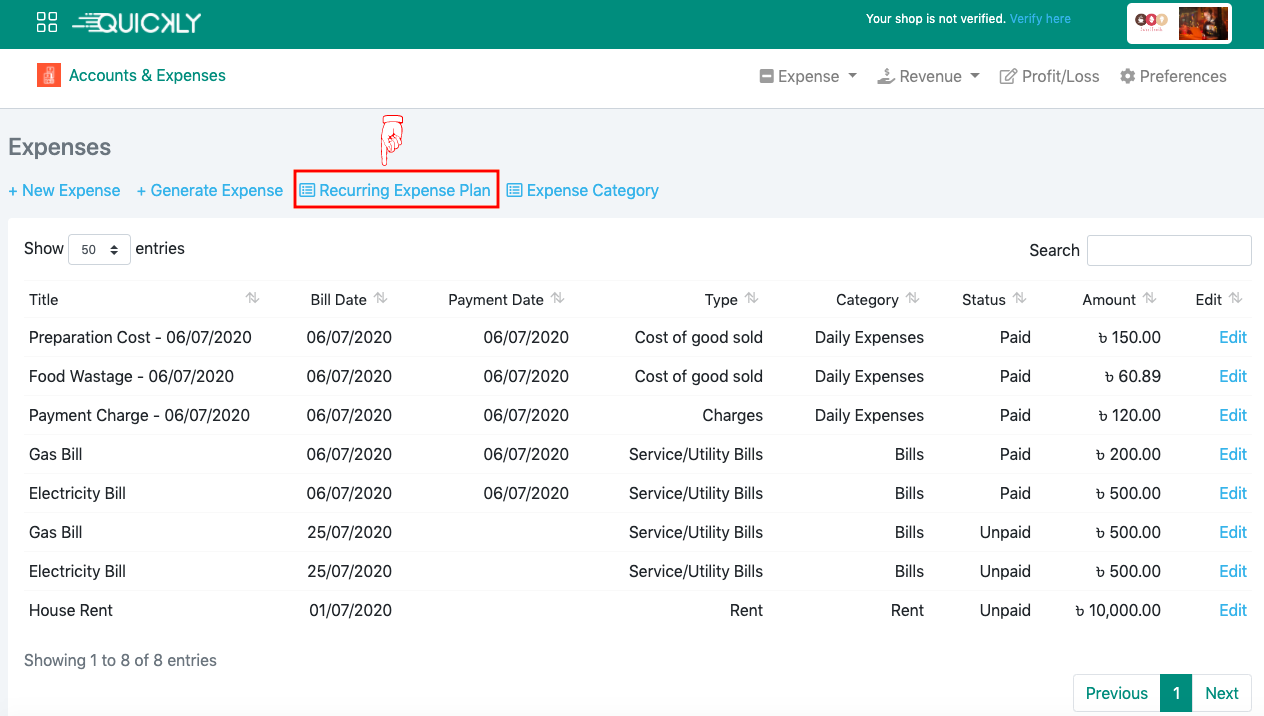
👉 You will find the list of all Recurring Expense Plans already created. You can check the payment status (paid/unpaid), recurring time (daily/weekly/monthly) and if the plan is going to be auto generated or not. You can create new recurring expense plans and download the list of recurring expense plans from this page if needed.
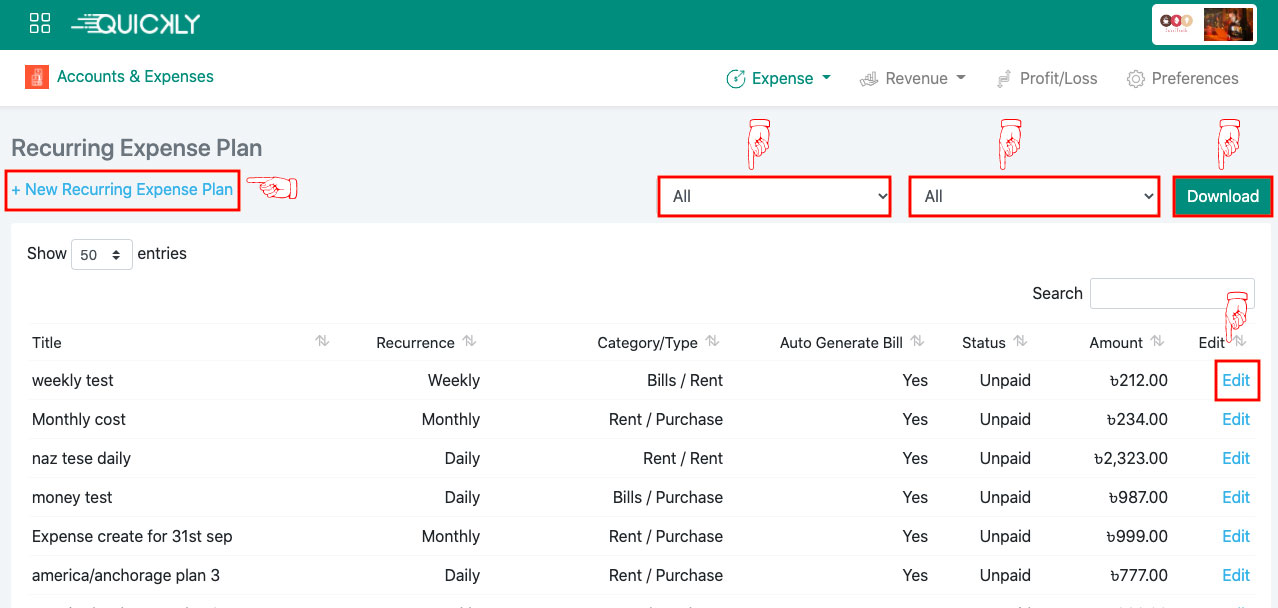
👉 To make a plan for your usual expenses recurring at a regular interval, Click on + New Recurring Expense Plan.
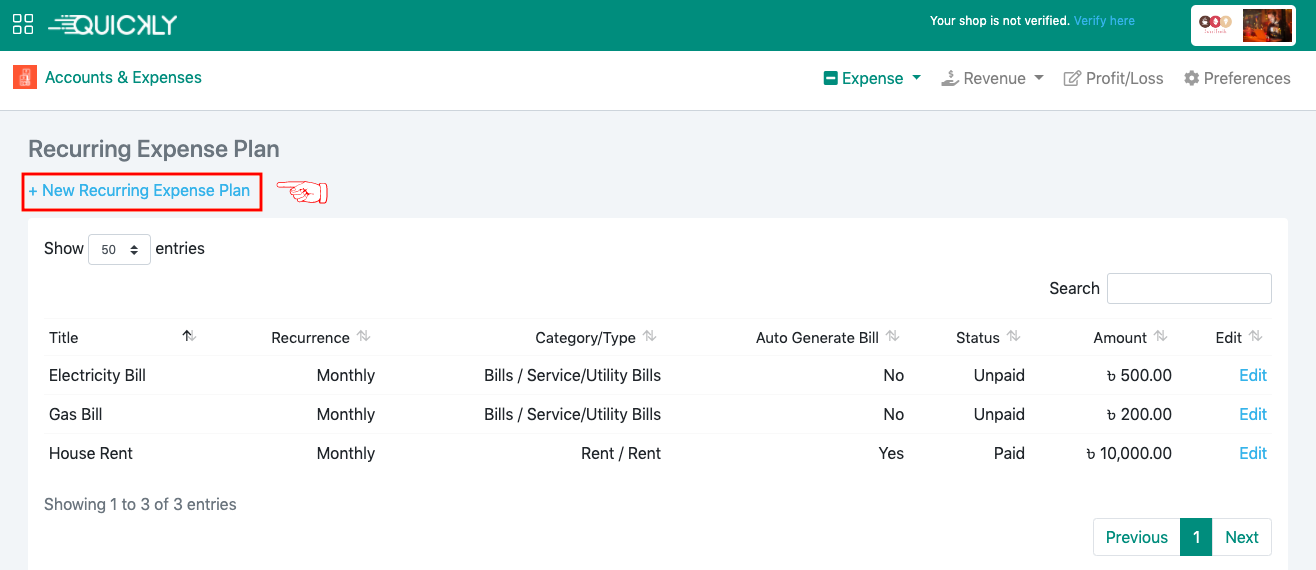
👉 Provide all the necessary data to the respective fields in the form; select the category, expense type and click on the Create button. By clicking on the switch, next to the Auto Generate Bill label, you can turn the Auto Generate Bill to Yes and the Recurring Expense will be auto generated according to the plan. You can change the Payment Status (Paid/Unpaid) too.
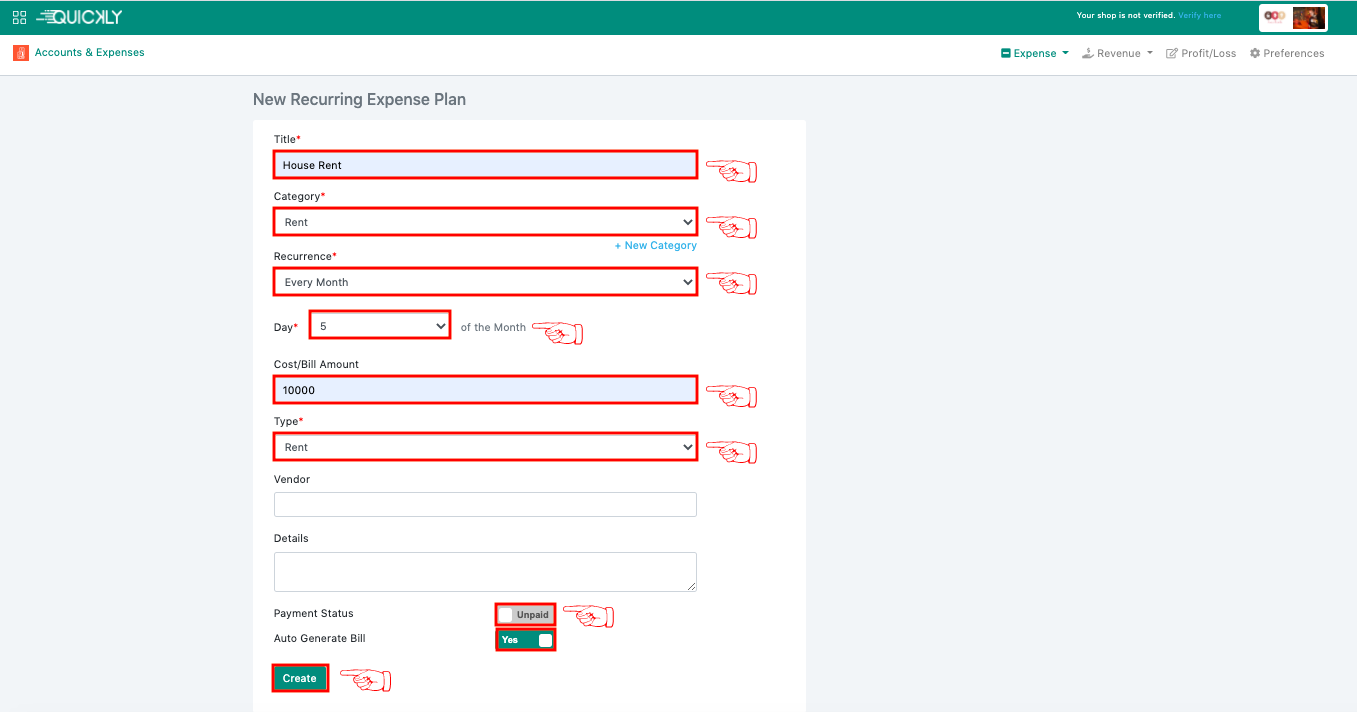
You may have some usual expenses recurring at regular intervals but the amount is variable. These kinds of expenses can not be auto generated and it can be managed in a very simple and easy way by generating expenses. From the Accounts & Expenses page, click on Generate Expense under the Expenses drop-down menu.
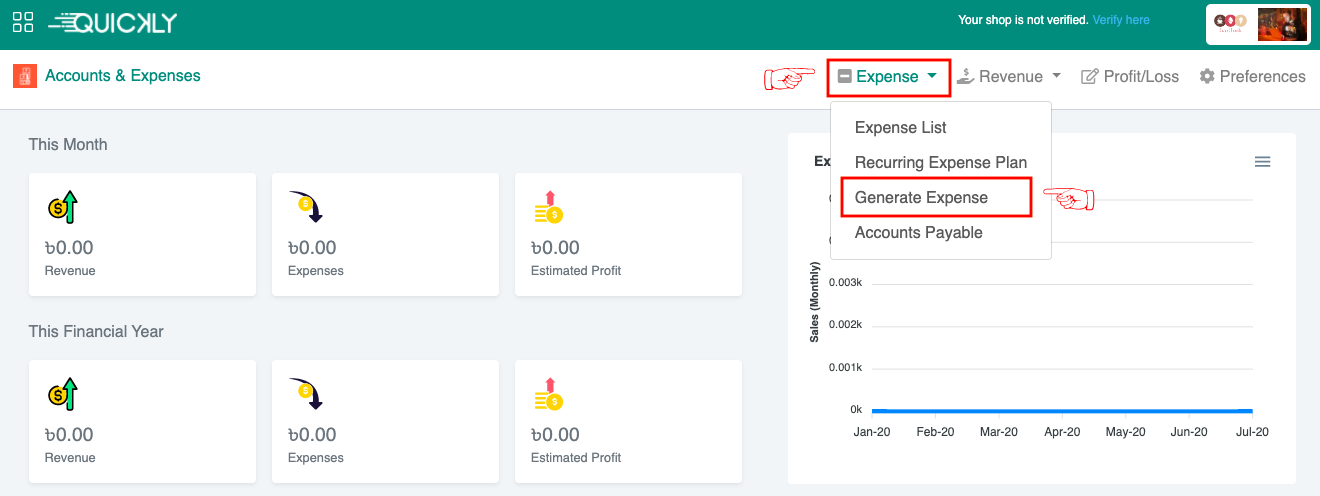
Or, from the Expenses page, Click on + Generate Expense which will bring up the generate expense page.
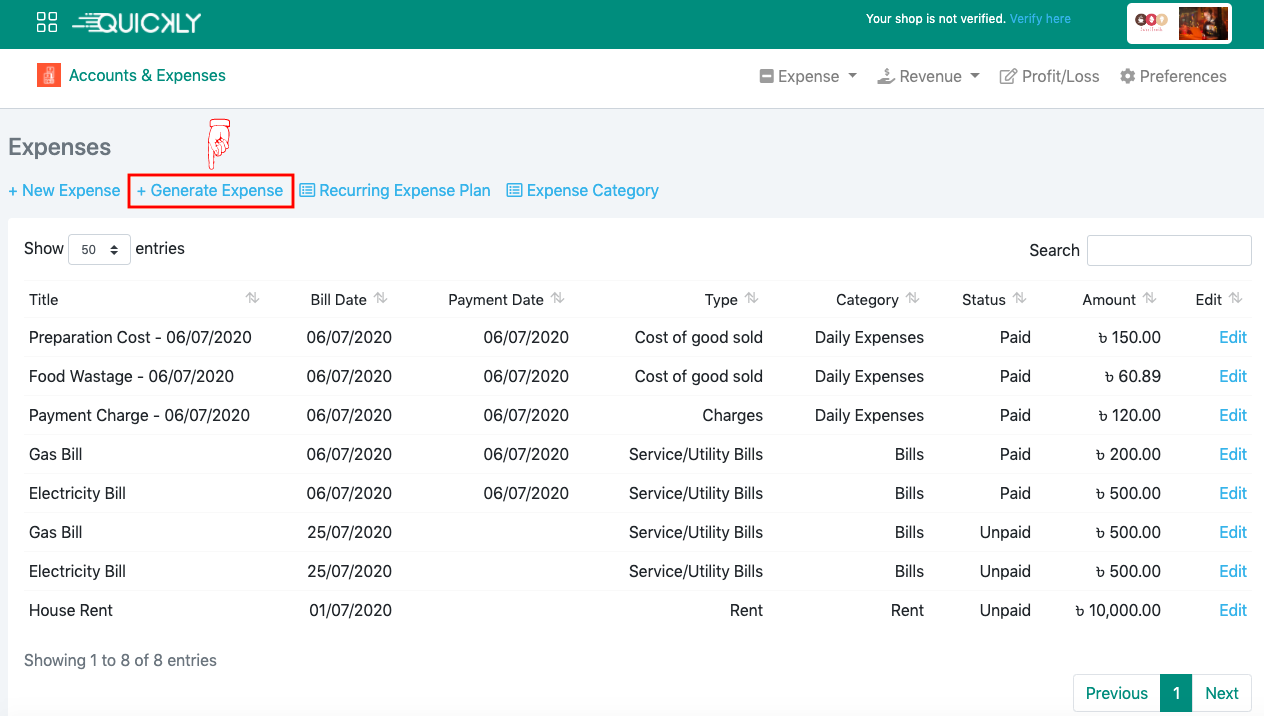
👉 You can generate expenses for a period, based on the Recurring Expense Plans which are not auto-generated. Select the Recurring Time (Day/Week/Month) from the Time Period drop-down menu to search for the recurring expenses which are not auto generated.
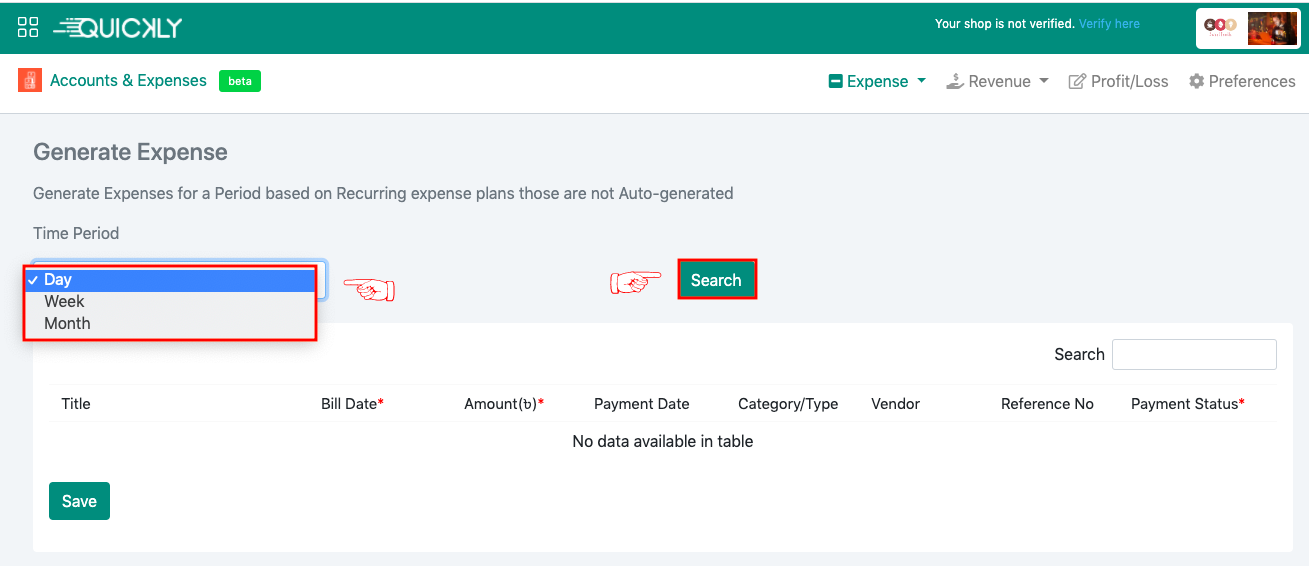
👉 For example, if you select Month, you will see all the recurring expenses which were already planned on a monthly basis. You can edit the details (for example, Bill Date, Amount, Payment Date, Vendor, Reference No) from this page. You can change the payment status too by clicking on the checkbox.
👉 Click on the Save button after all the information you’ve put to the respective fields, and you will find these expenses added to the Expense List.
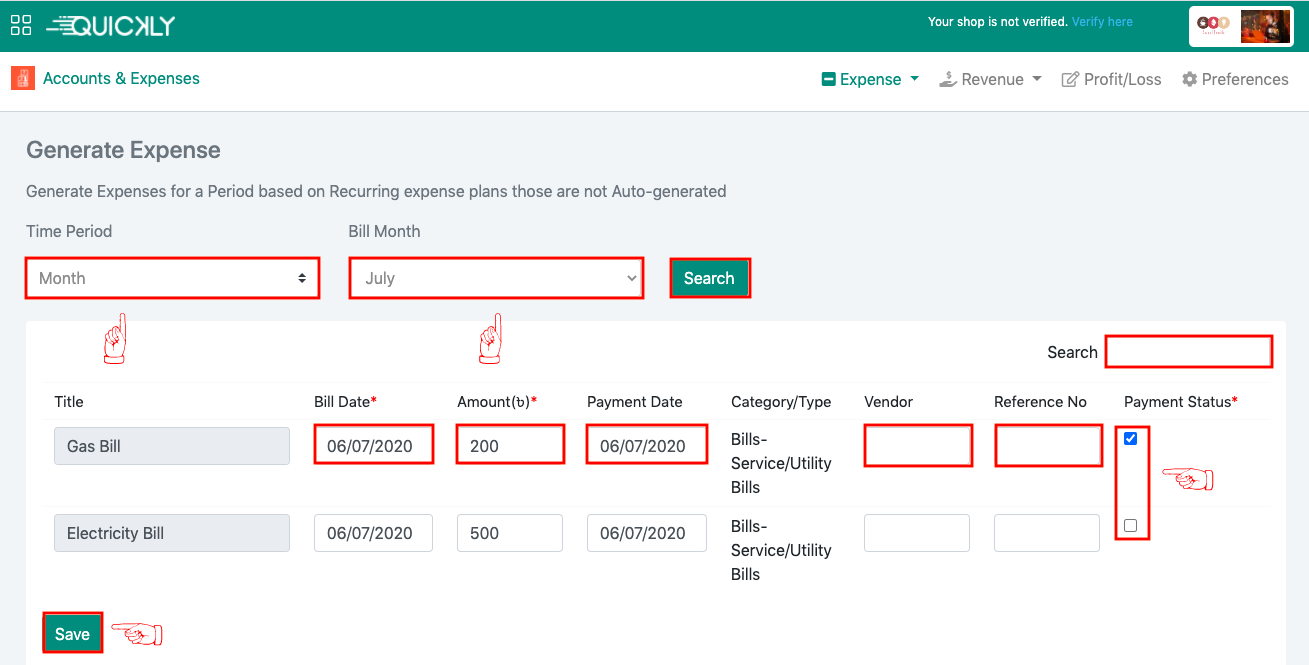
Related Video Support
How to manage revenue, expense, vendor credit & profit/loss
In this video we will see how to keep track of your received or receivable revenue and paid or unpaid expenses using Quickly Restaurant and how to manage the credit and due of your vendors and how to get profit/loss calculation of your restaurant.
Monitor and manage your payable expenses
Admin
Accounts Payable is there to handle all your billed yet unpaid expenses. Let’s take a look at how you can make it useful.
👉 From the Accounts & Expenses page, click on Accounts Payable under the Expenses drop-down menu.
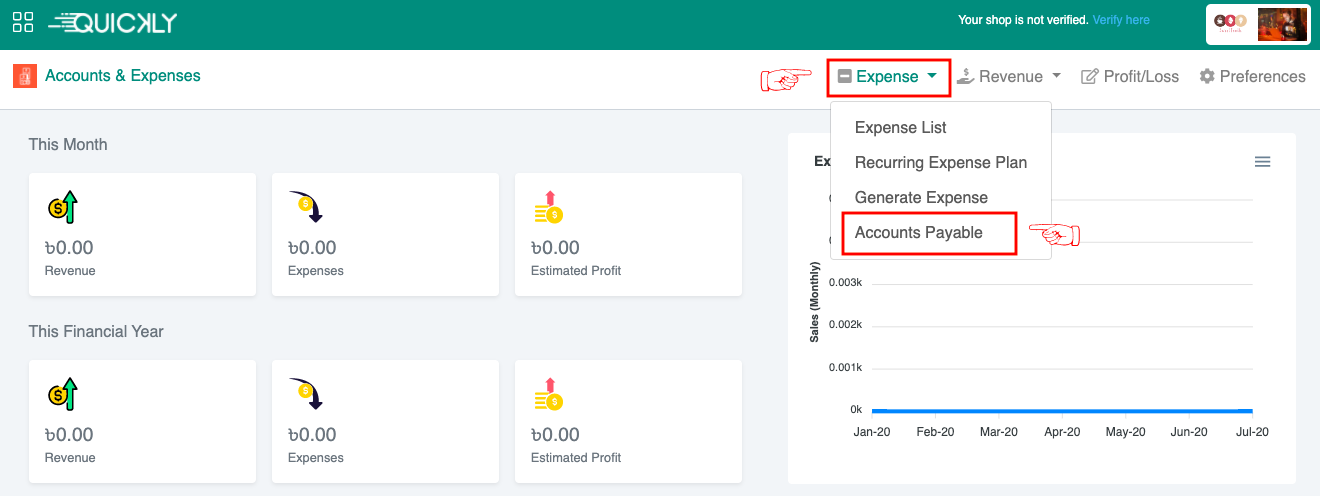
👉 You will find all the unpaid expenses which are billed, have been listed in the Accounts Payable page. You can update your payment status from there. If you want to update the payment status (from unpaid to paid), click on Update Payment under Action; you can change the payment date too.
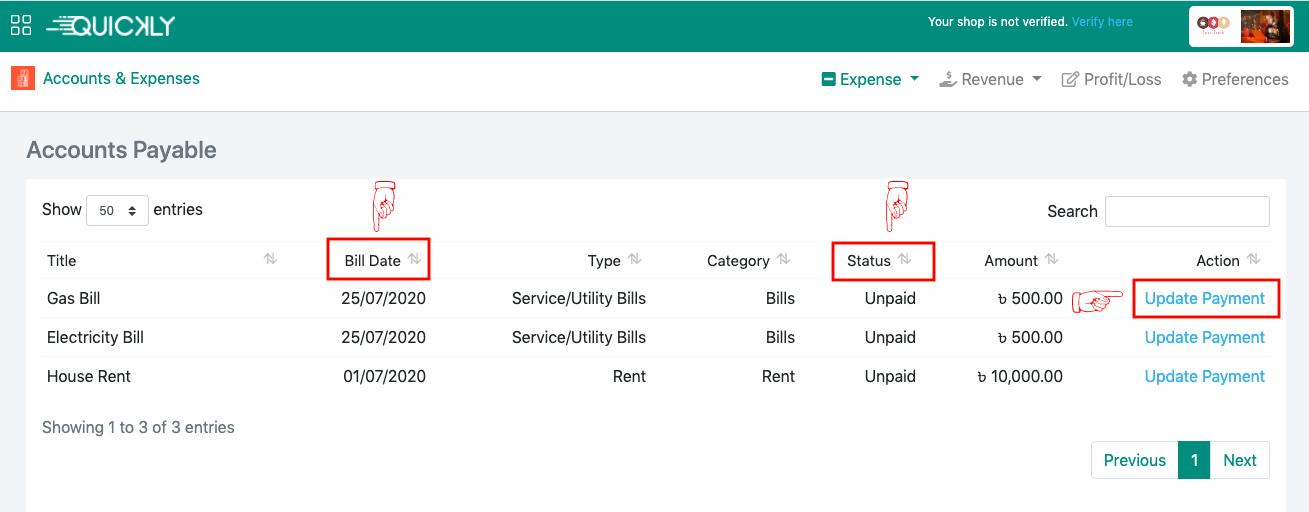
👉 If you want to update the Payment Status (from unpaid to paid), Click on Update Payment under Action; you can change the payment date too. Click on the Update button and the updated expense will be found in the Expense List along with paid status.
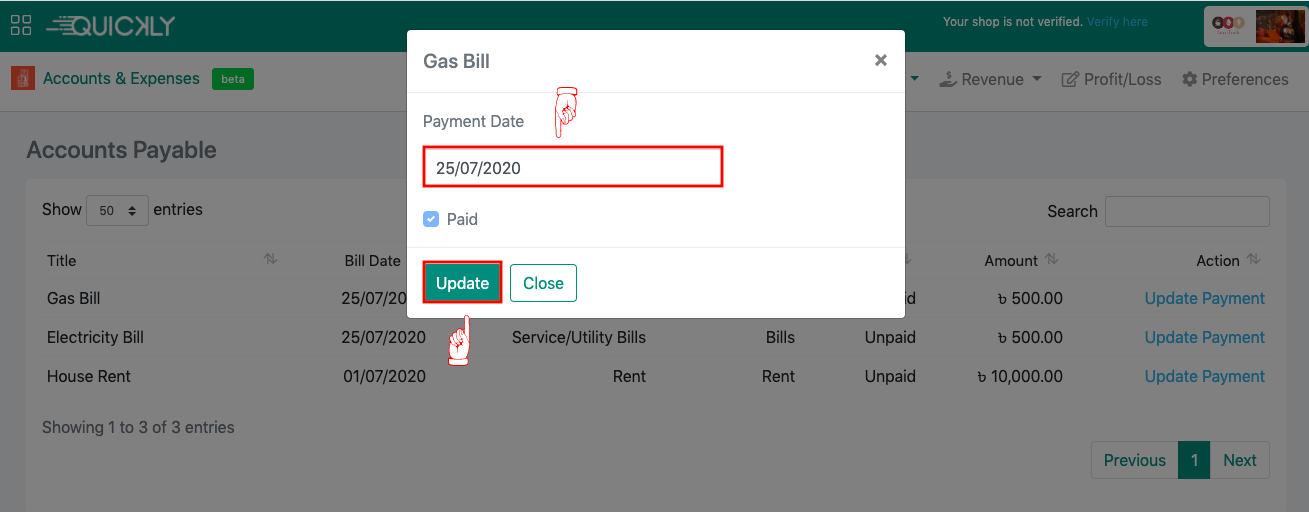
Related Video Support
How to manage revenue, expense, vendor credit & profit/loss
In this video we will see how to keep track of your received or receivable revenue and paid or unpaid expenses using Quickly Restaurant and how to manage the credit and due of your vendors and how to get profit/loss calculation of your restaurant.
Keep track of your Revenues
Admin
At the end of the day, you will get your Revenue List updated according to your restaurant's sales data.
👉 Click on Revenue List under the Revenue drop-down menu at the Accounts & Expenses page to get the updated revenue list.
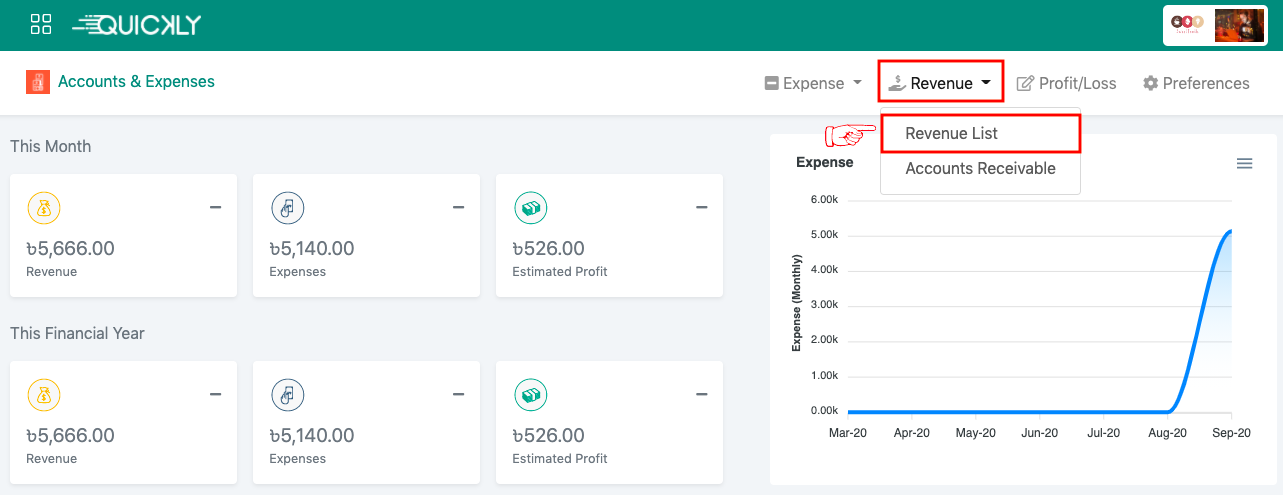
👉 The Revenue List is getting updated everyday according to the restaurant’s sales data along with bill date, collection date (if already received), bill amount, category, collection status (received/receivable), and so on. There is a search option to filter sales revenues from any date. Revenues can be edited from this page. If you want to download the revenue list, click on the Download button at the right corner of the page.
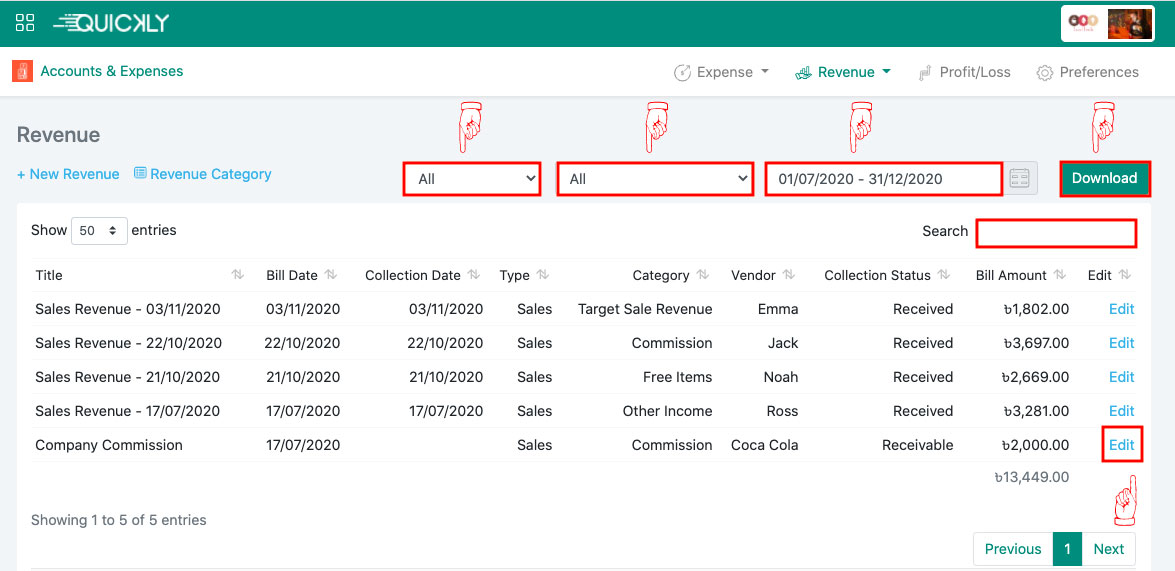
You can filter the revenue list by it’s collection status (all/received/receivable).
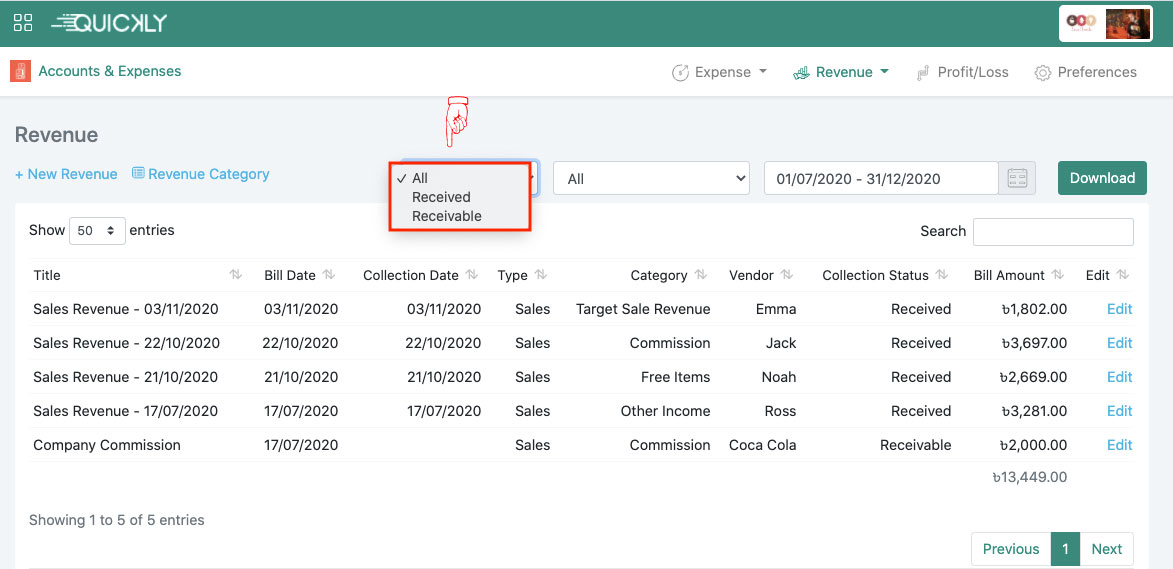
You can filter the revenue list by it’s collection types (sales/commission/service revenue/interest/dividend) too. There is a datepicker to filter revenues by date as well.

In order to update revenue data manually, you need to create categories first. To create categories, follow the steps below,
👉 Select the Revenue List from Revenue drop-down menu and click on Revenue Category from the Revenue page.
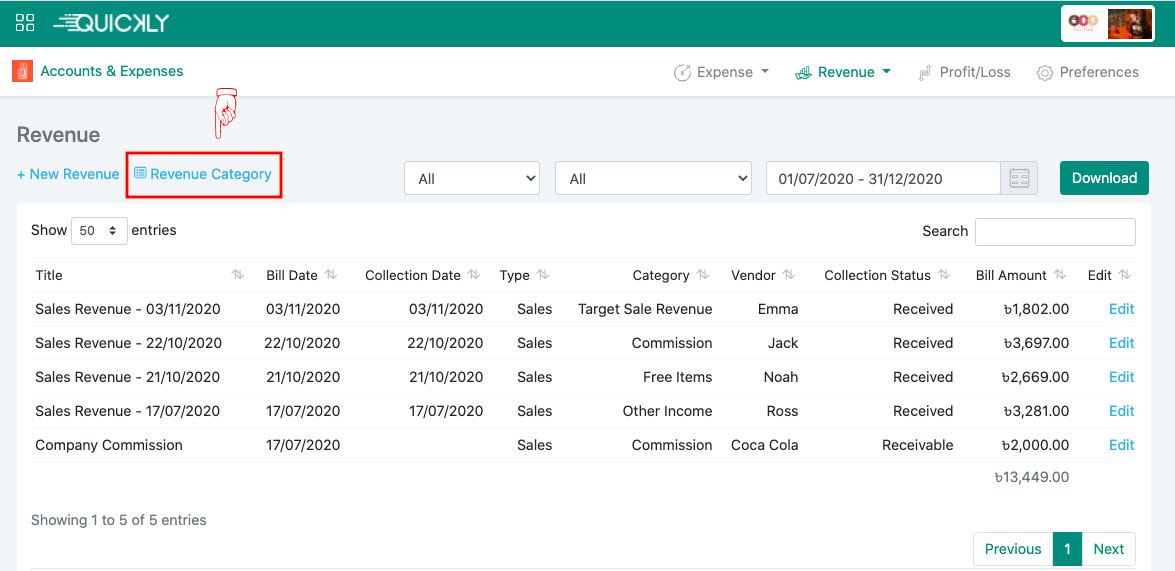
👉 You will find the list of all revenue categories created so far. You can edit the category and keep it active or inactive by clicking on the checkbox. To create a new category, click on + New Category from the Revenue Category page.
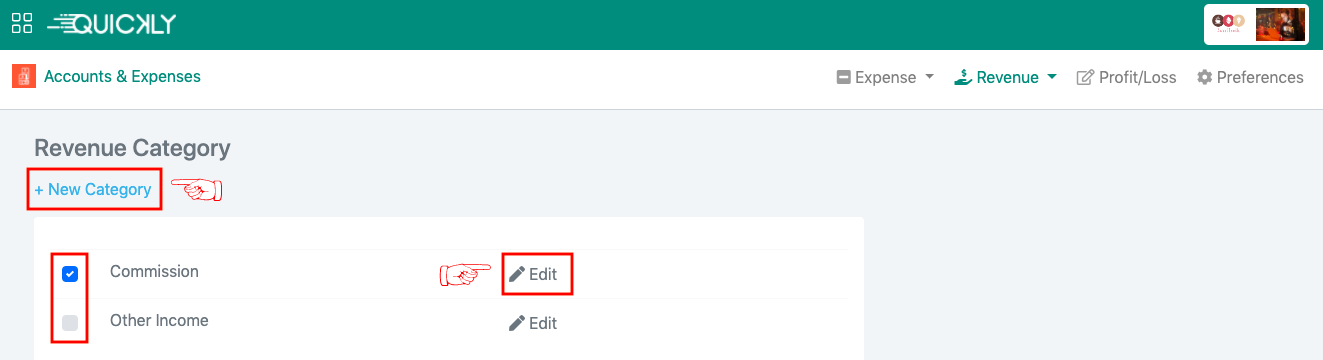
👉 After providing a meaningful title of the category and/or description, click on the Create button to create a new category. If you want to create more revenue categories, click on the Save & Create Another button instead of the create button.
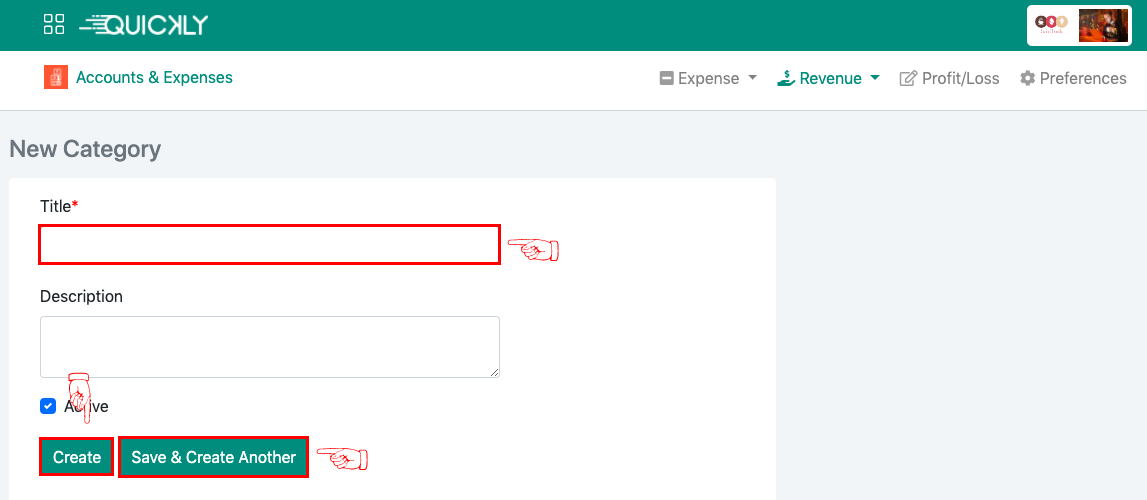
👉 Now, click on + New Revenue from the revenue page to create a new revenue which will bring up a new revenue form.
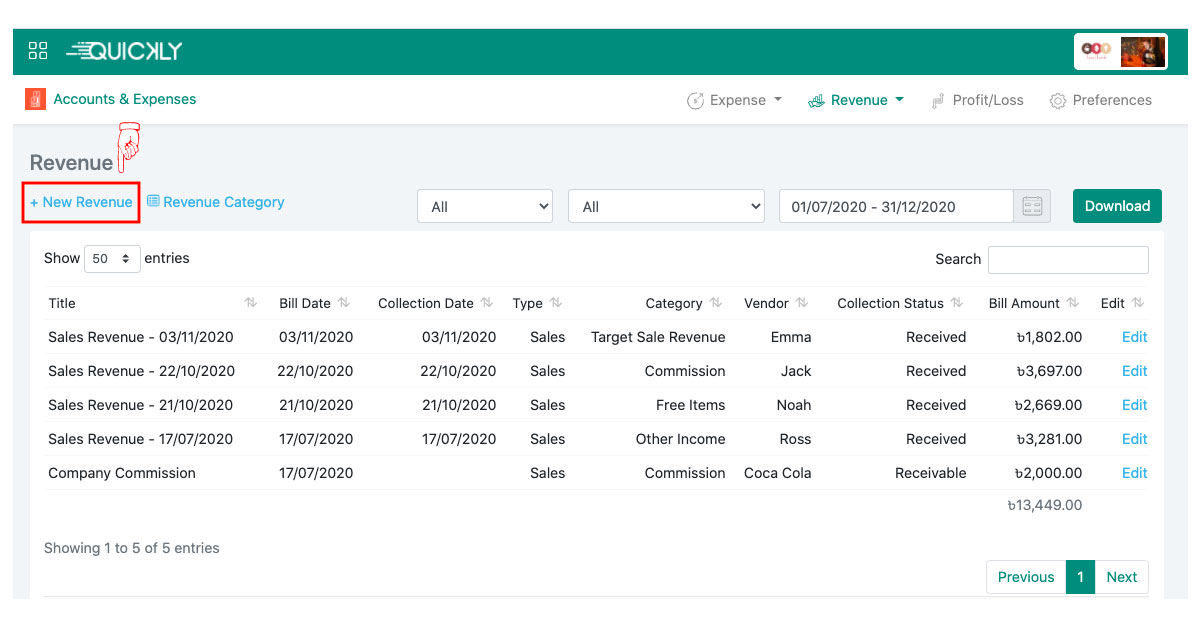
👉 Provide all the required information to the respective fields; select revenue category and type, and click on the Create button. You can update the payment status (paid/unpaid) by clicking on the switch next to the payment status label and upload files (pdf/image).
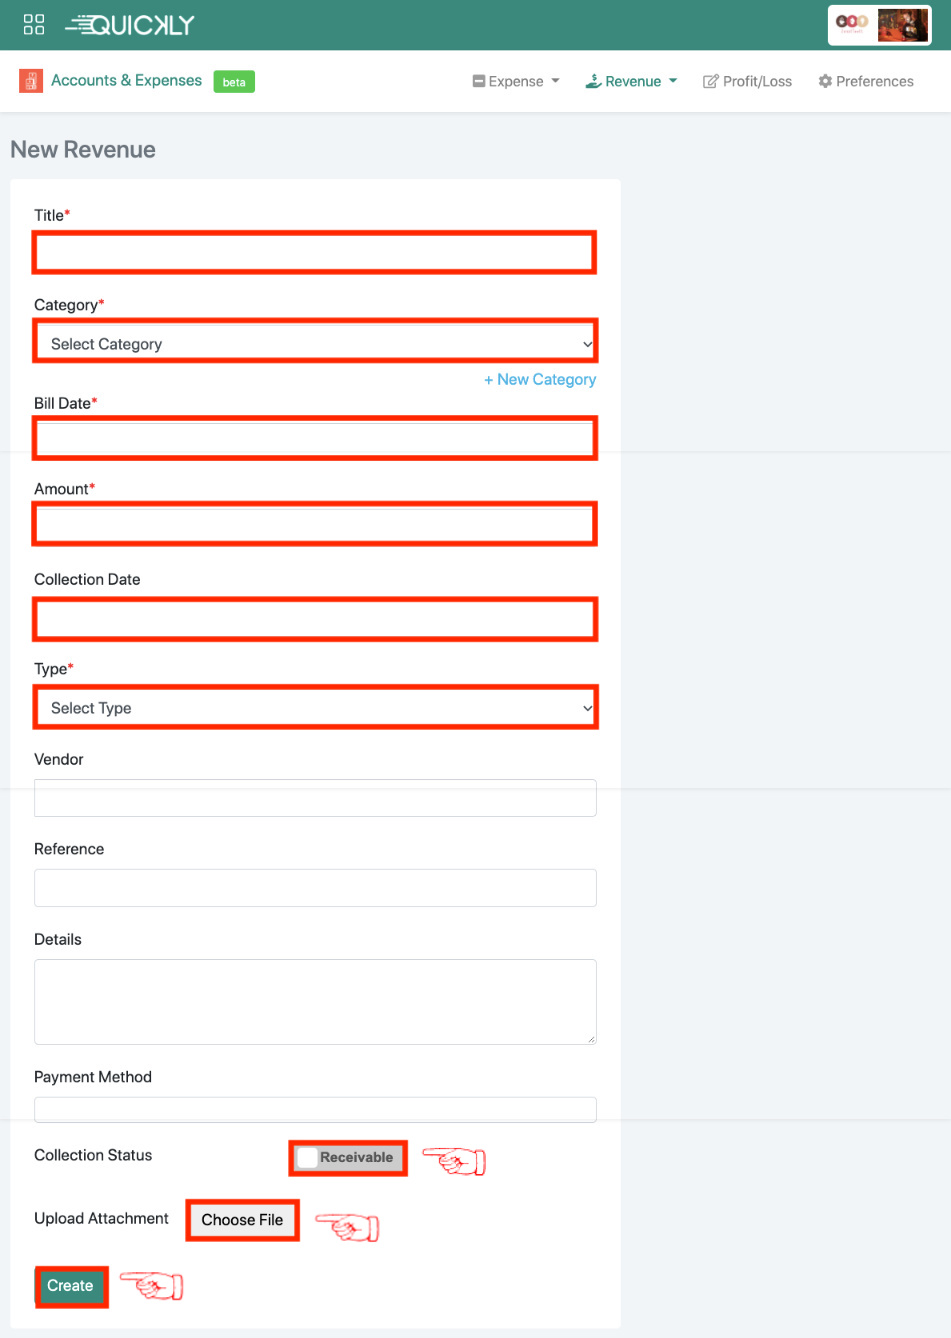
Related Video Support
How to manage revenue, expense, vendor credit & profit/loss
In this video we will see how to keep track of your received or receivable revenue and paid or unpaid expenses using Quickly Restaurant and how to manage the credit and due of your vendors and how to get profit/loss calculation of your restaurant.
How to trace your receivables?
Admin
You can easily Keep track of your Revenues you are going to receive. The revenues which are not received yet, will be listed in the accounts receivable page. To find your receivables, select Accounts Receivable from the Revenue drop down list.
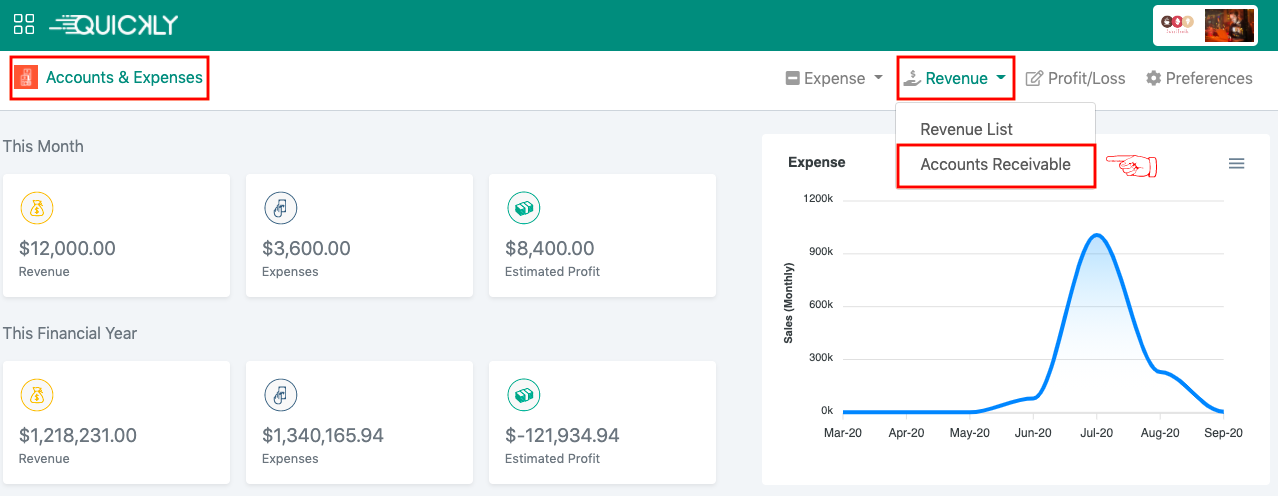
In the Accounts Receivable page, you can filter your receivables by types, and search by title, category, vendor name, amount and so on. Collection status can be changed by clicking on the Update Status button right next to the item you want to change the status for.
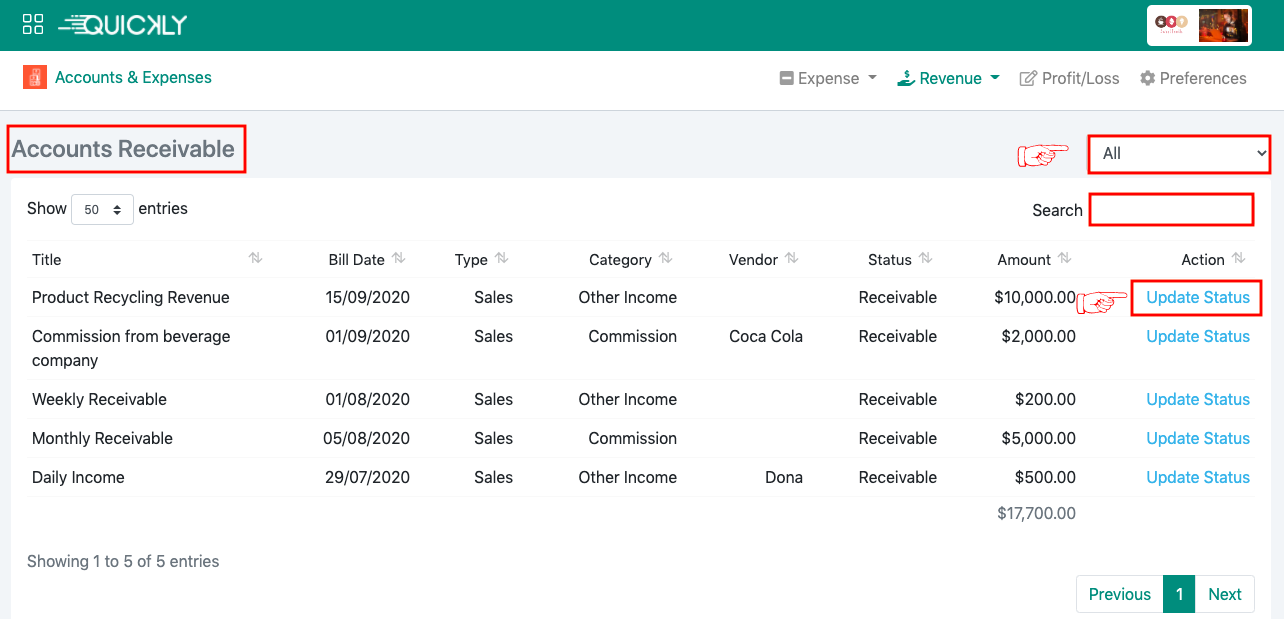
You can update your collection status from receivable to received by clicking on the update button, collection date can be changed too.
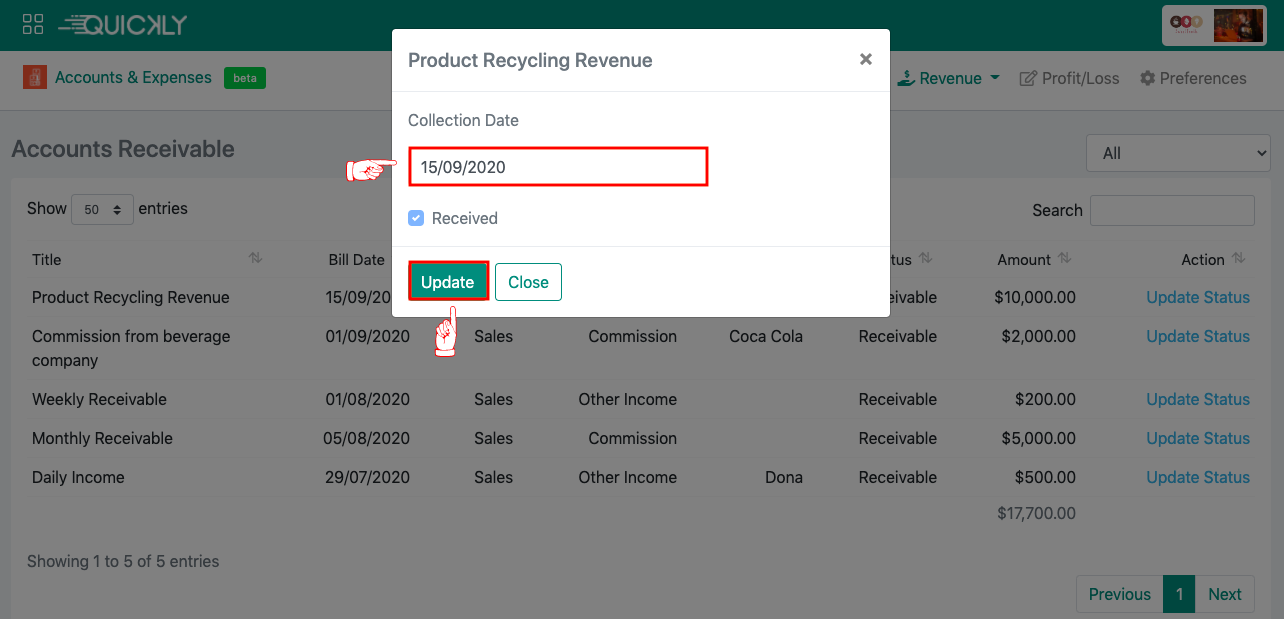
Related Video Support
How to manage revenue, expense, vendor credit & profit/loss
In this video we will see how to keep track of your received or receivable revenue and paid or unpaid expenses using Quickly Restaurant and how to manage the credit and due of your vendors and how to get profit/loss calculation of your restaurant.
Get your income statement
Admin
👉 You can know your net income at a glance from the Profit/Loss page. Click on Profit/Loss from the Accounts & Expenses page.
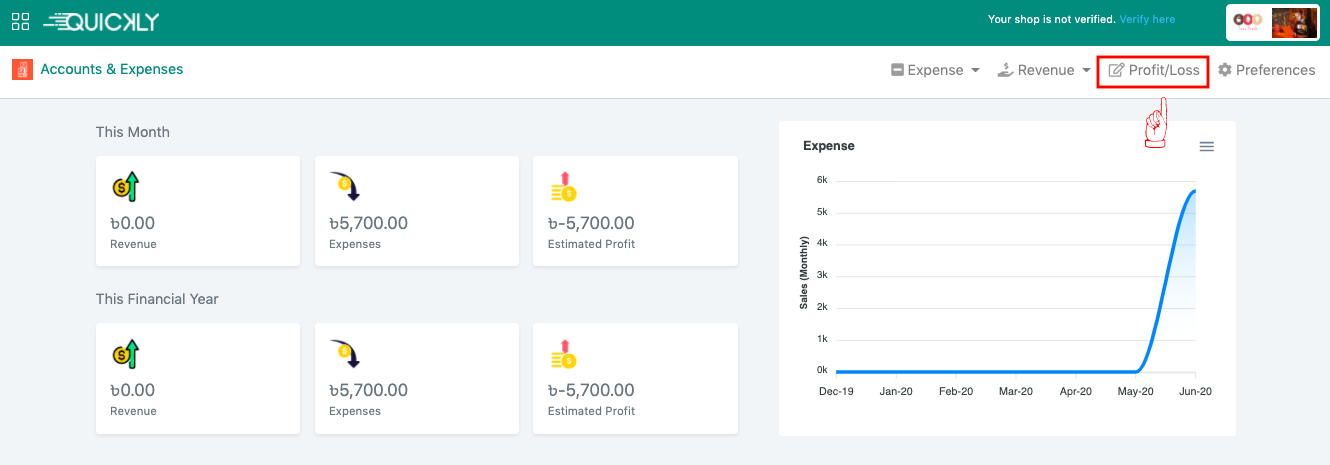
👉 You can see your net income(Profit/Loss) statement from the Profit/Loss page on your preferred accounting period and can download the income statement as PDF.
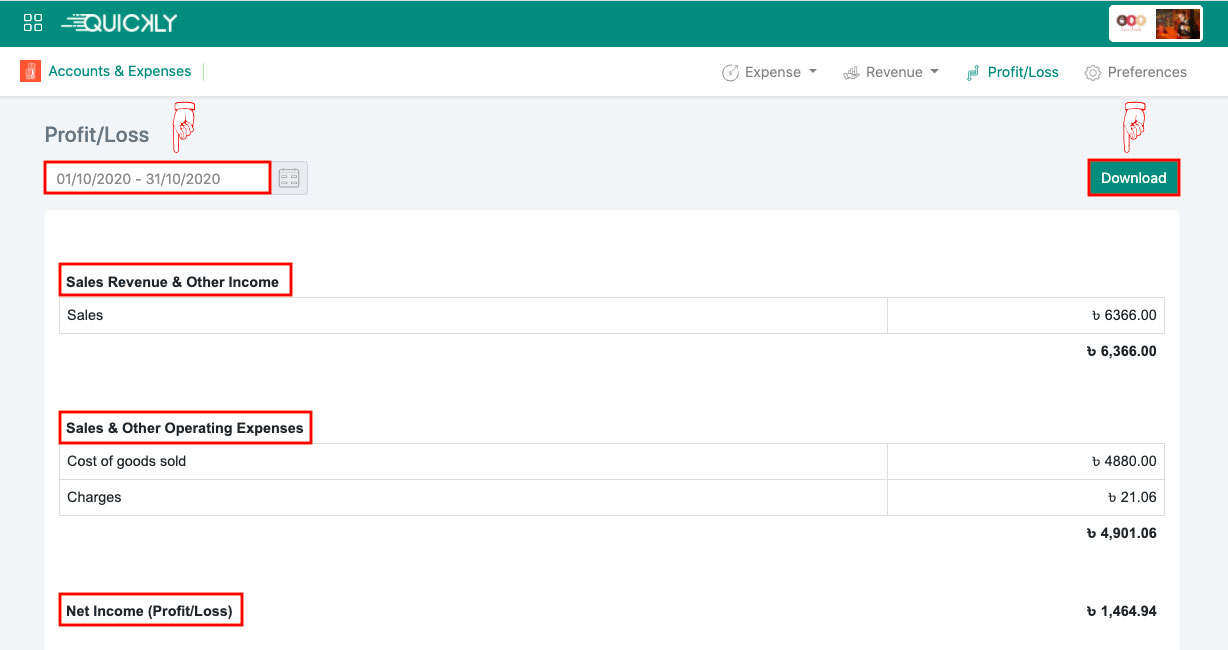
Related Video Support
How to manage revenue, expense, vendor credit & profit/loss
In this video we will see how to keep track of your received or receivable revenue and paid or unpaid expenses using Quickly Restaurant and how to manage the credit and due of your vendors and how to get profit/loss calculation of your restaurant.
Set your accounting period and financial year
Admin
You can set your preferred accounting period and financial year from the Accounting Preference page. You can set the calculation of your expenses and revenues as well in order to get a more exact assessment of your restaurant’s profit/loss.
👉 From the Accounts & Expenses page, click on Preferences at the top right corner.
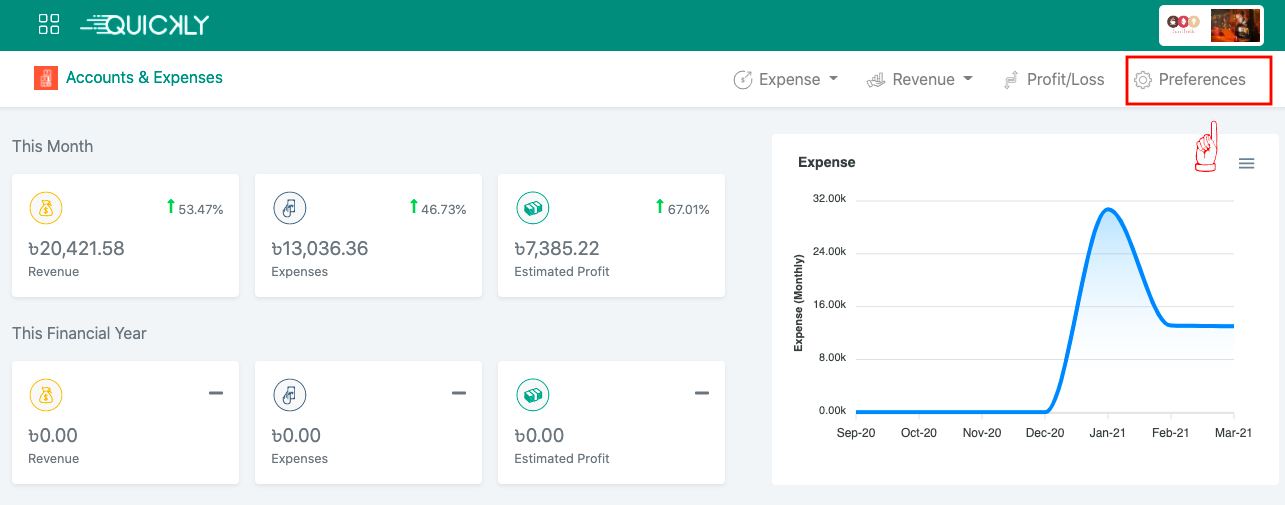
👉 You can set the accounting period as weekly or monthly to see the total income statement in the Profit/Loss page based on your preferences. Click on the Save button after selecting your preferred accounting period.
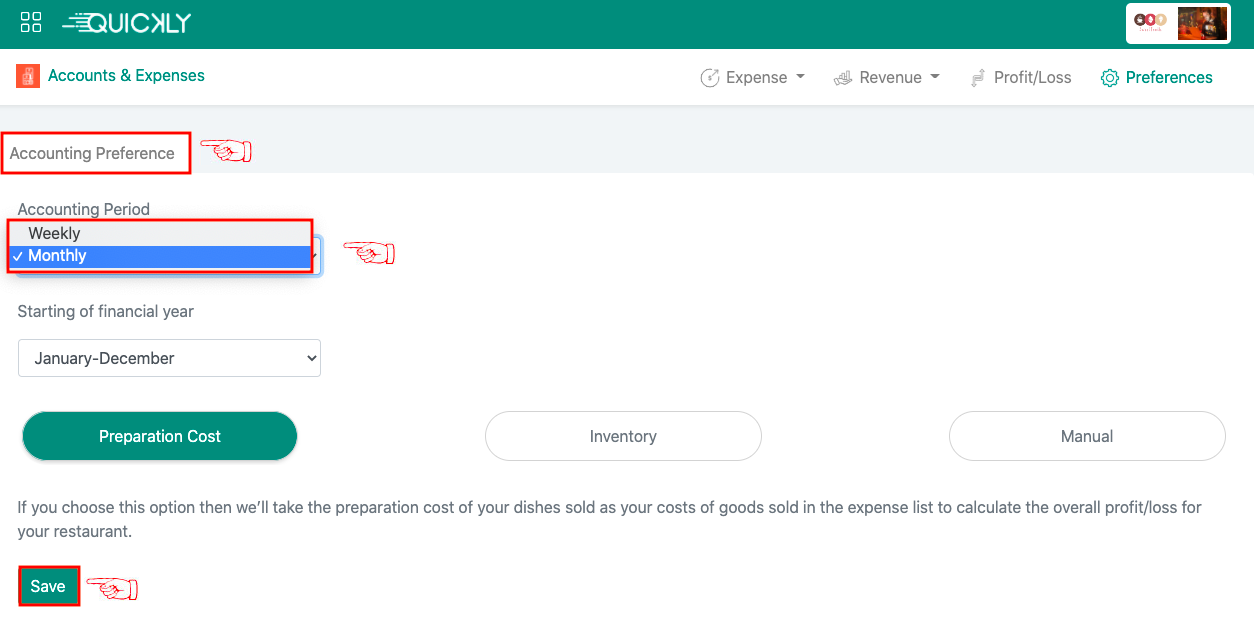
👉 You can set the financial year too as per your preference (For example, January-December/April-March/July-June/October-September) to see the total income statement in the Profit/Loss page. Click on the Save button after selecting your preferred financial year.
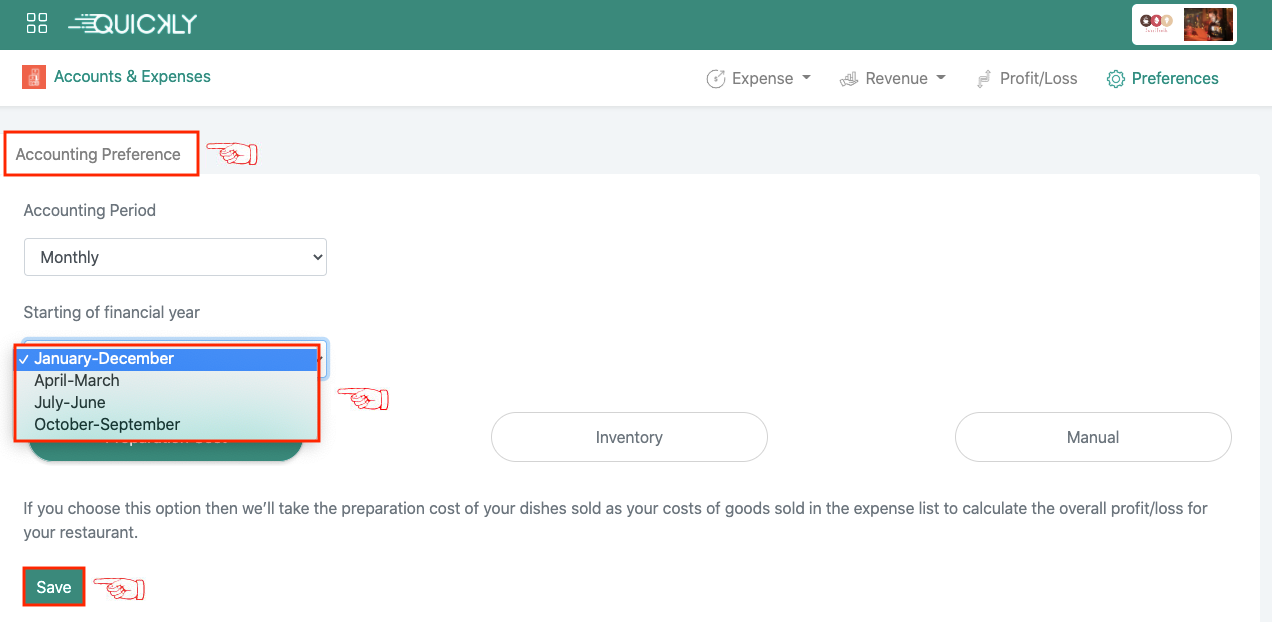
If you want the preparation cost of your sold dishes to be calculated automatically to assess your overall profit/loss, then select the Preparation Cost option and update it by clicking on the Save button. The preparation cost of the sold dishes will be shown as Cost of Goods Sold in your Expense List page.
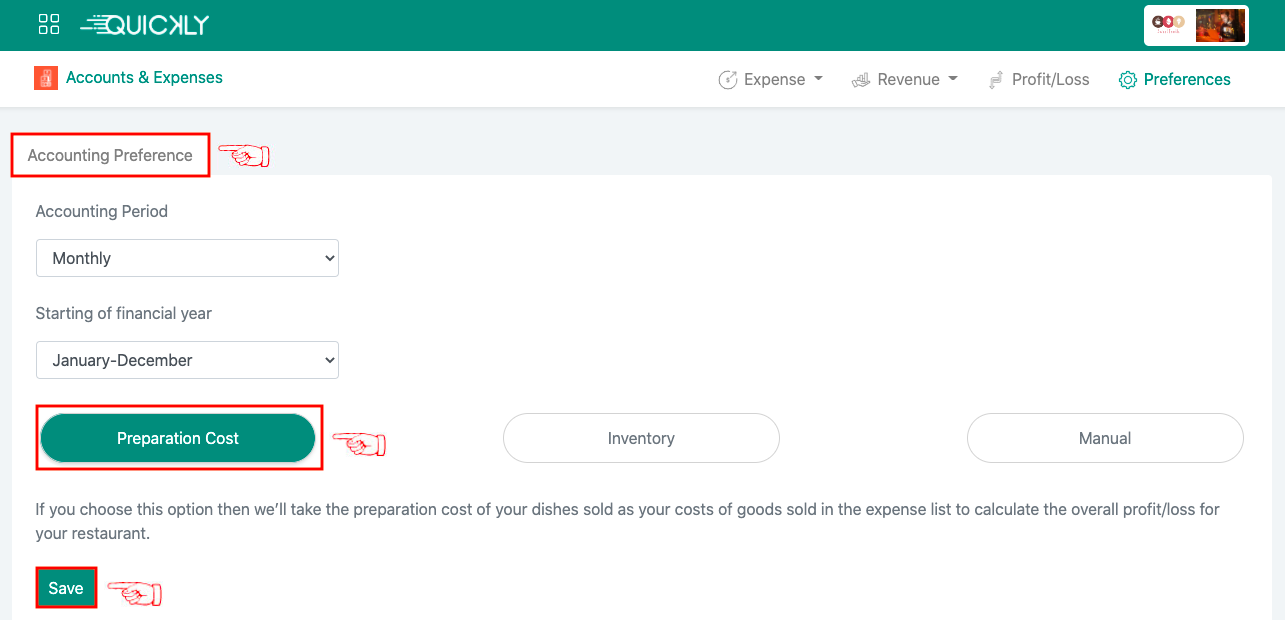
You may want to calculate your total expense based on the amount spent for stocking-up. If this is the scenario, then select Inventory as a preference and save it. Your stock items’ costs will be used as your costs of goods sold which will be added in the expense list. On the other hand, the amount you have received as refunds from your stock reconciliation will be added in the revenue list.
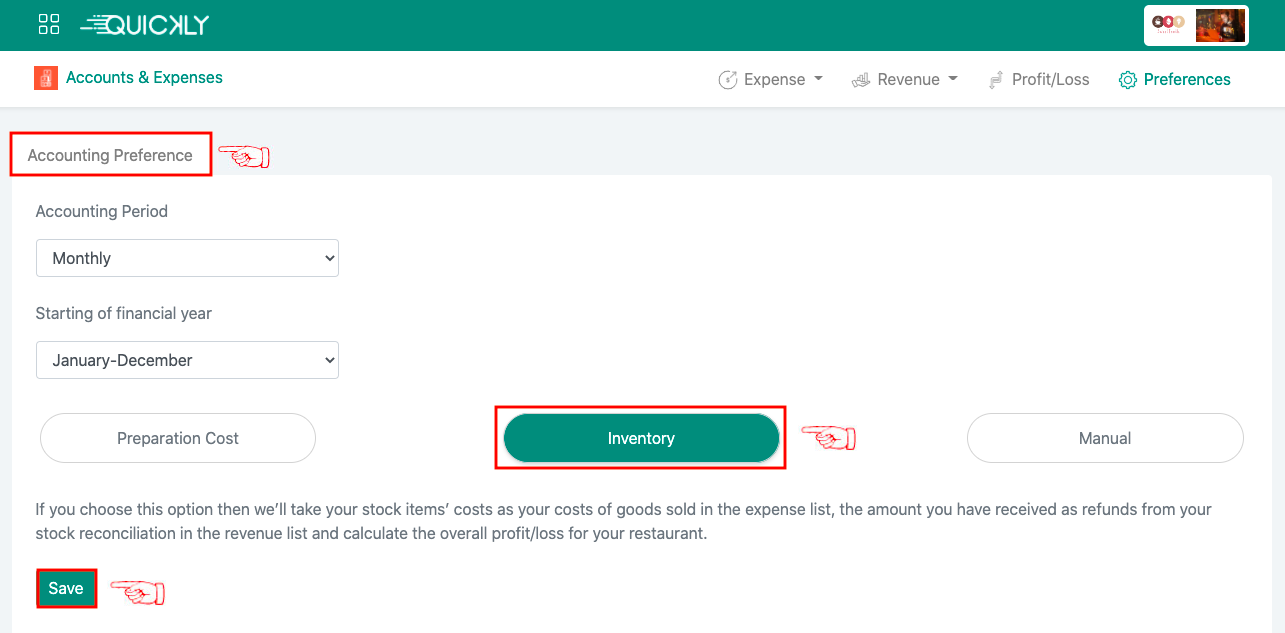
You may want to provide the total amount of expenses manually. We have a solution for that as well. Simply select the Manual option and save your preference. This will allow you to enter your grocery items costs as a daily recurring expense and input the total amount expenses manually.
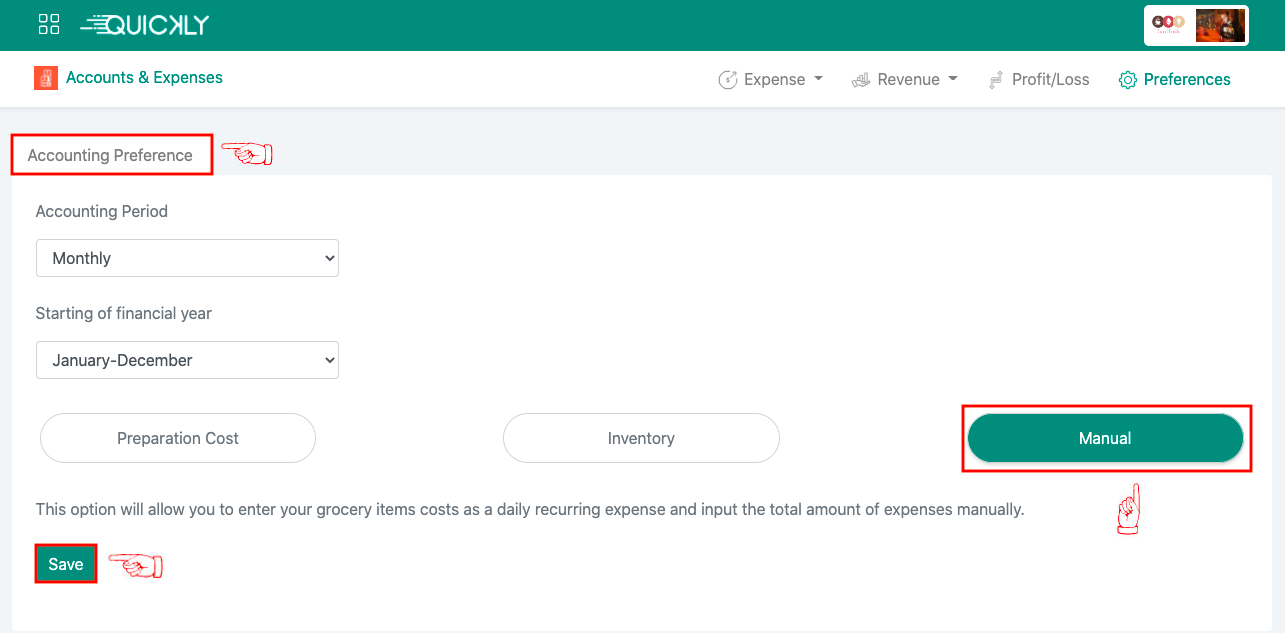
Related Video Support
How to manage revenue, expense, vendor credit & profit/loss
In this video we will see how to keep track of your received or receivable revenue and paid or unpaid expenses using Quickly Restaurant and how to manage the credit and due of your vendors and how to get profit/loss calculation of your restaurant.
Keep track of your vendor credit
Admin
Quickly helps you in keeping track of the payments made to your vendors in advance so that you can better manage them.
Learn how to create a vendor/supplier list.
Add vendor credit
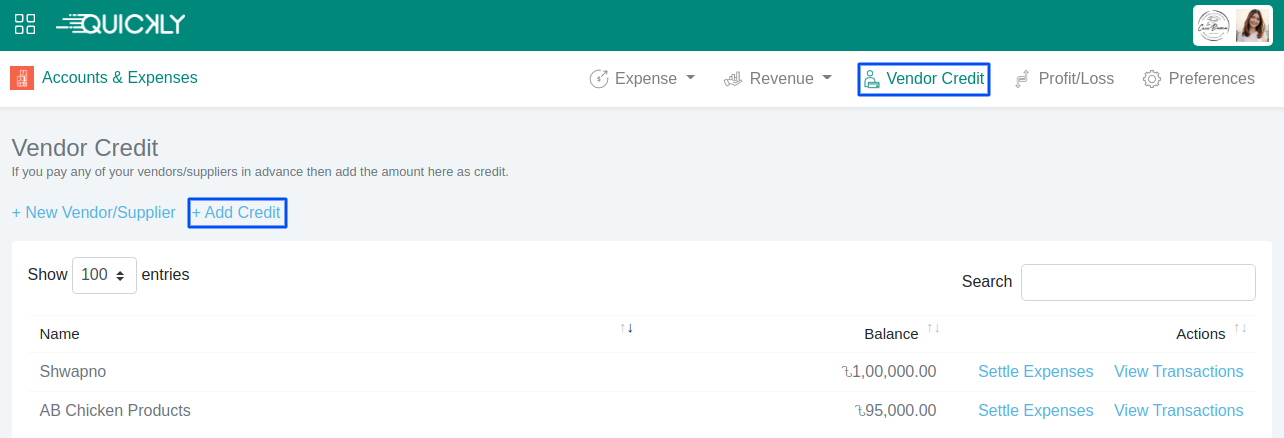
- Go to Vendor Credit.
- Click Add Credit.
- Add vendor information and amount, then click Add Credit.
Settle expenses

- Click Settle Expenses.
You will be redirected to a page containing the vendor's unpaid expense list. - Click Settle.
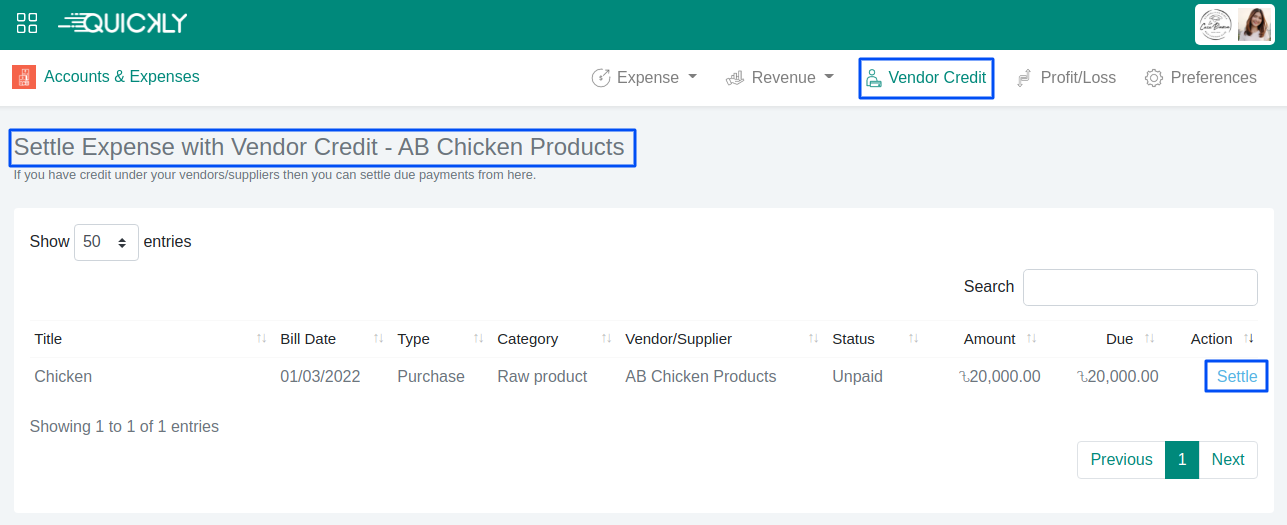
- Add the amount and settle.
To see a detailed transaction history of the amount credited and debited for a vendor, click View Transactions from Vendor Credit.
Set how to calculate the cost of goods sold
Admin
Cost of goods sold (COGS) refers to the direct costs of producing the foods sold by your restaurant. This amount includes the cost of the ingredients and staff directly used to prepare the food.
Knowing the cost of goods sold helps analysts, investors, and managers estimate the company’s bottom line. So it is very important for you to identify your COGS and try to keep it low so that your net profits will be higher.
To calculate your restaurant's overall profit/loss, determine how you want to calculate the cost of goods sold from Preferences.
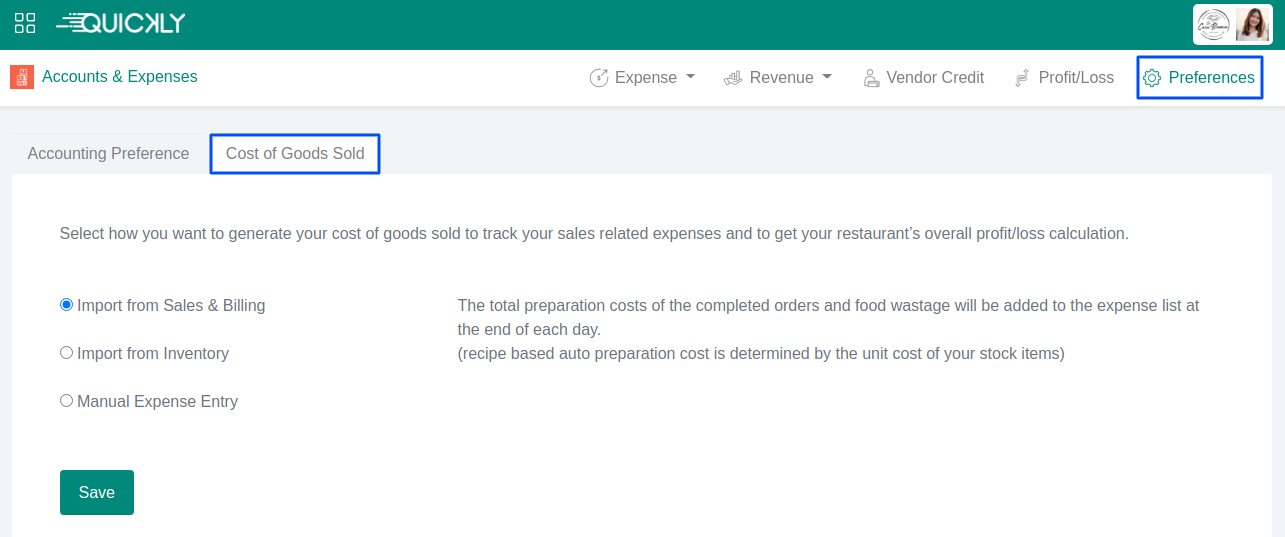
Add vendor credit
For the completed orders and wastage, the cost of goods sold will be added to the expense list at the end of each day. This will be calculated based on the preparation cost of the dishes.
You can manually set the preparation cost when creating a dish or use the auto preparation cost, which is calculated based on the recipe.
To create a recipe for a dish, read how to create recipes.
Import from Inventory
You must enable the Inventory module first before proceeding with this preference.
The stock-ins will be added as expenses and the refunds will be added as revenues.
To create a new stock-in, read how
to stock-in items to the inventory.
To add a refund, read how to
adjust damaged or refundable items to the inventory.
Manual Expense Entry
Apart from these two methods, you can also manually enter your expenses and keep track of the cost of your goods. For example, you can create recurring expense plan and generate those expenses as your COGS each time you purchase groceries for your restaurant.
Please note that, selecting any one among these 3 options will disable the other two. For example, if you select option 3 then even if you have preparation cost set in the Sales & Billing module and/or items stocked-in in the Inventory module, those values will not be counted as your COGS.
e-Restaurant
Admin
Quickly e-Restaurant creates an online ordering platform for you, providing a complete sales channel for your restaurant. This means you can have your own website and use it to better organize the restaurant’s online orders.
Right after enabling the module, you’ll get a customizable URL for your website or map a custom domain and smartly manage your online orders, modify the menu from the e-Restaurant admin portal.
Give your website a personal touch by changing its theme color, contents, banner - all by yourself. No technical knowledge or designing skill needed.
Your e-Restaurant is always in sync with your Business portal and linked to the Sales & Billing module. So any changes to the restaurant's information (e.g. location, contact details, business hours, social media links, etc.) and menu will automatically reflect on the website.
Gain control of your business, start your own delivery fleet, and have it delivered to your customers’ doorstep right away!
Change website URL
Admin
To change the default Site URL,
- In the e-Restaurant module, go to Setup.
- Click Change next to the Default Site URL.
- Enter the new URL path (e.g. example) and click Update.
Note that the URL path must not contain any special character (i.e @#$%^&*(){}[]!~<>?/\|’+-=:;”) or space.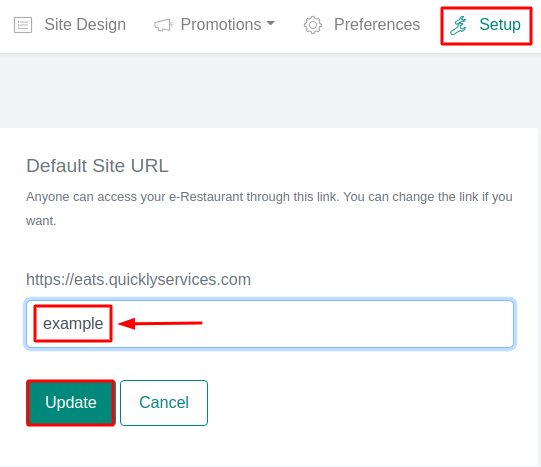
After updating the path, you can access your website from the new URL (https://eats.quicklyservices.com/example).
Map custom domain
Admin
You can use a custom domain rather than the default Site URL provided for
your website.
You can map a main domain (e.g. example.com) or a subdomain (e.g.
abc.example.com). By default, when you map a domain to your website, we
process a managed SSL certificate for HTTPS connection.
Before you begin, if you do not have a domain, purchase one.
To map a custom domain to your website,
- In the e-Restaurant module, go to Setup.
- Click Add Custom Domain.
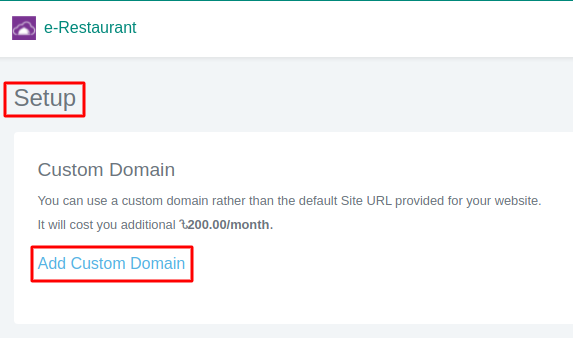
- Enter your domain name (e.g. example.com) and click Save
Domain.
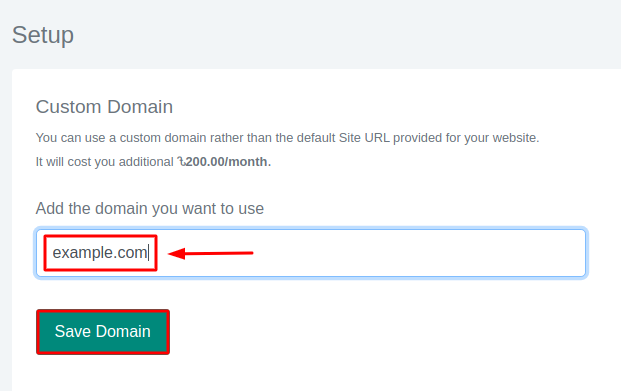
- Go to your domain registrar website and update
your DNS records with the displayed records.
You can retrieve these records any time from the Custom Domain section. - After saving the DNS records in your domain registrar, click Update.
Note that HTTPS connection will not work if you click update before changing your DNS configuration.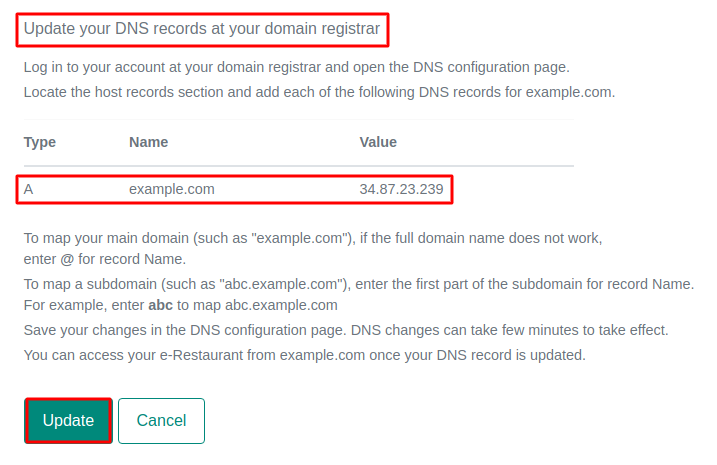
Updating DNS records at your domain registrar
- Log in to your account at your domain registrar and open the DNS configuration page.
- Locate the host records section of your domain's configuration page and
add the DNS record. Enter the following information in the record
fields:
- Type: A
- Name:
- To map a main domain (e.g. example.com), enter the full domain name (example.com). If it doesn’t work enter @
- To map a subdomain (e.g. abc.example.com), enter the first part (abc).
- Value: 34.87.23.239
Save your changes in the DNS configuration page. In most cases, it takes only a few minutes for these changes to take effect, but in some cases it can take up to several hours, depending on the registrar.
You can also change your Custom Domain any time in the same way. Click Change next to the Custom Domain URL and follow the mentioned steps above.
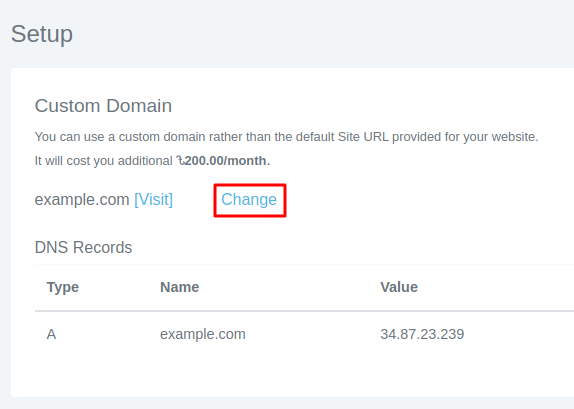
Now access your website at its new URL, for example https://example.com.
Setup menu for your website
Admin
Your e-Restaurant’s menu is always synced to your restaurant's dine-in menu. On the website, you'll find all active categories and dishes, along with their prices, images, descriptions, options and add-ons. Hence, any changes in the menu from the Sales & Billing module will immediately reflect on your website.
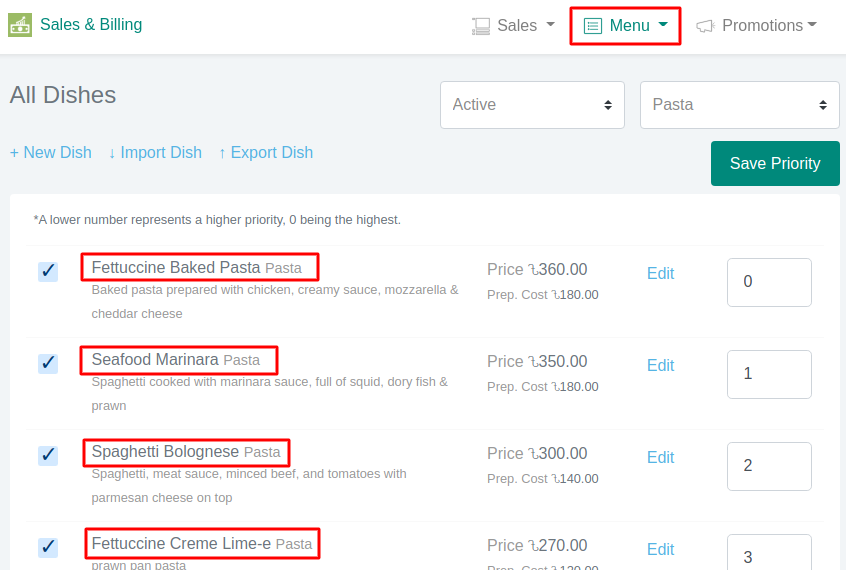
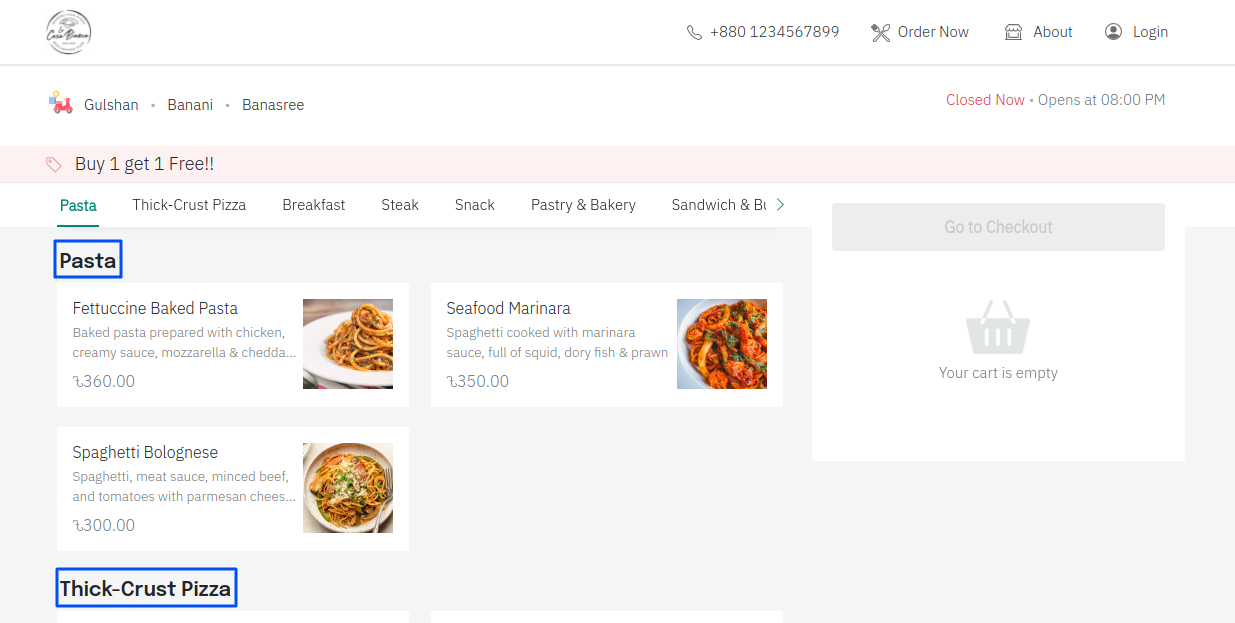
If you haven’t prepared your menu yet, learn how to organise your restaurant menu.
Hide/unhide a dish or category an item from your website
Admin
If you are not delivering certain meals to online customers temporarily, you can instantly hide or unhide those categories or dishes on your website from the e-Restaurant Admin Portal.
- Login to the e-Restaurant Admin Portal.
You’ll find the link on the e-Restaurant dashboard.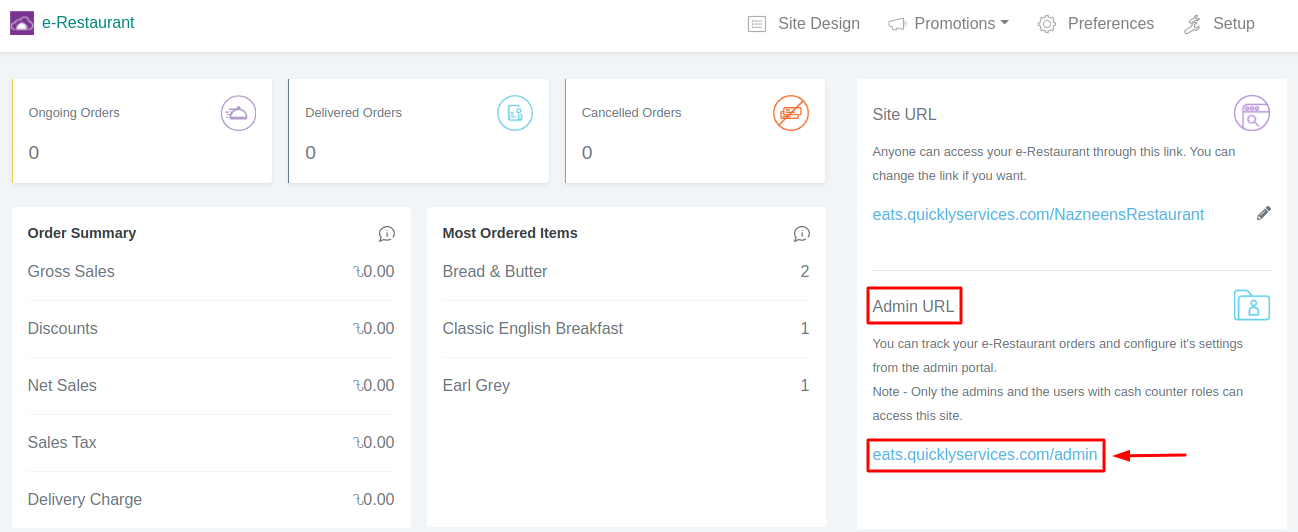
- Click Menu
- To hide/unhide a category or dish, click the switch next to it.
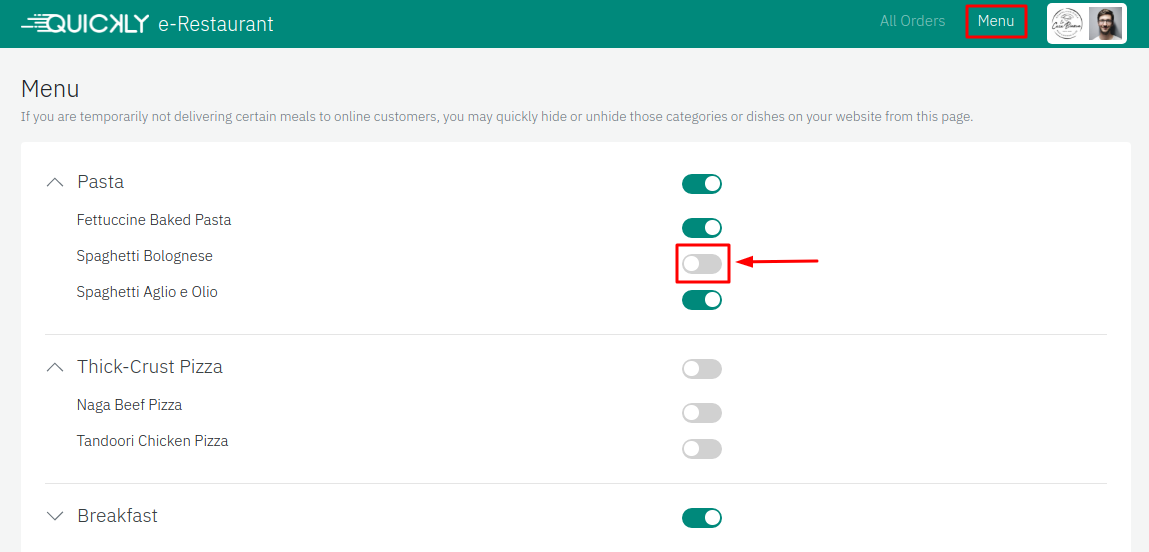
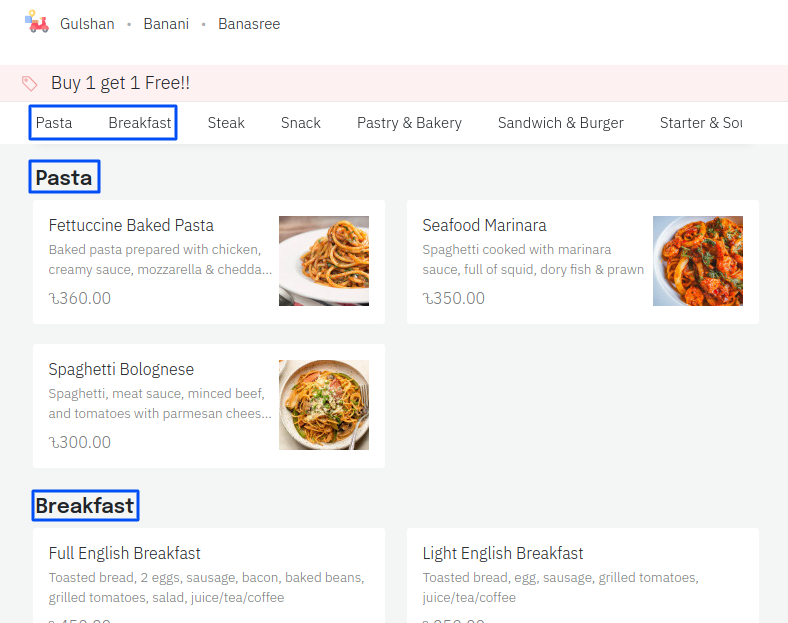
Remove inconsistency between dine-in menu and website’s menu
Admin
If the categories and dishes you have in the Sales & Billing module are not showing properly in your e-Restaurant website, you can sync menu following these steps -
- In the e-Restaurant module, go to Preference.
- Go the the Sync Menu tab.
- Click Sync Menu.
Note that once you sync menu, your e-Restaurant's menu will be reset.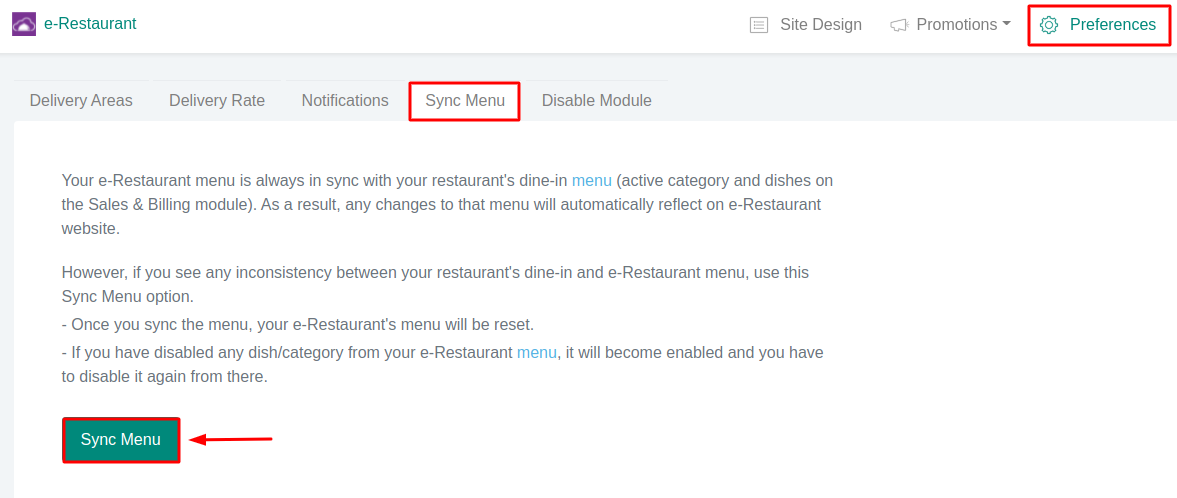
Setup delivery areas and delivery charges
Admin
To add the areas you want to provide delivery service,
- In the e-Restaurant module, go to Preference.
- Go the the Delivery Areas tab.
- Click New Area
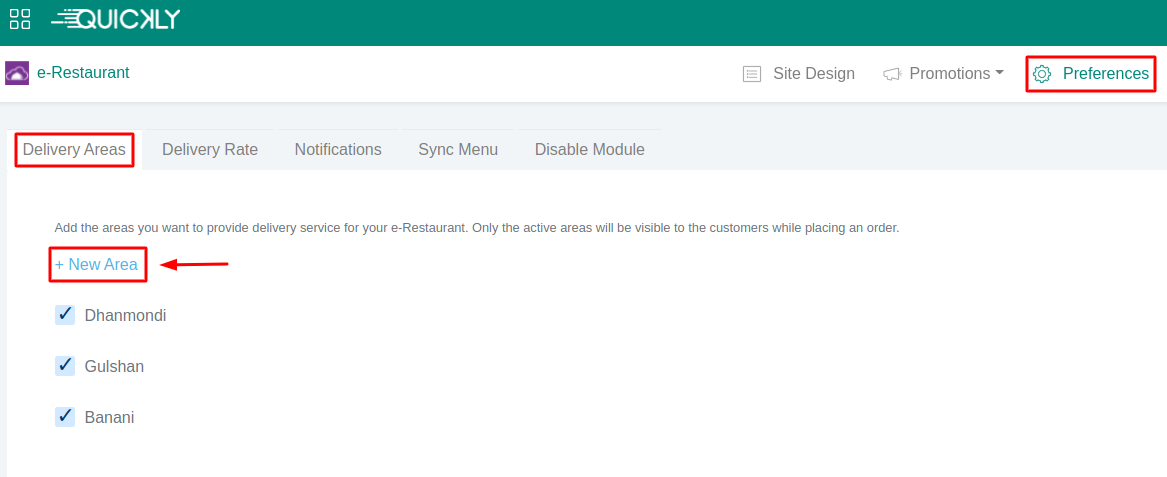
- Enter the area name and click Save
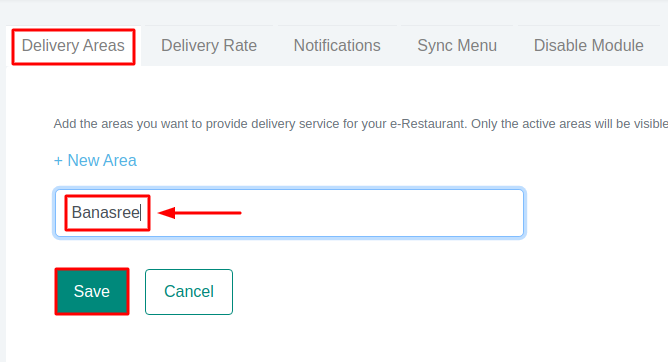
- To Deactivate any area, uncheck the box next to the
area.
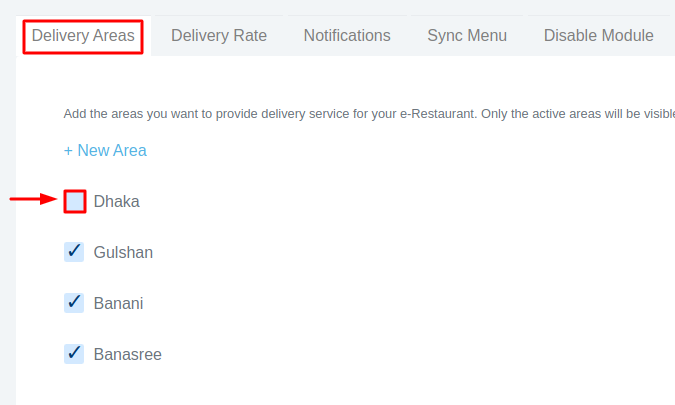

Only active areas will be visible to the customers.
Change delivery charge
By default, your restaurant’s delivery charge is considered as the fixed delivery rate.
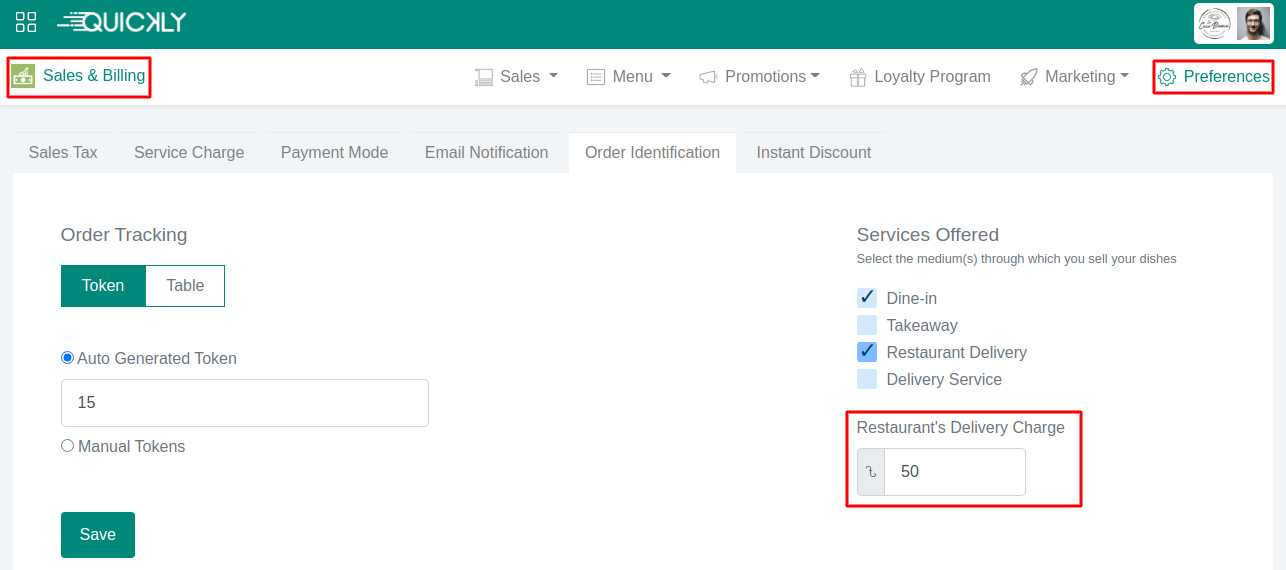
To change the fixed rate,
- Go the the Delivery Rate tab in the Preference section.
- Select Fixed option.
- Enter the delivery charge amount and click Save.
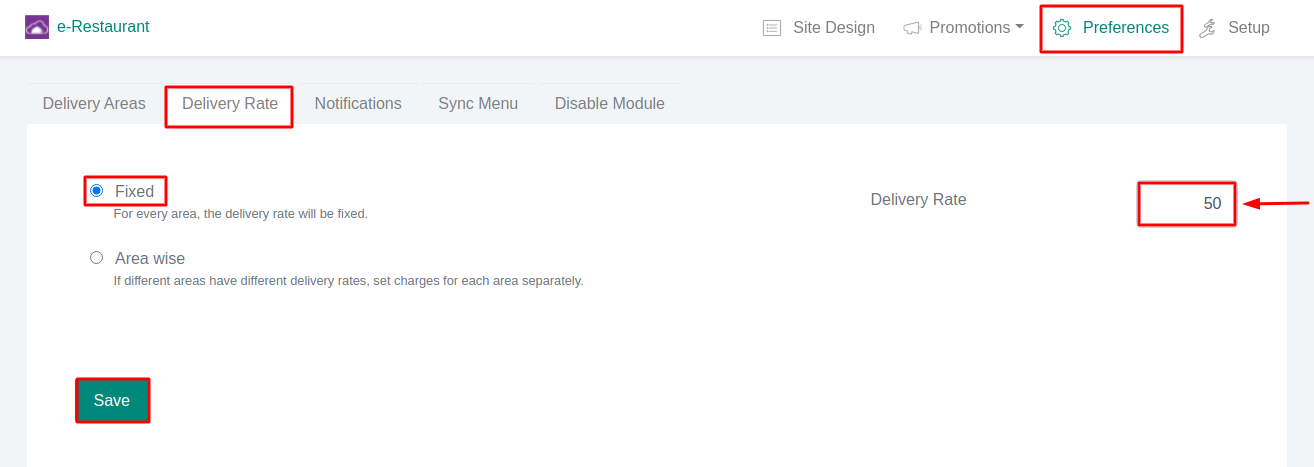
To set different delivery rates for different areas,
- Go the the Delivery Rate tab in the Preference section.
- Select Area wise option.
- Enter the delivery charge amounts and click Save.
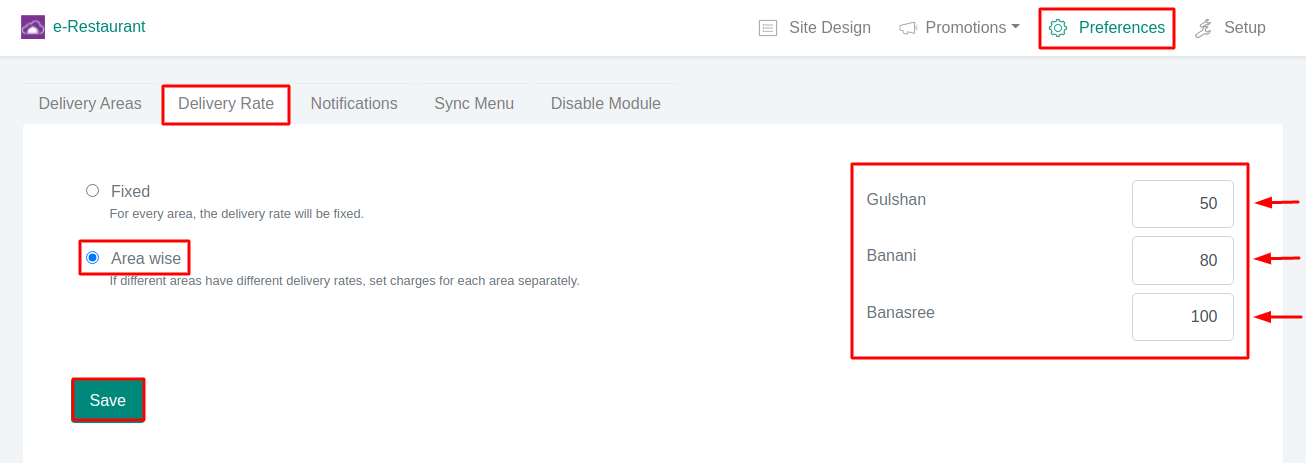
During checkout, customers will be able to choose from the Delivery Areas and the delivery charge will be calculated accordingly.
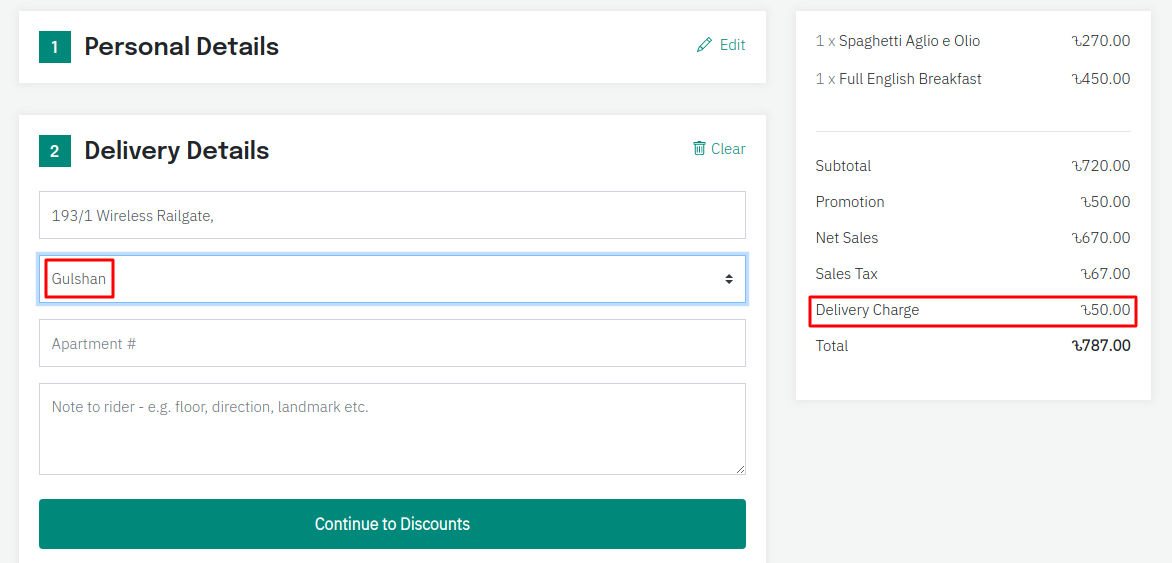
Personalize your website (update site content and choose theme)
Admin
All branding information (i.e. restaurant location, email, phone or social media links) of your e-Restaurant is automatically generated from the Branding & Settings section of the Business Portal.
If you haven’t set up your branding information yet, learn how to update your
business details.
Customers can only place orders during your business hours. Learn how to set up your
business hours.
Update site content
-
Go to
Site Design in the e-Restaurant module and click
Content
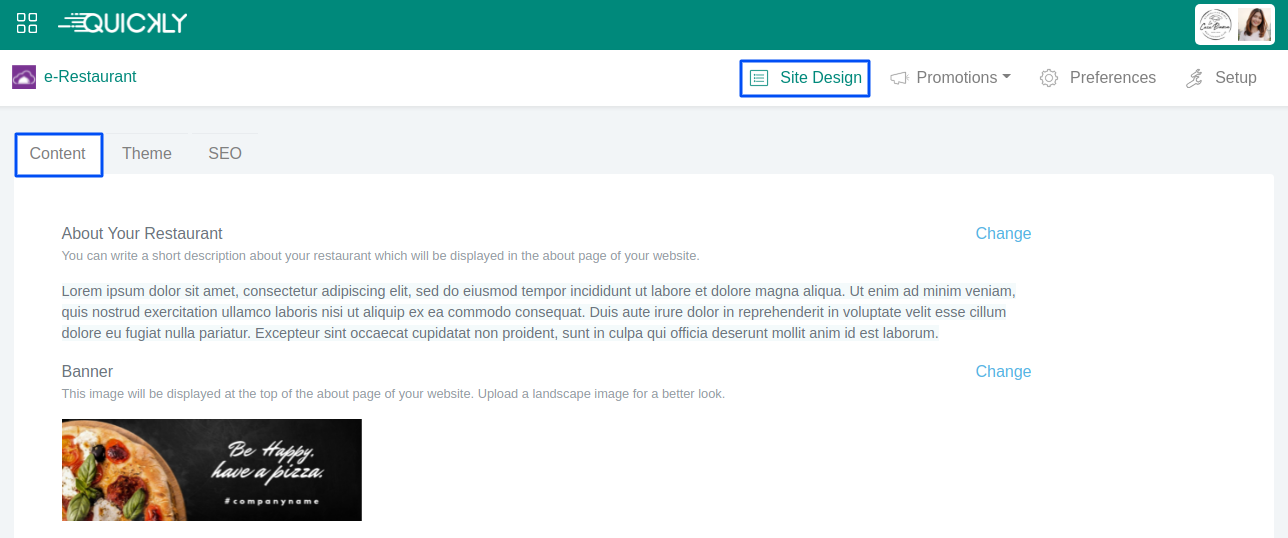
- To add About, click Add next to About Your Restaurant.
- To add Banner, click Add next to Banner.
You can see the changes at the About page as well as the header and footer of your e-Restaurant website.
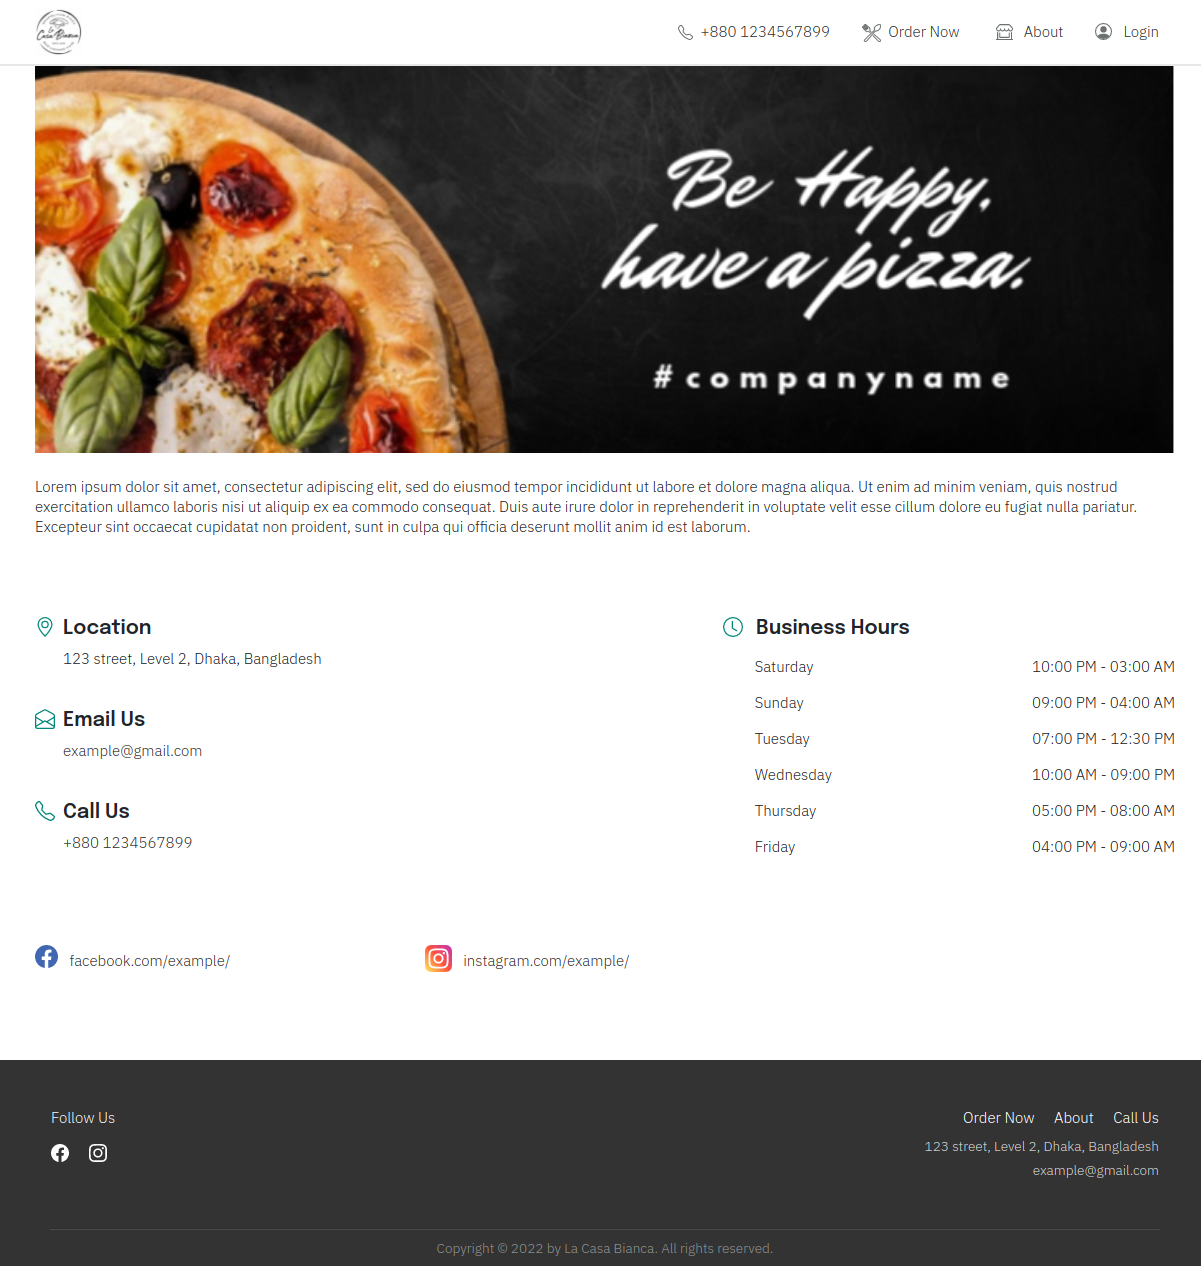
Choose theme
- Go to Site Design in the e-Restaurant module and click Theme
- To change the website’s header or accent color, choose a color from the
color picker.
You can also directly enter any color codes to the input fields. - Click Save
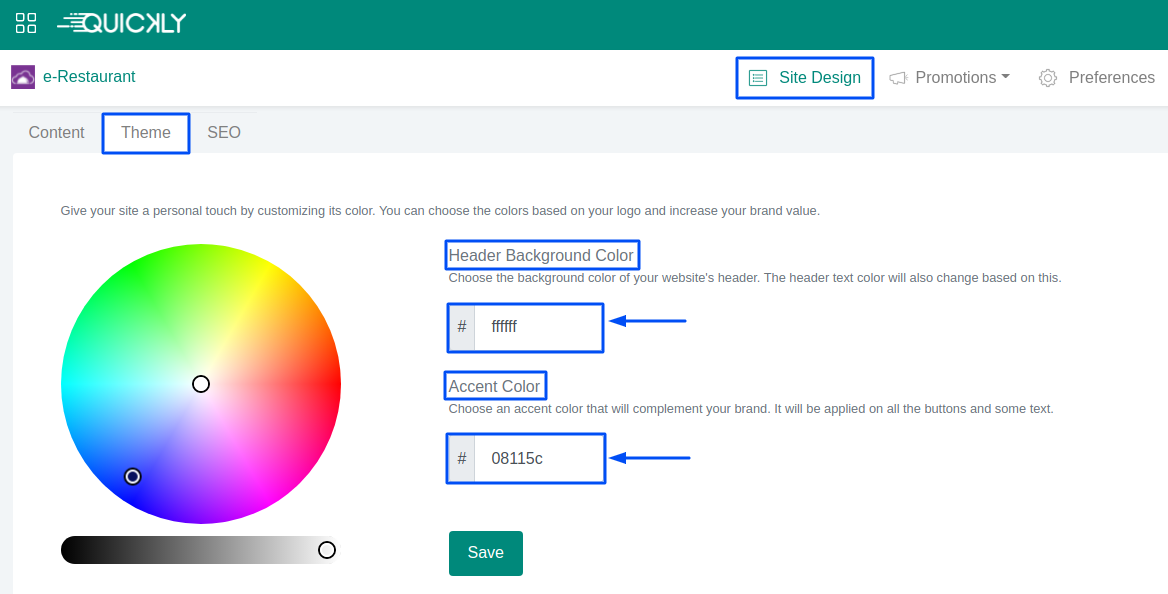
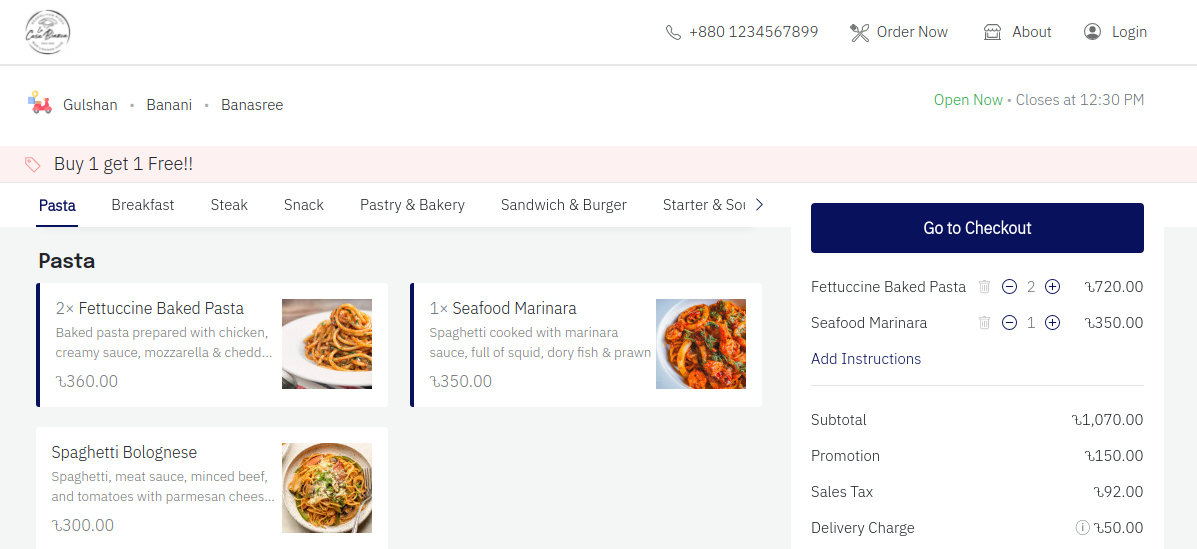
Offer Vouchers to your customers
Admin
You can create and promote vouchers and attract more customers to your e-Restaurant website.
To create a voucher,
- Go to the Voucher section under Promotions in the e-Restaurant module.
- Click New Voucher
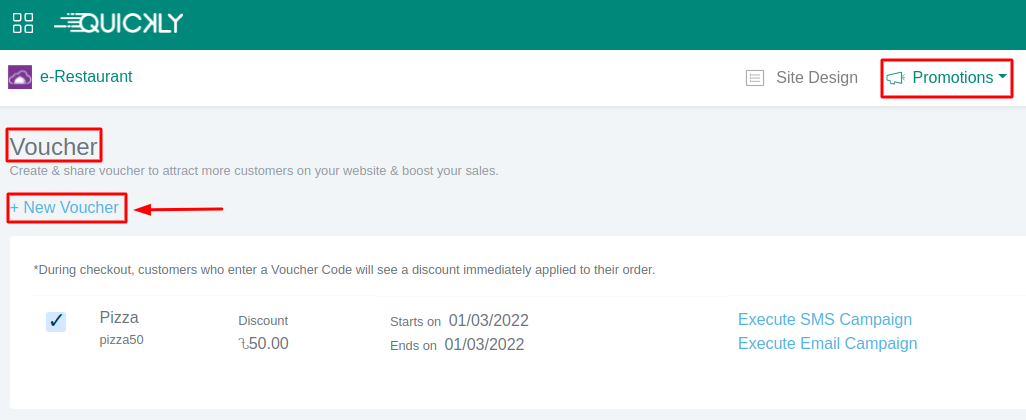
- Enter the required information (i.e. Title, Code, Discount Amount etc.)
- To limit a voucher usage for customers, enter the Usage
Limit. If you want to provide unlimited usage of a voucher,
uncheck the box next to it.

- Click Create
- Click Edit next to voucher to make any changes.
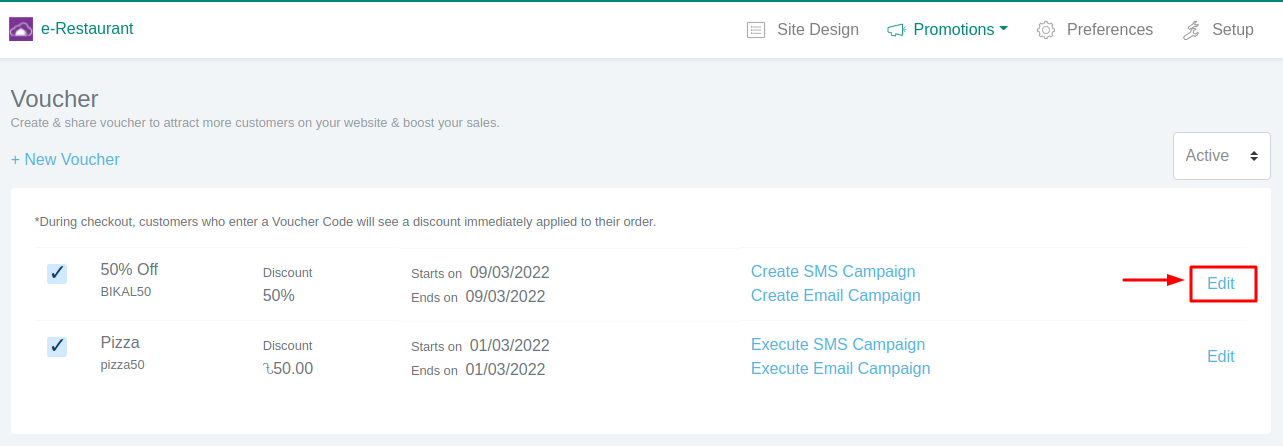
You can share vouchers with your customers by executing Email and SMS
campaigns.
Campaigns are automatically generated when a voucher is created. You can
also create a campaign from the Voucher List.
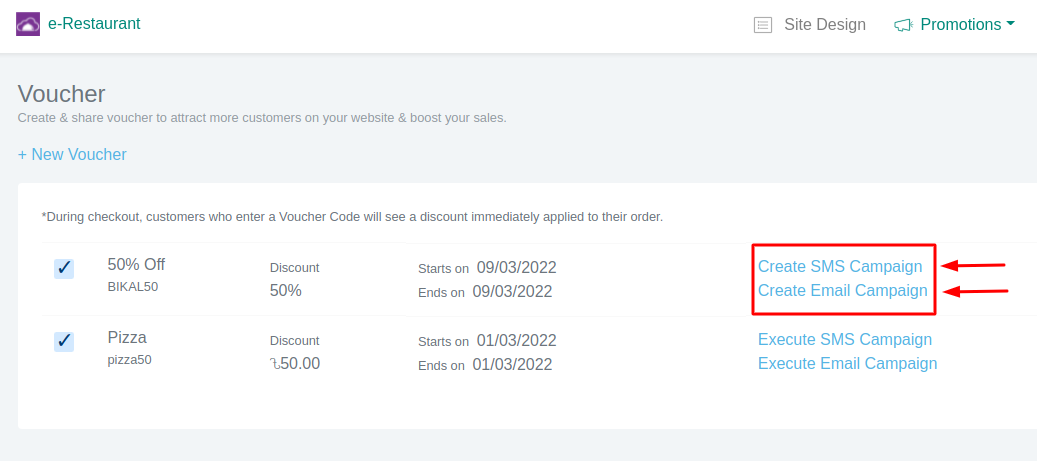
Before executing a campaign, make sure you have enough marketing credit available. Learn how to add credits to run campaigns.
To execute an Email Campaign,
- Go to the Voucher section under Promotions in the e-Restaurant module.
- Click Execute Email Campaign
- You can change the email subject, from address, recipients and the
content if needed.
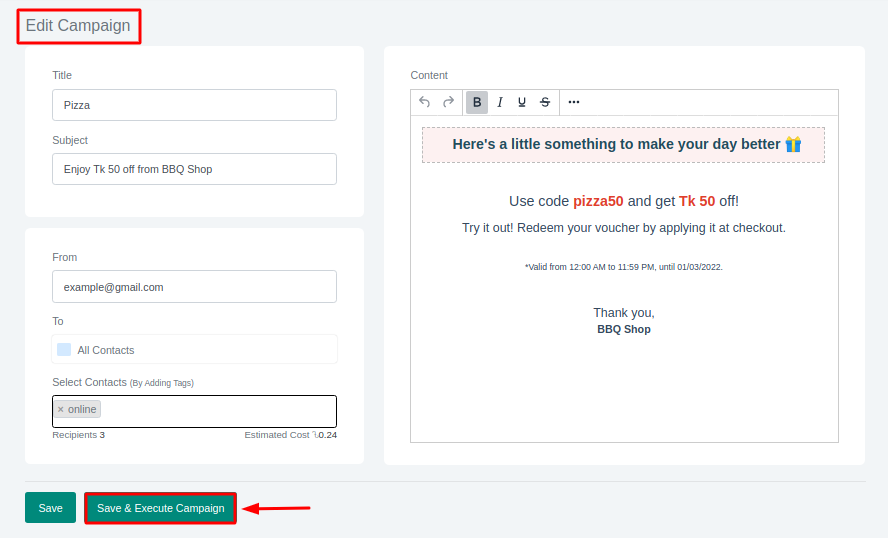
- You will get an overview of the campaign from the Email Campaign page.
Similarly, to execute a SMS Campaign,
- Go to the Voucher section under Promotions in the e-Restaurant module.
- Click Execute SMS Campaign
- You can change the text message, and recipients if needed.
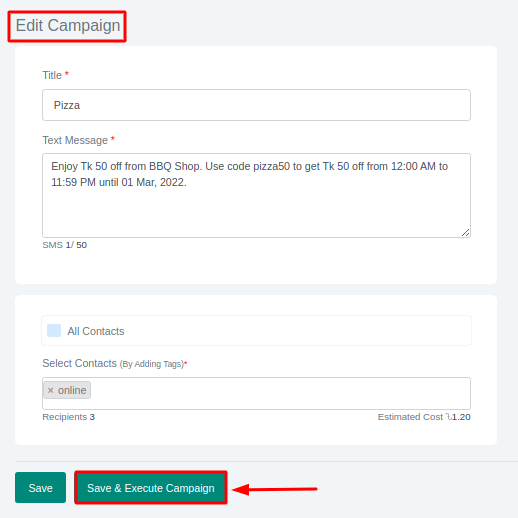
- You will get an overview of the campaign from the SMS
Campaign page.
Note that, SMS Campaign is only available for Bangladeshi Restaurants.
Highlight the ongoing offers and discounts
Admin
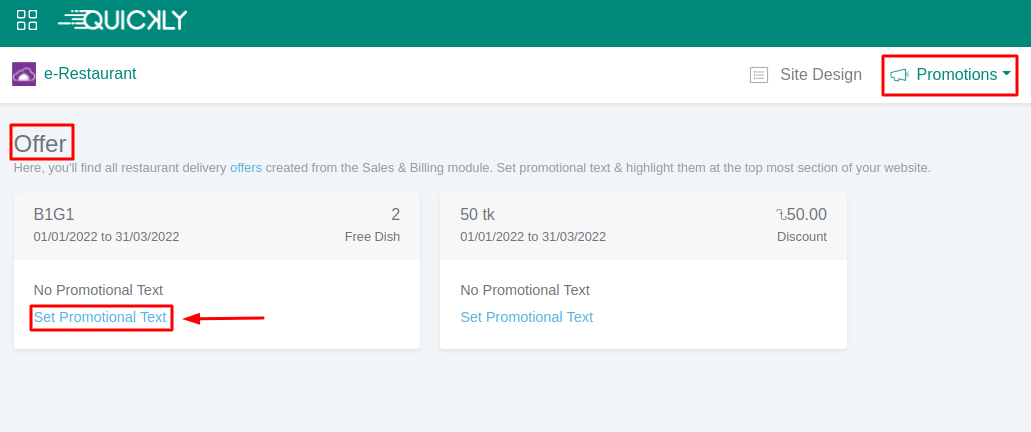
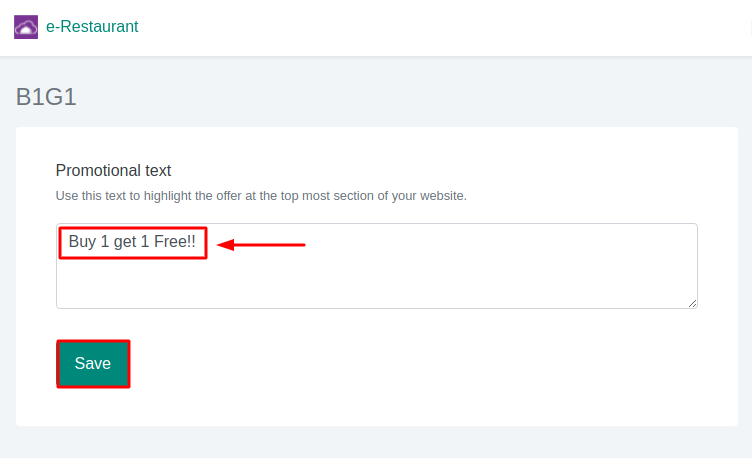
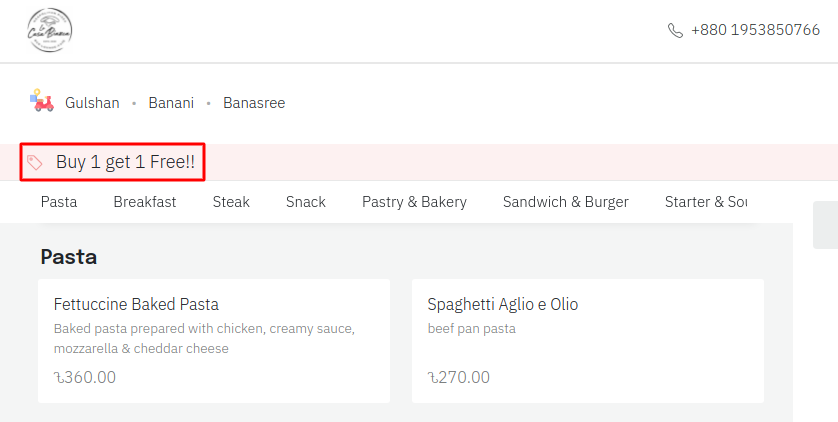
Select users to send order notification via email
Admin
After an order is placed via e-Restaurant, you will receive a notification on your order taking app.
You can also enable email notifications for the online orders. To assign users who will receive email notifications,
- Go to Preference in the e-Restaurant module.
- Click Notifications tab.
- Check the box next to the user's name
Note that you can only enable notifications for admins and users with e-Restaurant roles.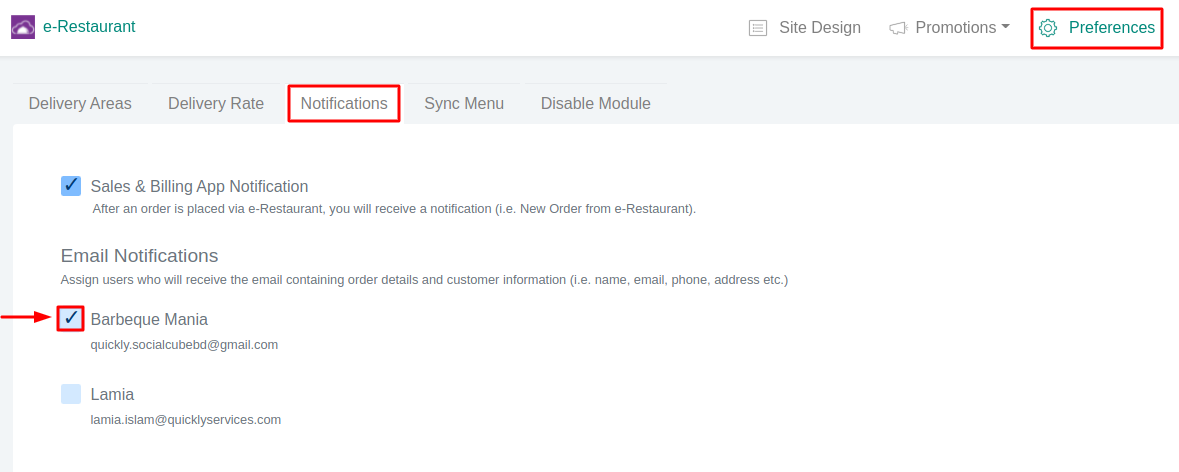
Learn how to invite users and control their access by asigning different roles.
Monitor & manage all orders from one place
Admin
You can see the details about online orders from the e-Restaurant Admin
Portal.
You can also change order status and filter orders based on their status
(i.e. Ongoing, Delivered, Cancelled) and placing time from this page.
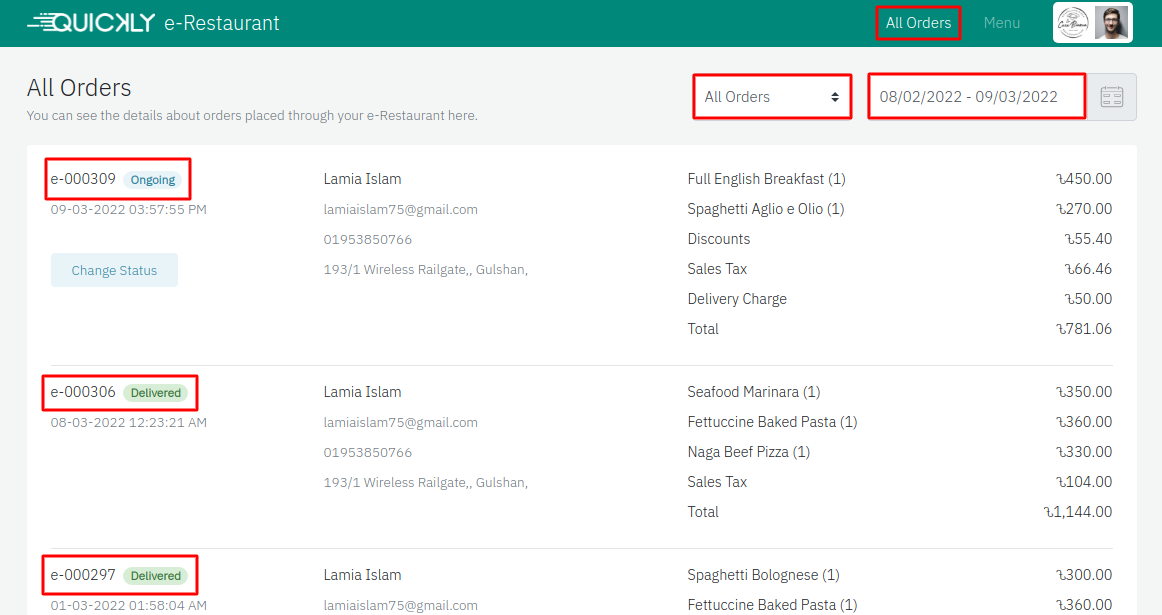
Cancel an online order
- Click Change Status
- Select the Cancelled option.
Note that customers will receive an email for the order cancellation.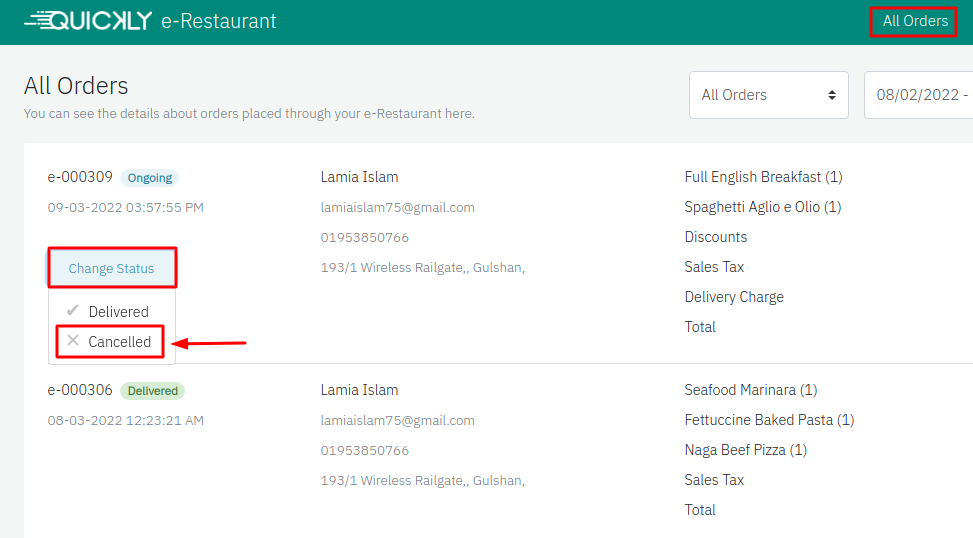
Make your website appear on top pages in search engines
Admin
Customers need to find your website quickly and easily, across multiple
search engines like Google, Firefox, Yahoo etc.
SEO (Search Engine Optimization) will make your website appear on top
pages in search engine results and help your customers find you easily and
increase the traffic to your website.
To setup the SEO content,
- Go to Site Design.
- Click SEO tab.

- Add your restaurant name as Title.
Note that this title will appear in the search results. So you should use a title that is easily searchable by customers. It is recommended that no special characters or languages other than English be used for the title. - Add short pieces of text that describe your restaurant as Meta
Description.
Search engines show meta descriptions below the page title in search results. Make your site inviting by keeping your descriptions short, relevant, and readable. - Add Meta Keywords.
Keywords are words and phrases that Internet users type into search engines to find websites for something they are looking for.
Include geographically targeted keywords on your restaurant website, as well as words that are most relevant to the cuisine you serve. This increases your chances of being found whenever someone searches for the relevant keywords.
For example, if you own a cafe, use keywords like cafe, cafe nearby, cafe near me, best coffee near me, espresso, cappuccino etc. - To set a logo that will be shown next to your website title in the browser tab add Favicon.
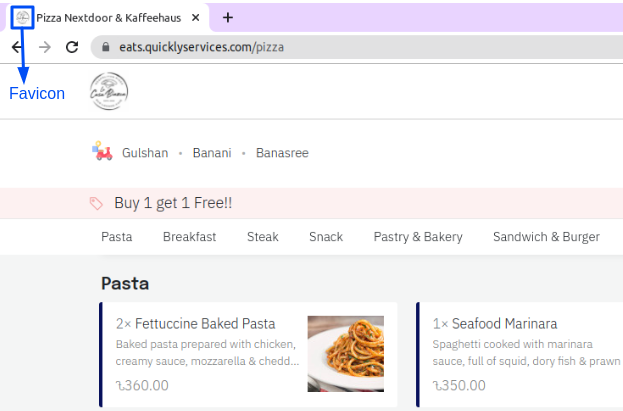
BackOffice App
Admin
Quickly Service is providing you the opportunity to manage your business from anywhere at any time. You will need a smartphone or tablet to use the Quickly BackOffice app. You may not have access to any computer or laptop all the time but you need to monitor your business always. Quickly BackOffice app is here to solve this problem for you so that you can monitor and manage your business simply using your mobile phone or tablet with an internet connection. You can install the app on your device from the Play Store and use the credentials authorised at your business portal to explore this app.
How to download and install the Quickly BackOffice App?
Admin
👉 You can simply download the Quickly BackOffice app from the Play Store and install it on your mobile phone or tablet to manage your restaurant business.
How to set up your Quickly BackOffice App?
Admin
👉 After installing the Quickly BackOffice app, Click on the Open button. You can login to the app with your credentials, which you have already used while signing-up to the Quickly RestroGreen website.
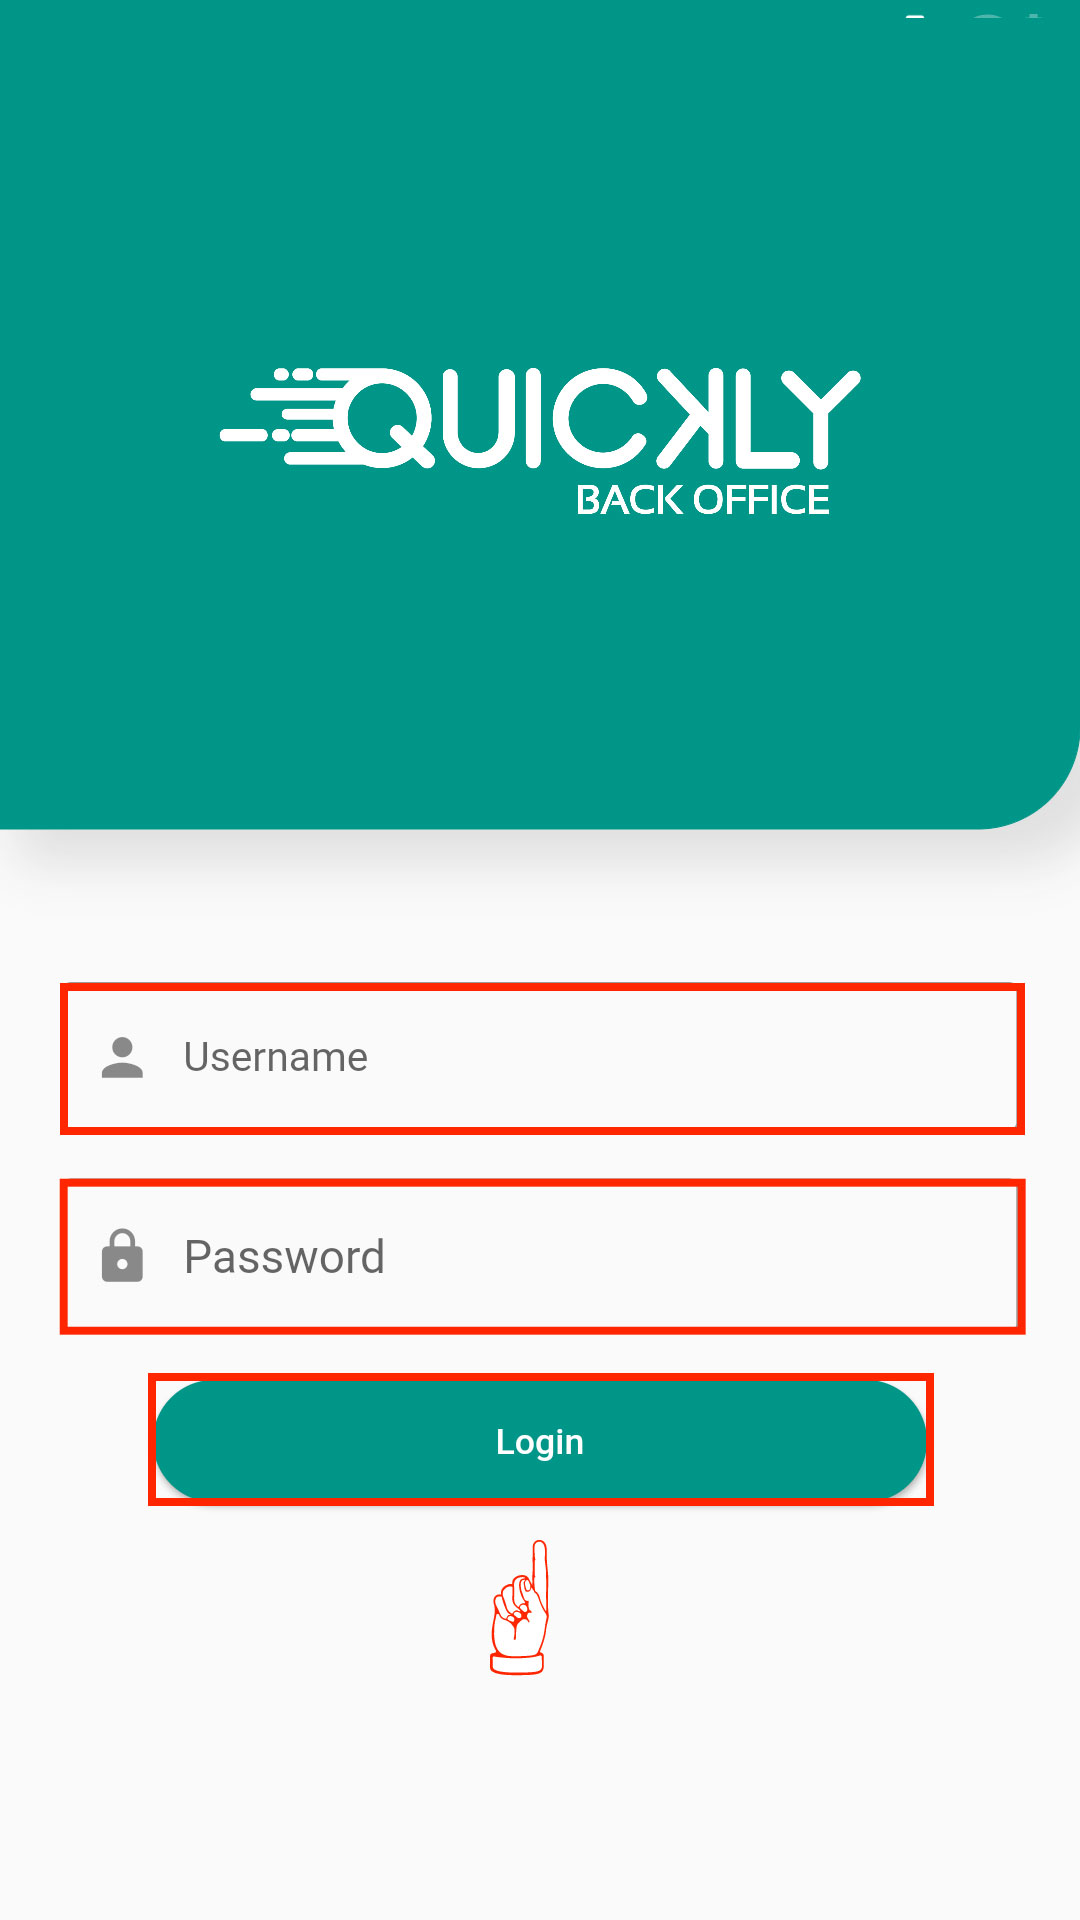
After successfully logging in to the Quickly BackOffice app, you will be directed to the Home screen. You will find the summary of all three modules, i.e Sales & Billing (Orders, Sales, and Profit ), Inventory (Stock Value and Re-Order Items), and Accounts & Expenses (Revenue and Expense). Employee Profile, User & Role, Bill & Payment, and Branding & Settings are at the bottom of the home screen.
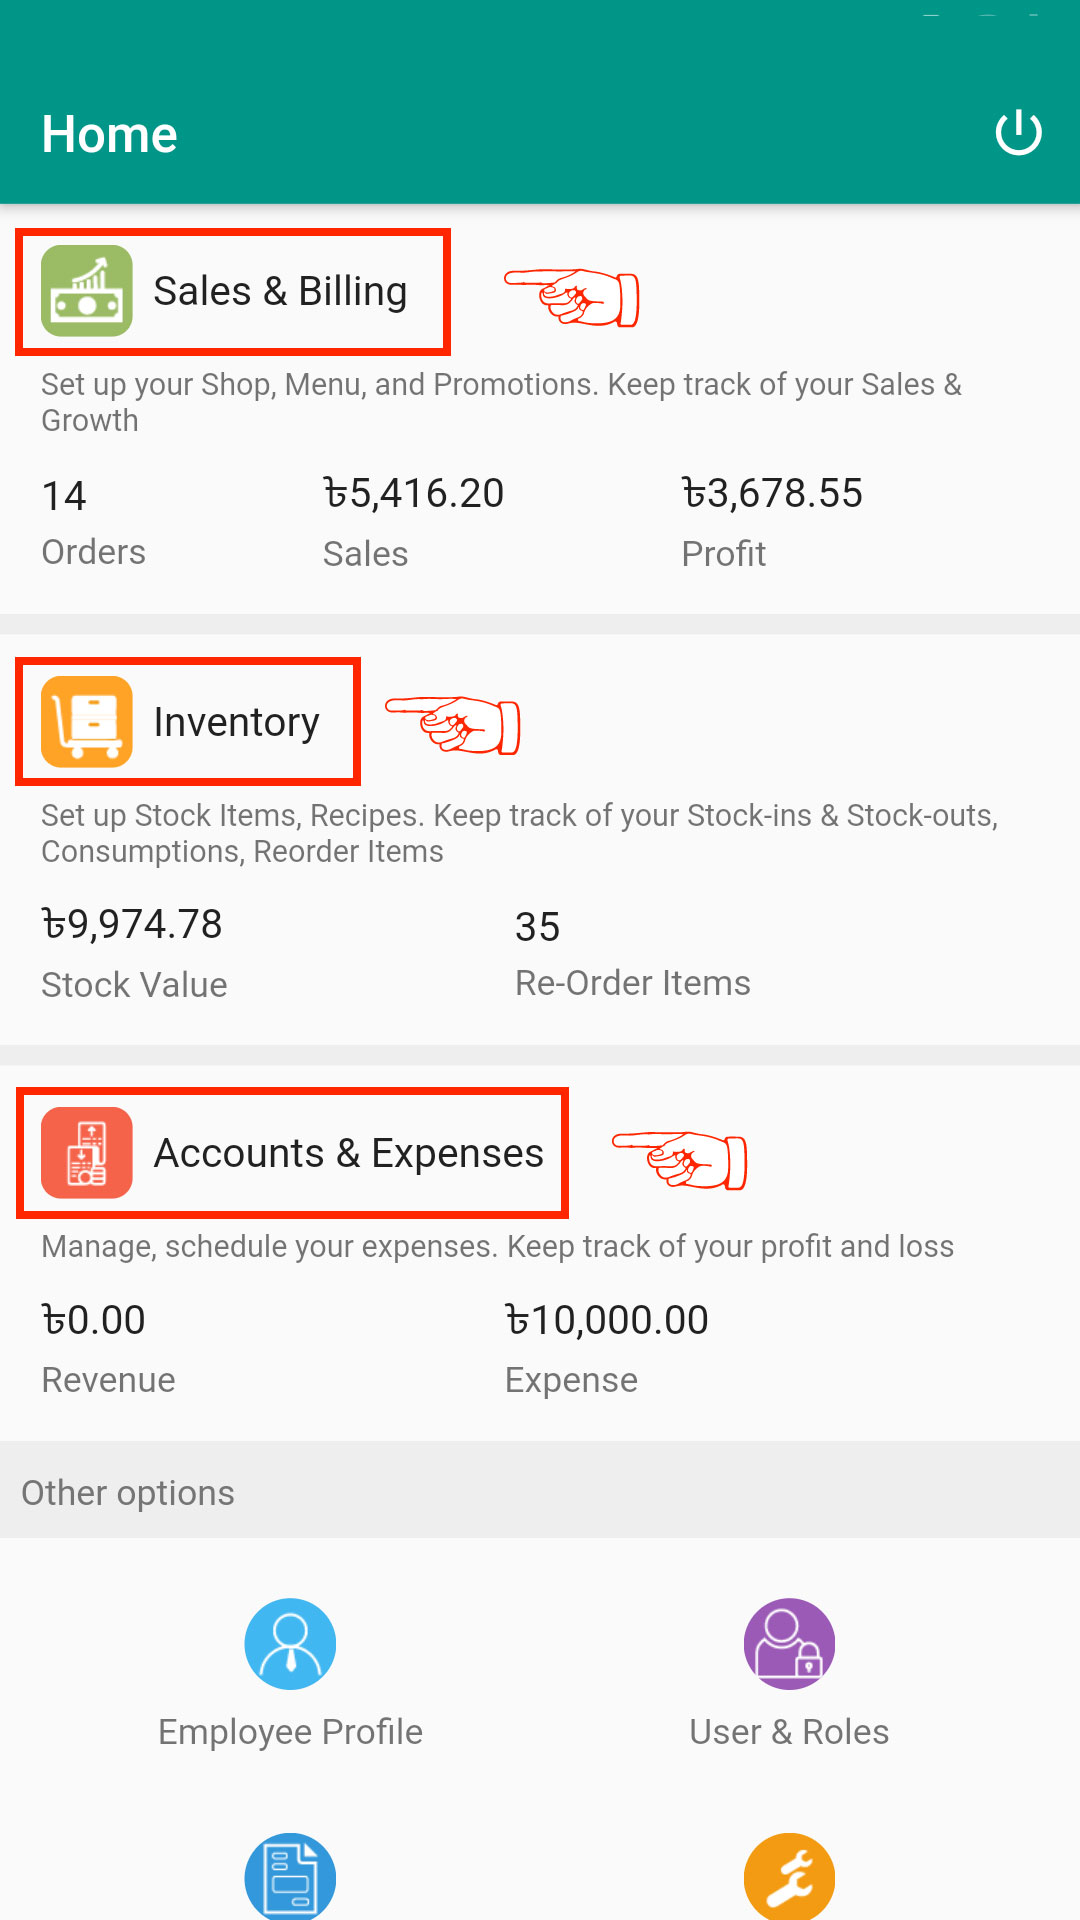
How to manage Employee Profiles and their access?
Admin
Tap on the Employee Profile section from the BackOffice home which will bring up the list of all your employees.
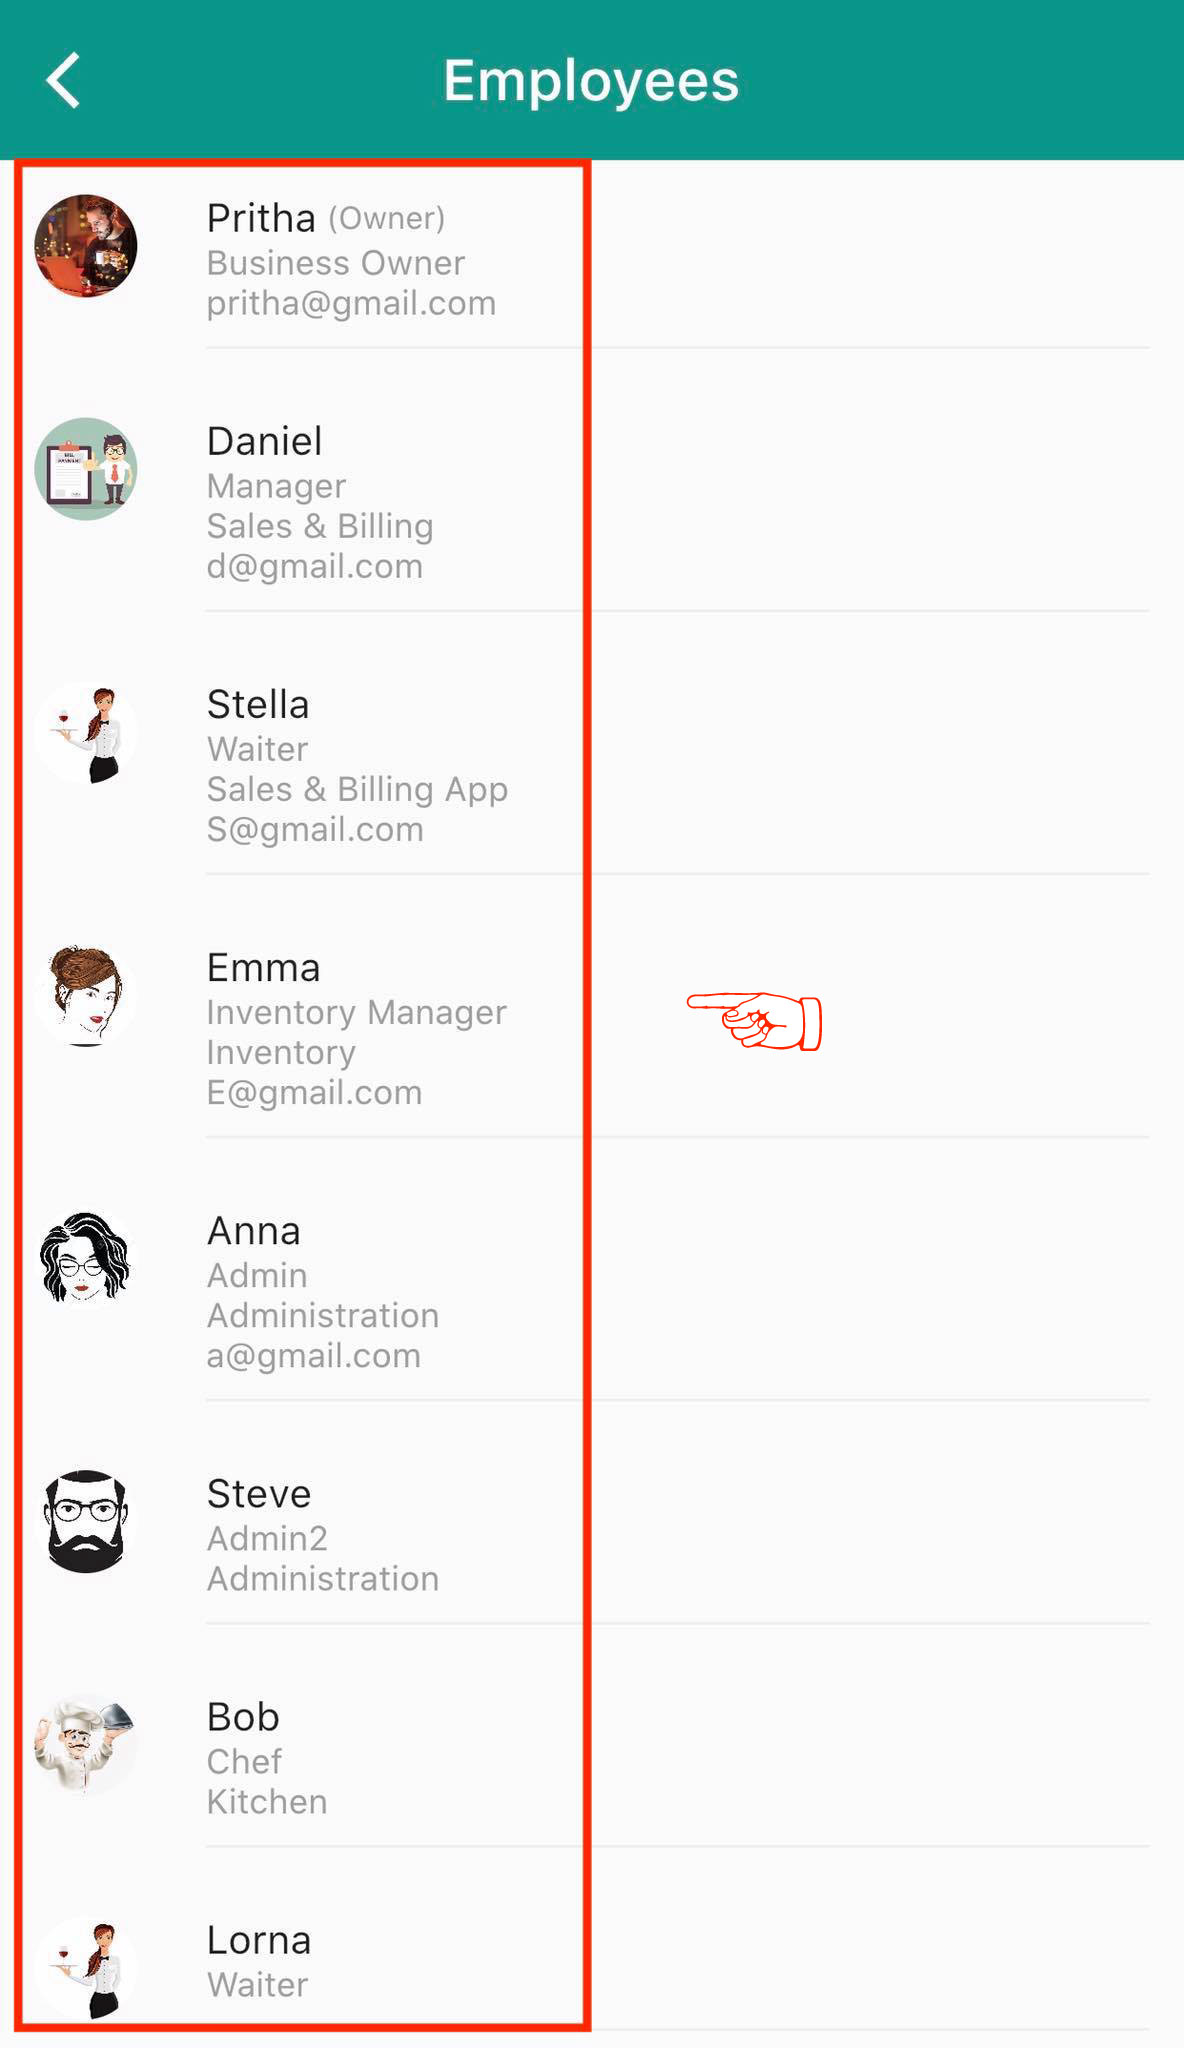
If you want to enable or disable the access of any employee, then tap on the User Roles from the BackOffice home which will bring up the list of all your employees with their roles. There is a switch next to each user name, turn the switch on/off according to your preference.
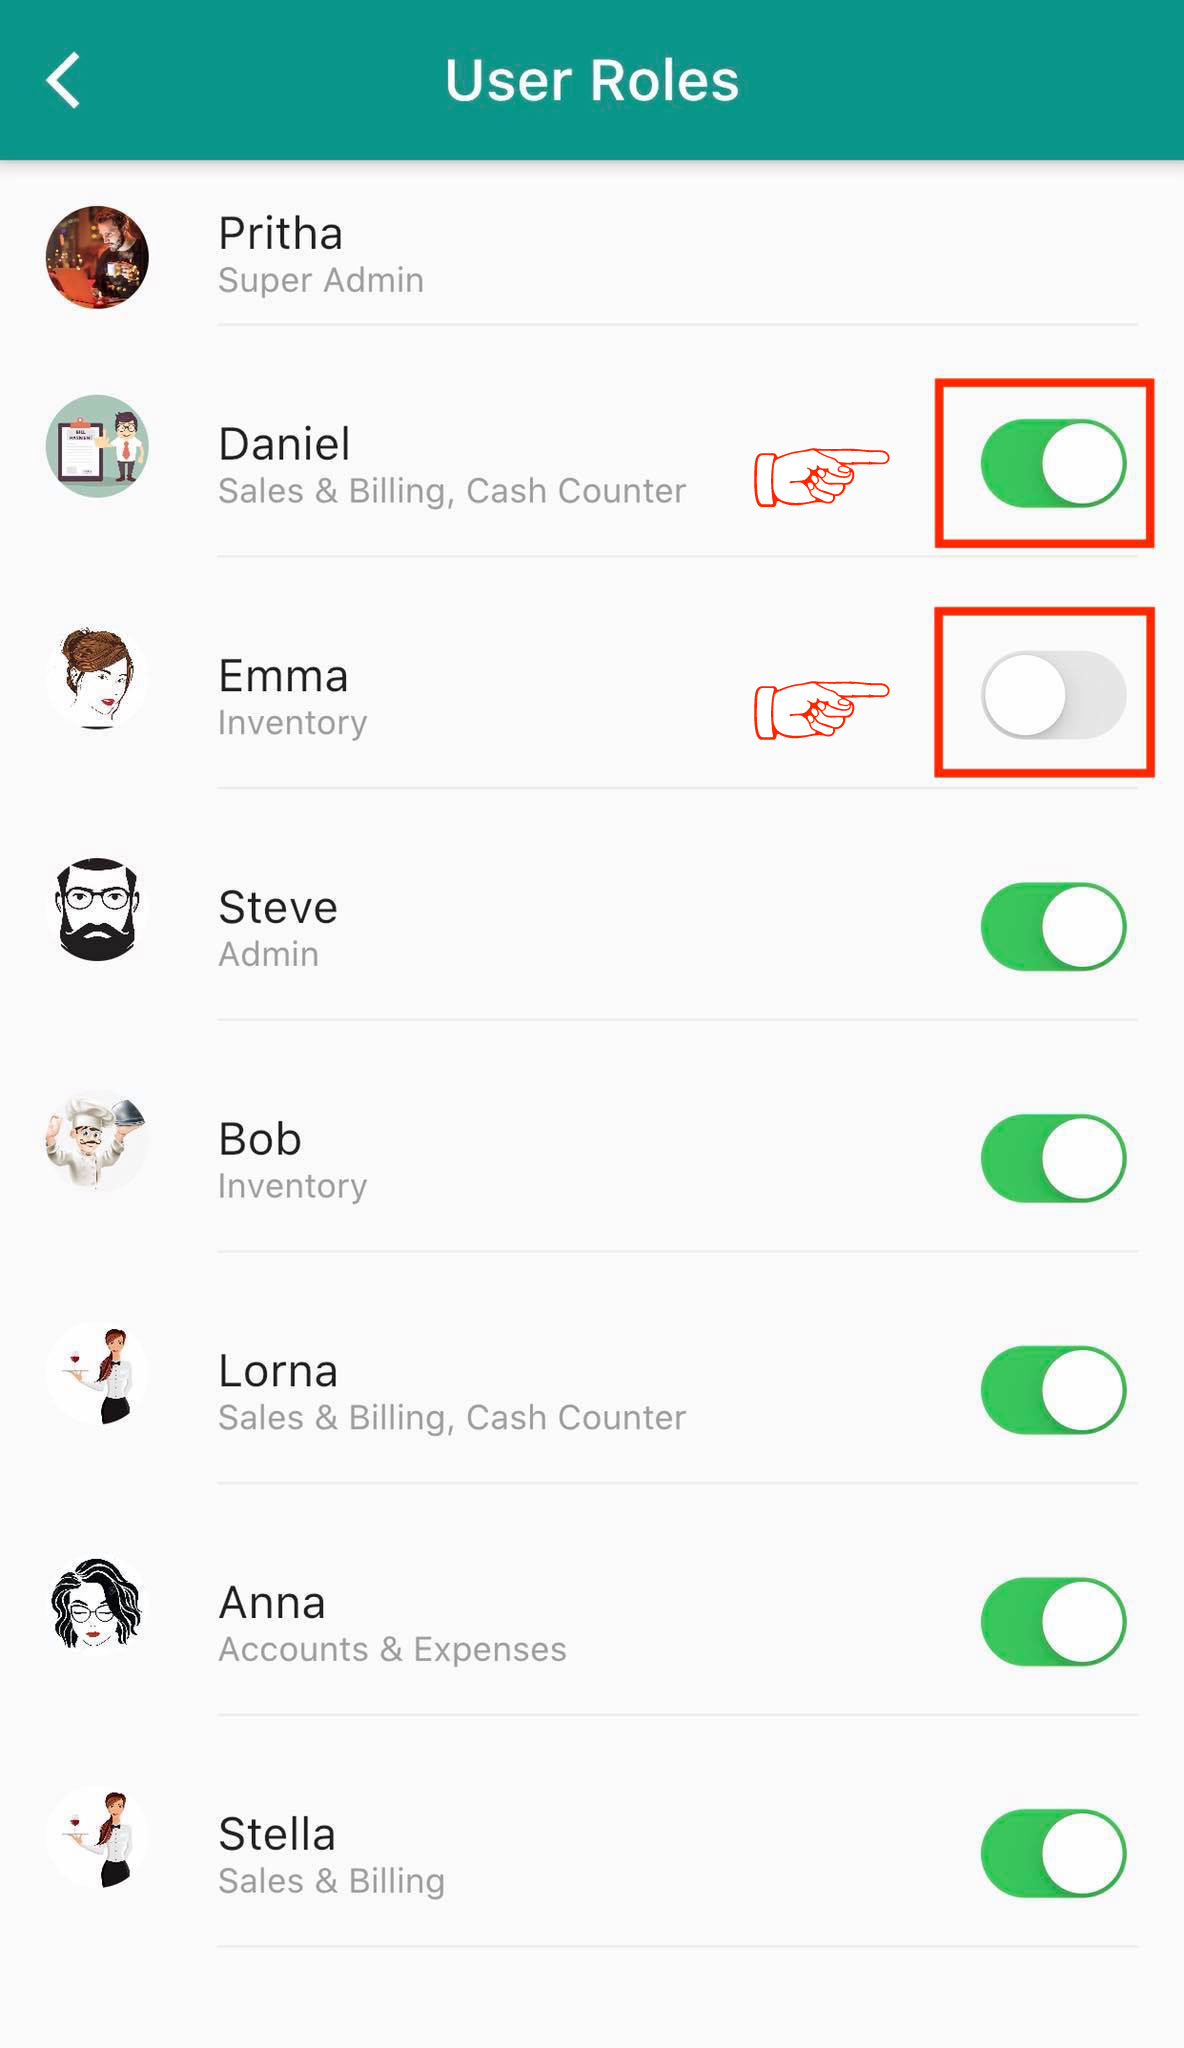
How to check and manage your billing and payment?
Admin
You can easily manage your billing and payment from BackOffice. Tap on Bill & Payment from the home which will bring up the invoices. Your estimated bill with details will be shown at the top part of this section. You can check if the bill is paid or unpaid. Unpaid bills can be paid and you can download the invoice too.
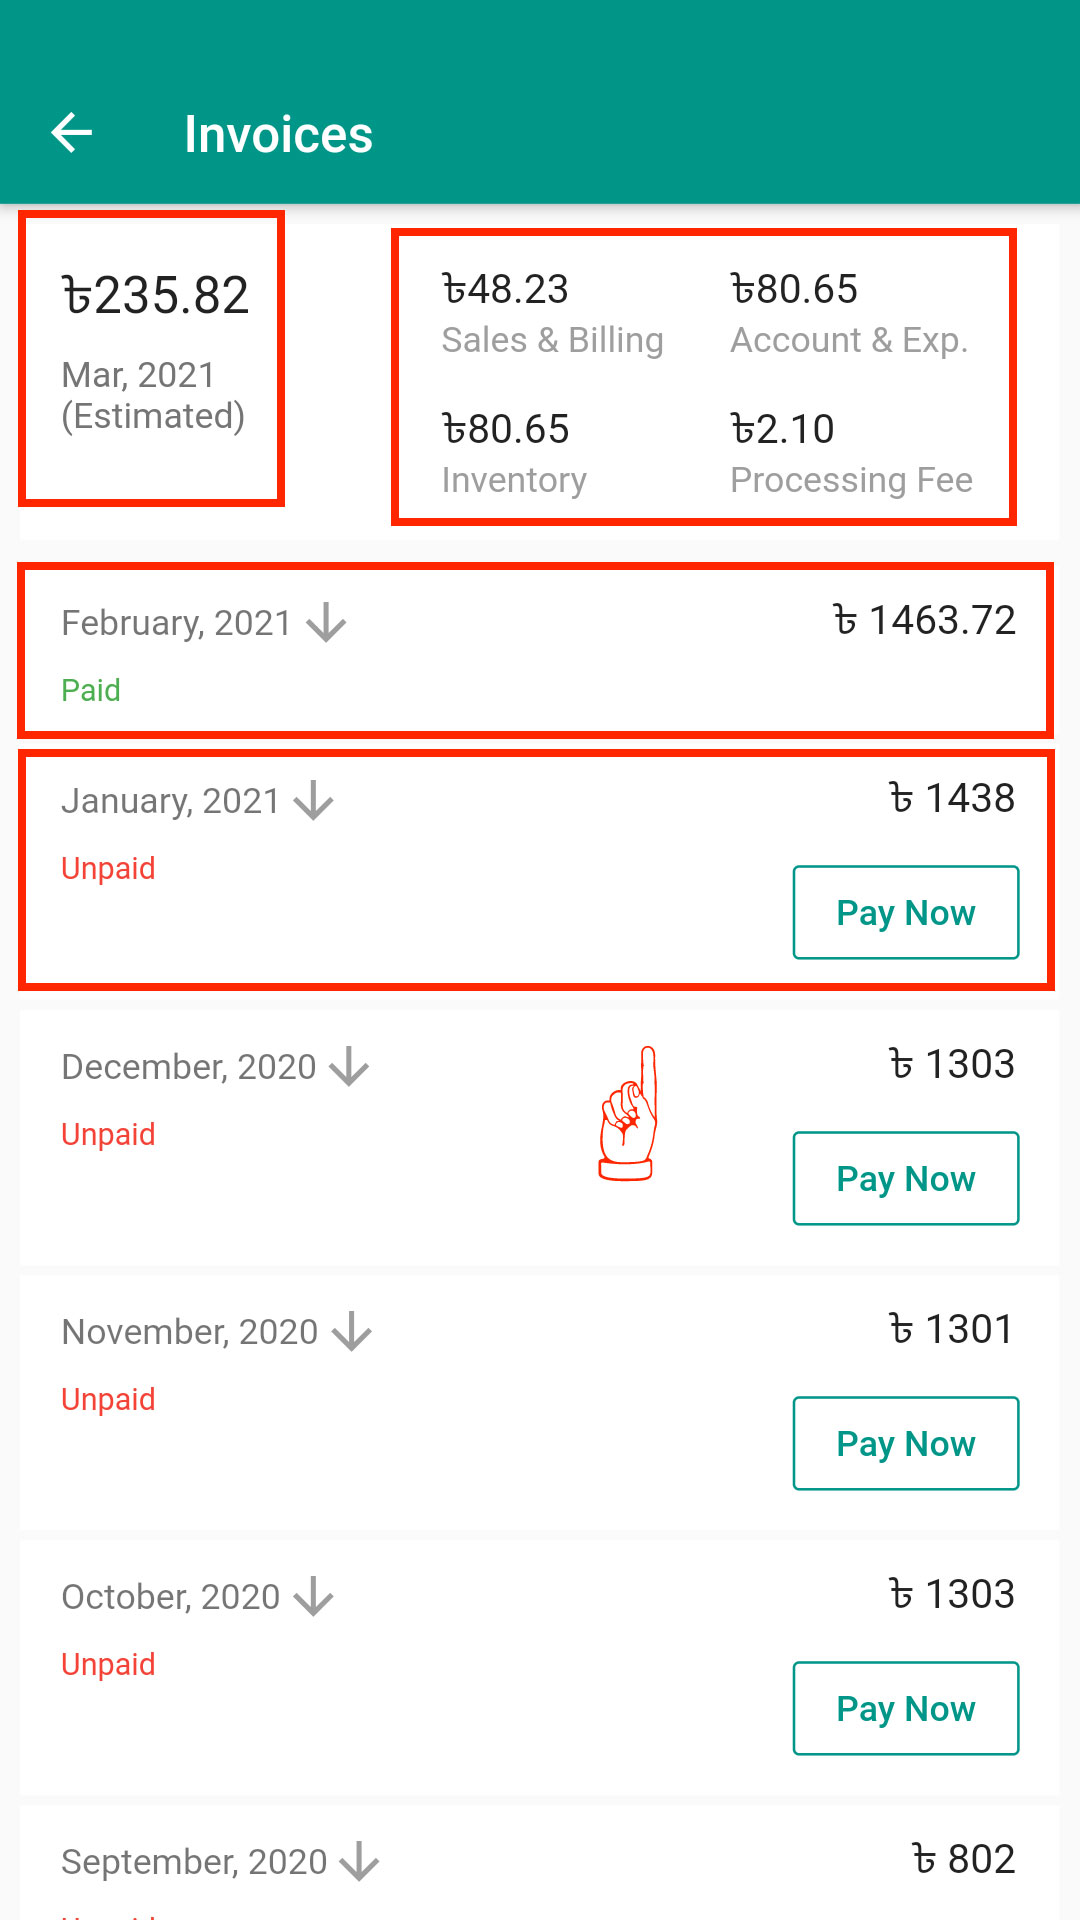
How to update your business details?
Admin
In order to update your business details, tap on Branding & Settings from the BackOffice home. You can edit all the information given earlier and update it with current information.
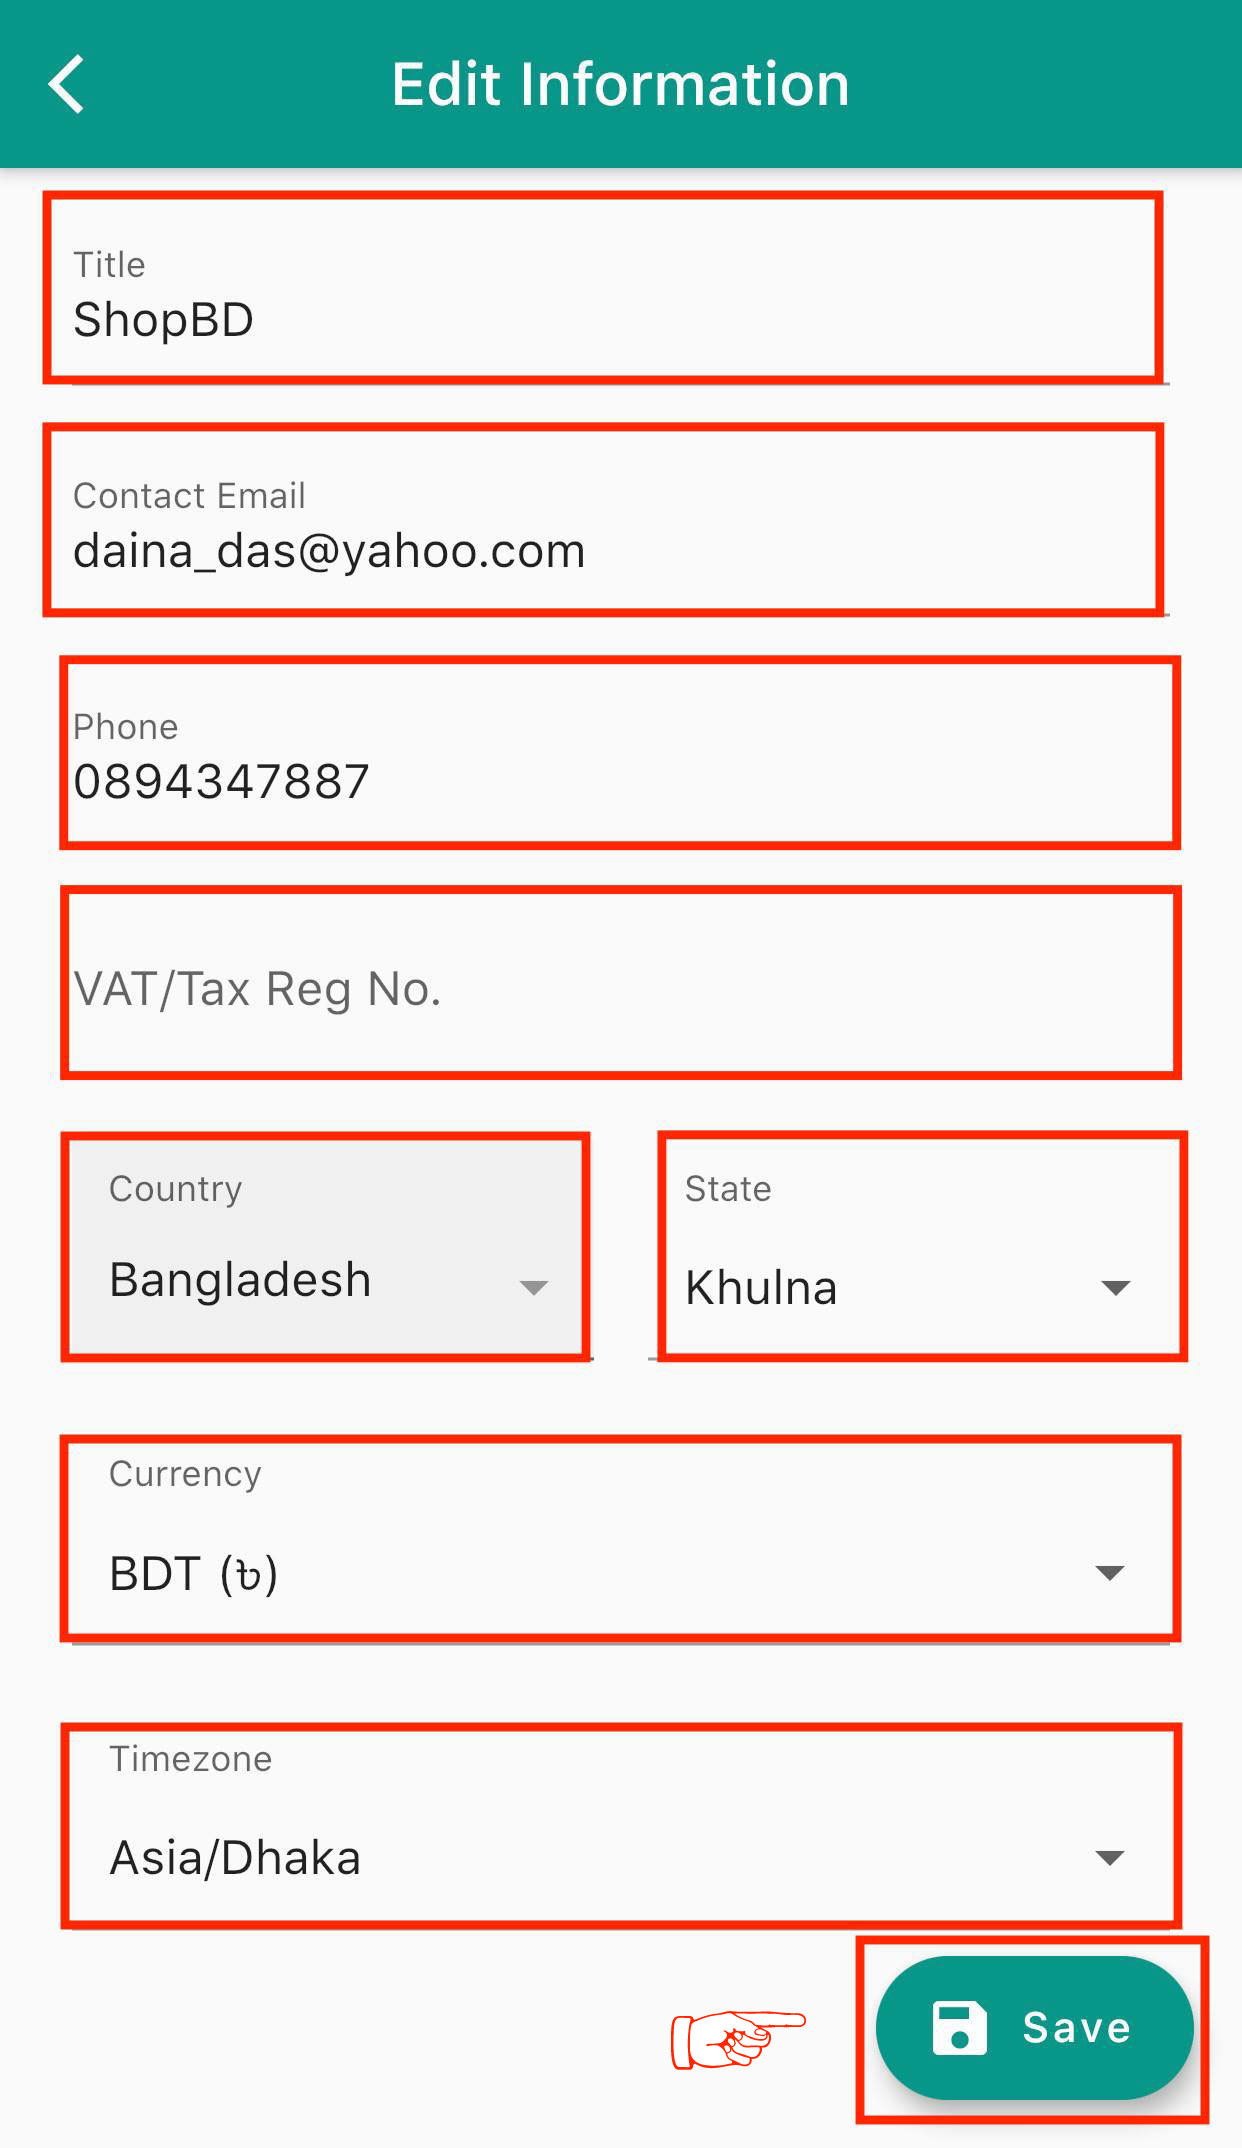
How to check the Sales Summary?
Admin
At the bottom of the Sales & Billing home screen, tap on “Home” in order to see the sales status for the current day. You will find the total number of orders placed, net sales and gross profit on the current day. Discounts, service charge, sales tax, customer free, and delivery charge are shown along with cost of goods sold (preparation cost, wastage, payment fee).
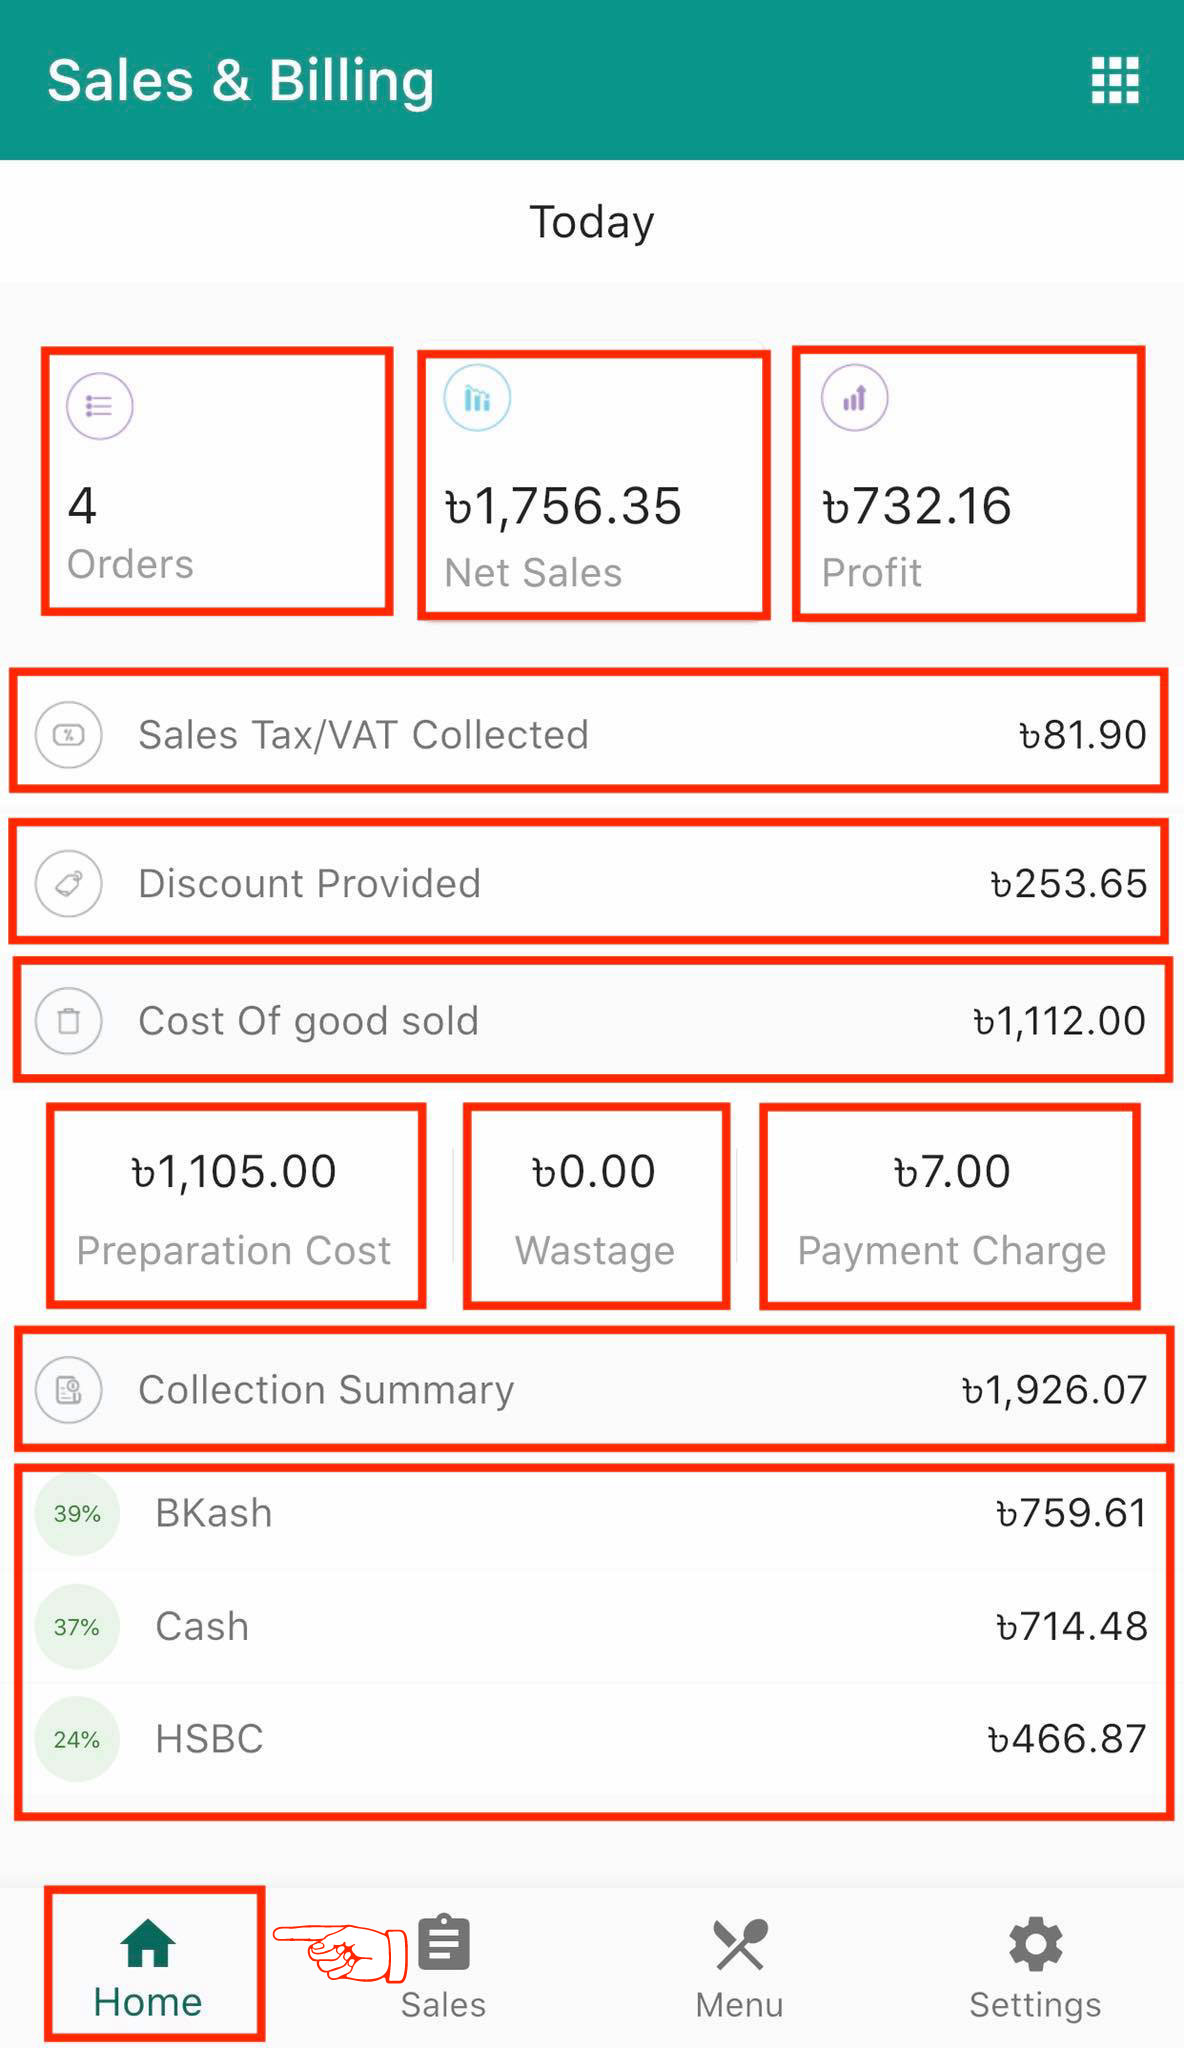
How to filter your restaurant orders?
Admin
You can see item wise sales data from the Sales & Billing section. Tap on Sales and see which dishes were sold today and the price for the sold dishes. You can check the order details and filter the orders according to users, payment modes, and order status (Billed, Completed, Deleted, Wastage). Tap on Orders to see the order details with status.
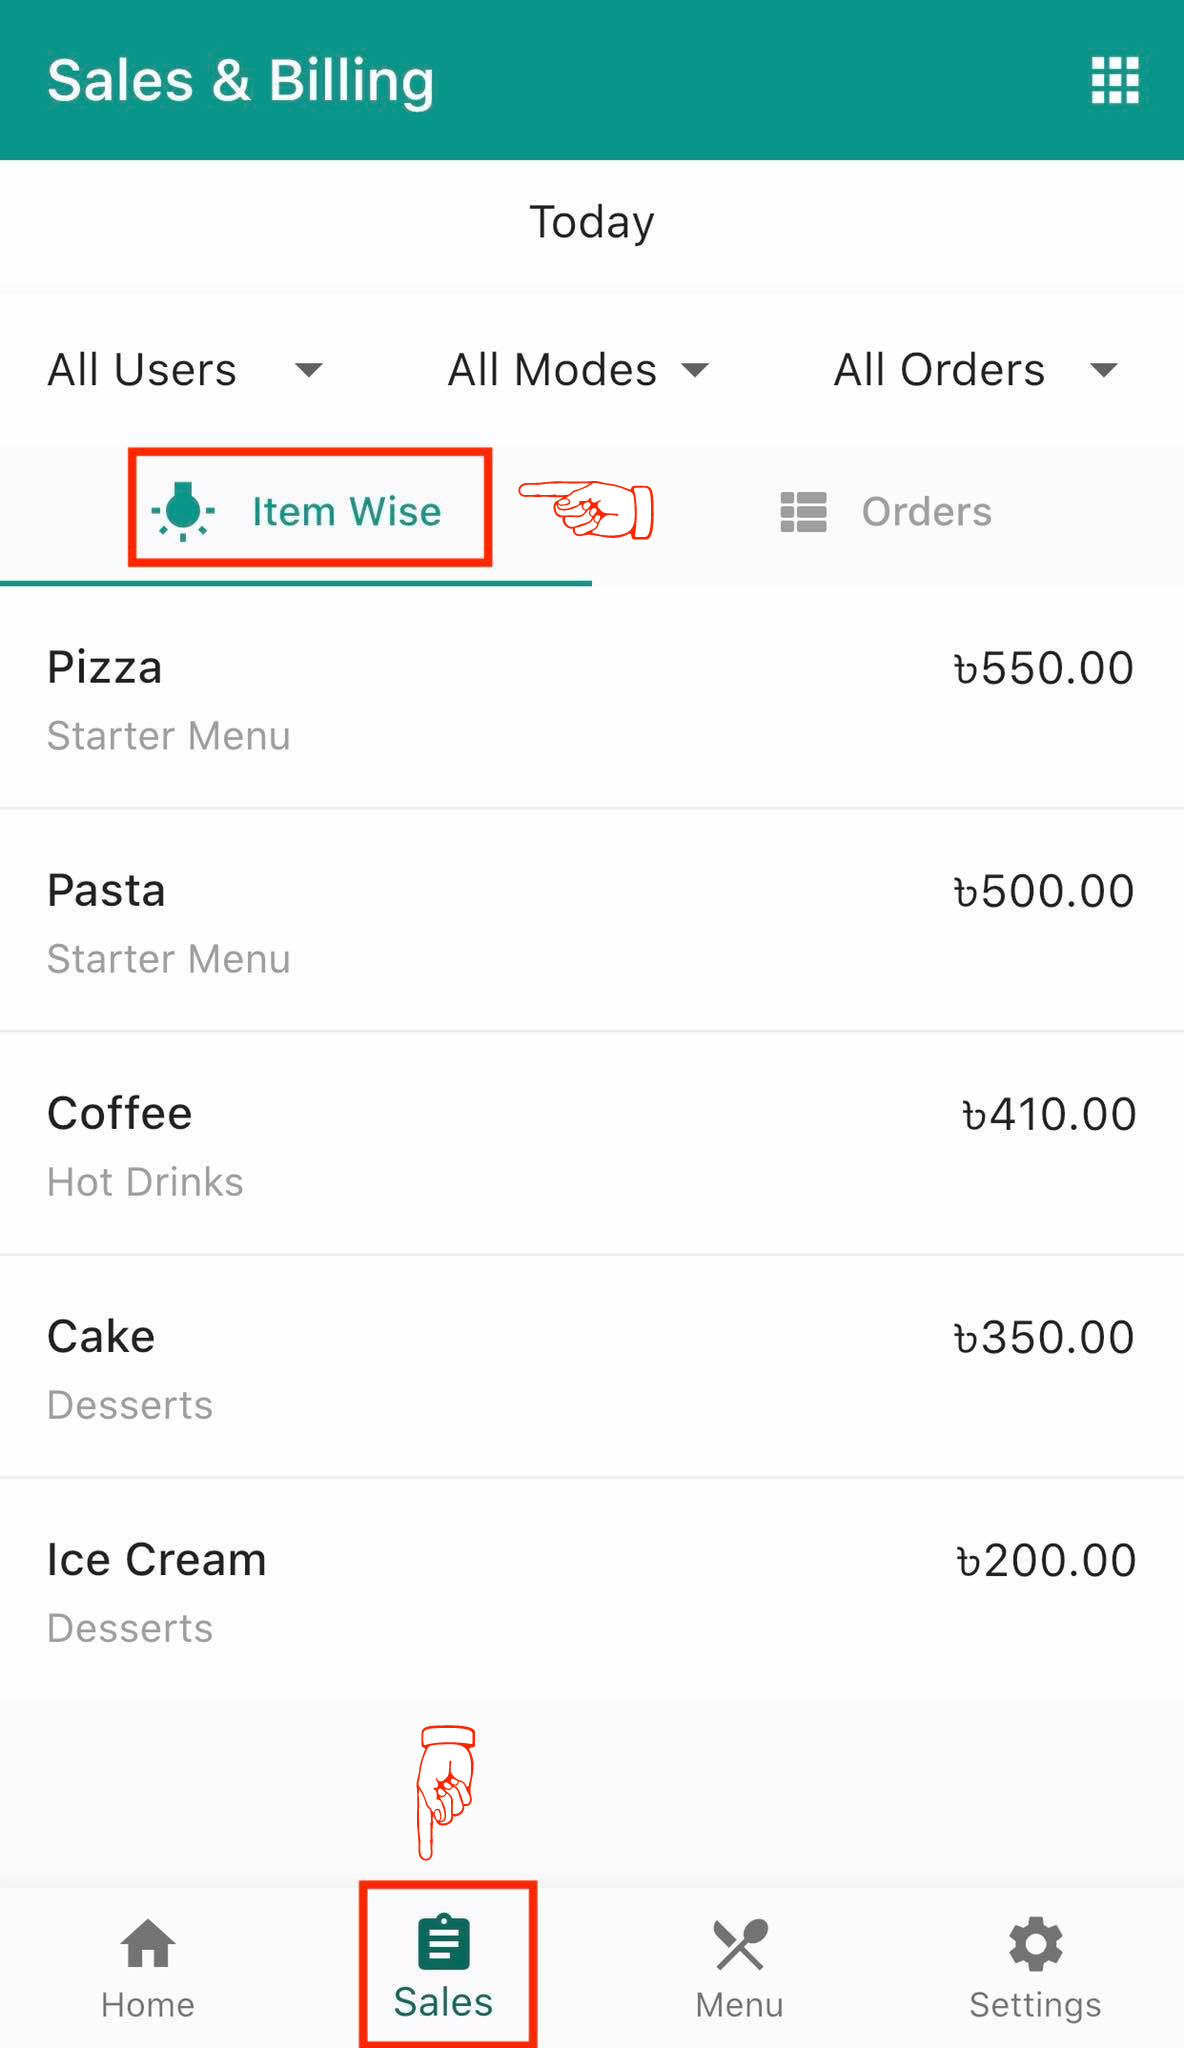
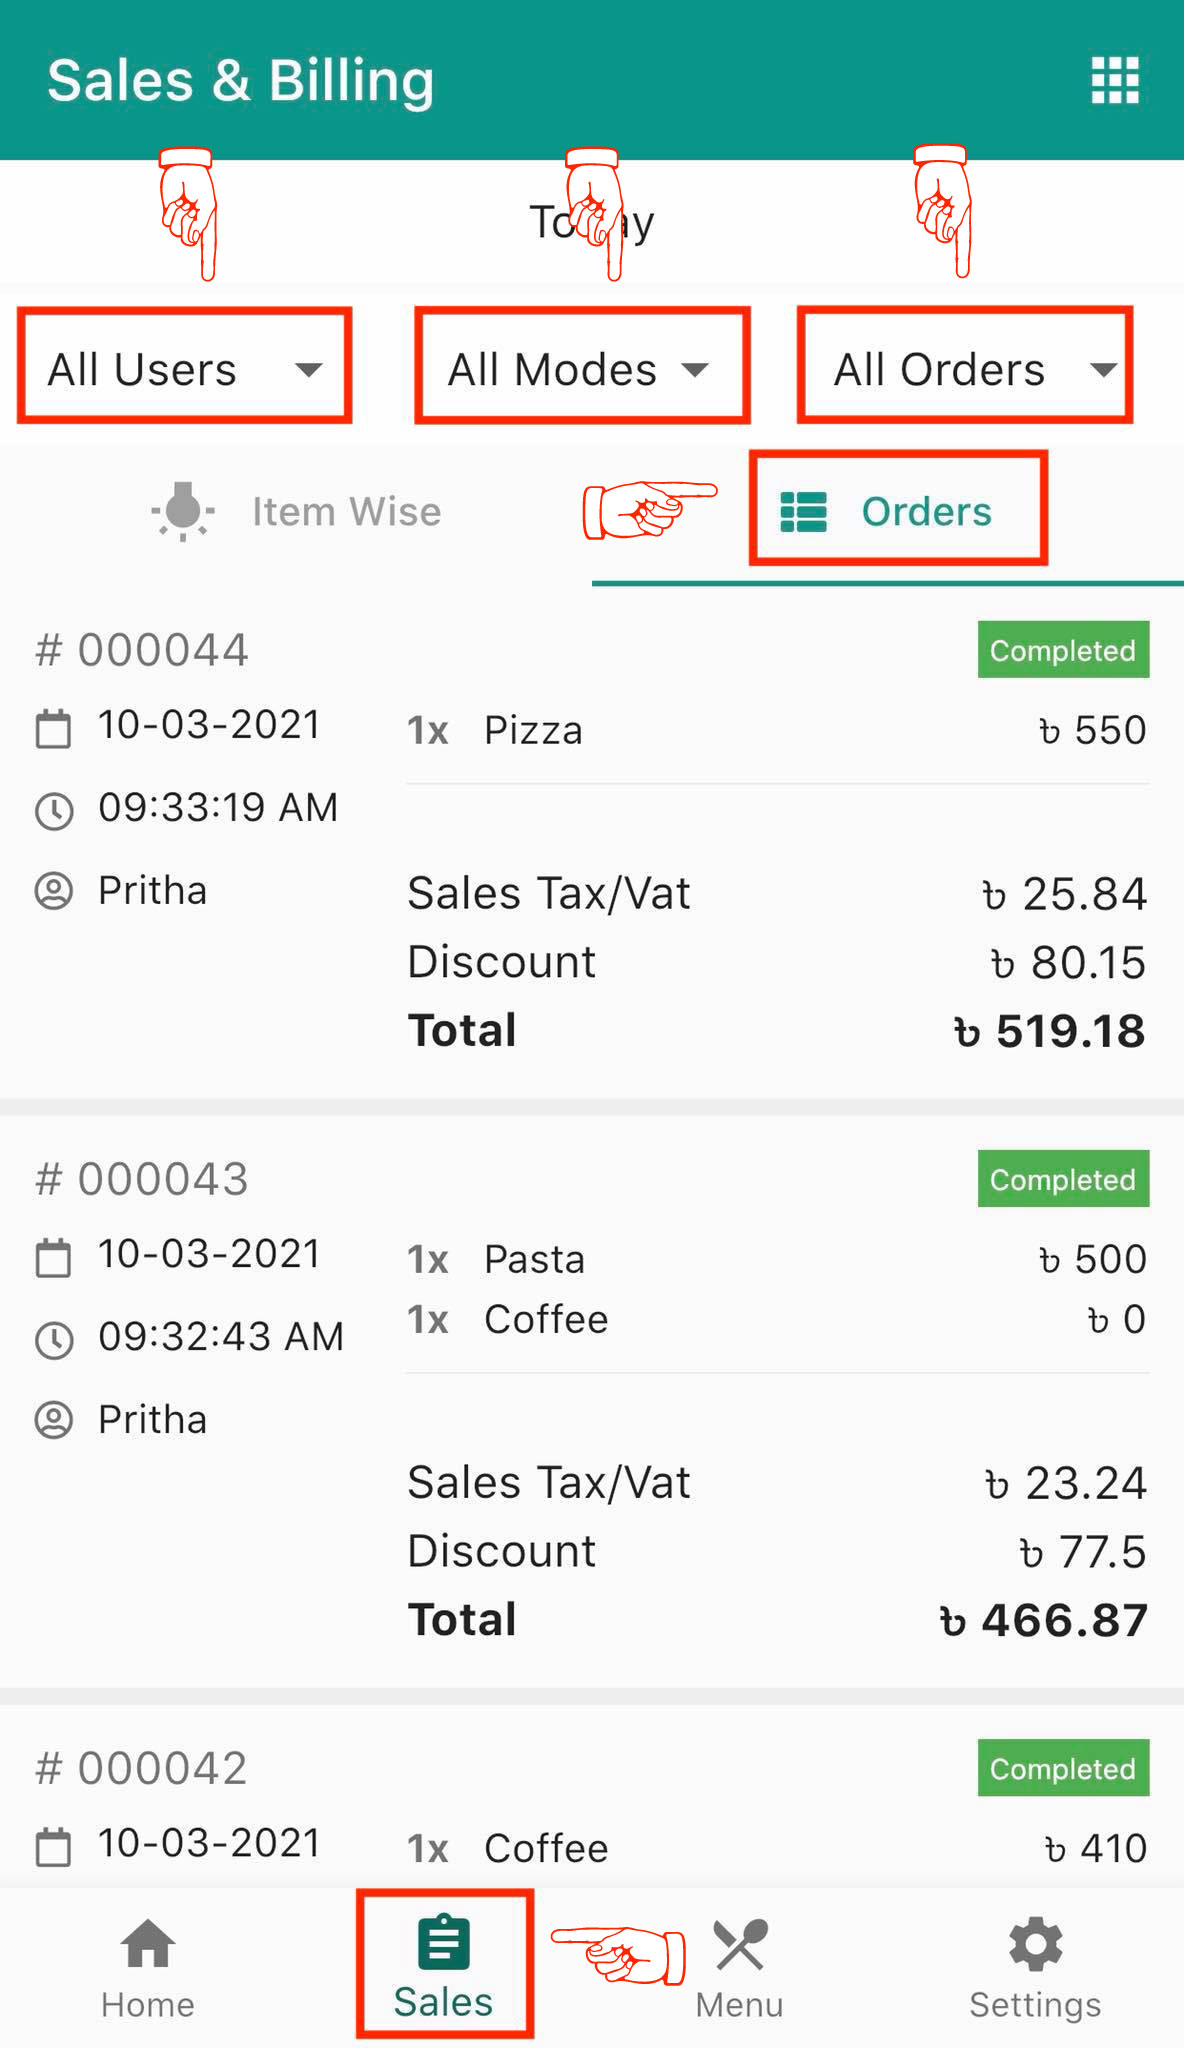
How to manage your restaurant menu?
Admin
From the Quickly BackOffice, you can easily manage your restaurant menu. You can activate or inactivate categories and dishes; create new categories and dishes too. From the Sales & Billing section tap on Menu which will bring up the existing menu with all dishes (active/inactive). If you want to add a new category, tap on “+Add Category” and provide the title, description before taping on Create button.
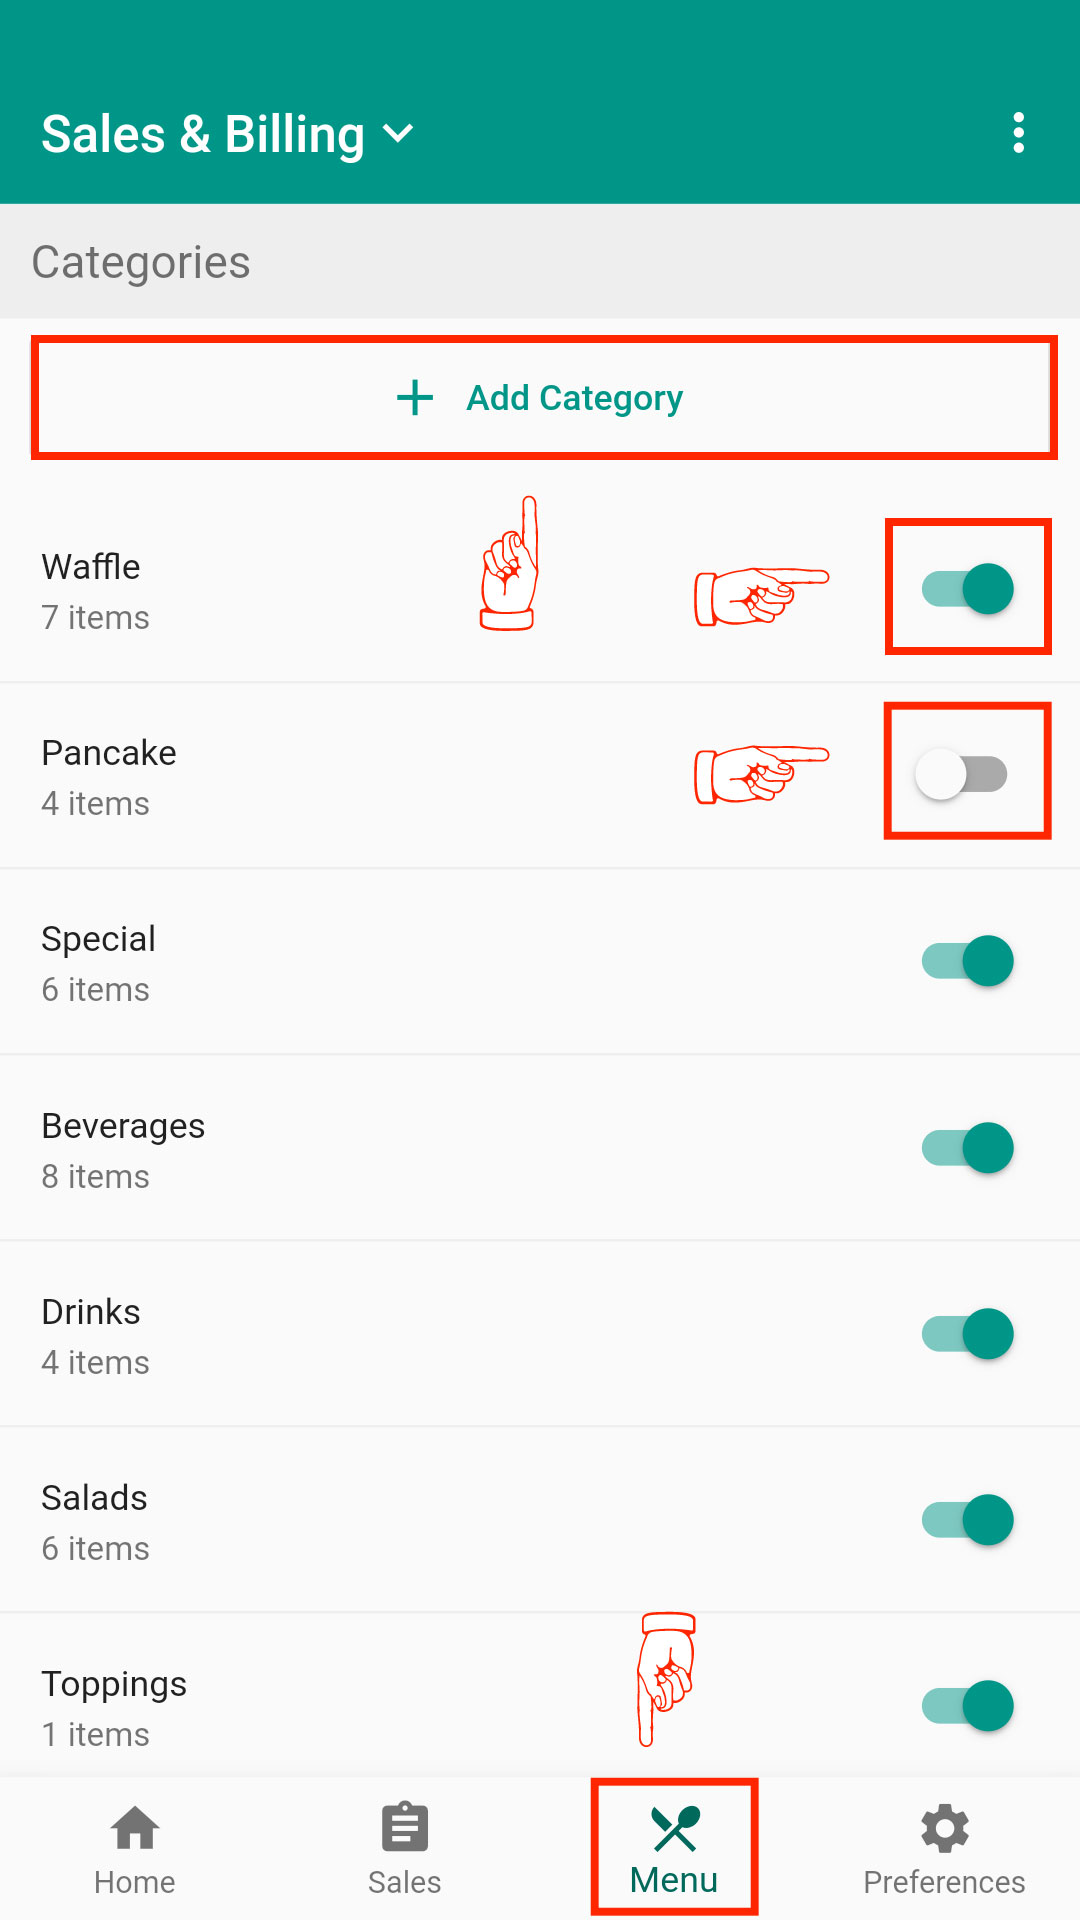
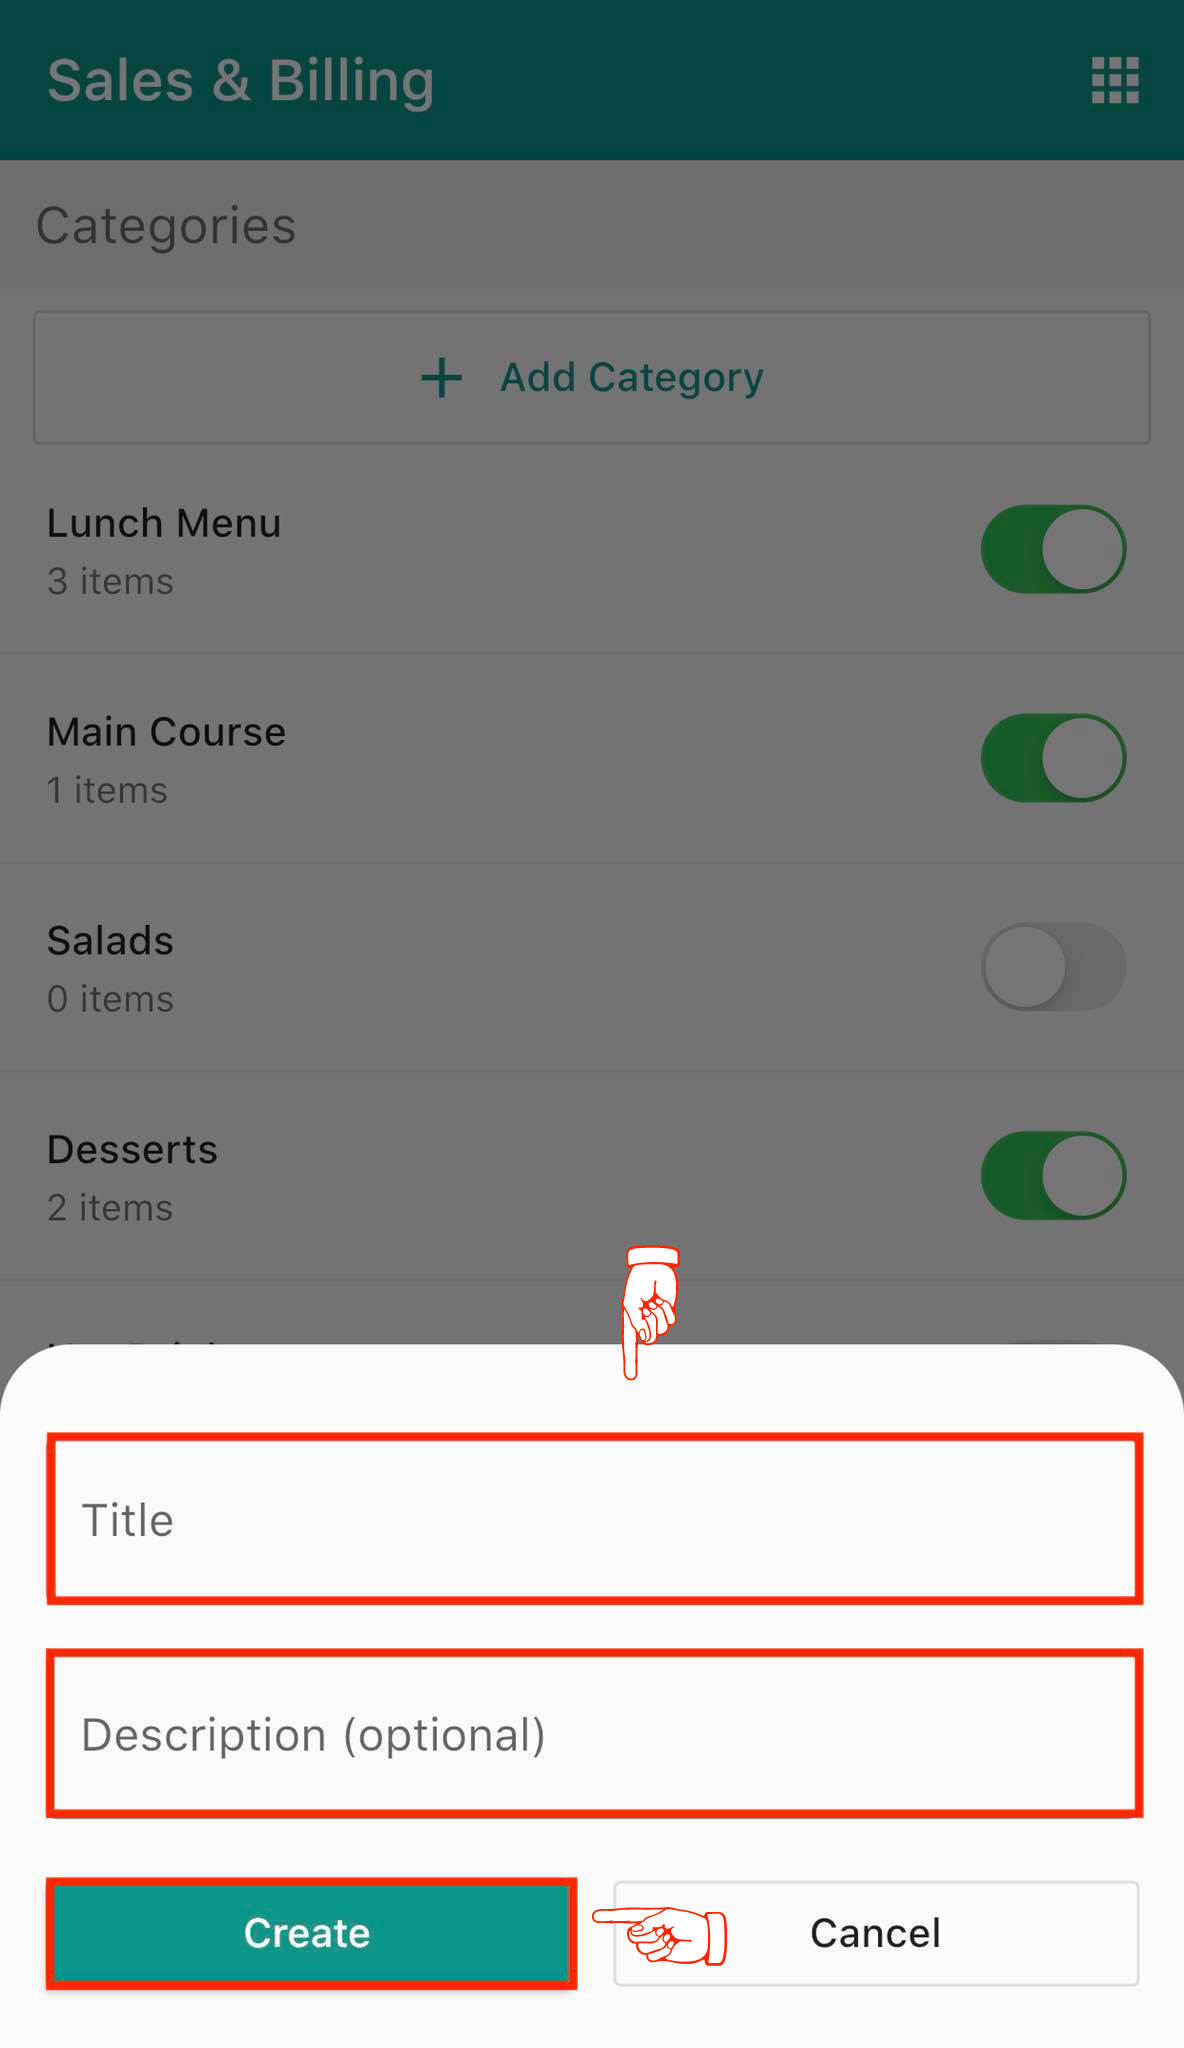
You can add new dishes to any category in a very simple way. Tap on the category you want to add a new dish to and all the existing dishe’s list will appear with a + Add Dish button at the bottom right corner of the screen. Tap on +Add Dish button in order to create a new dish for the same category.
Provide the dish name, description, price, preparation cost and don’t forget to check the active button if you want the dish to appear when placing orders through the Sales & Billing app; finally tap on the Done button to update the dish.
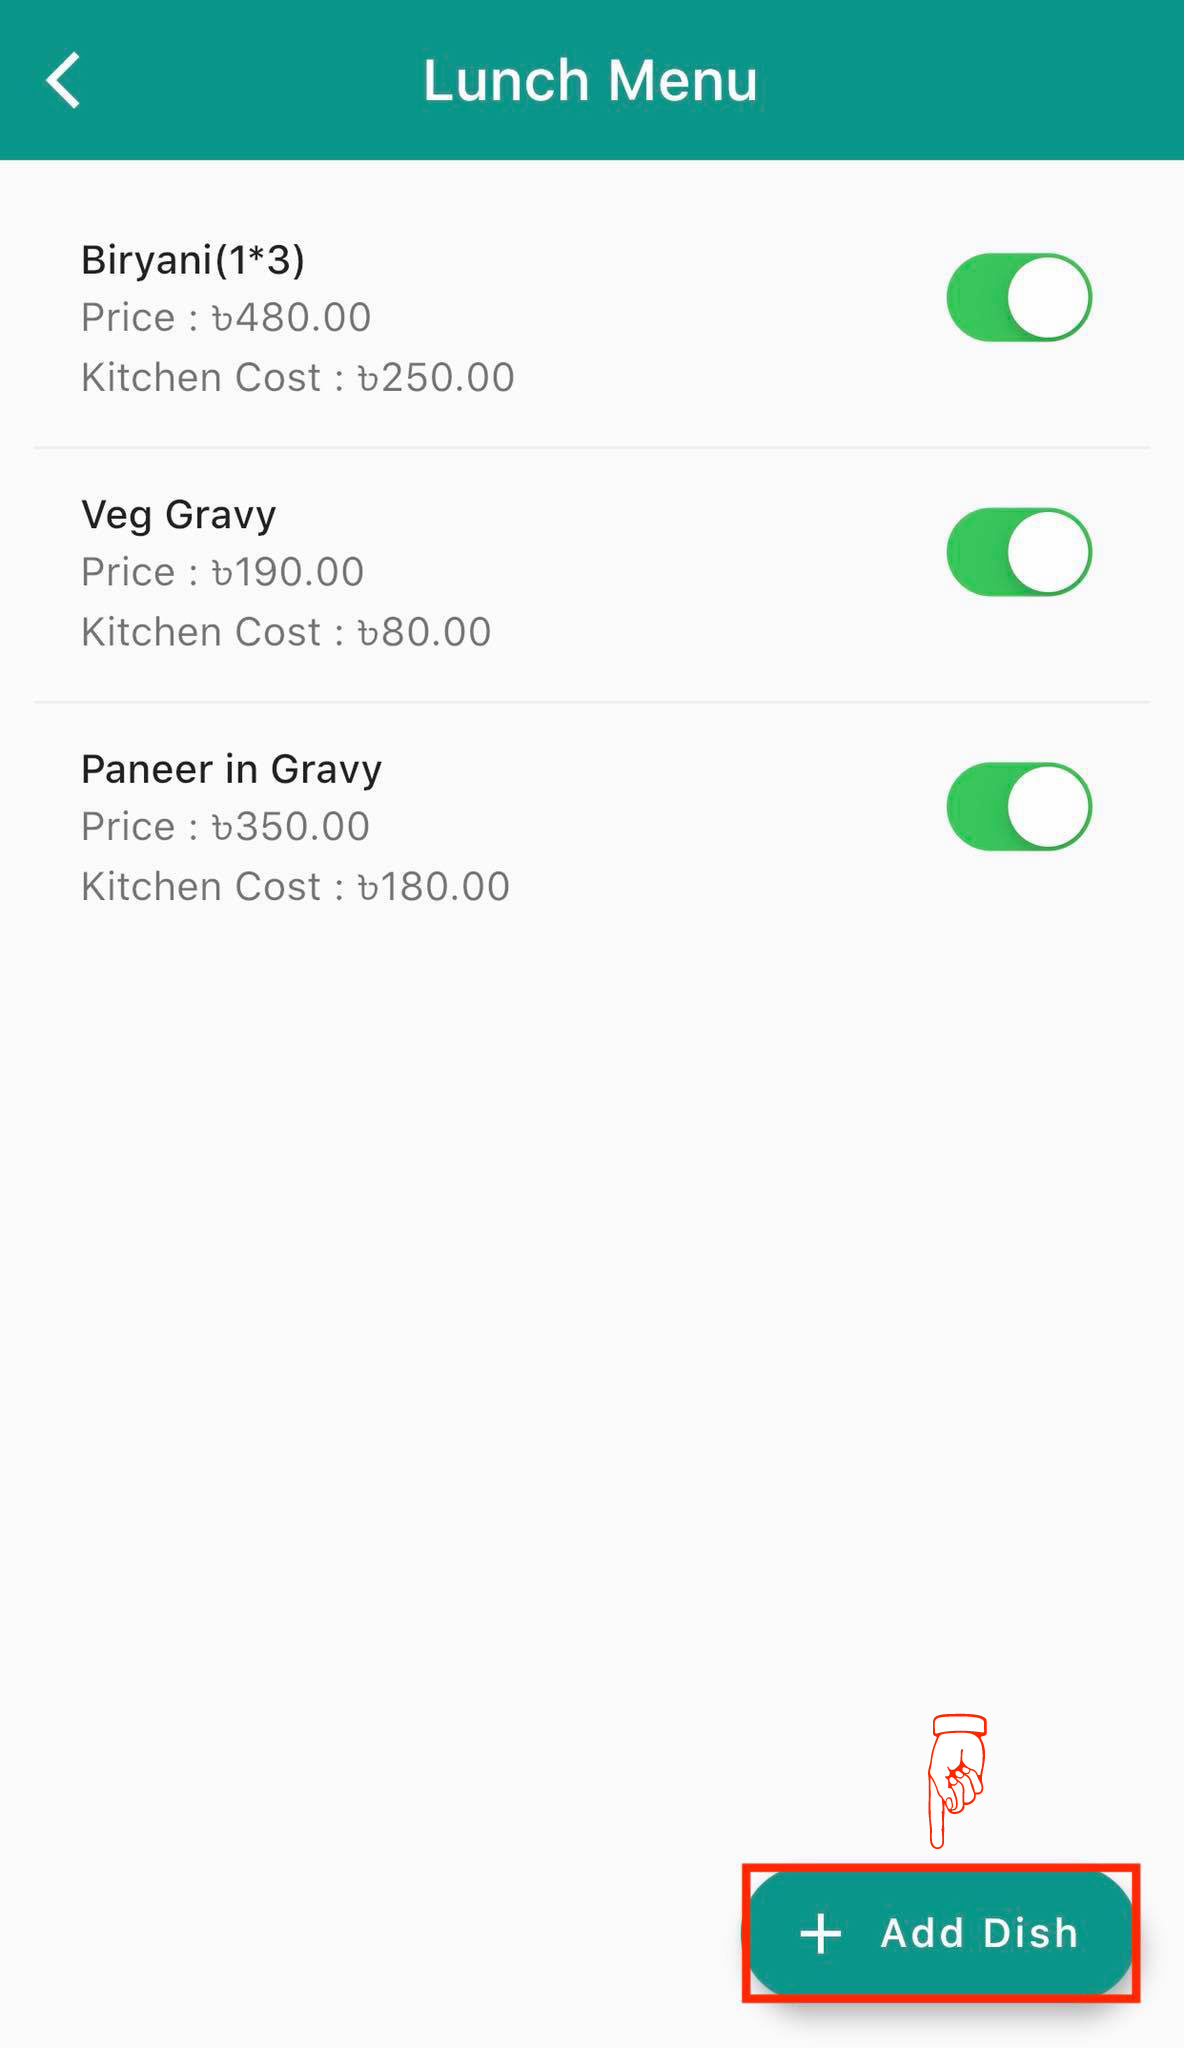
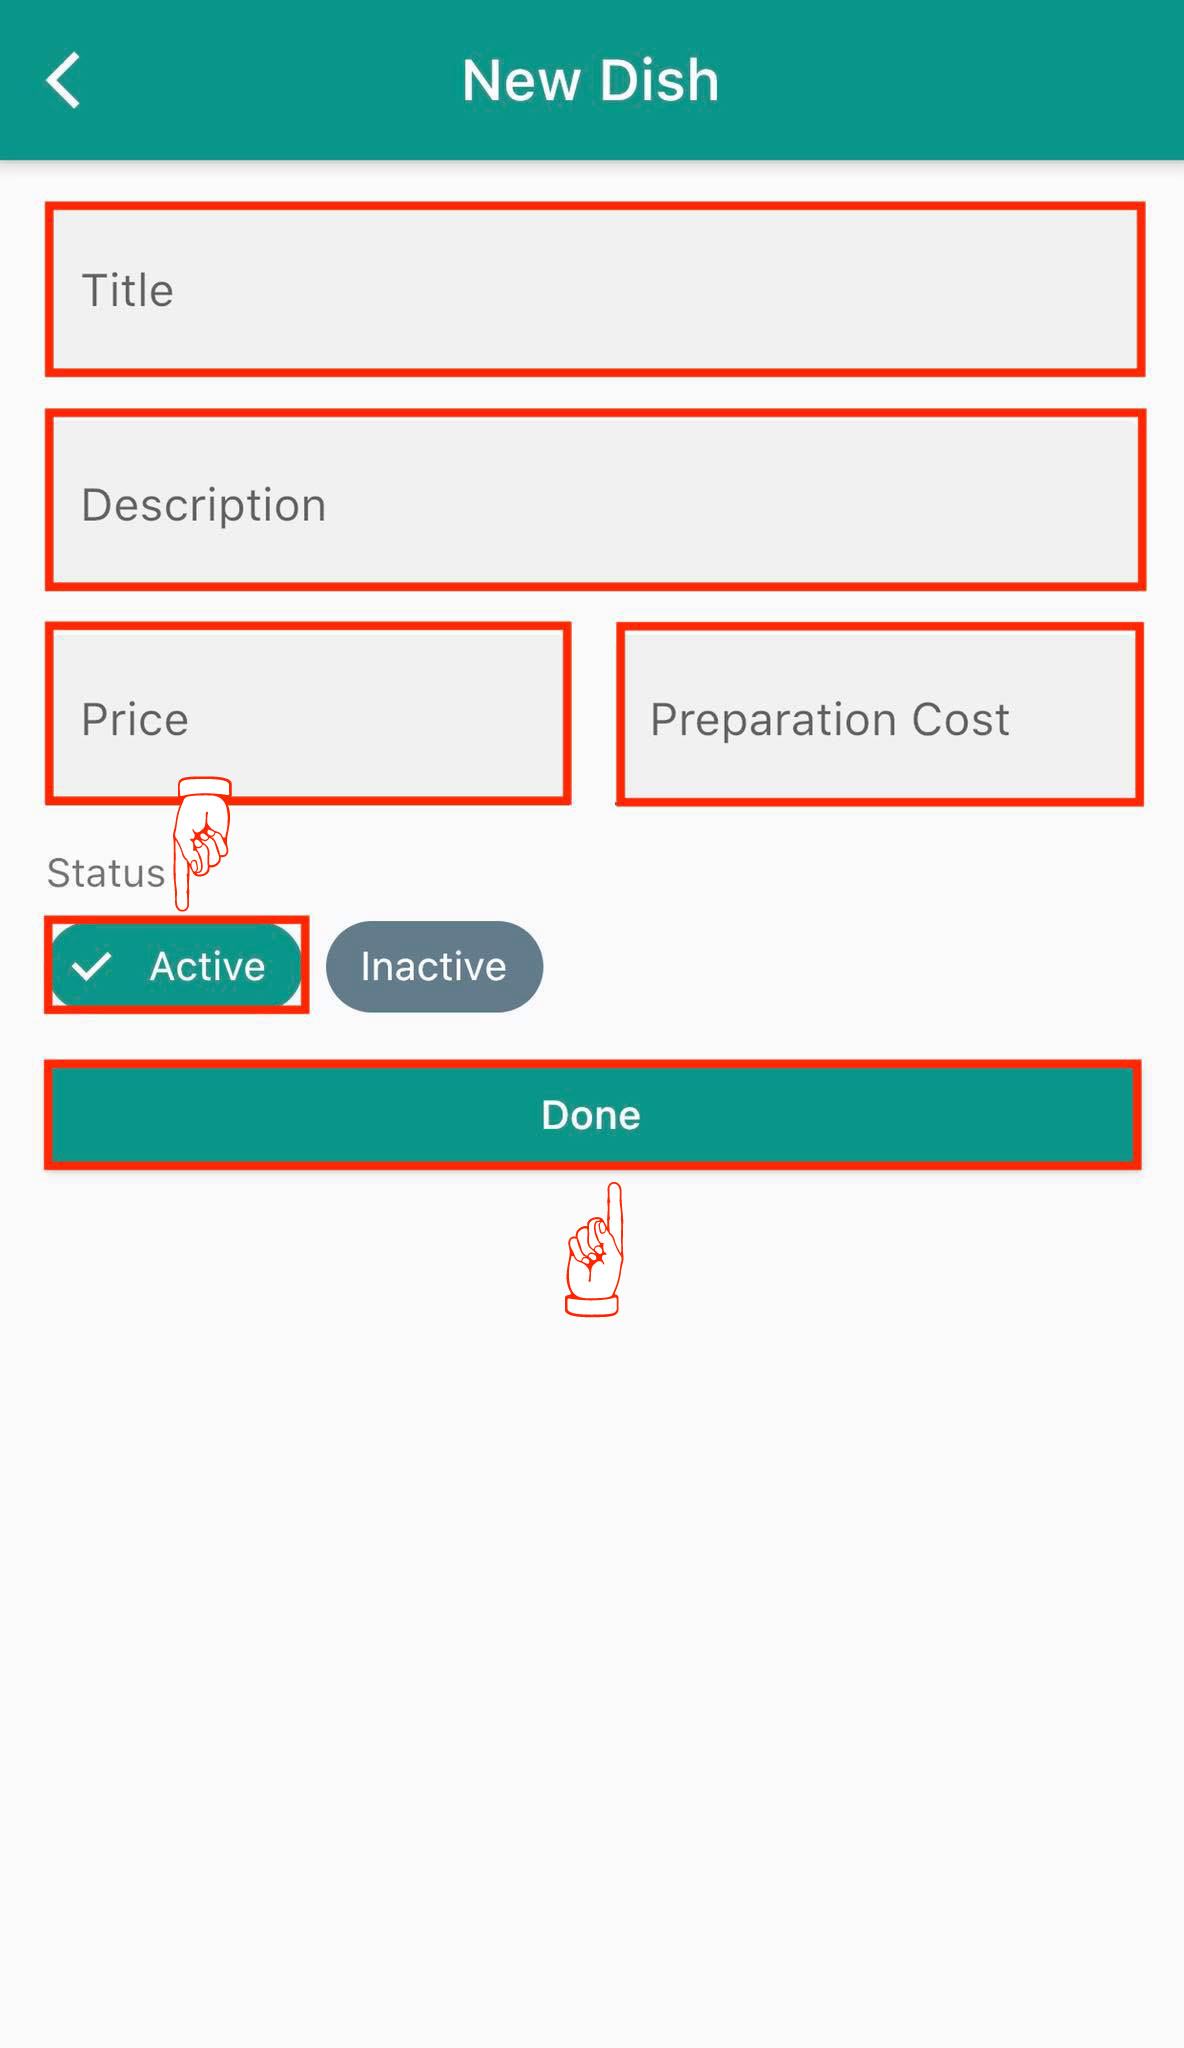
How to manage Sales Tax and Service Charge?
Admin
Tap on Settings which will bring up the preferences to set Sales Tax, Service Charge, Payment Mode, Order Identification, Email preferences and instant discount on the app. If you want to set the Sales Tax mode included with the dish price then tap on the switch to turn it on. You can check the sales tax set for each category from this section.
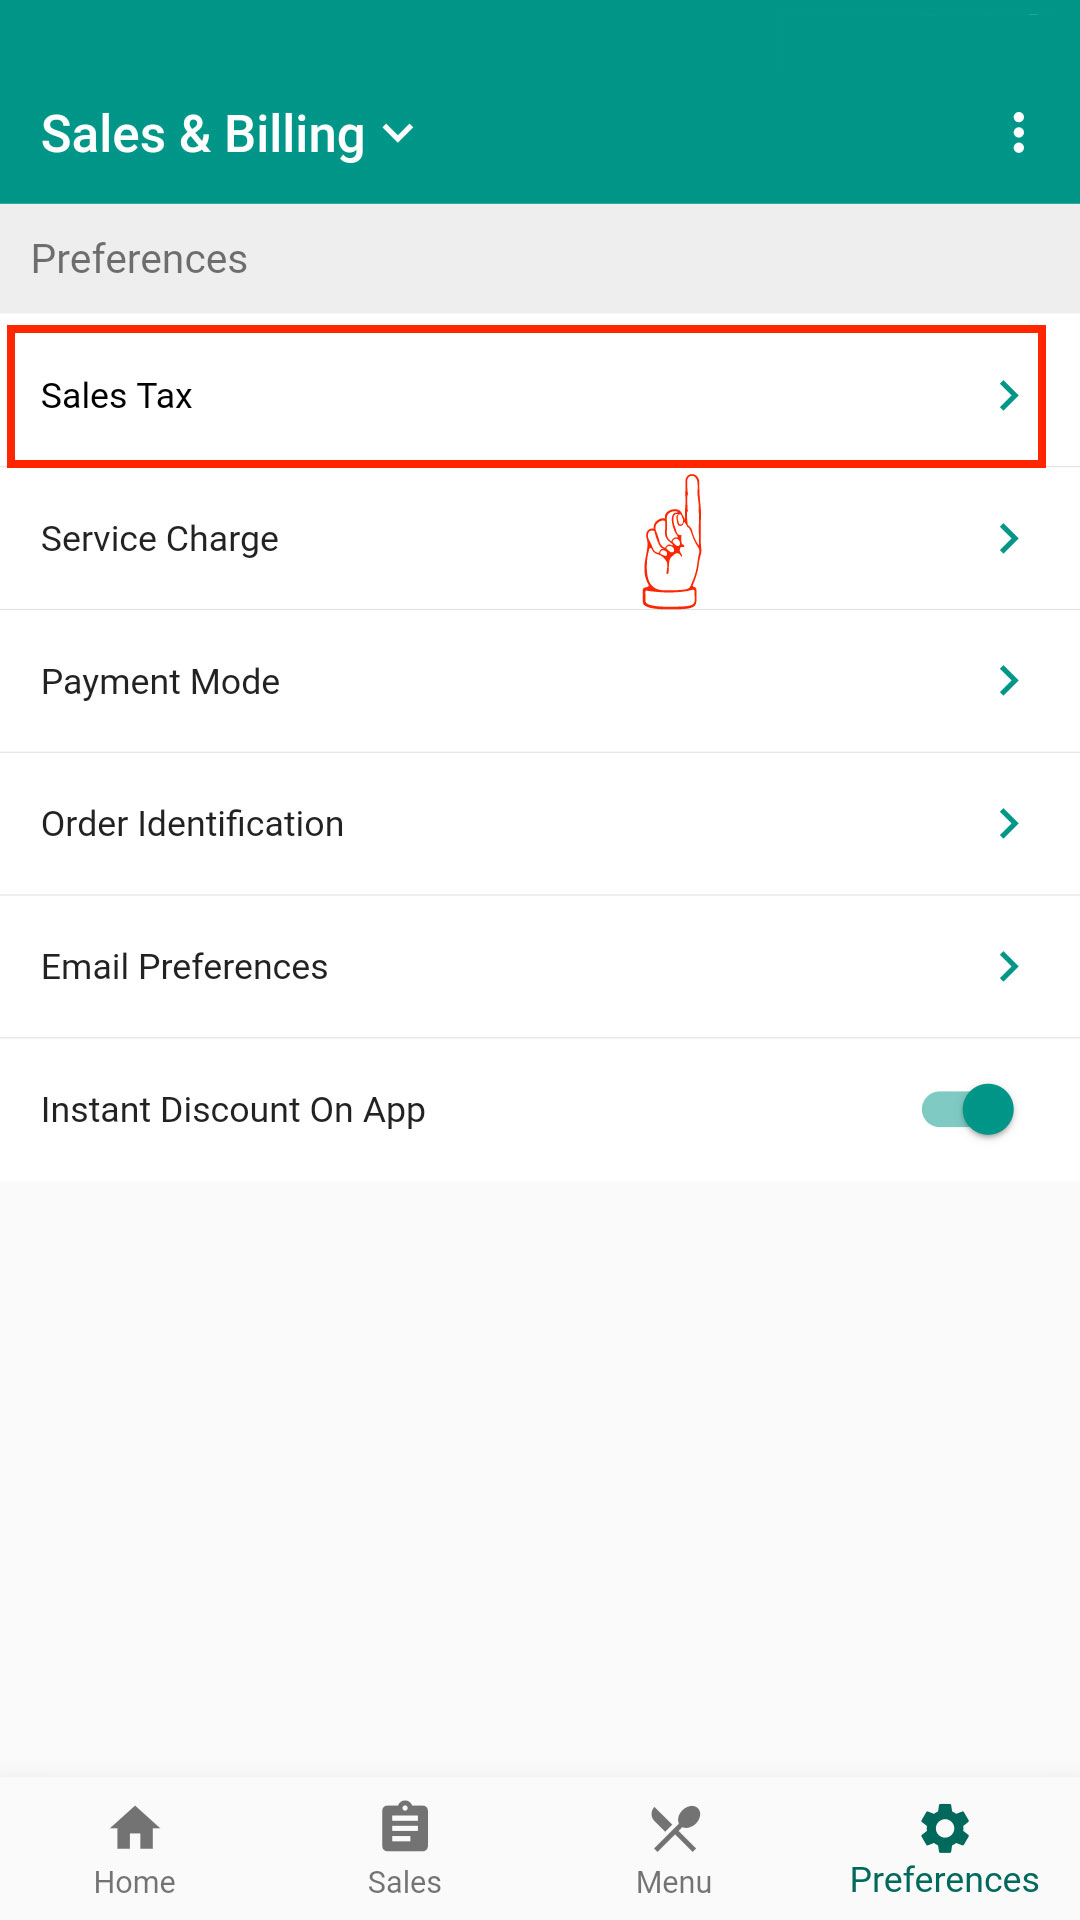
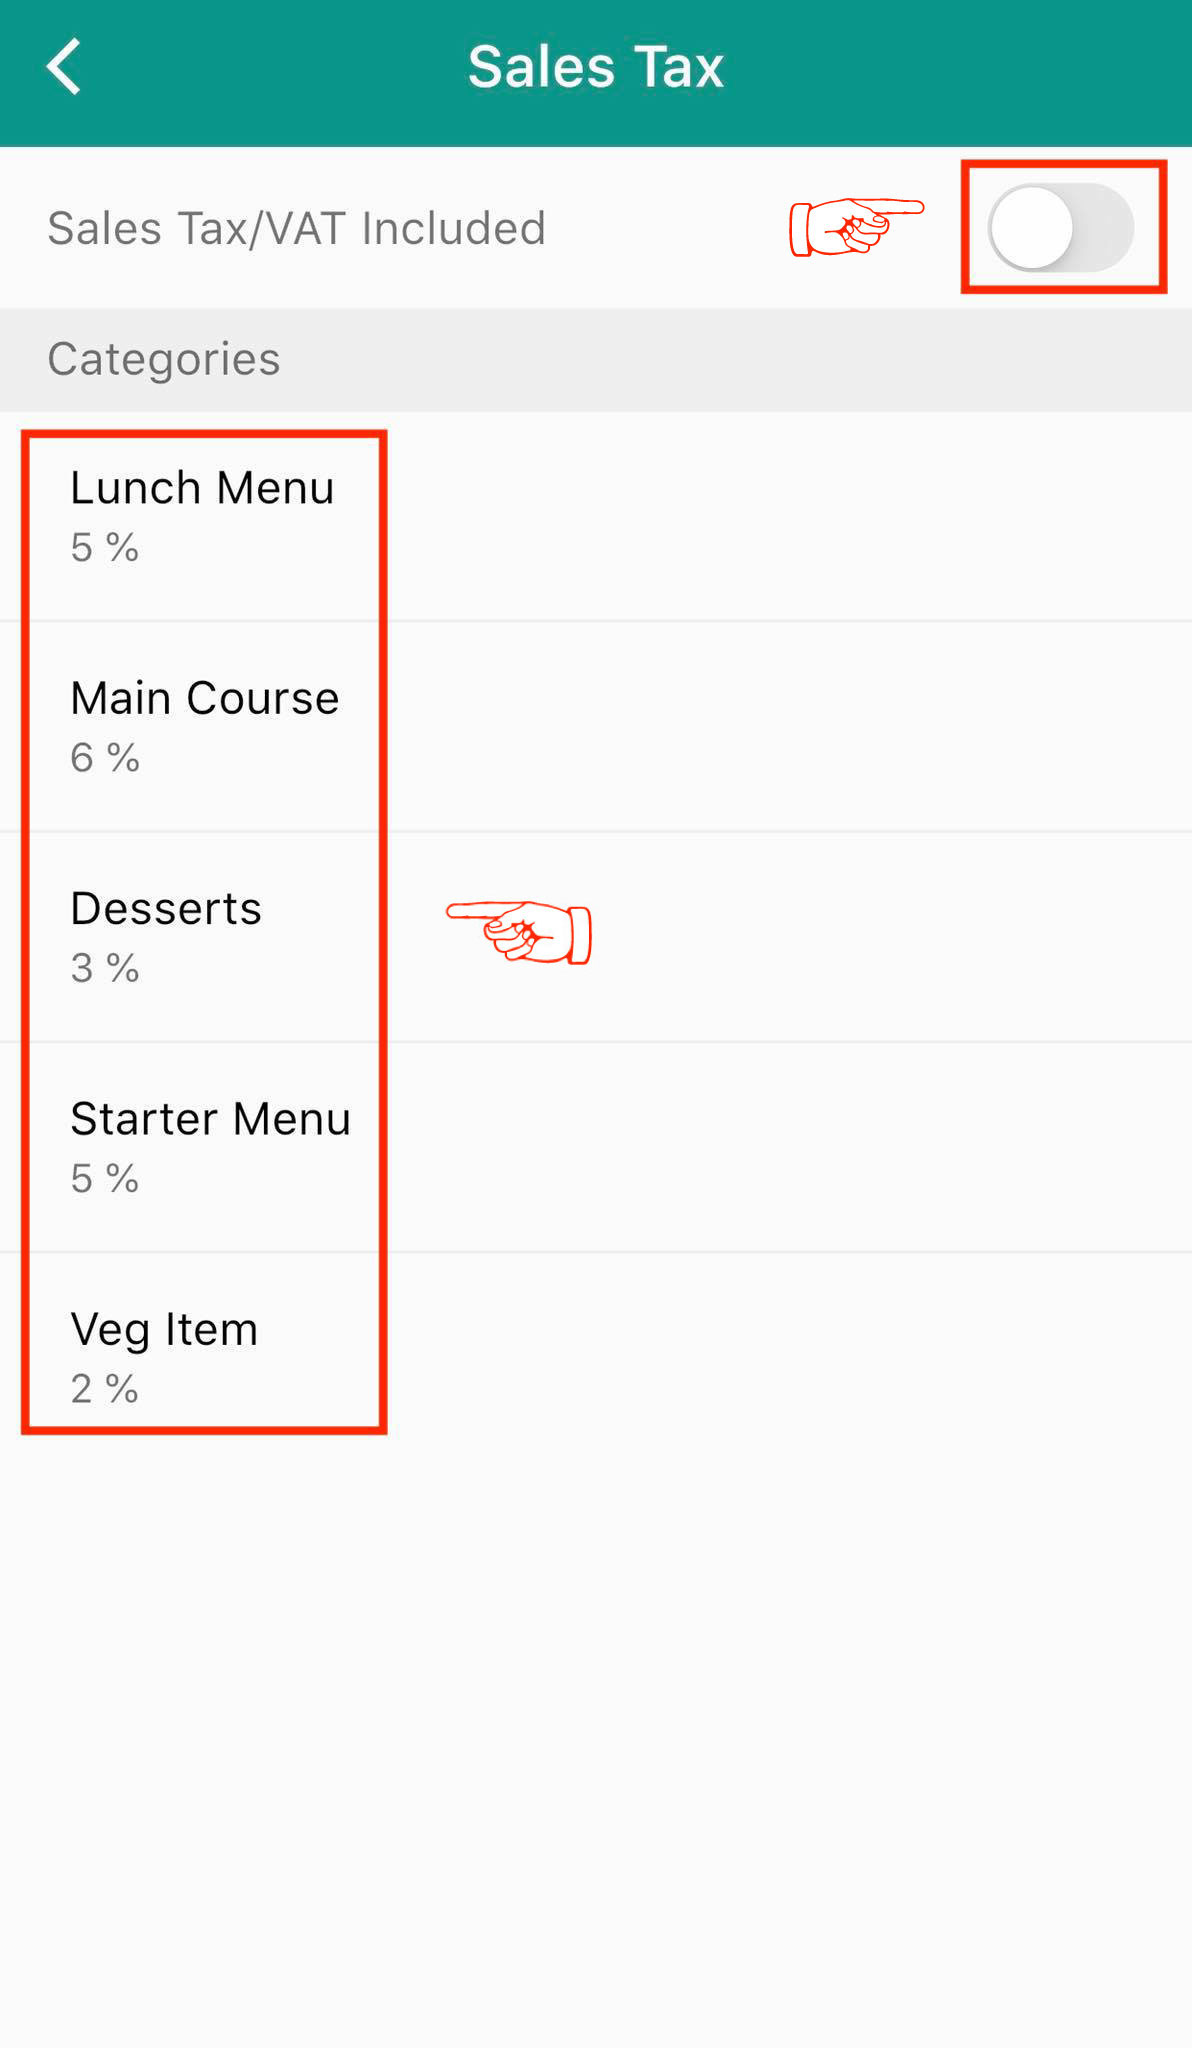
Tap on Service Charge in order to set the service charge and sales tax on it. You need to turn the service charge switch on to enable it and then provide the amount you want to charge for service and set the sales tax on the service charge as well.
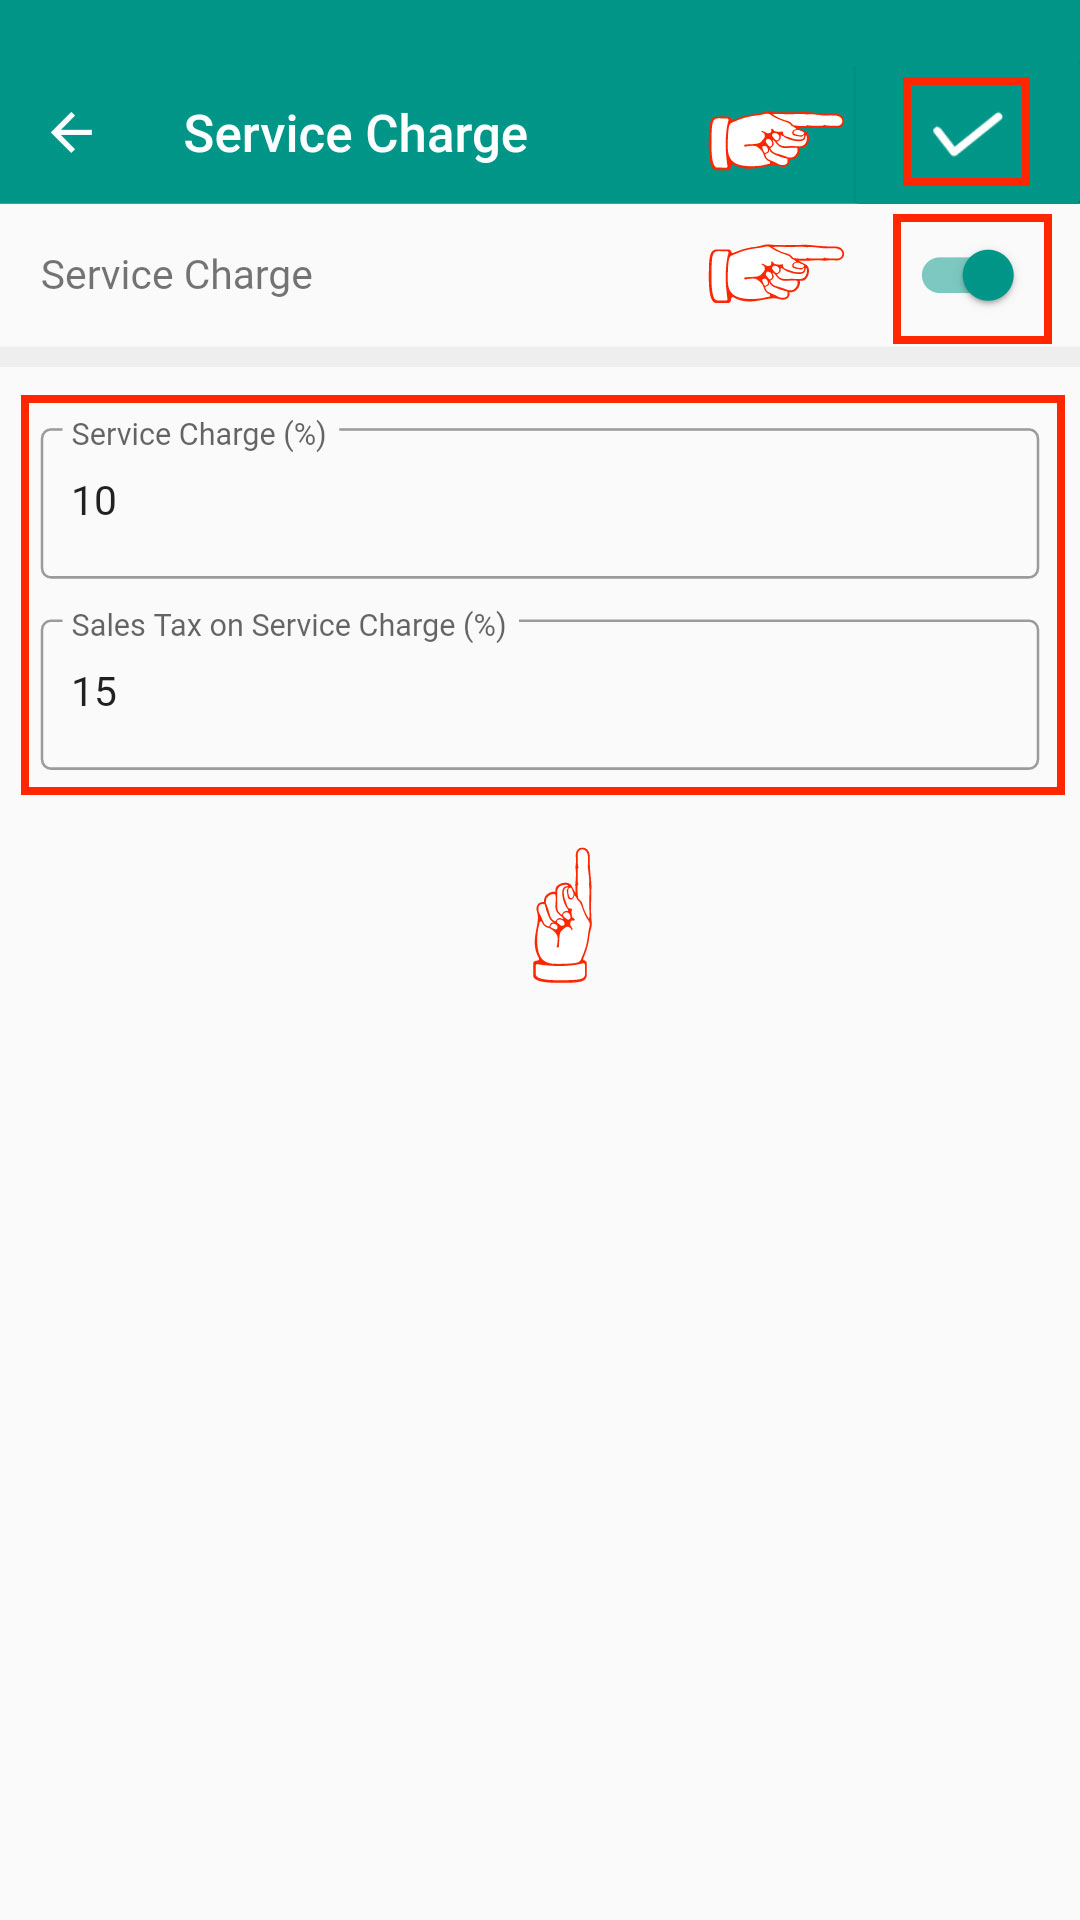
How to manage payment modes?
Admin
You can enable, disable, and edit any payment mode from the Payment Mode section.
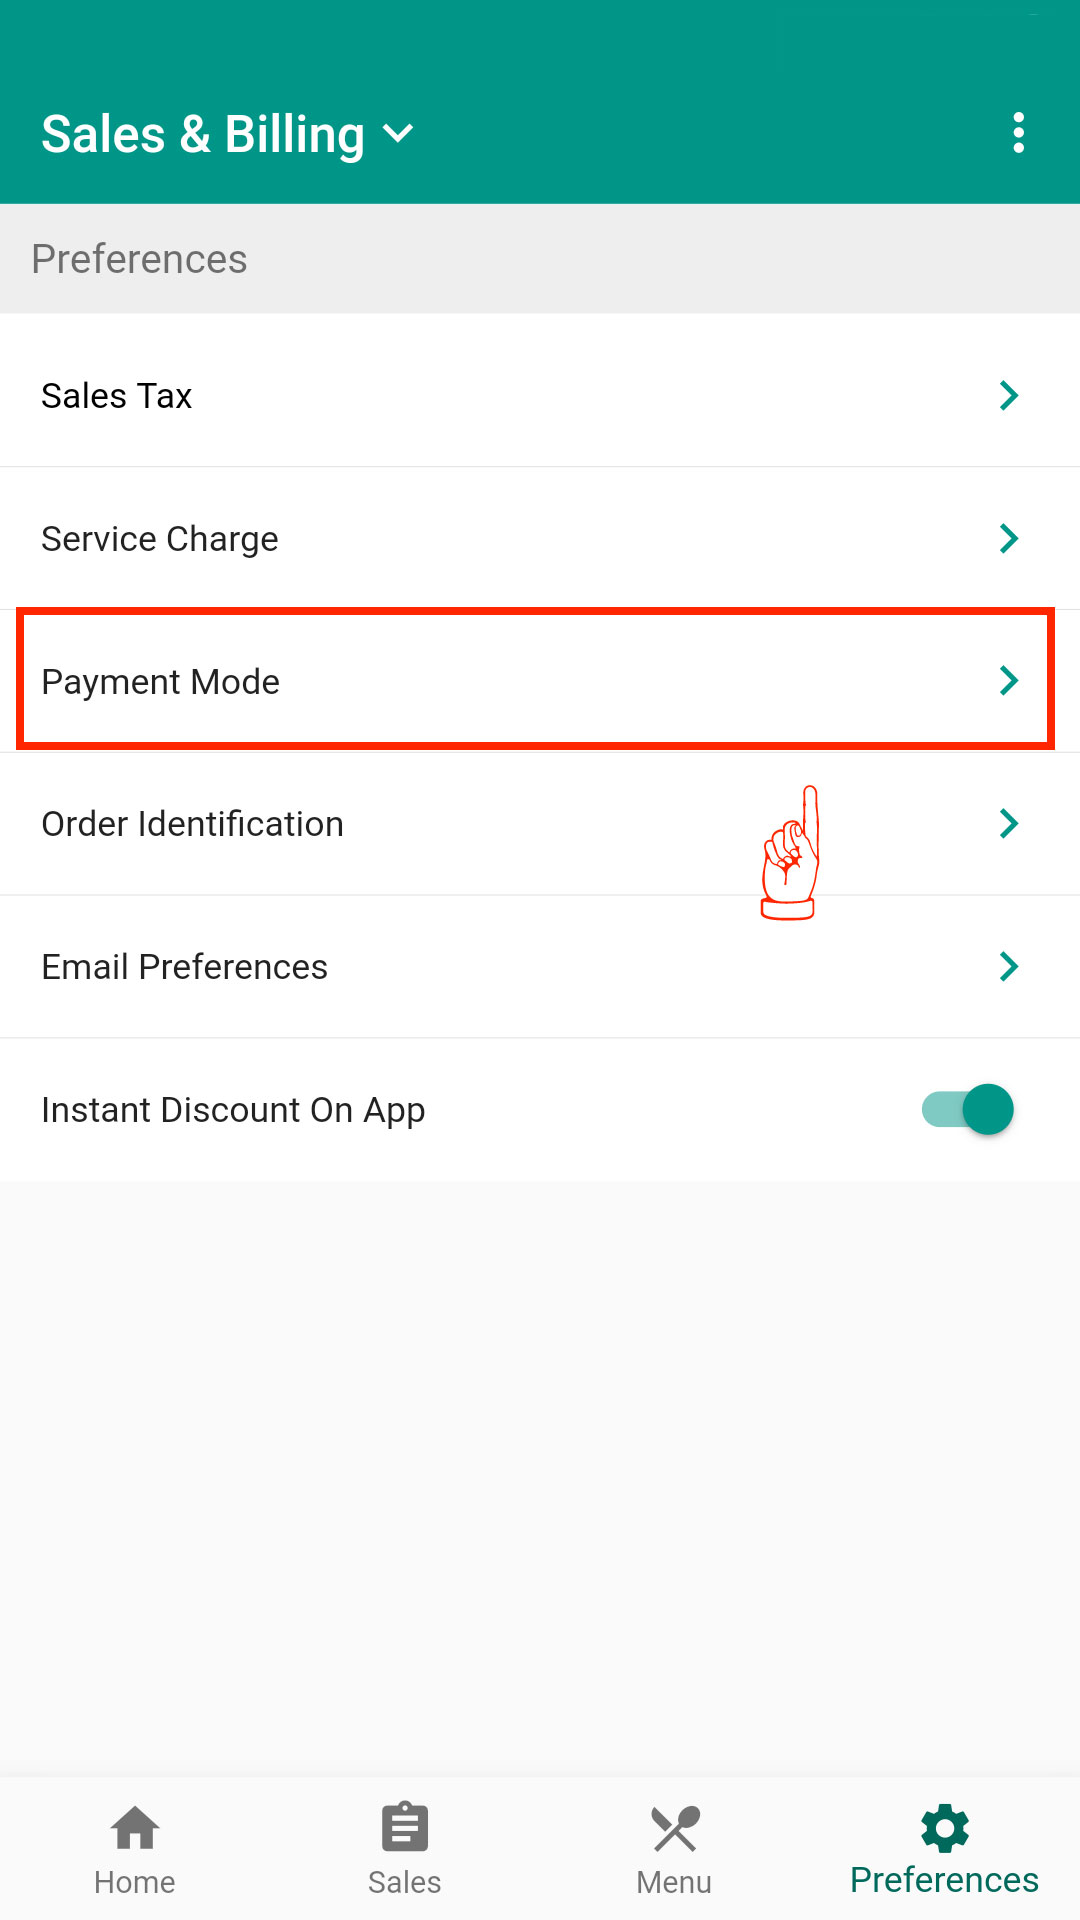
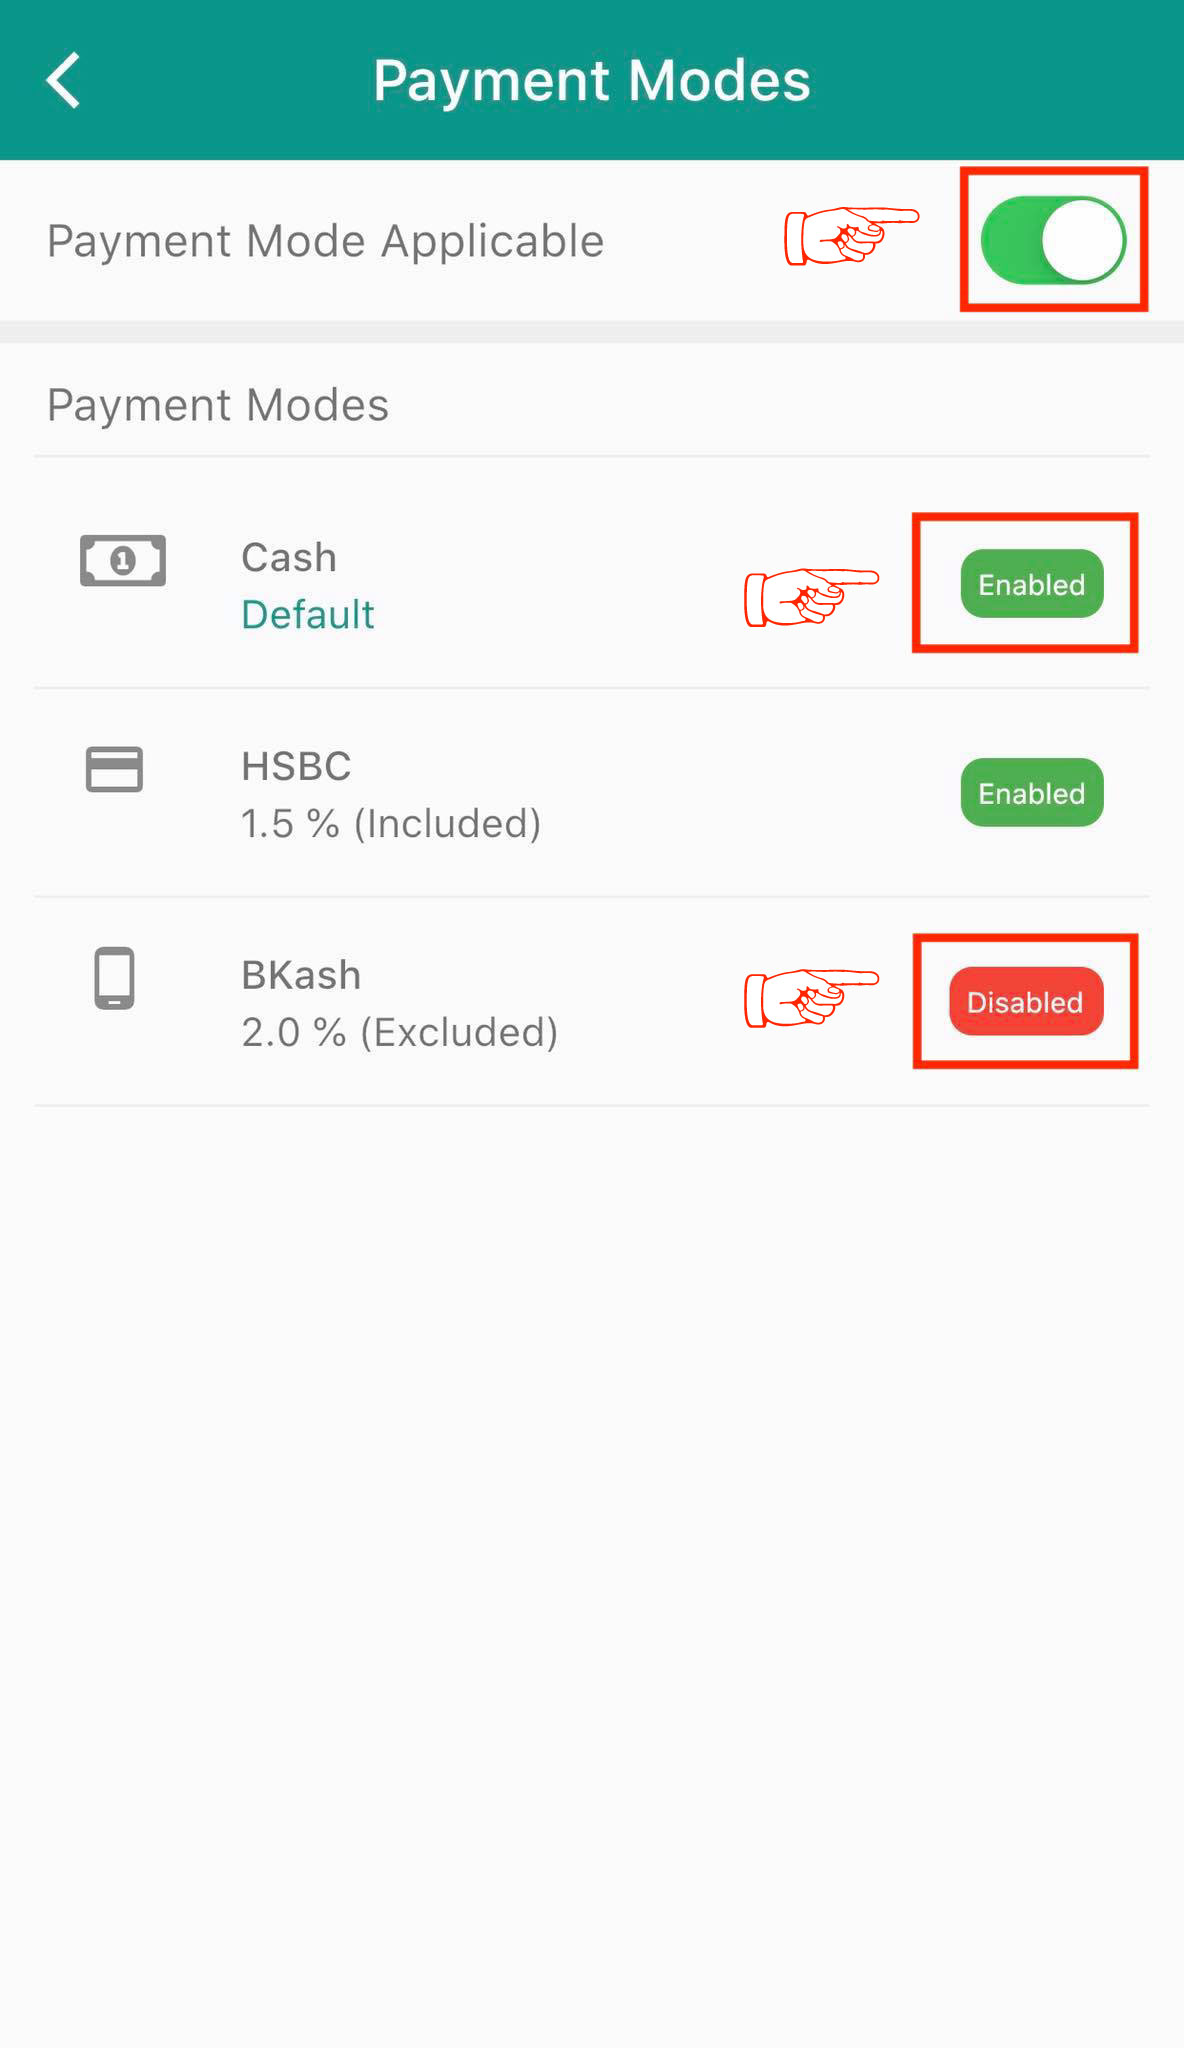
All the existing payment modes (enabled and disabled) will be showing and from there you can enable or disable any mode. Tap on the mode you want to edit and change the status (enable/disable) or simply edit the mode as you prefer.
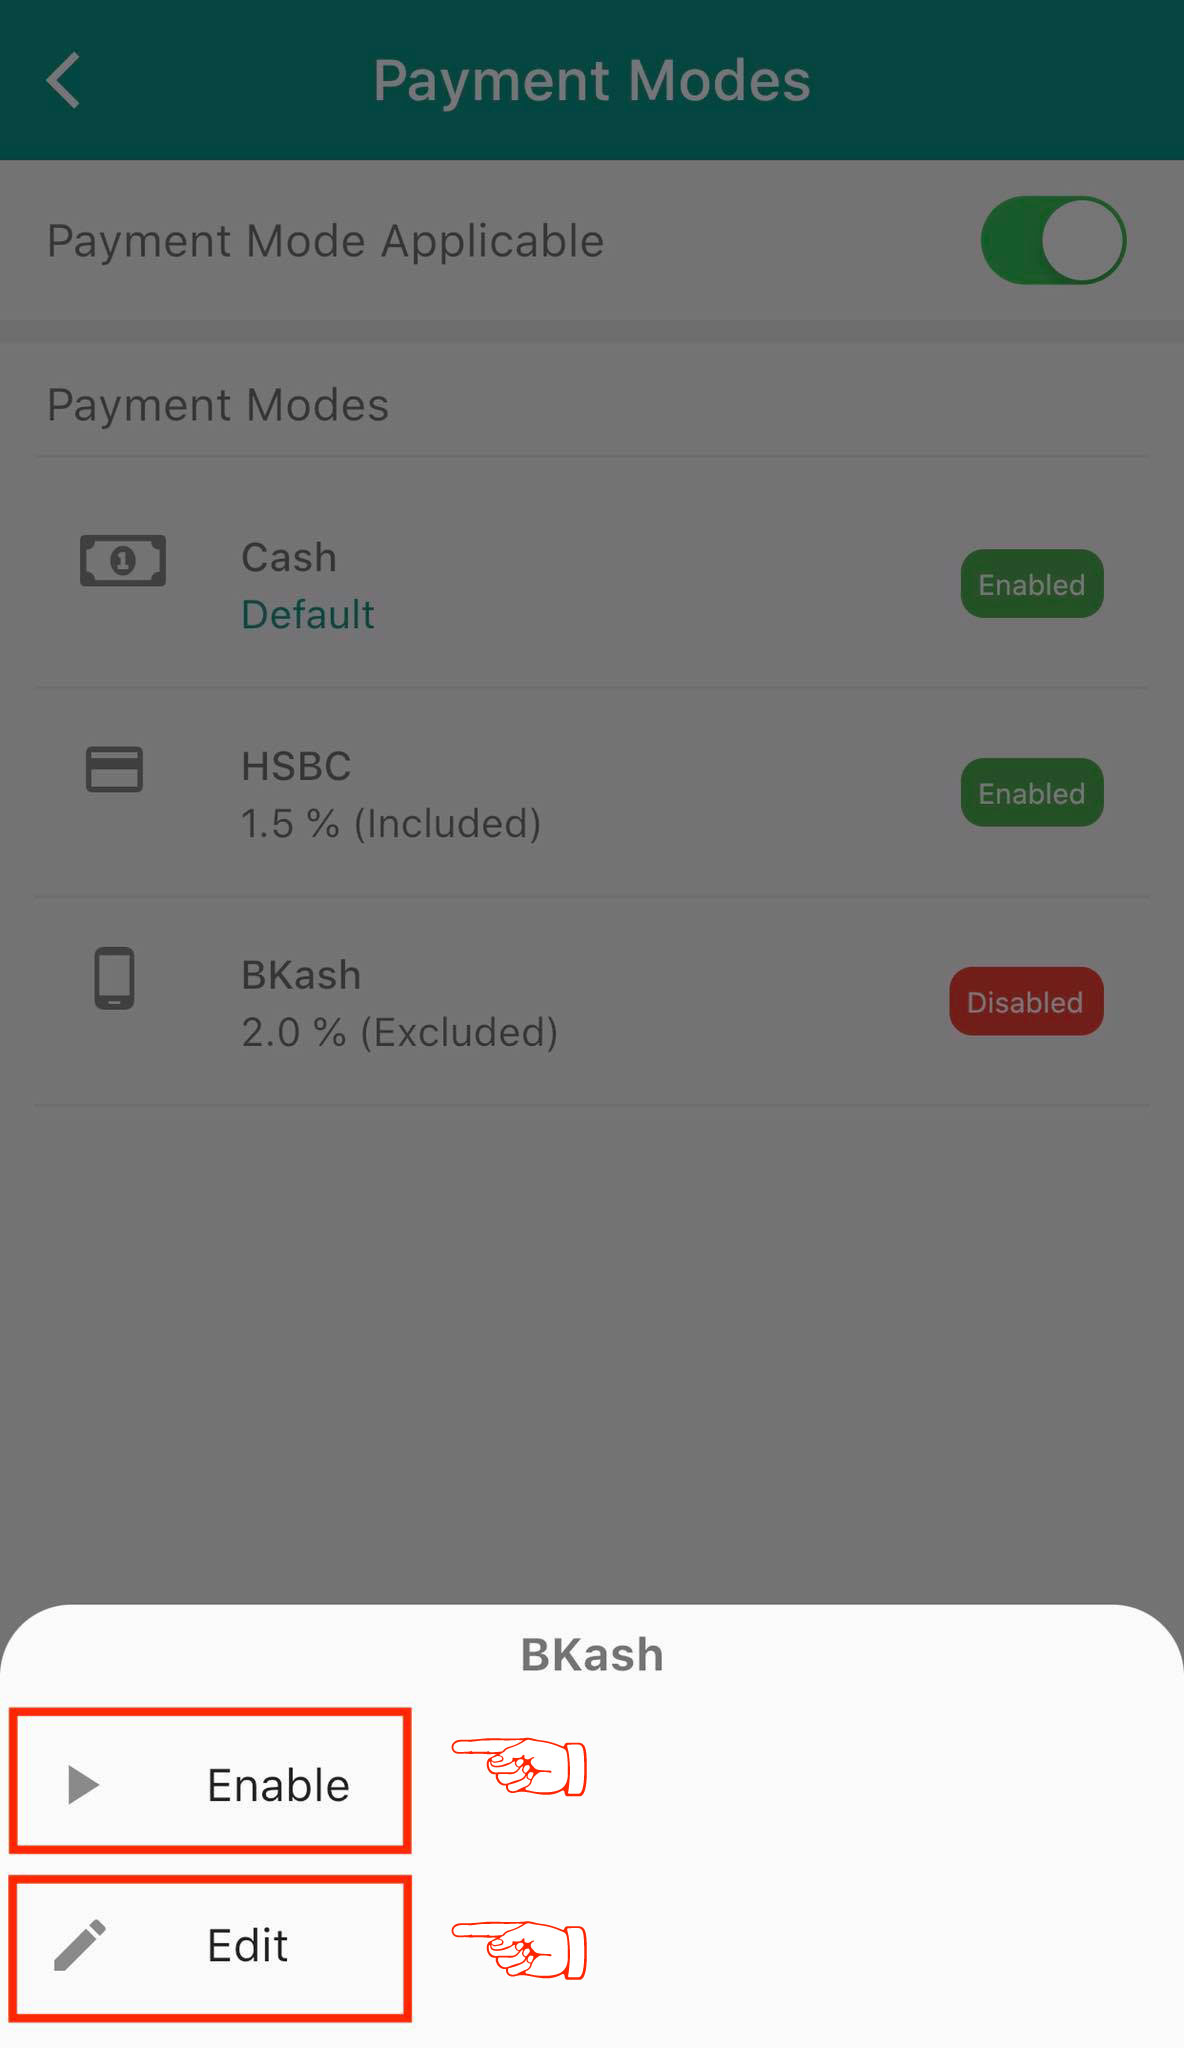
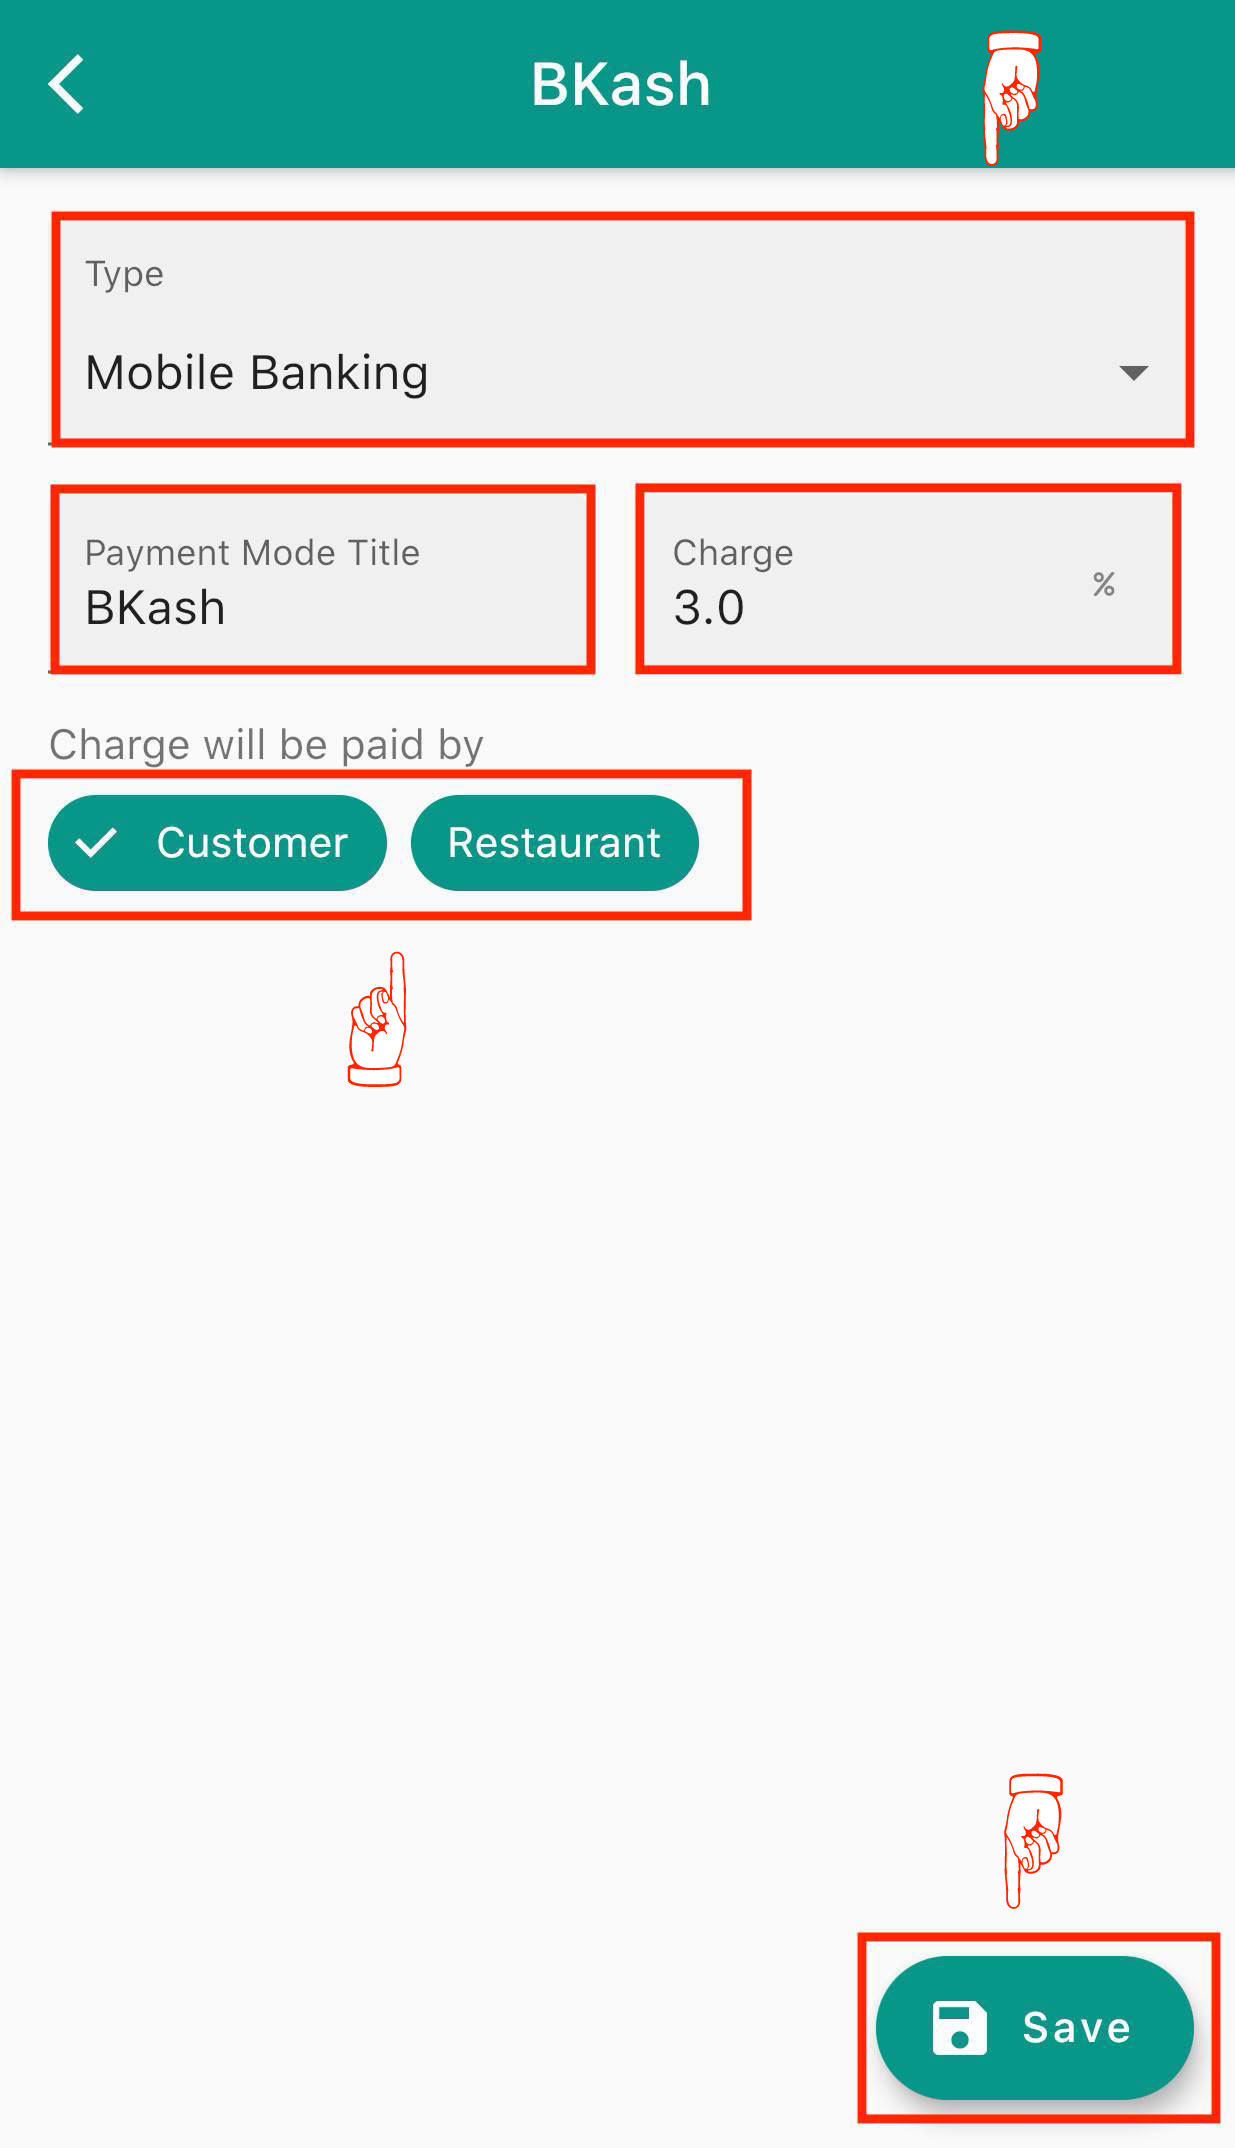
How to track your restaurant orders?
Admin
In order to track your restaurant orders, tap on Order Identification and then select Token or Table. If you select Token, then there are two options to set it: Auto Generated Token and Manual Token. If you select Auto Generated Token, then for each order a token number will be auto generated or you can define the maximum token number to reset the token number after reaching that number. If you select Table, then you need to define the number of tables and after adding dishes to the cart, the table number must be assigned by the user.

How to set email preferences for the business?
Admin
You can set your email preferences by simply tapping on the switch to turn it on and email will be sent to you according to your choice of getting notification.