What is RetailGo?
Admin
2 months ago
RetailGo is the first-ever fully portable, subscription-based,
affordable
software solution for retail shops, introduced by ‘Quickly Services’. This
Software as Service (SAS) solution helps the retail shops
to manage and track their inventory, generate bills and calculate
profits.
The system comes with three primary products- ordering mobile app, business
owner portal
and business owner mobile app (upcoming). The business owner portal and app
is
equipped with all the necessary features you need to keep yourself
up-to-date
with your business and configure things your business needs on the fly.
The ordering app is designed and built in such a way that it becomes easy
for your staff to operate swiftly and conveniently, even for people who are
not used to smartphones. It also comes with a portable bluetooth printer to
avoid all the clutter of cables and power supply so that it takes less space
and gives freedom to your staff to operate even from a distance.
You can access all your data at any time from anywhere in the world because
we are providing Cloud-based pos, where the data is stored in a highly
secured
google cloud server. With this, Quickly Services ensures the security and
reliability of service and promises the best on-demand support from support
engineers and customer executives.
Related Video Support
How to setup account, create employee, vendor profile & user role
In this video, we will see in how to sign up for RetailGo, how to update your shop detail information, how to add information of your shop employees to software, how to set user account and role for them and how to manage your vendor/supplier profile.
Why RetailGo?
Admin
2 months ago
We know that most of the retail shop owners do not get the time to be present physically in their shops. Hence, the retail stores are run by managers or staff and as per our research, these owners struggle with keeping track of their sales volume, profit/ loss, stock items, billing etc. They are highly dependent on their staff.
Having these in mind, we designed our software in such a way that will eliminate your hessal. Using our software, you can easily manage your business from anywhere in the world, without being present physically in your shop.
Core Benefits of Using RetailGo-
- Unlike other Traditional POS software, our service-based solution eliminates all the inconvenience of big setups, large investment for installation, maintenance cost of software and hardware.
- We provide various graphs & charts to help you understand the growth of orders, revenue, inventory along with your business details and summary just in time when you need it. You can keep track of all these analytics from your business portal for your further business decision making.
- We know the importance of data in today’s world and so we made sure that you can access your data 24/7 from anywhere in the world through your phone or any android device. You just need a decent internet connection.
- You do not need expensive gadgets to operate the app. Any smartphone would work just fine. You’ll never need a pen or paper from the day you start using our app.
- Our product pricing is very convenient and competent given the features it has. Enjoy 14 days trial period and witness how easily you can use it.
- We have a Support Portal containing step-by-step tutorials of the use of our business portal & mobile app. Our customer support team will also be at your service 24/7 over the phone and other alternatives.
Related Video Support
How to setup account, create employee, vendor profile & user role
In this video, we will see in how to sign up for RetailGo, how to update your shop detail information, how to add information of your shop employees to software, how to set user account and role for them and how to manage your vendor/supplier profile.
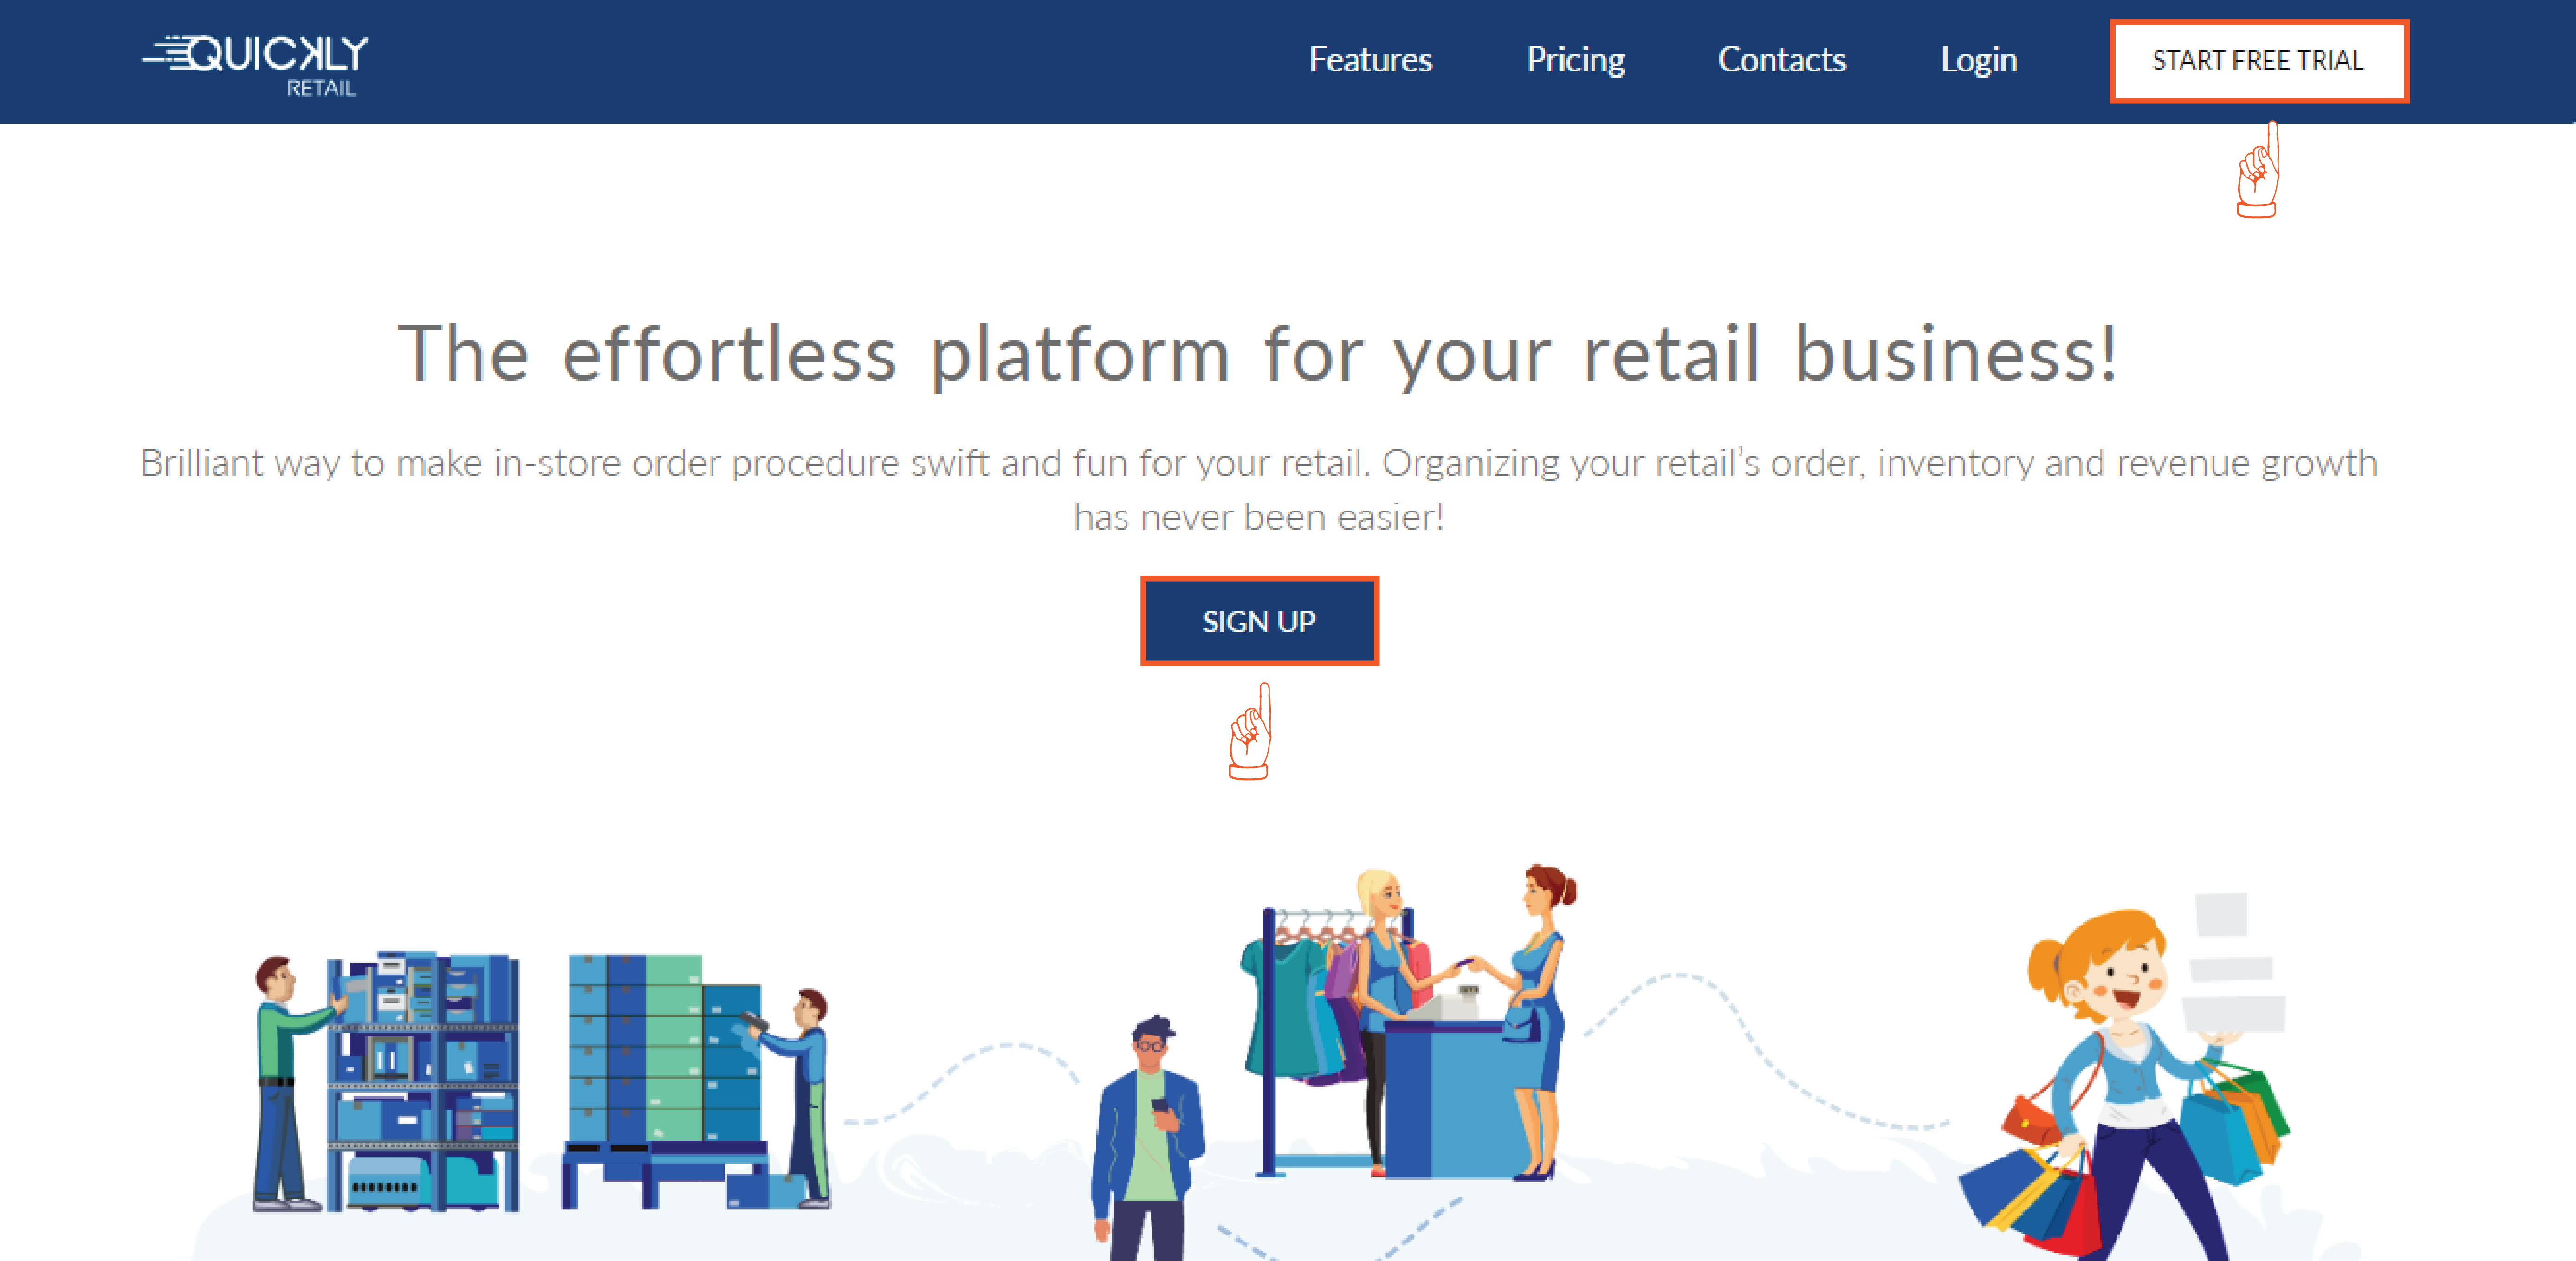
How to Sign up for RetailGo?
Admin
2 months ago
To enjoy our service you need to sign up through our website and download the RetailGo App in your smartphone from the play store.
Step-1 Go to our website and just press START FREE TRIAl or SIGN UP for signing up.
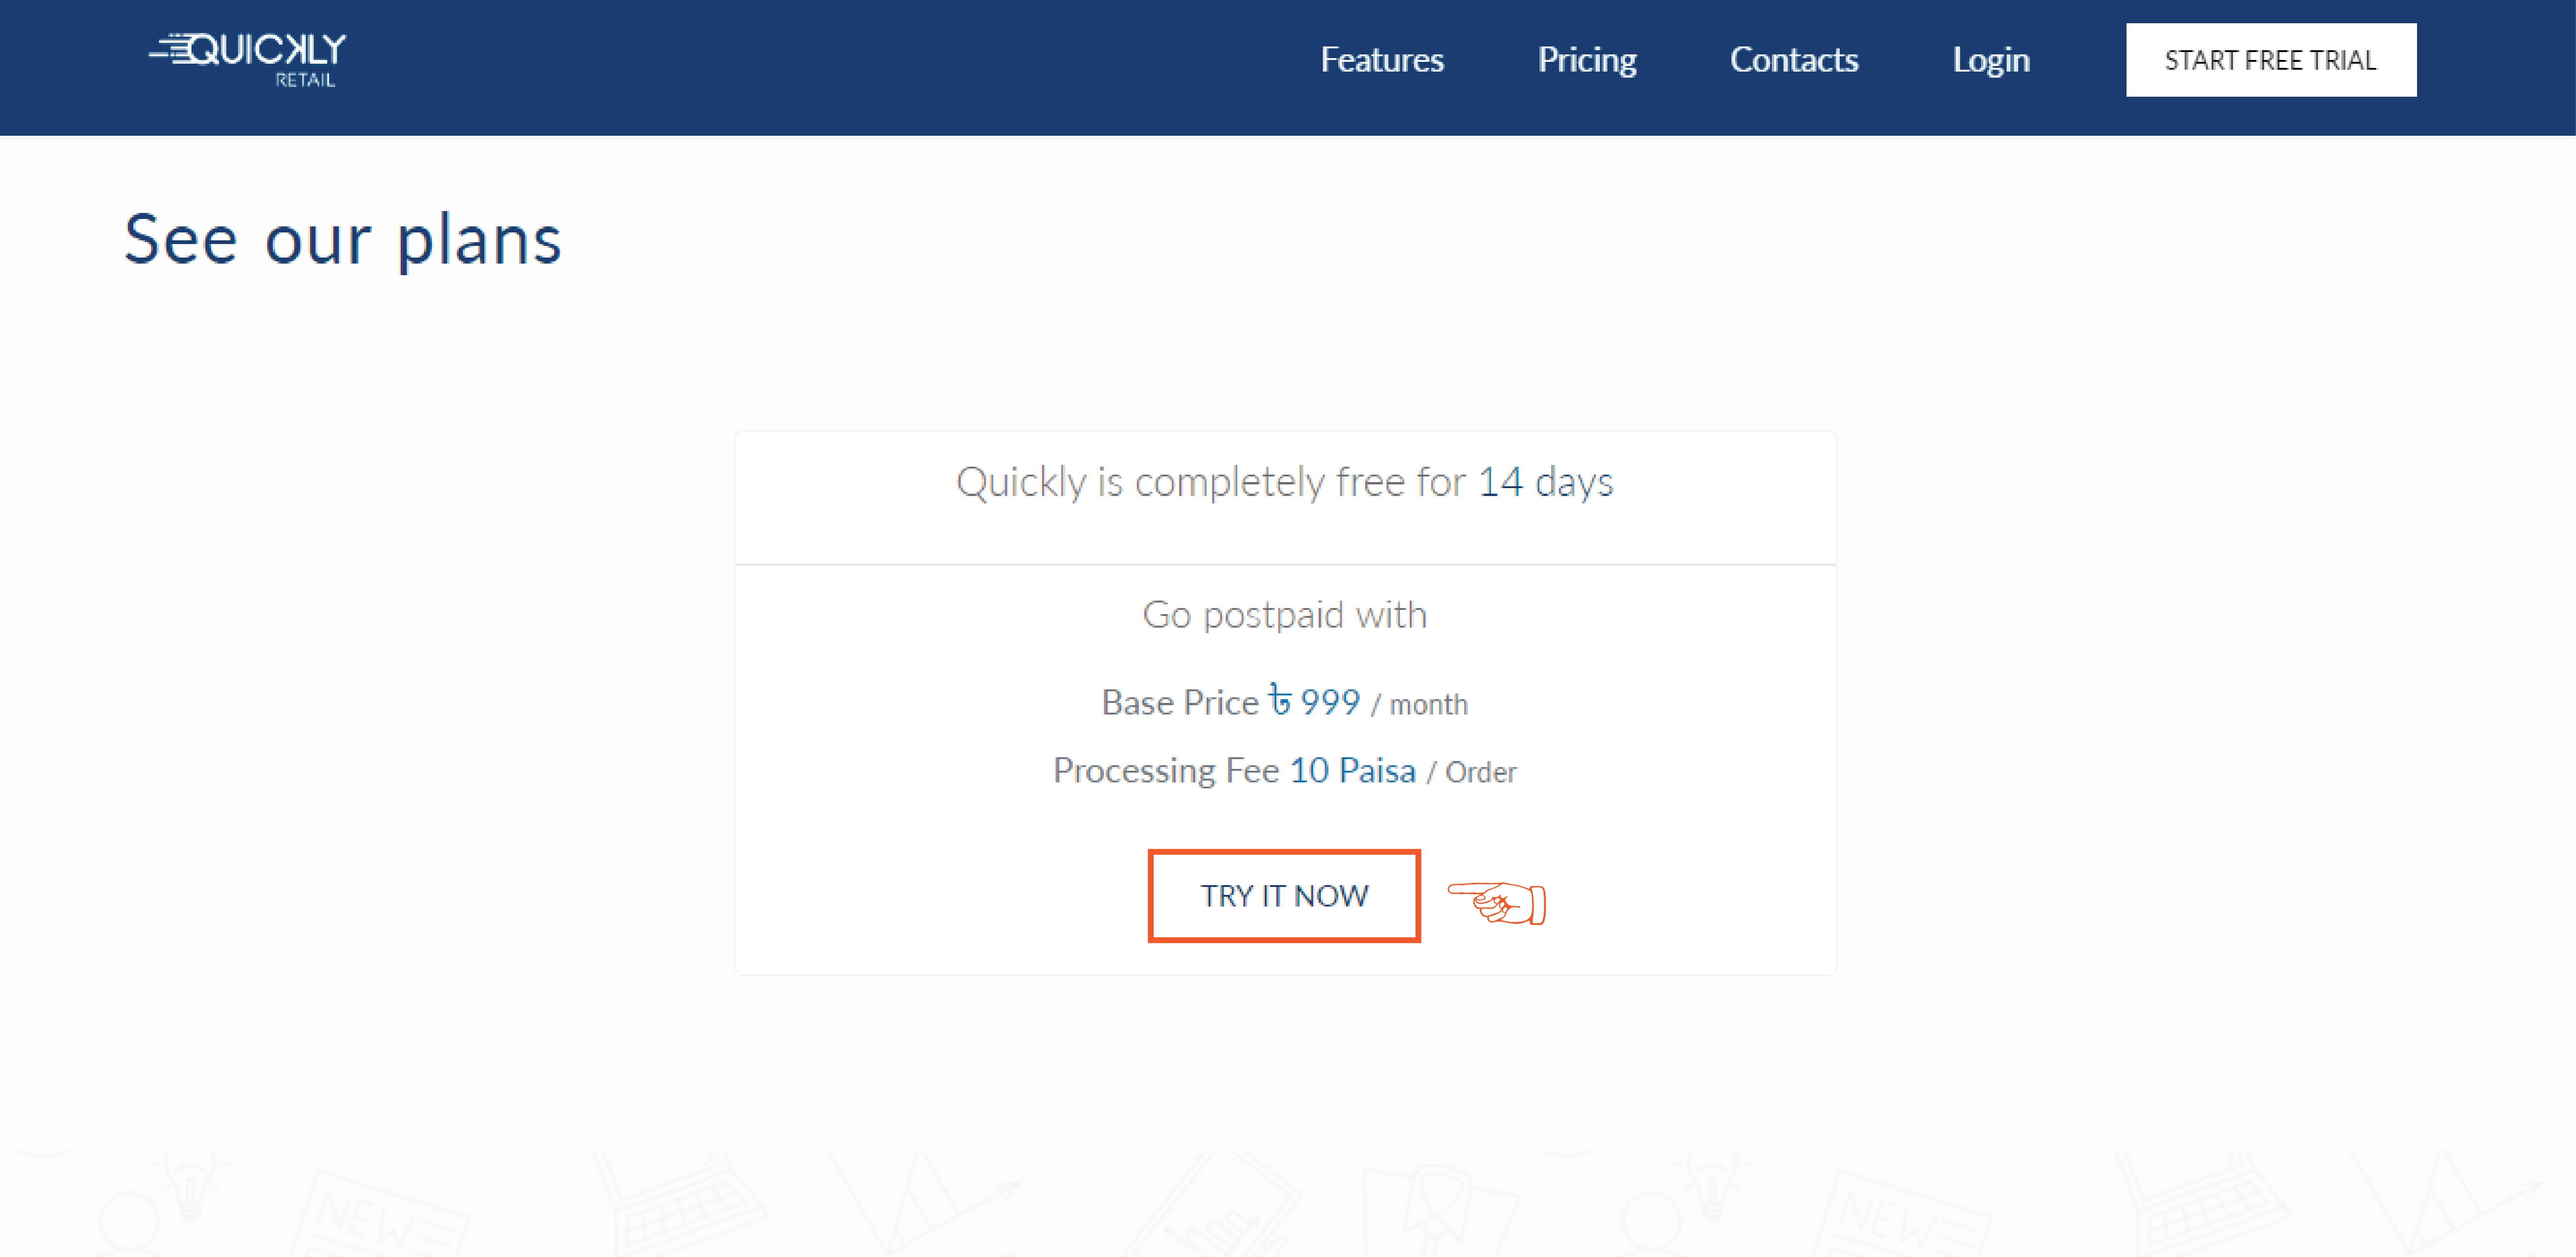
You can also sign up by clicking on the “TRY IT NOW” button.
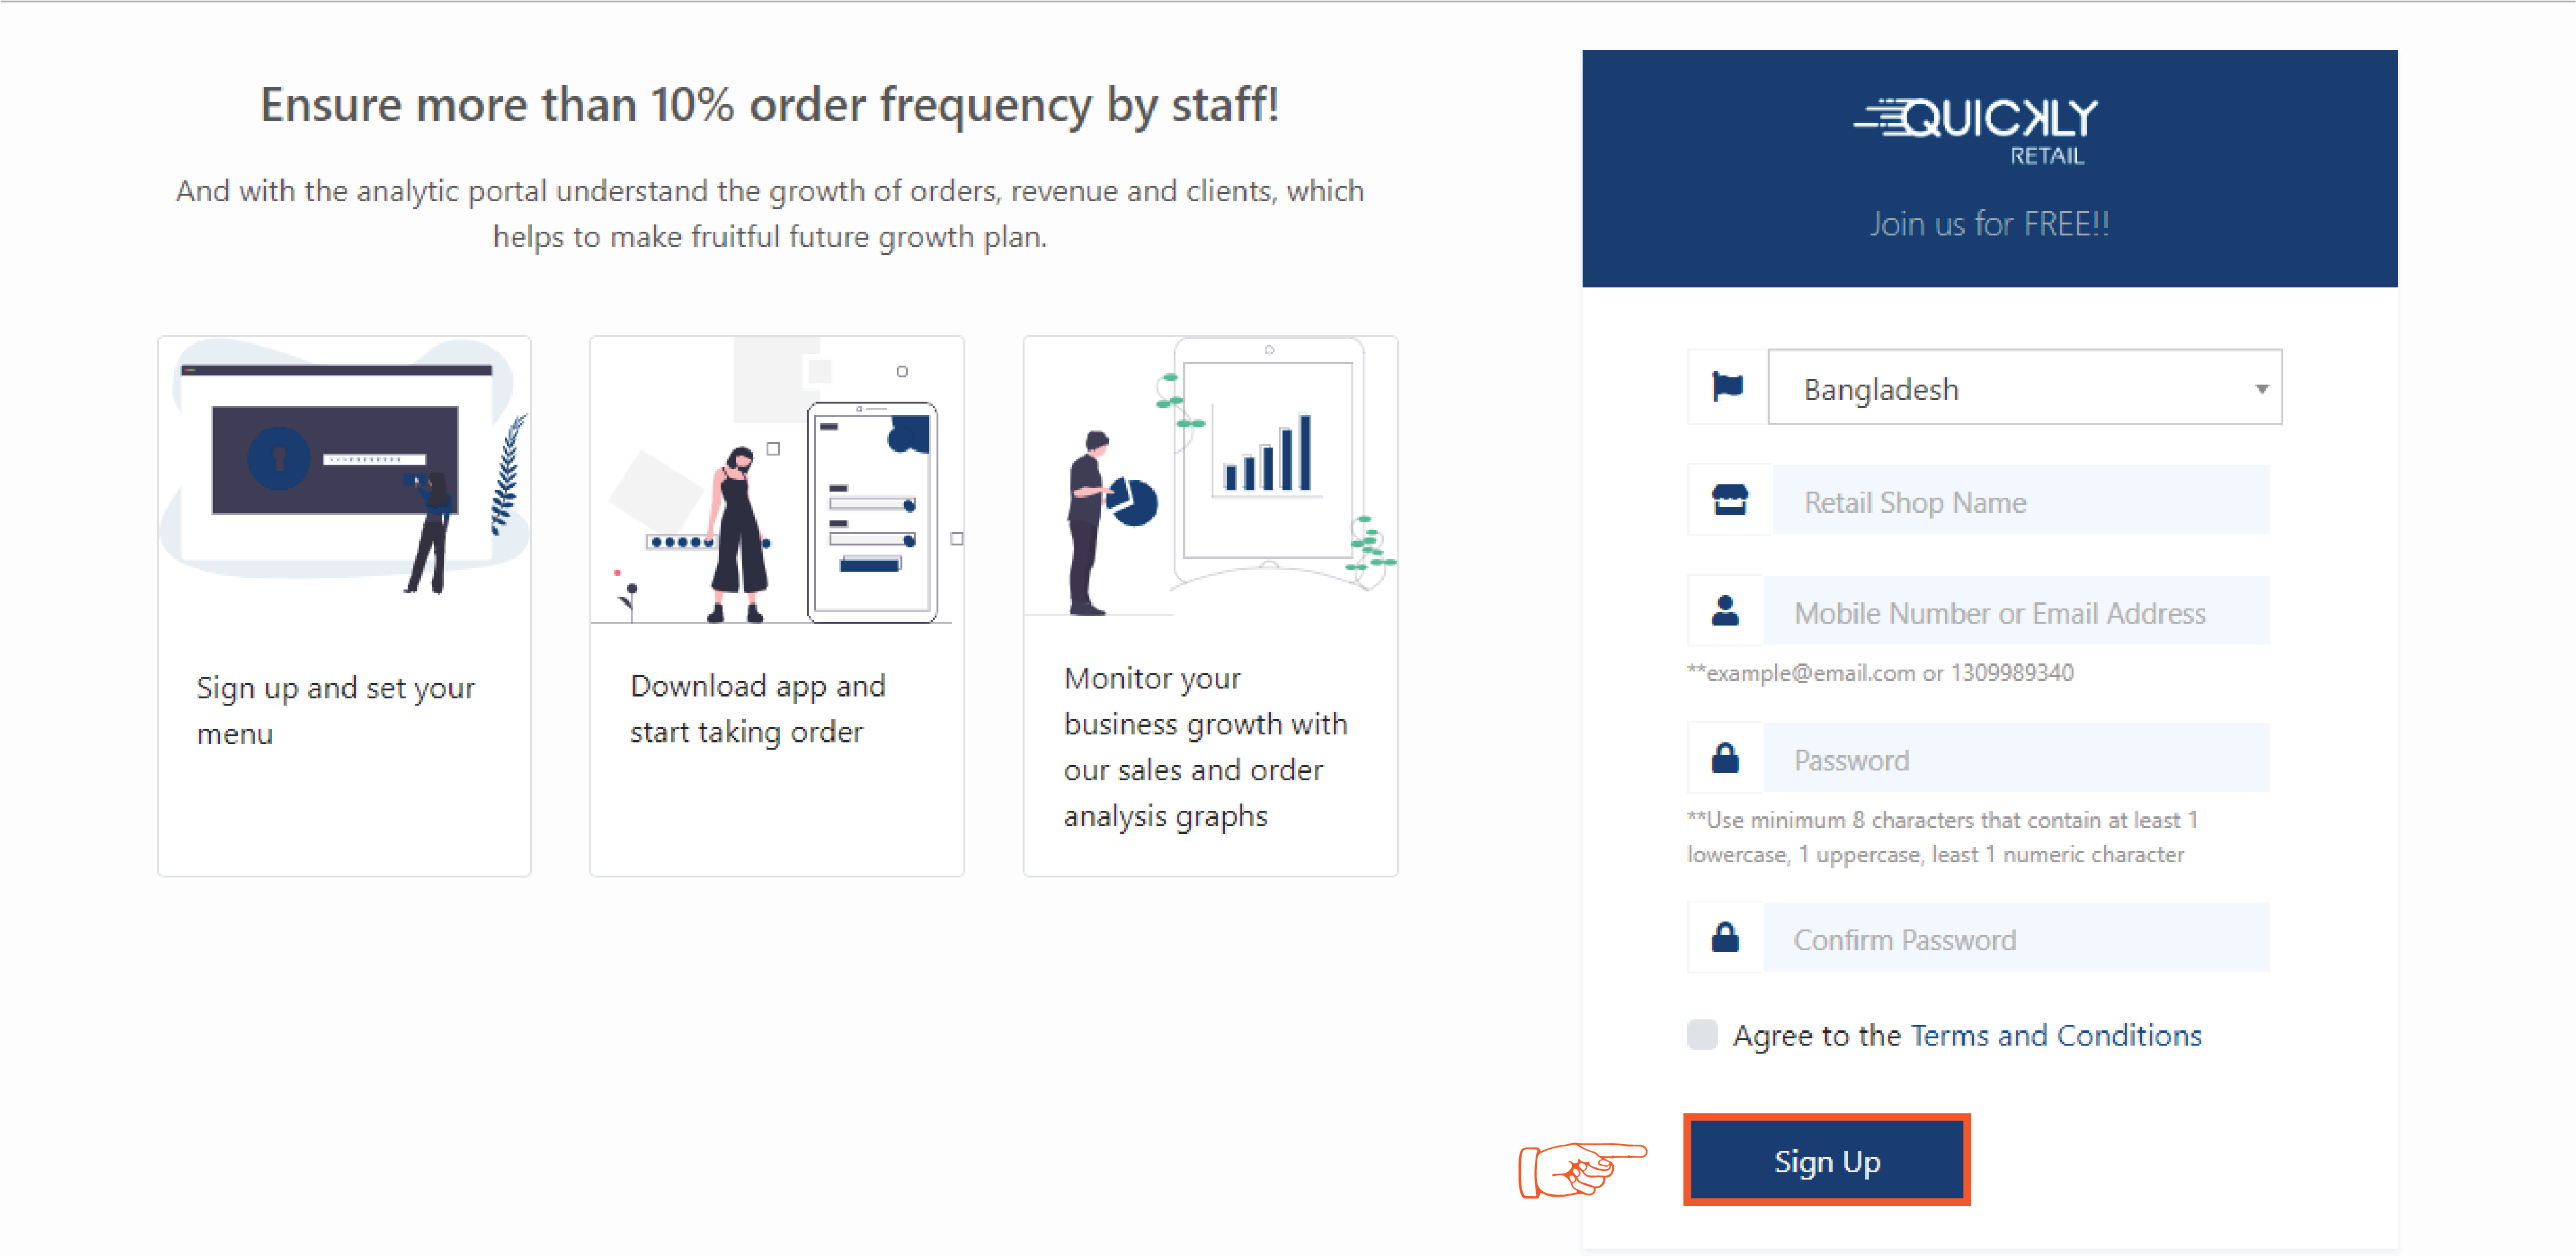
Step-2 Fill up the sign up form with your necessary information and click the sign up button.
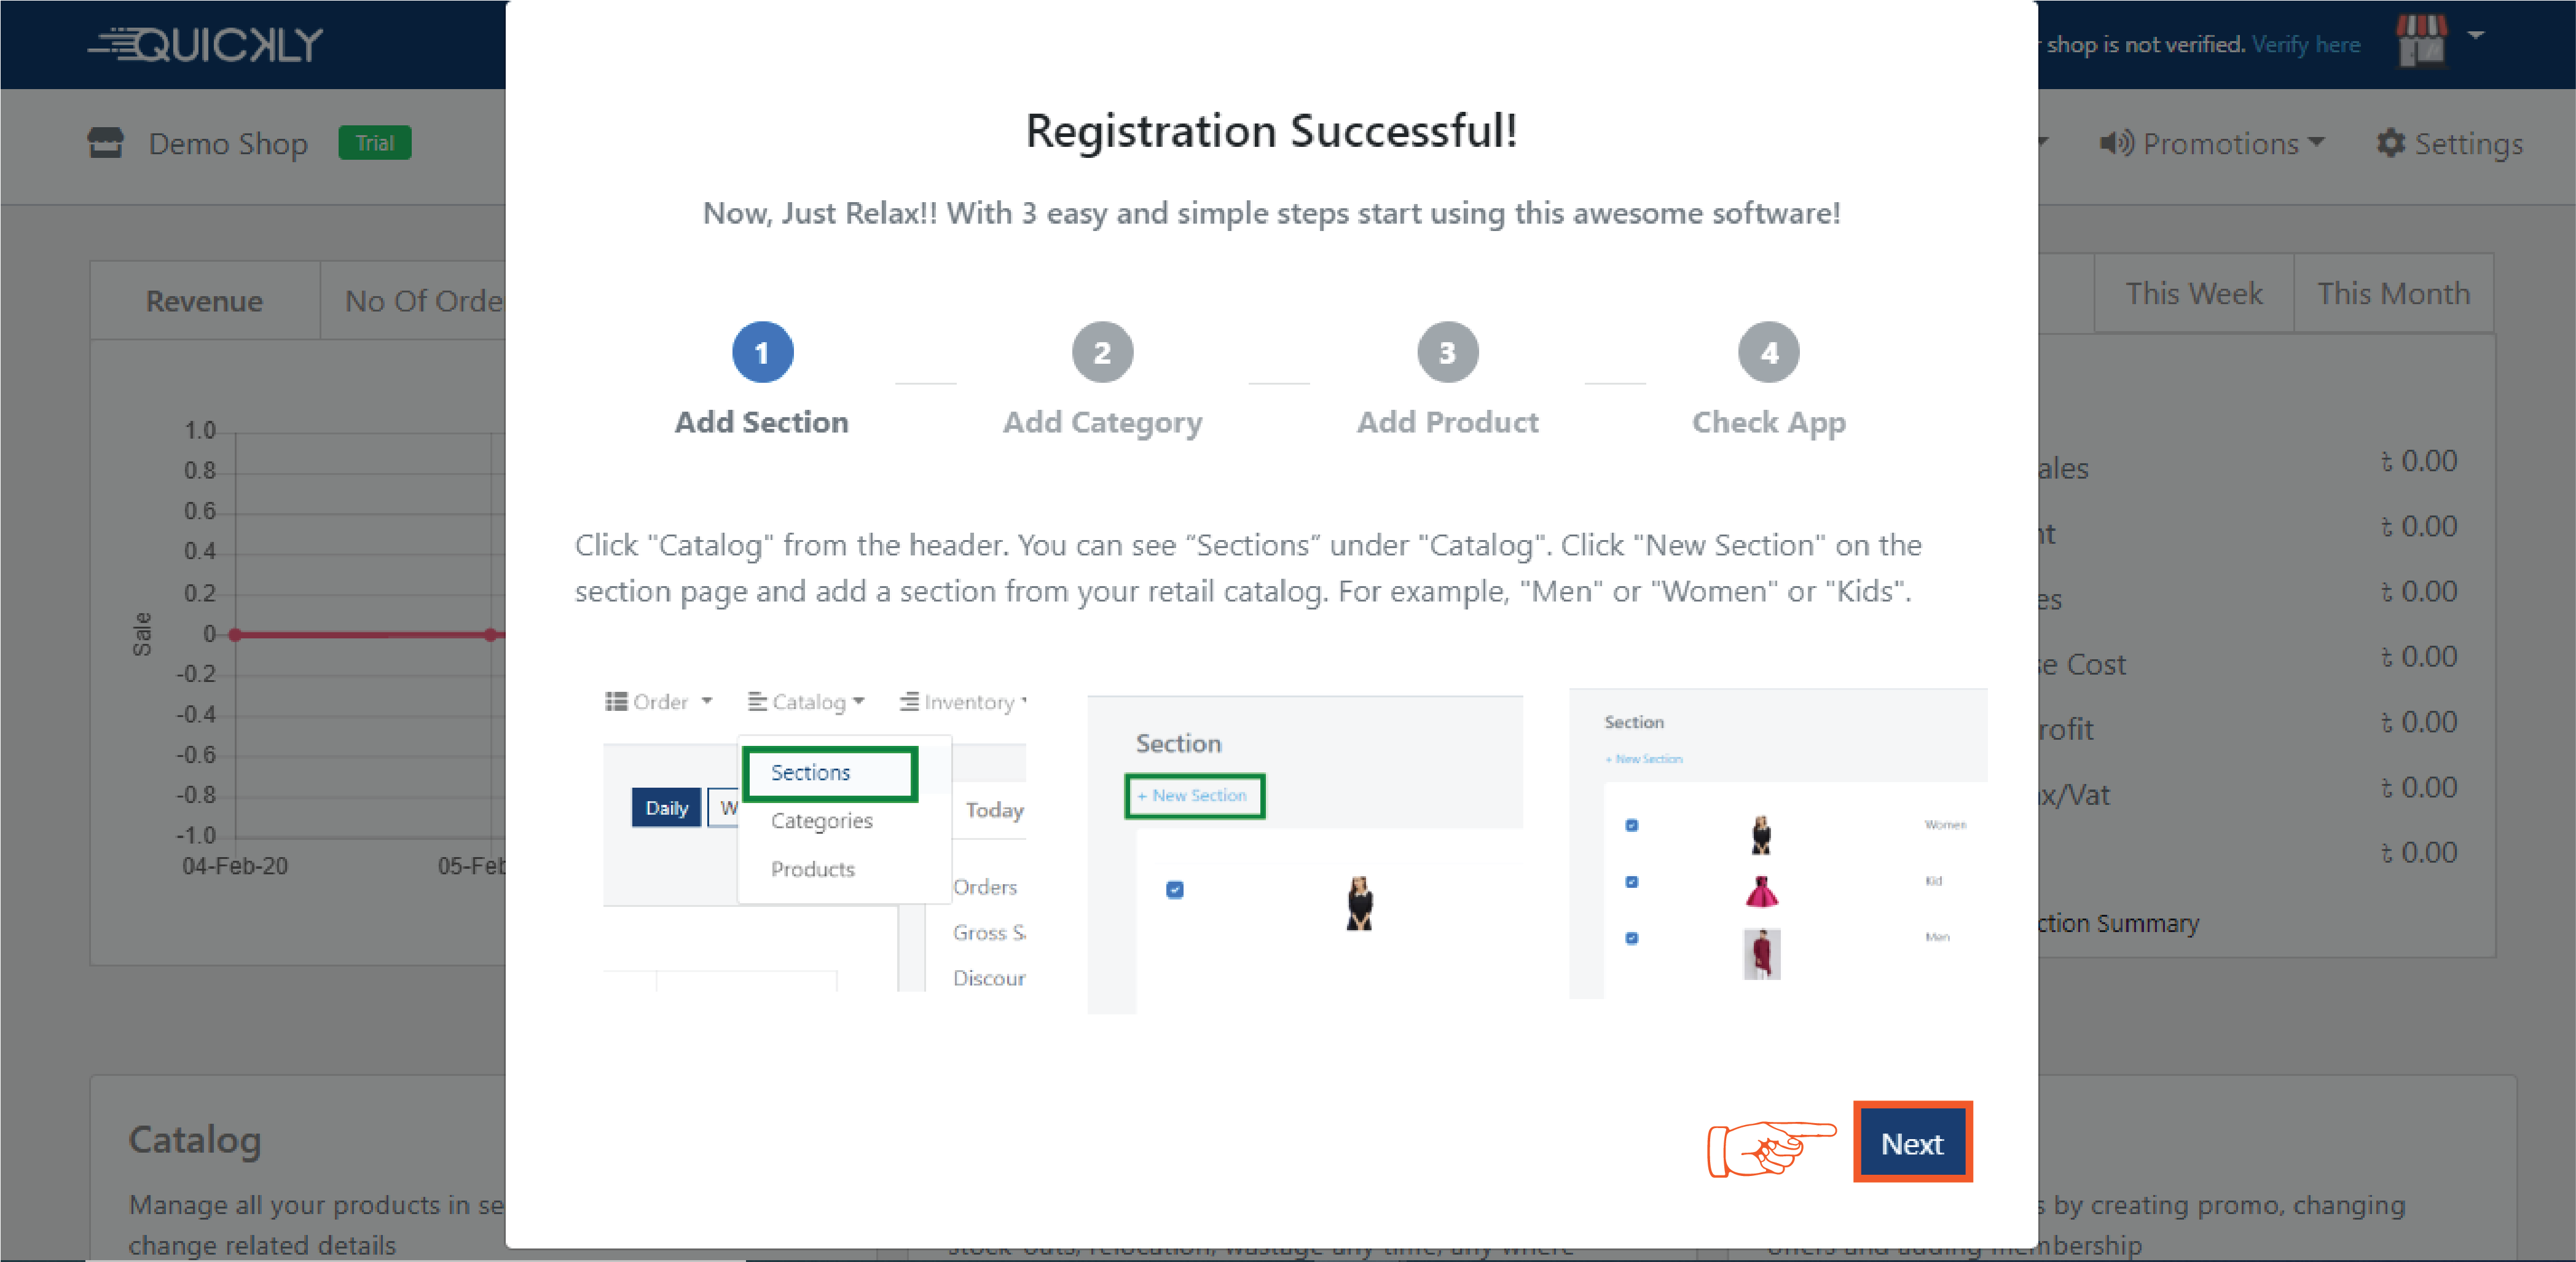
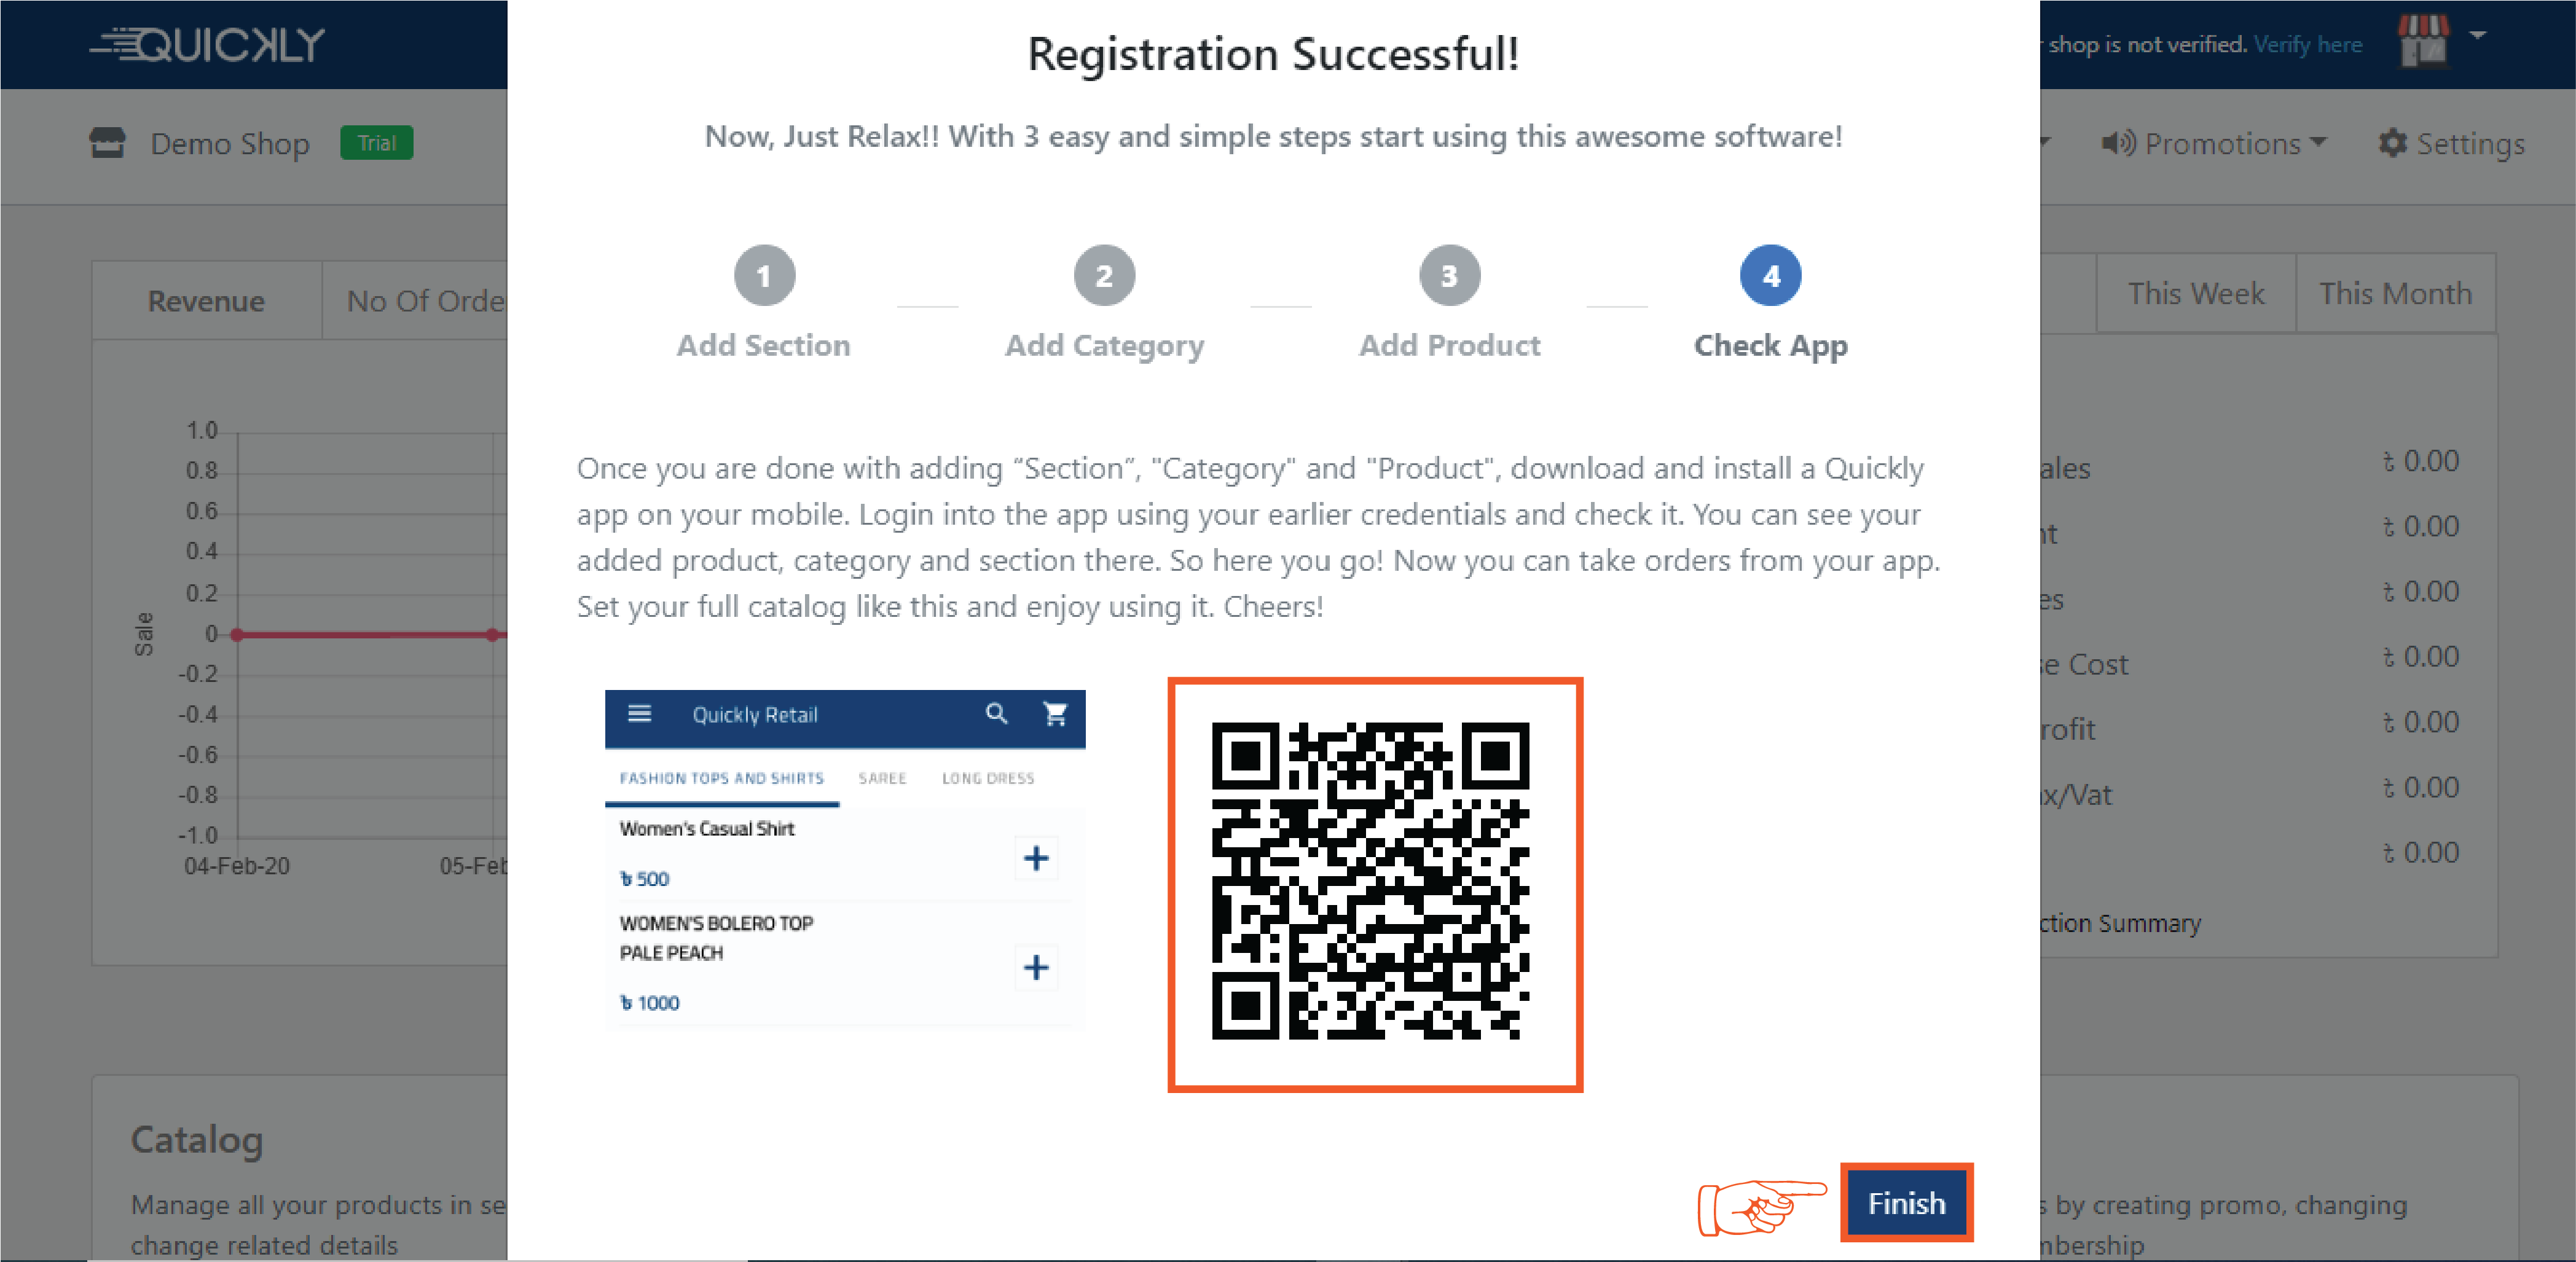
👉 After a successful signup procedure, for the first time you will get
a tour which will help you to understand how to set up your business
portal. Please go through the tour carefully!
Press the “Next” button to get the next instruction.
Again press the “Next” button to get the next instruction
Again press the “Next” button to get the next instruction

Now, scan the QR code and download the RetailGo app from the play store.
👉 To help you trace your business’s data in a more convenient way we will send you the daily, weekly and/or monthly stock, consumption and/or sales reports to your mailbox. Simply go to the email notification page and select the reports you want to get via email.
Related Video Support
How to setup account, create employee, vendor profile & user role
In this video, we will see in how to sign up for RetailGo, how to update your shop detail information, how to add information of your shop employees to software, how to set user account and role for them and how to manage your vendor/supplier profile.
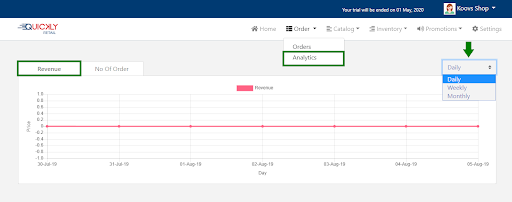
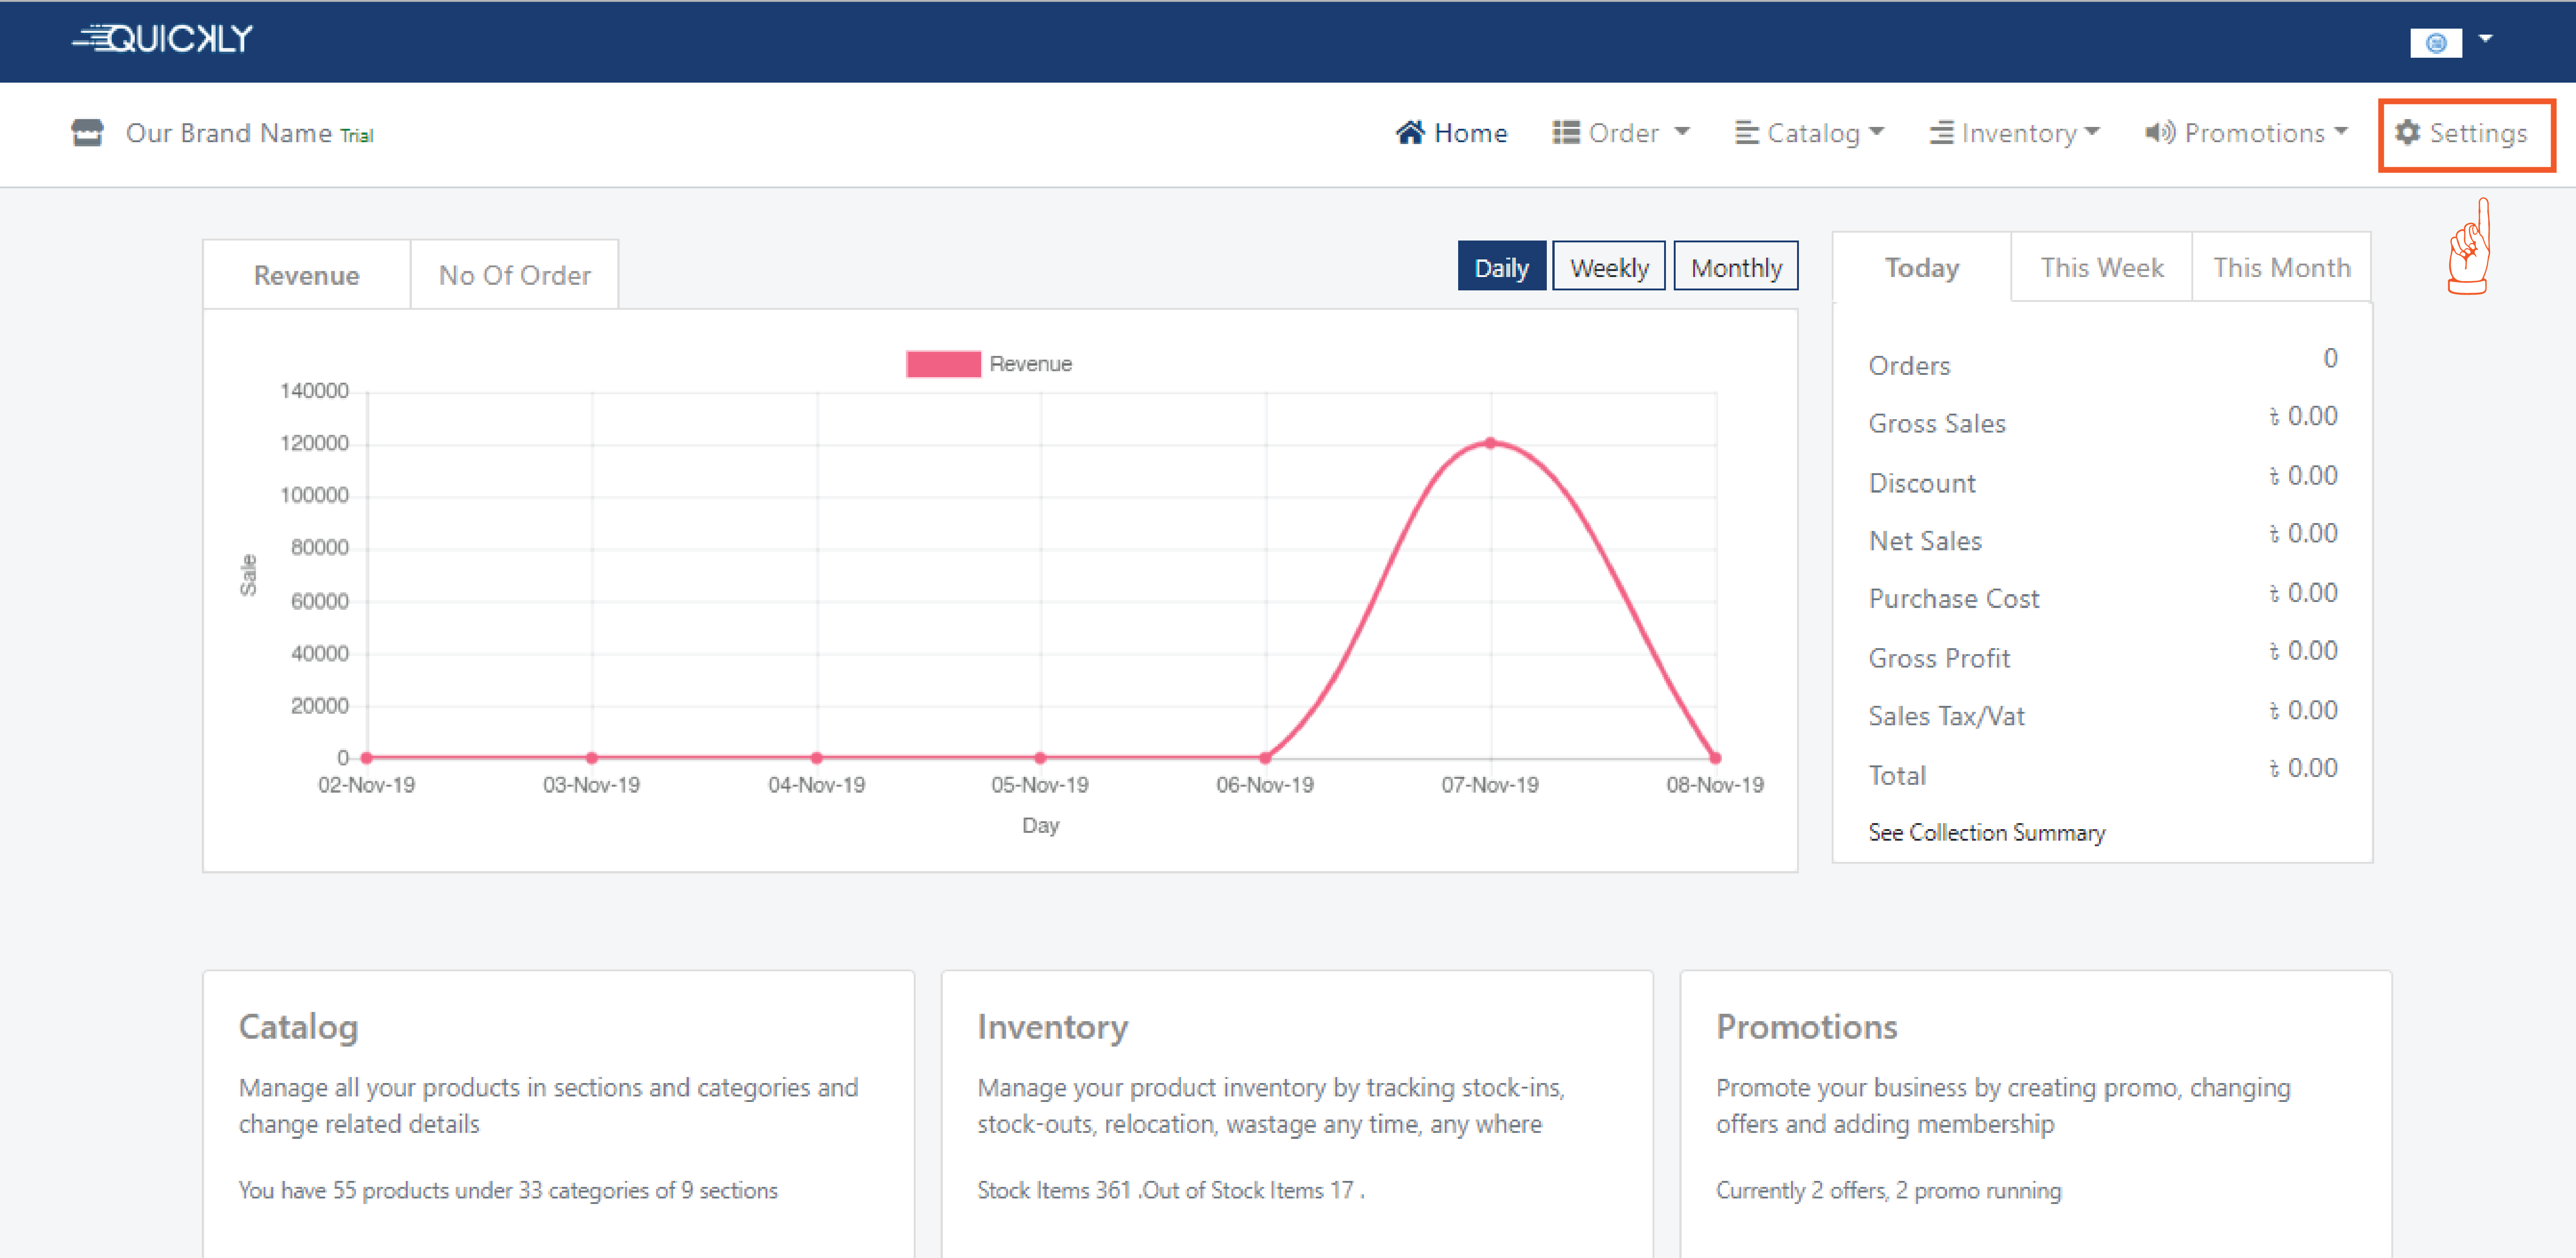
Get an insight of Sales and Revenues of your shop
Admin
2 months ago
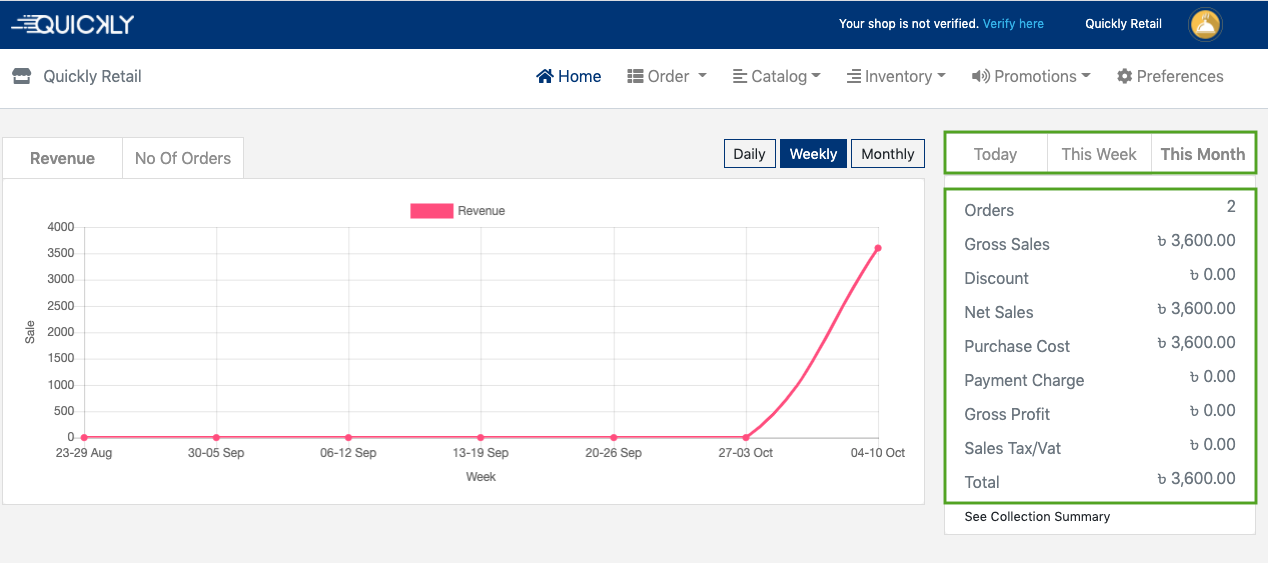
In the dashboard there are different types of graphs, bar charts and pie charts.
👉 Revenue graph shows daily, weekly, and monthly sales. On the horizontal side we take the days and on the vertical side we take the sales. You can find out how much revenue you are getting every day, week or month in graphical interface from these charts. By looking at the graph you can easily understand your revenue.
👉 Average sale day wise graph shows weekly wise sales. On the horizontal side we take the days and on the vertical side we take the average sales. From the graph you can easily find out the average sales per week. If a certain day earns more sales it’s no brainer that you should hire more help to reduce the extra pressure. In the other days you can keep the normal number of employees. Average sale time wise graph similarly shows sales weekly and this sales is time wise. On the horizontal side we take the average sale and on the vertical side we take the time. At a certain moment when earning more sales, you should hire more employees to reduce the extra pressure. In the other times you can keep a normal number of employees.
Day wise Average sale and Time wise Average sale can be seen in charts of the last 4 weeks, 12 weeks, and 25 weeks.
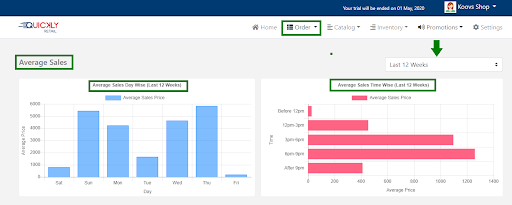
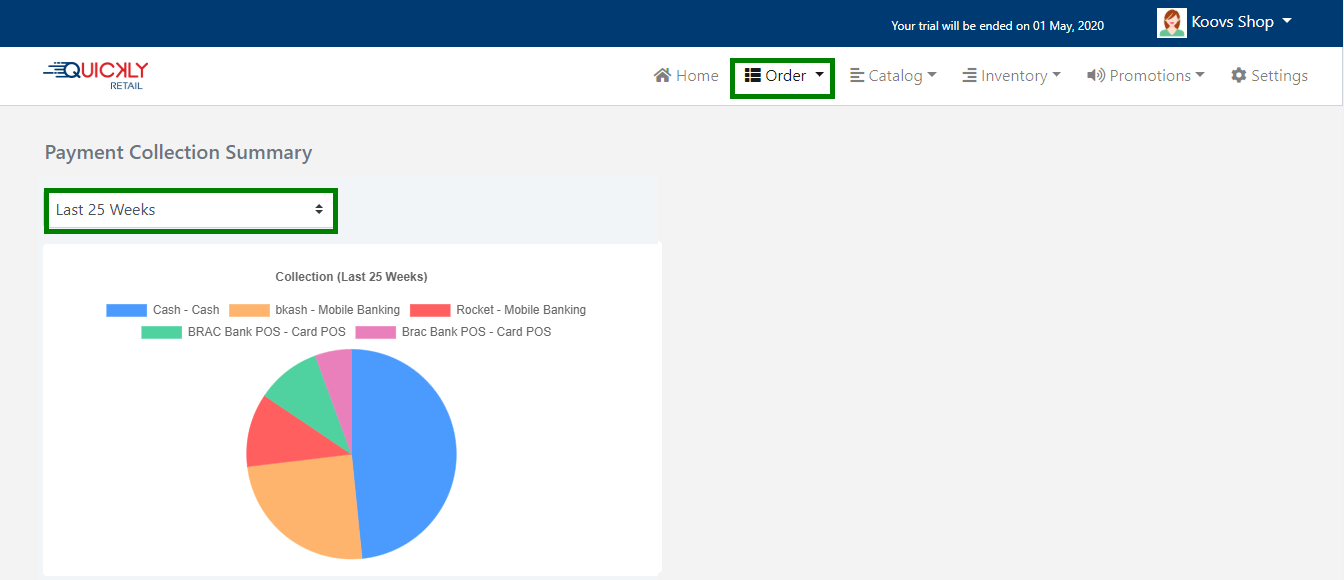
👉 In short, the Payment collection pie chart shows the mode which is preferred most by the customers to pay for the food they eat. This option also supports weekly. The whole dashboard is for our understanding of business growth or where it is lacking. So you can make your strength more strong and come up with ideas to improve where you lack.
Related Video Support
How to upload catalog, take orders & generate bills
In this video, we have shown in detail how to upload your shop catalog to RetailGo, how to initial stock of products, how to place orders from your customers and generate bills for them using RetailGo - Sales & Billing App.
How to monitor the collection summary?
Admin
2 months ago
You will find the total collection summary from the right column of the RetailGo dashboard. The collection summary can be filtered by date (today/this week/this month).
Related Video Support
How to upload catalog, take orders & generate bills
In this video, we have shown in detail how to upload your shop catalog to RetailGo, how to initial stock of products, how to place orders from your customers and generate bills for them using RetailGo - Sales & Billing App.
How to get your Order summary from the website?
Admin
2 months ago
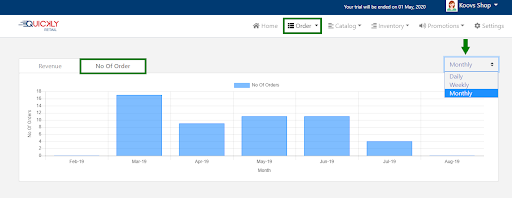
👉 No. Of Order Graph shows sales of daily,weekly and monthly. On the horizontal side we take the weeks and on the vertical side we take the no of orders. You can find out ‘no of orders’ you are getting every day, week and month in graphical interface from these charts.
Related Video Support
How to upload catalog, take orders & generate bills
In this video, we have shown in detail how to upload your shop catalog to RetailGo, how to initial stock of products, how to place orders from your customers and generate bills for them using RetailGo - Sales & Billing App.
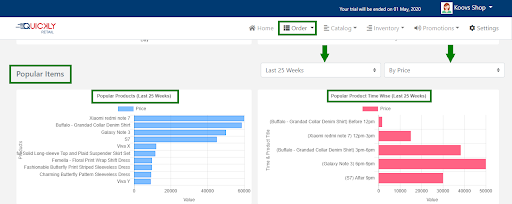
How to find your shop’s most popular products?
Admin
2 months ago
👉 The popular product graph shows the amount of popular product sales weekly. On the horizontal side we take the value and on the vertical side we take the products. In a certain moment when the sale of popular products increased. You should have to keep stock in that product more. You should also hire more employees to reduce the extra pressure. You can see these results on a weekly basis along with the price of the product and the quantity of the product sold. The popular product timewise graph shows the amount of popular products sales more in certain time. On the horizontal side we take the average sales and on the vertical side we take the time. In a certain moment when increased the sale of popular products.You should have to keep stock in that food more.You can cross match the data from timewise sale to prepare ourselves beforehand. You can make the product more available and can try to improve the product which isn't selling. You should also hire more employees to reduce the extra pressure. On other days you can keep the normal number of employees.You can see this results on a weekly basis along with the price of the product and the quantity of the product sold.
Related Video Support
How to upload catalog, take orders & generate bills
In this video, we have shown in detail how to upload your shop catalog to RetailGo, how to initial stock of products, how to place orders from your customers and generate bills for them using RetailGo - Sales & Billing App.
How to monitor performance of any product?
Admin
2 months ago
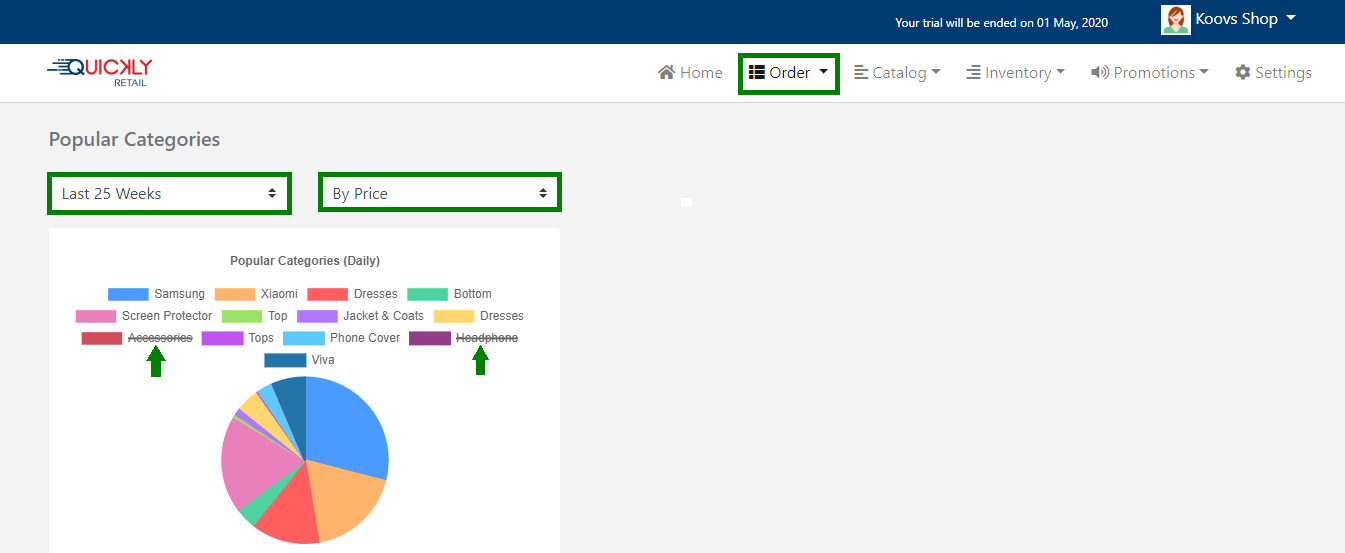
The popular category pie chart helps people to understand which category is sold more and which category is sold less. You can also eliminate the category by hovering the mouse on the category name.
Related Video Support
How to upload catalog, take orders & generate bills
In this video, we have shown in detail how to upload your shop catalog to RetailGo, how to initial stock of products, how to place orders from your customers and generate bills for them using RetailGo - Sales & Billing App.
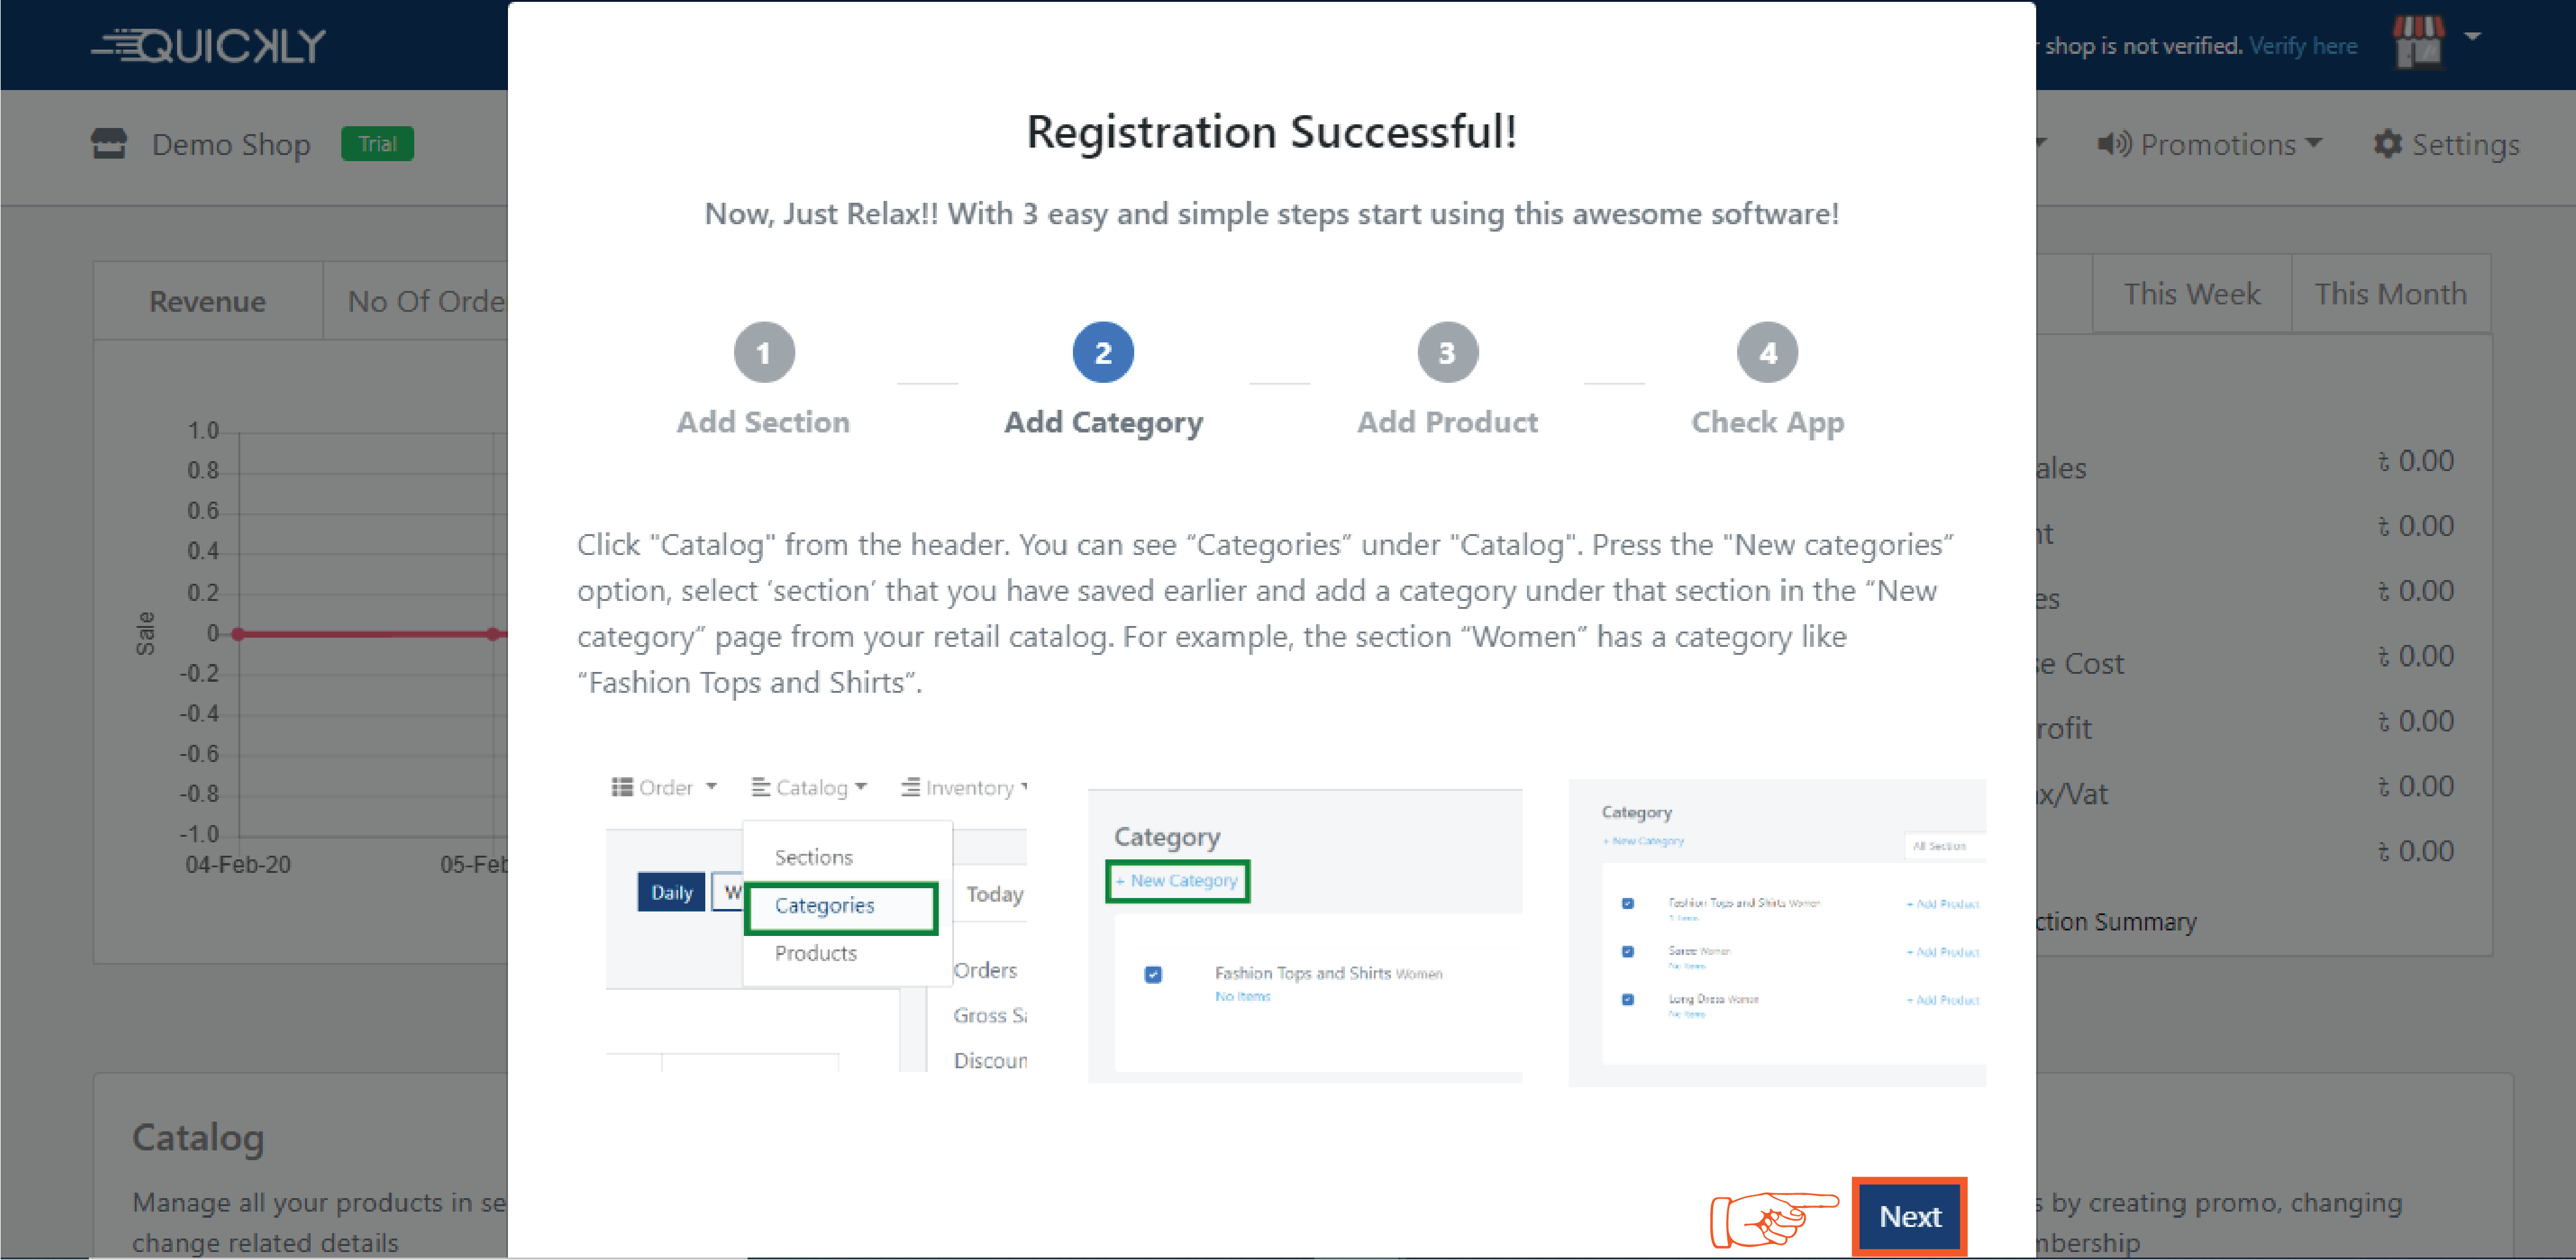
How to organise your catalog?
Admin
2 months ago
We know that the products you offer are one of the most important parts
of your business and that is why RetailGo ease the integration of
dishes into our platform by categorizing products. You can create as
many sections as you want and can organize multiple categories under each
section.
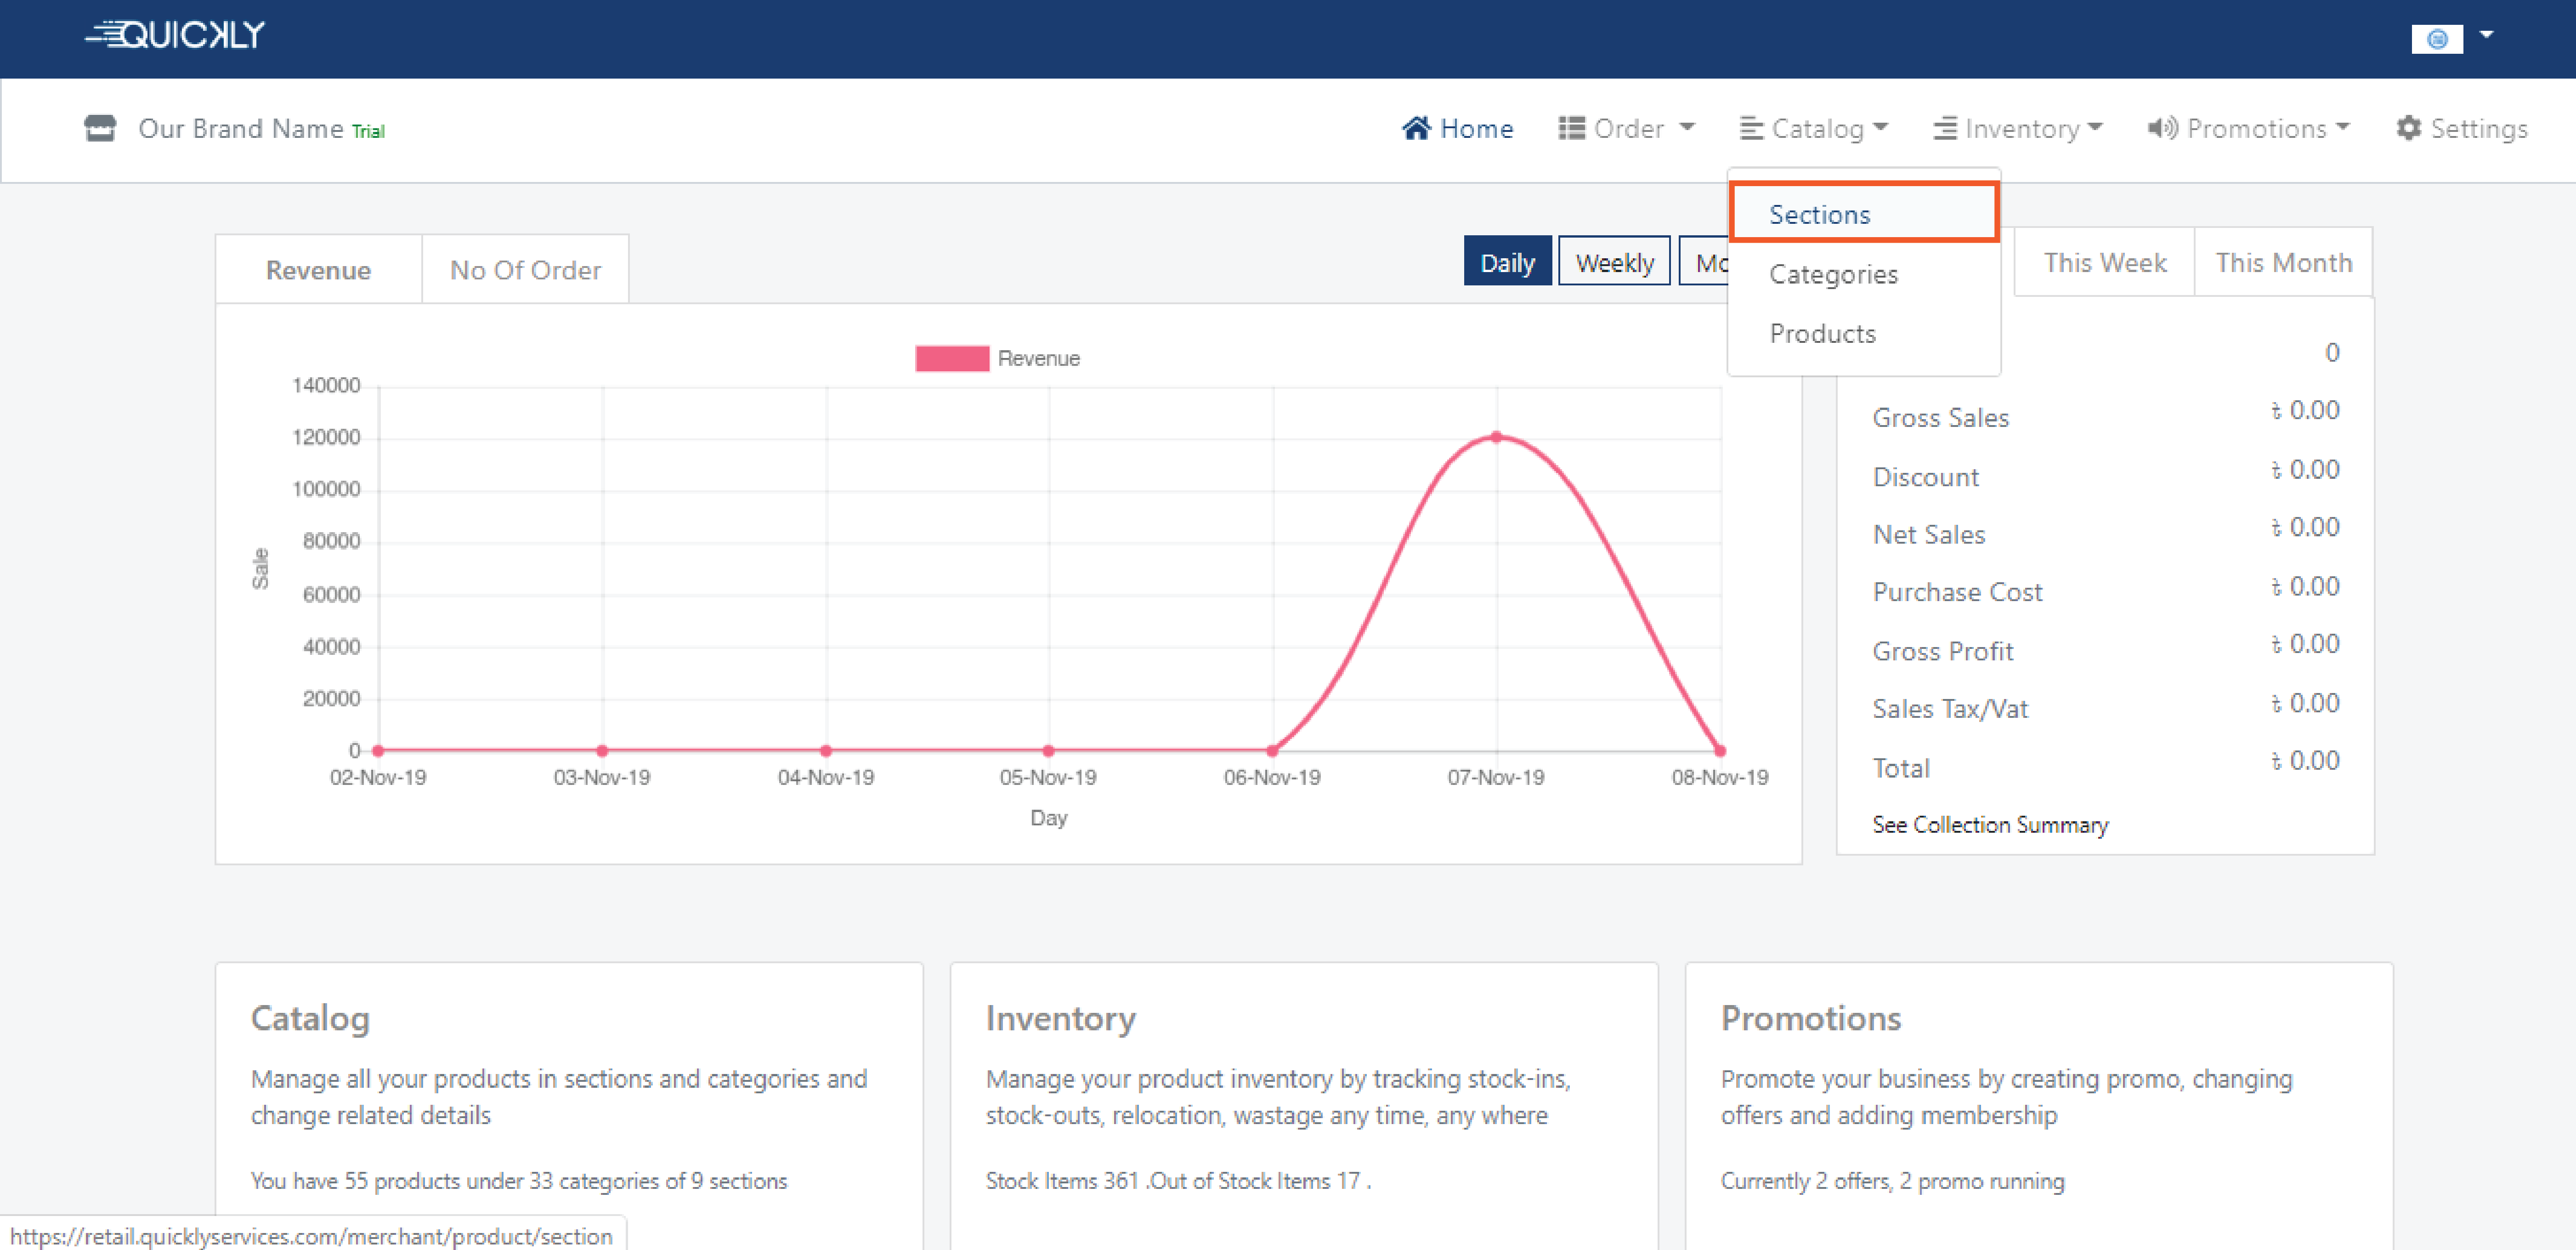
👉 To create sections, simply navigate to the Catalog option of the portal
and
click on the Sections.
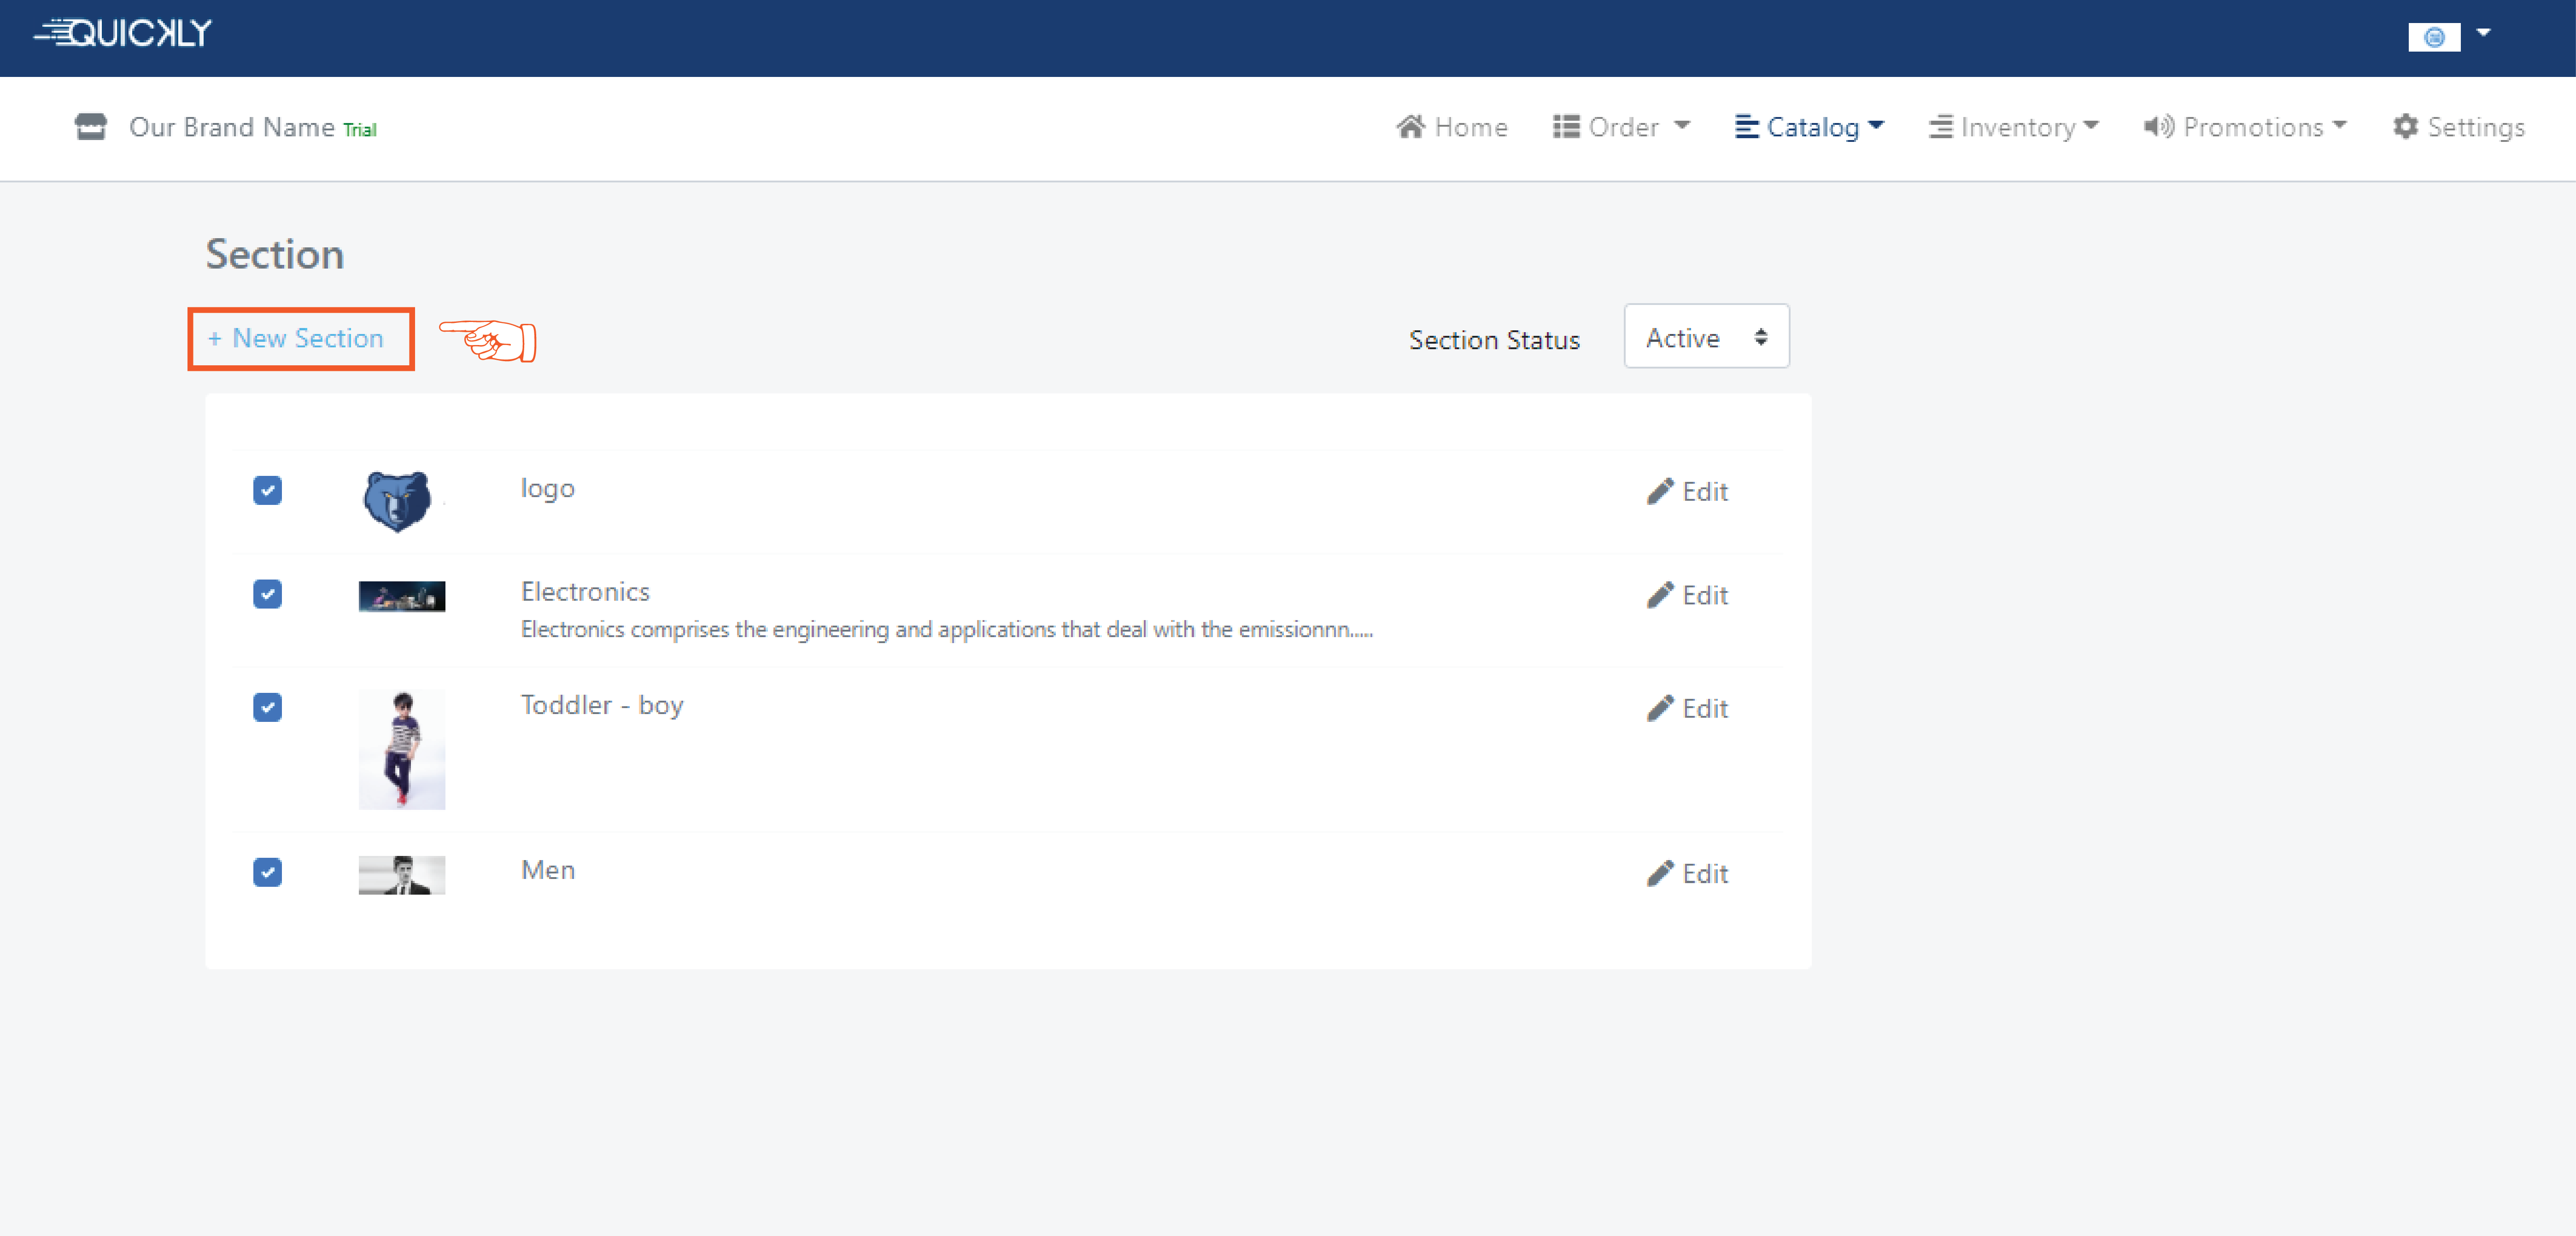
👉 If you have already created some sections then the list of existing
sections
will appear on this page. You will also find every customizable option for
each section and you can also edit the sections any time you want. If you
don’t want to keep a section in your catalog then check that category as
inactive and it will not be visible in your app.
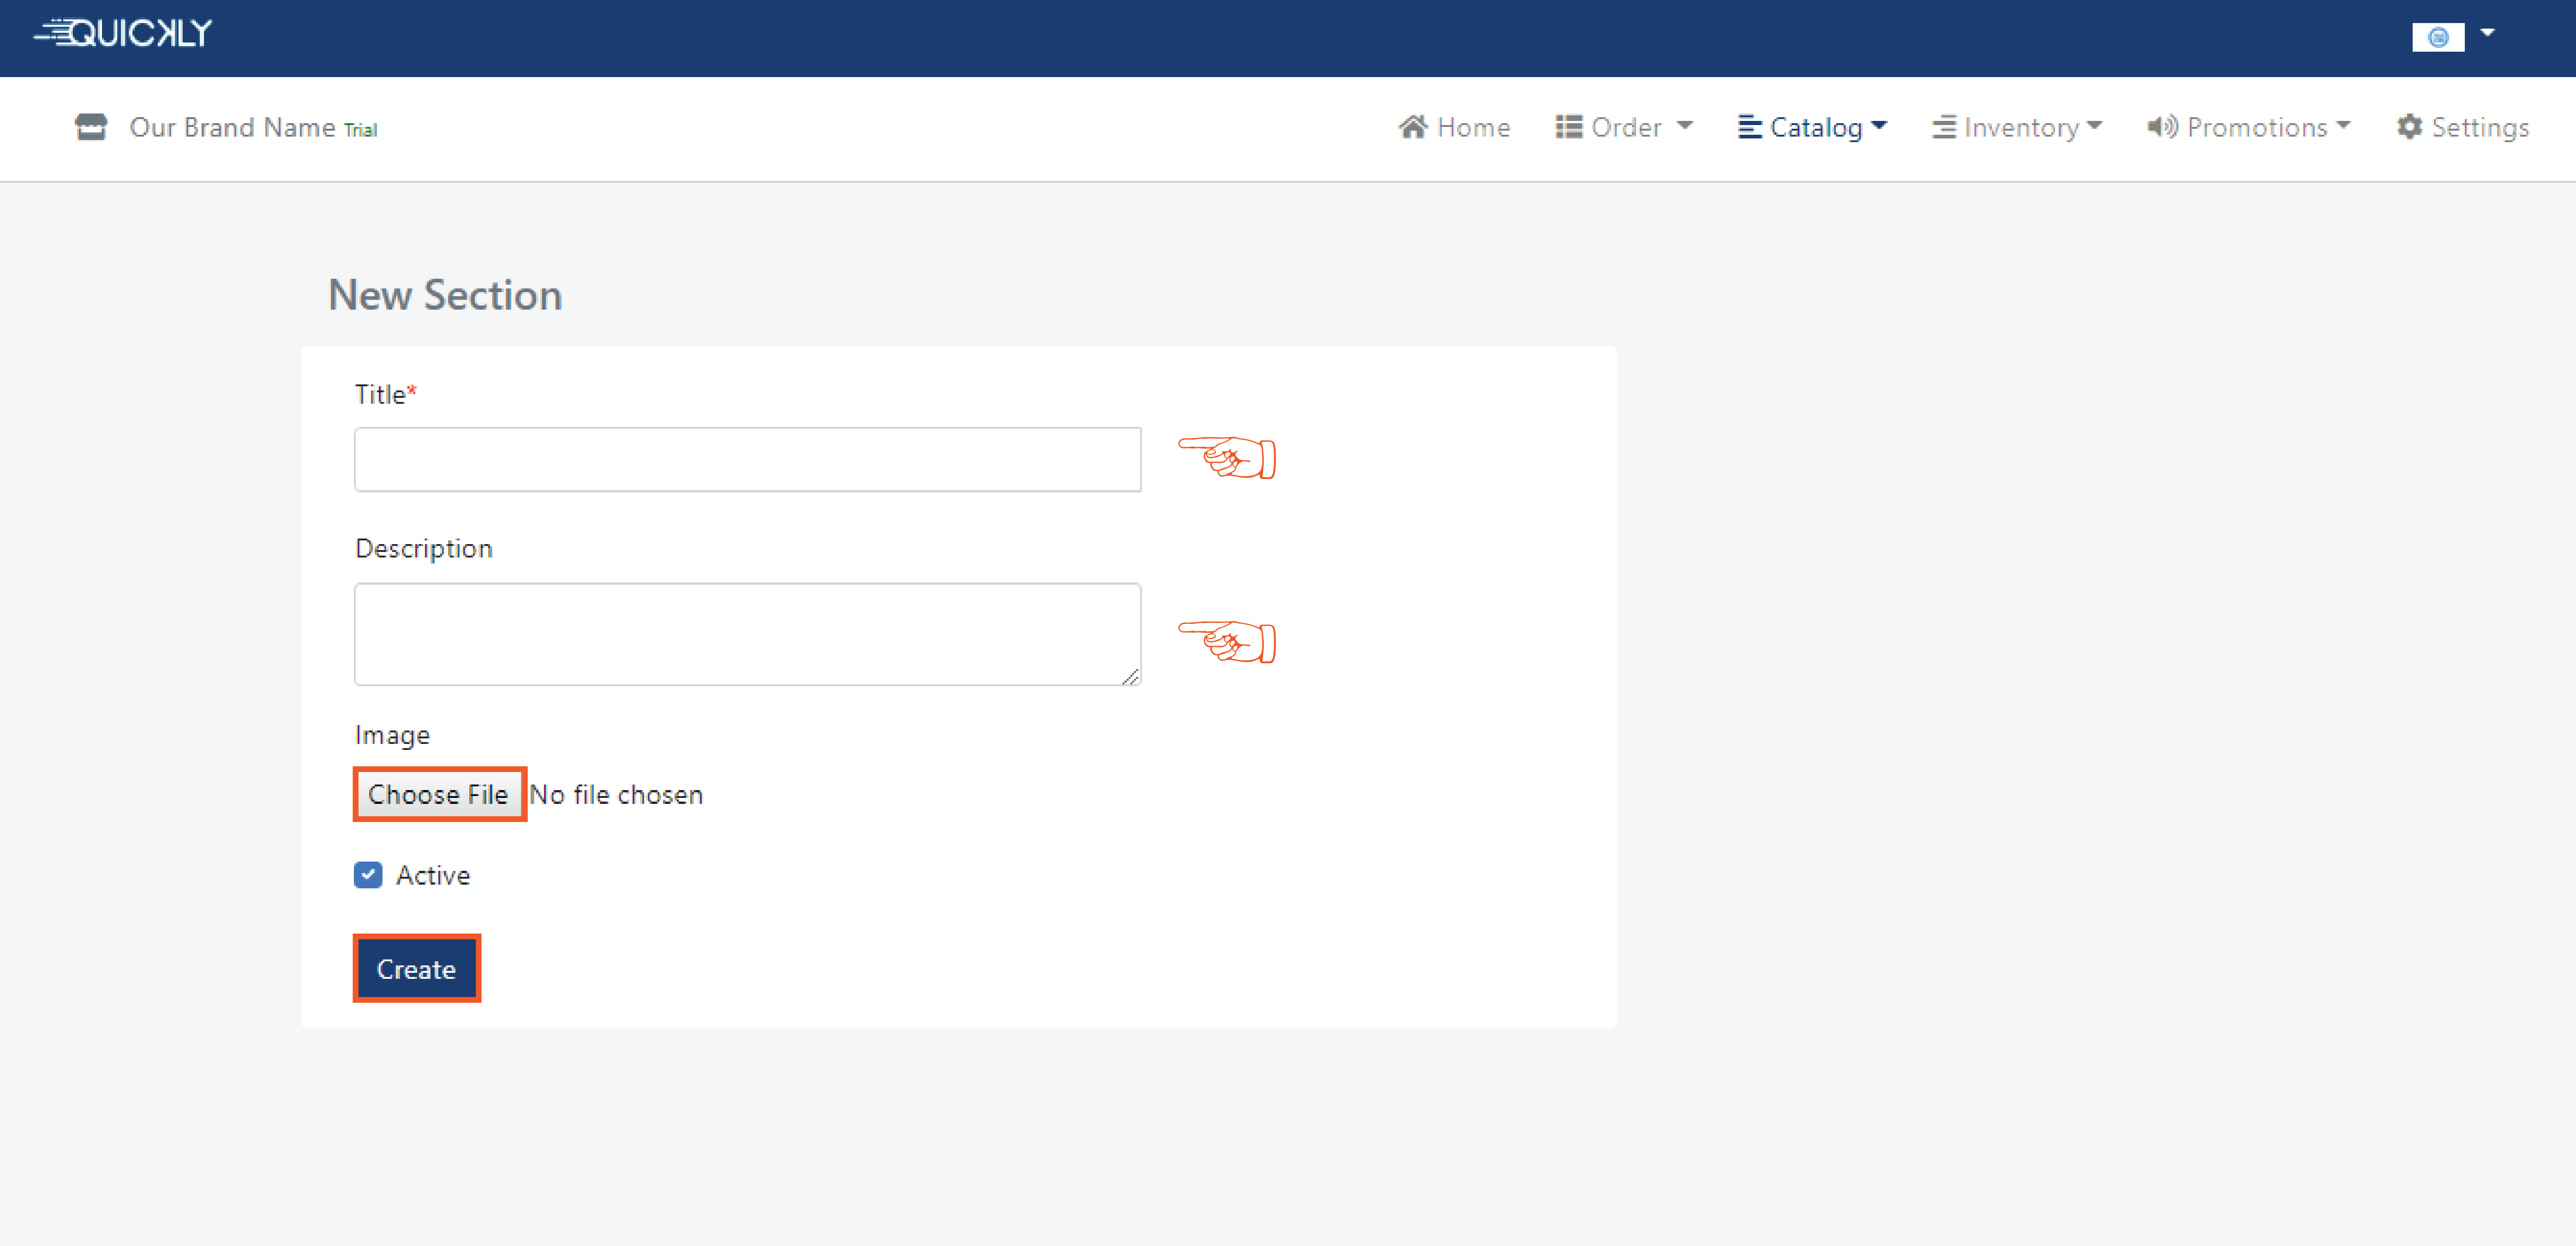
Click on the “+New Section” option to create a new section.
👉 Simply write down the name of your section (i.e Electronics) in the title and put a little description if you want to. You can also upload an image of your section. Check the active checkbox and click on the create button.
Set up your categories
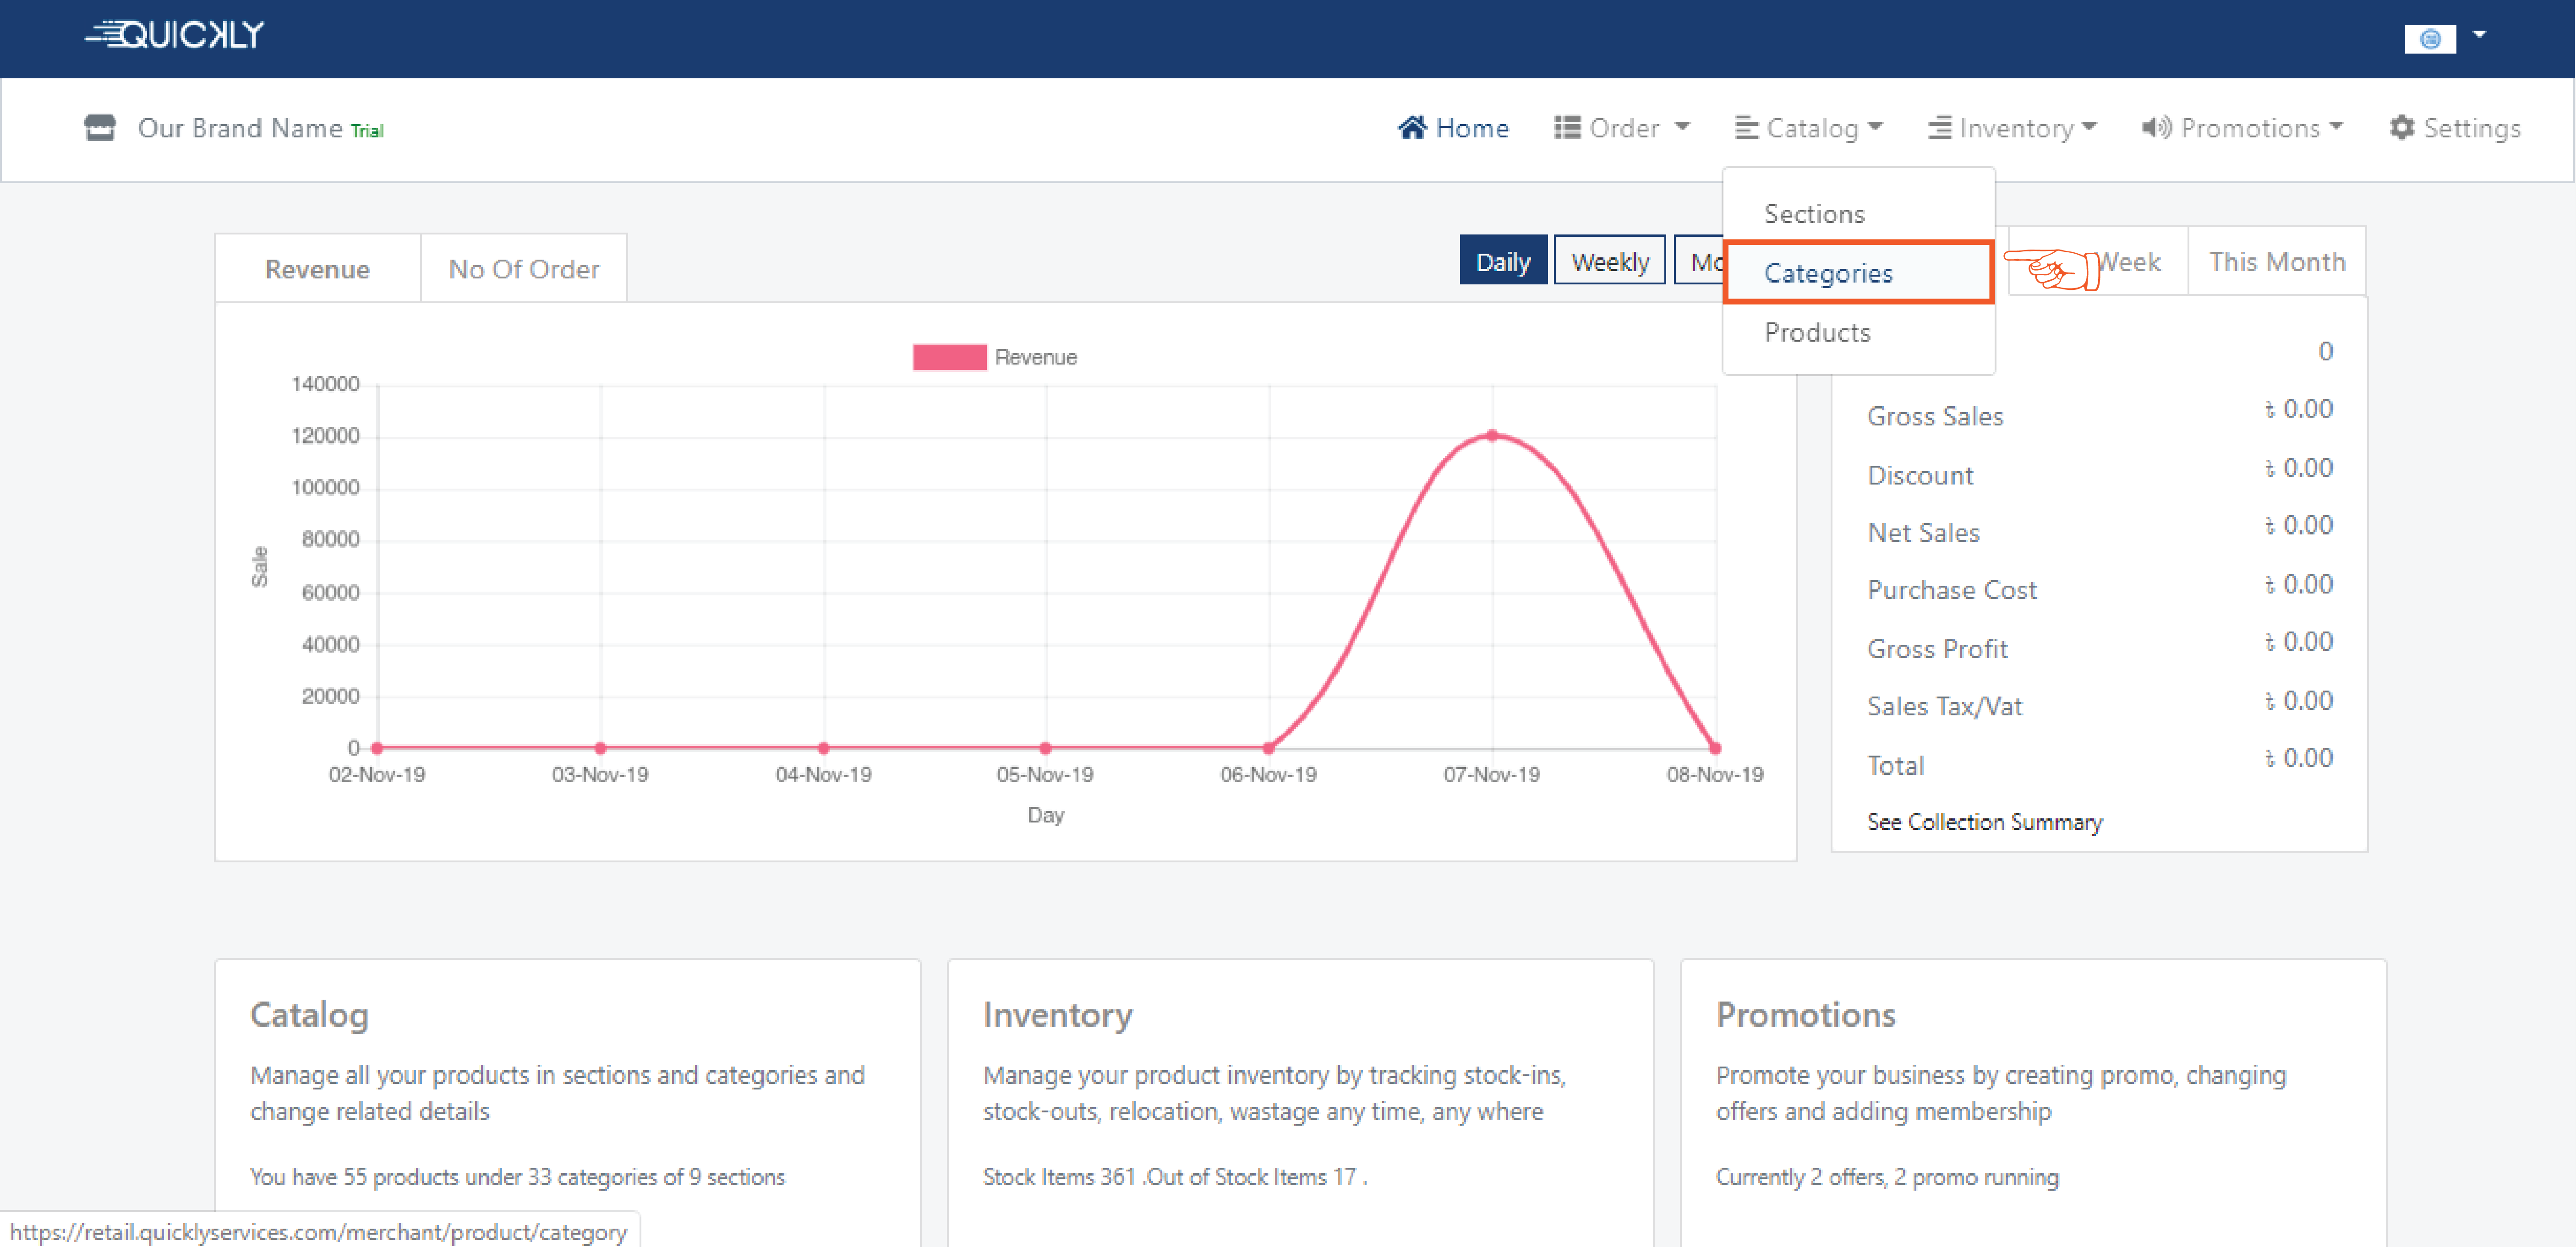
👉 To create a category, simply navigate to the Catalog option of the portal and click on the Categories.
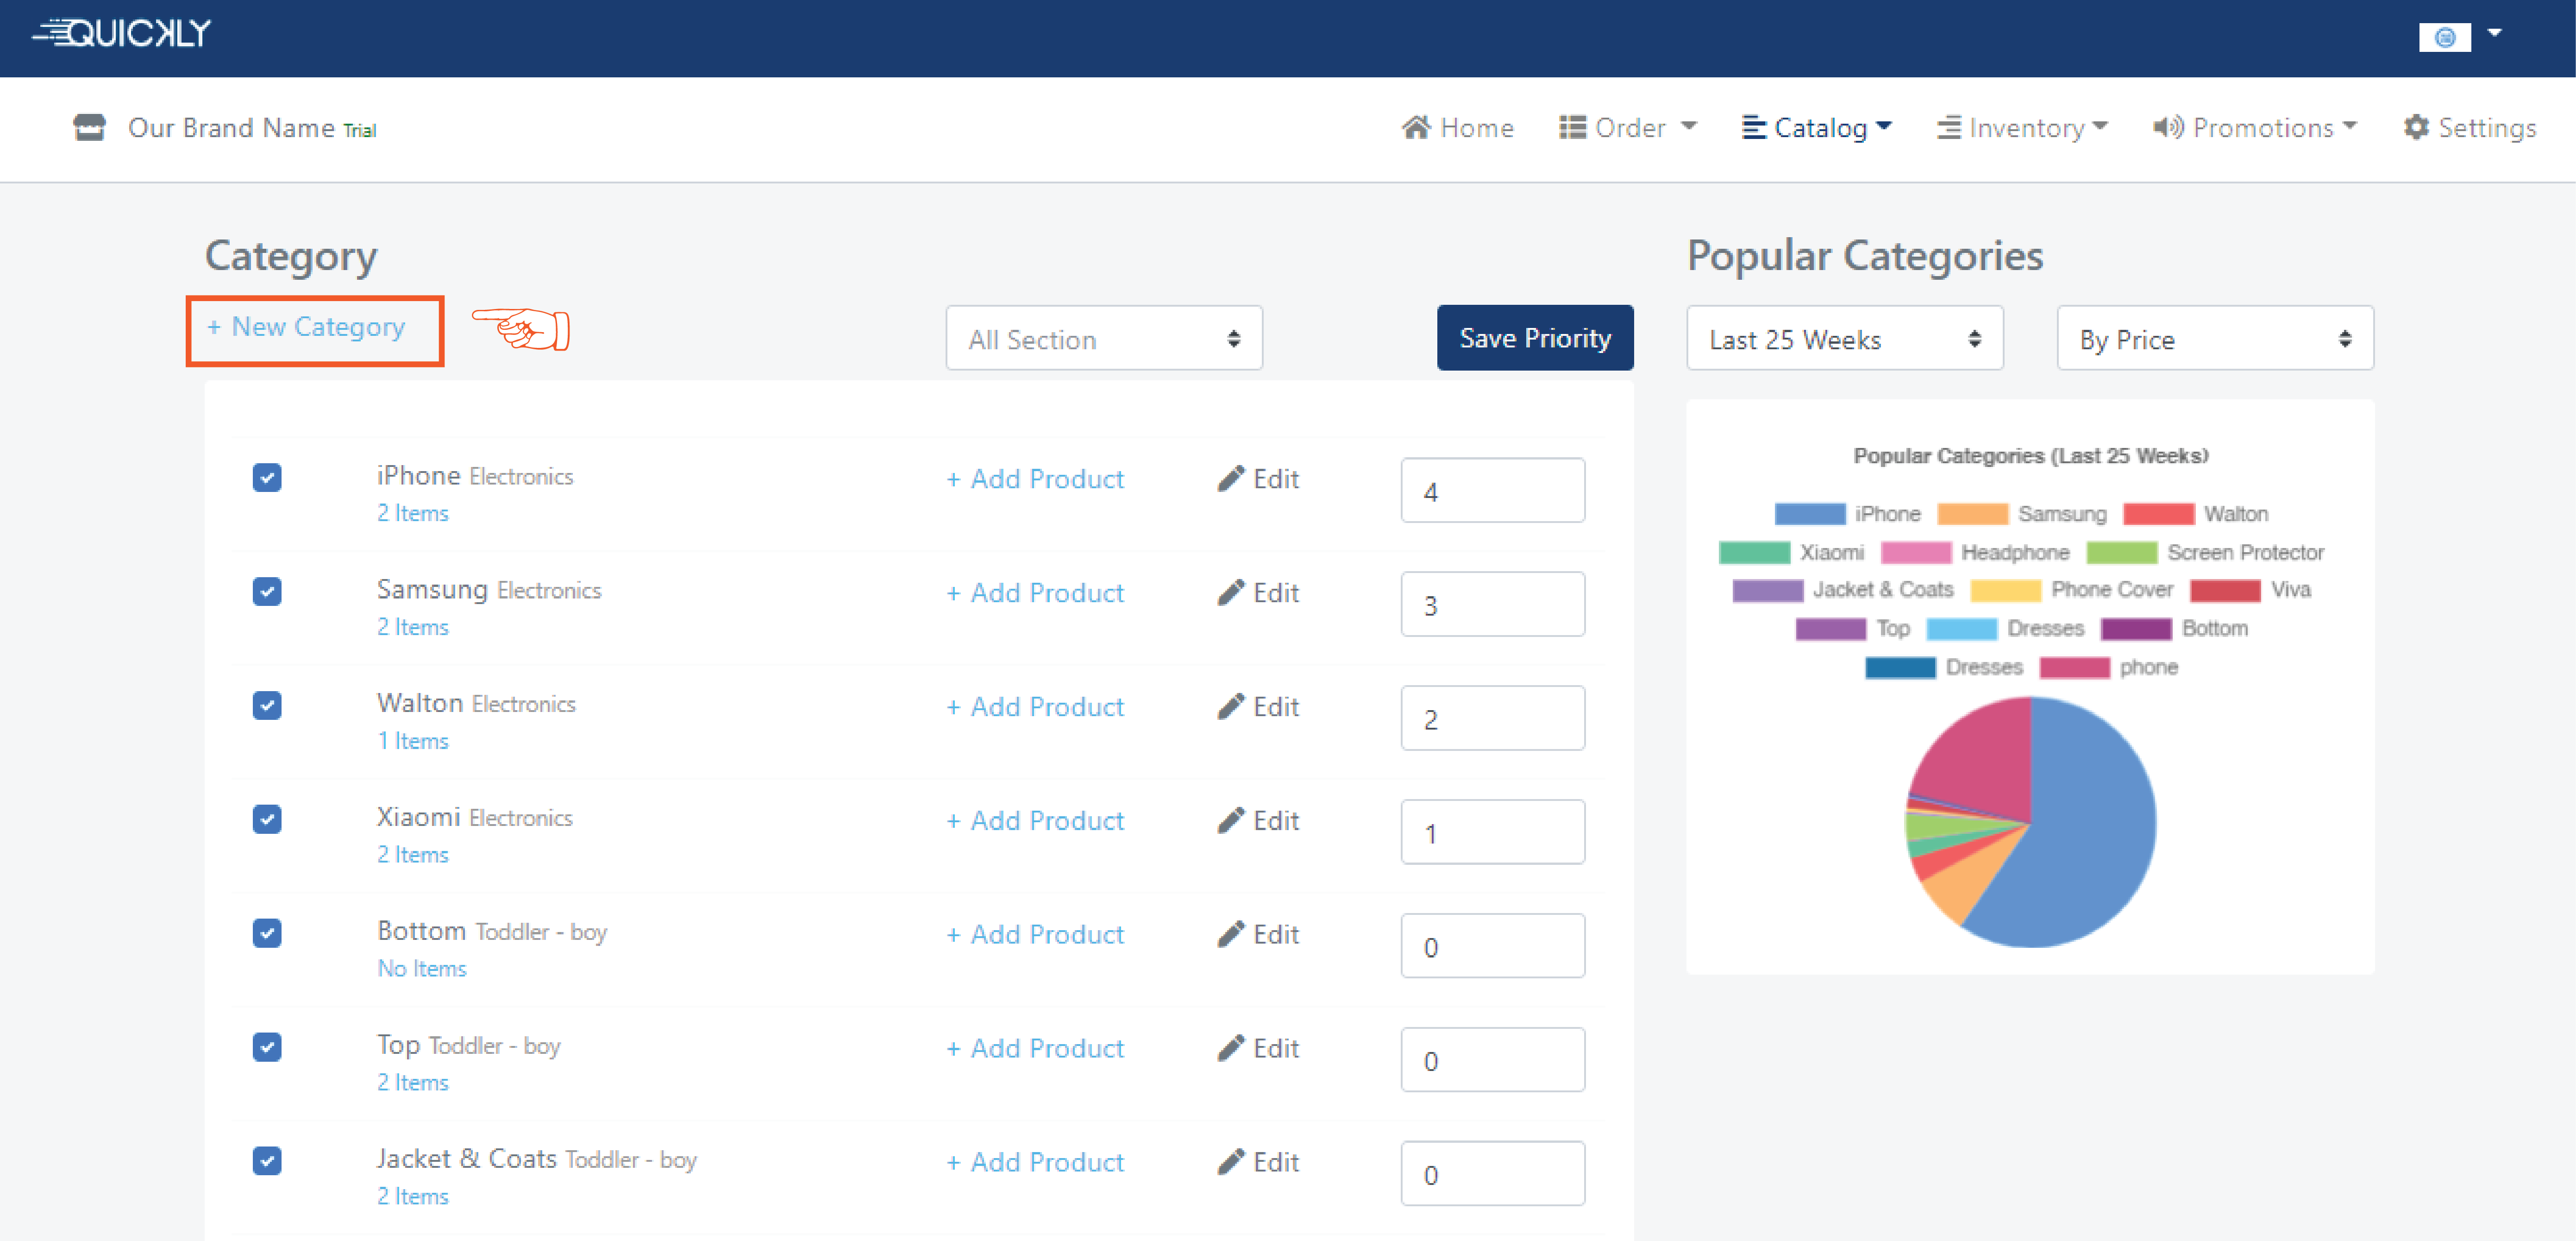
👉 The list of the Categories you have already created will appear on
this page with an editing option which allows you to make any change
at any time you want. You can also change the order of the categories
from the portal by setting the priority of the category.
The category with the highest priority value will be shown in the
first place and the lowest priority value will be shown in the last
place in the app.
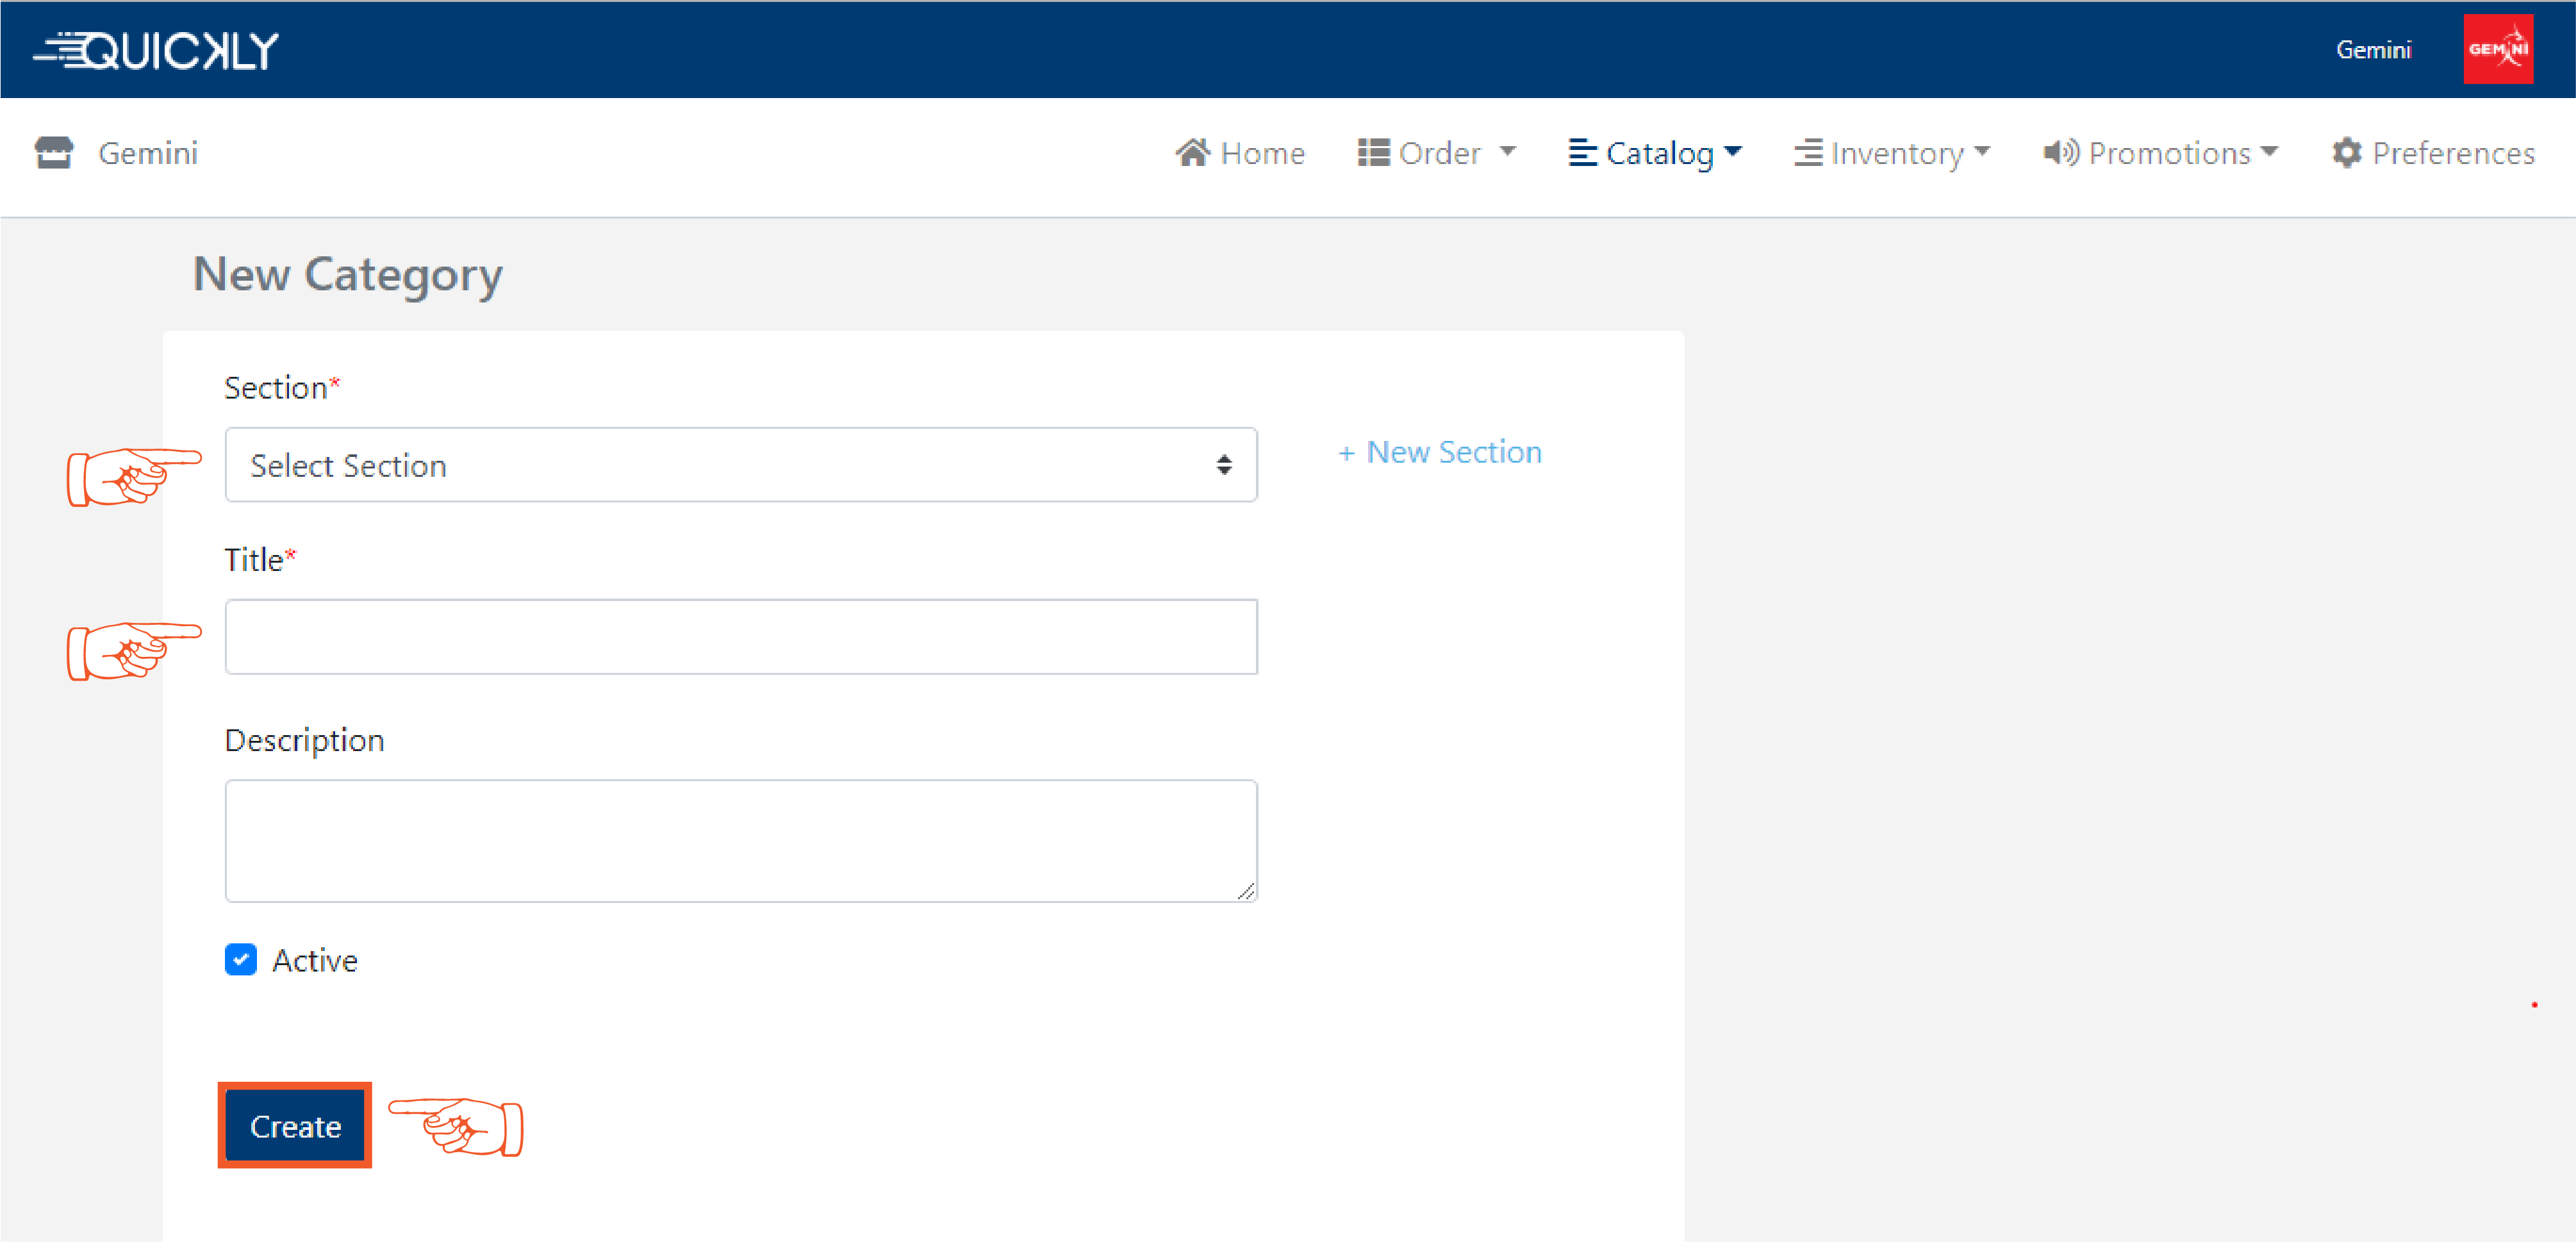
To create a new Category, click on the +New Category button.
👉 Now fill up the form choosing the right Section, write down the
name of your Category (i.e Xiaomi) in the title, add a description
if you want to.
Lastly, check on the active checkbox and click on the create button.
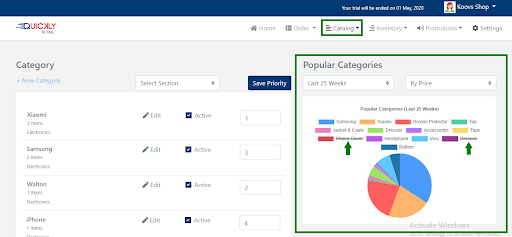
👉 On the right side of this page, you can see a handy pie chart indicating the popular categories of your shop according to time, quantity and sales. You can also eliminate one or more categories by clicking on the category names and the pie chart will show data excluding information of those categories.
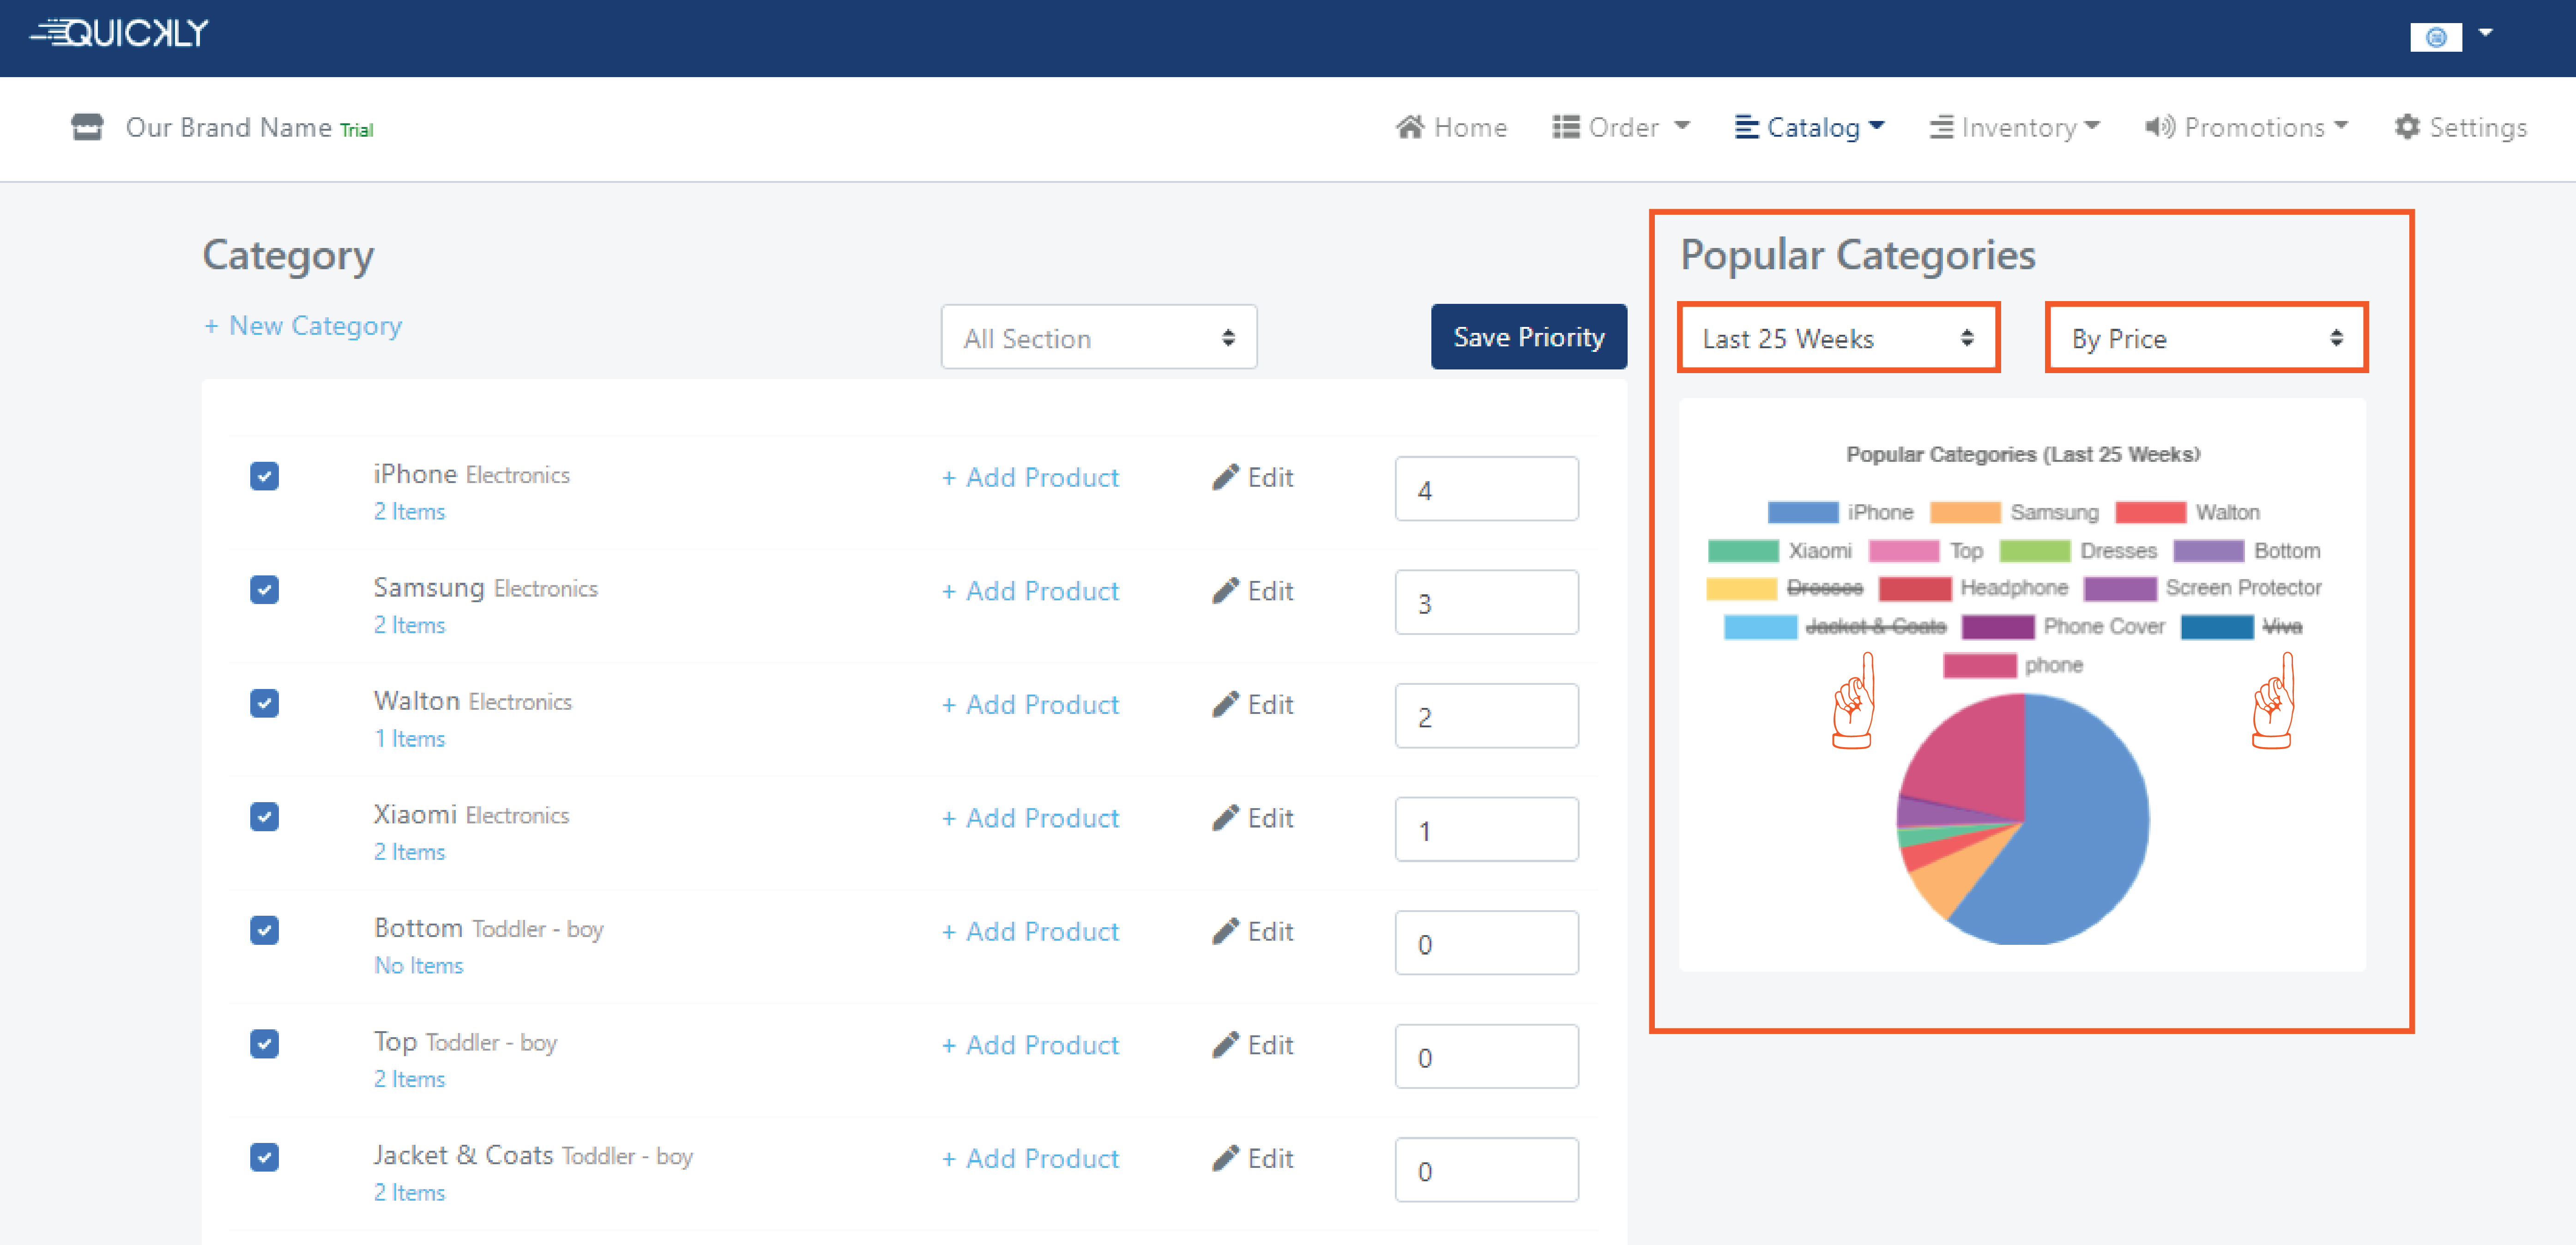
👉 You can also eliminate one or more categories by clicking on the category names and the pie chart will show data excluding information of those categories.
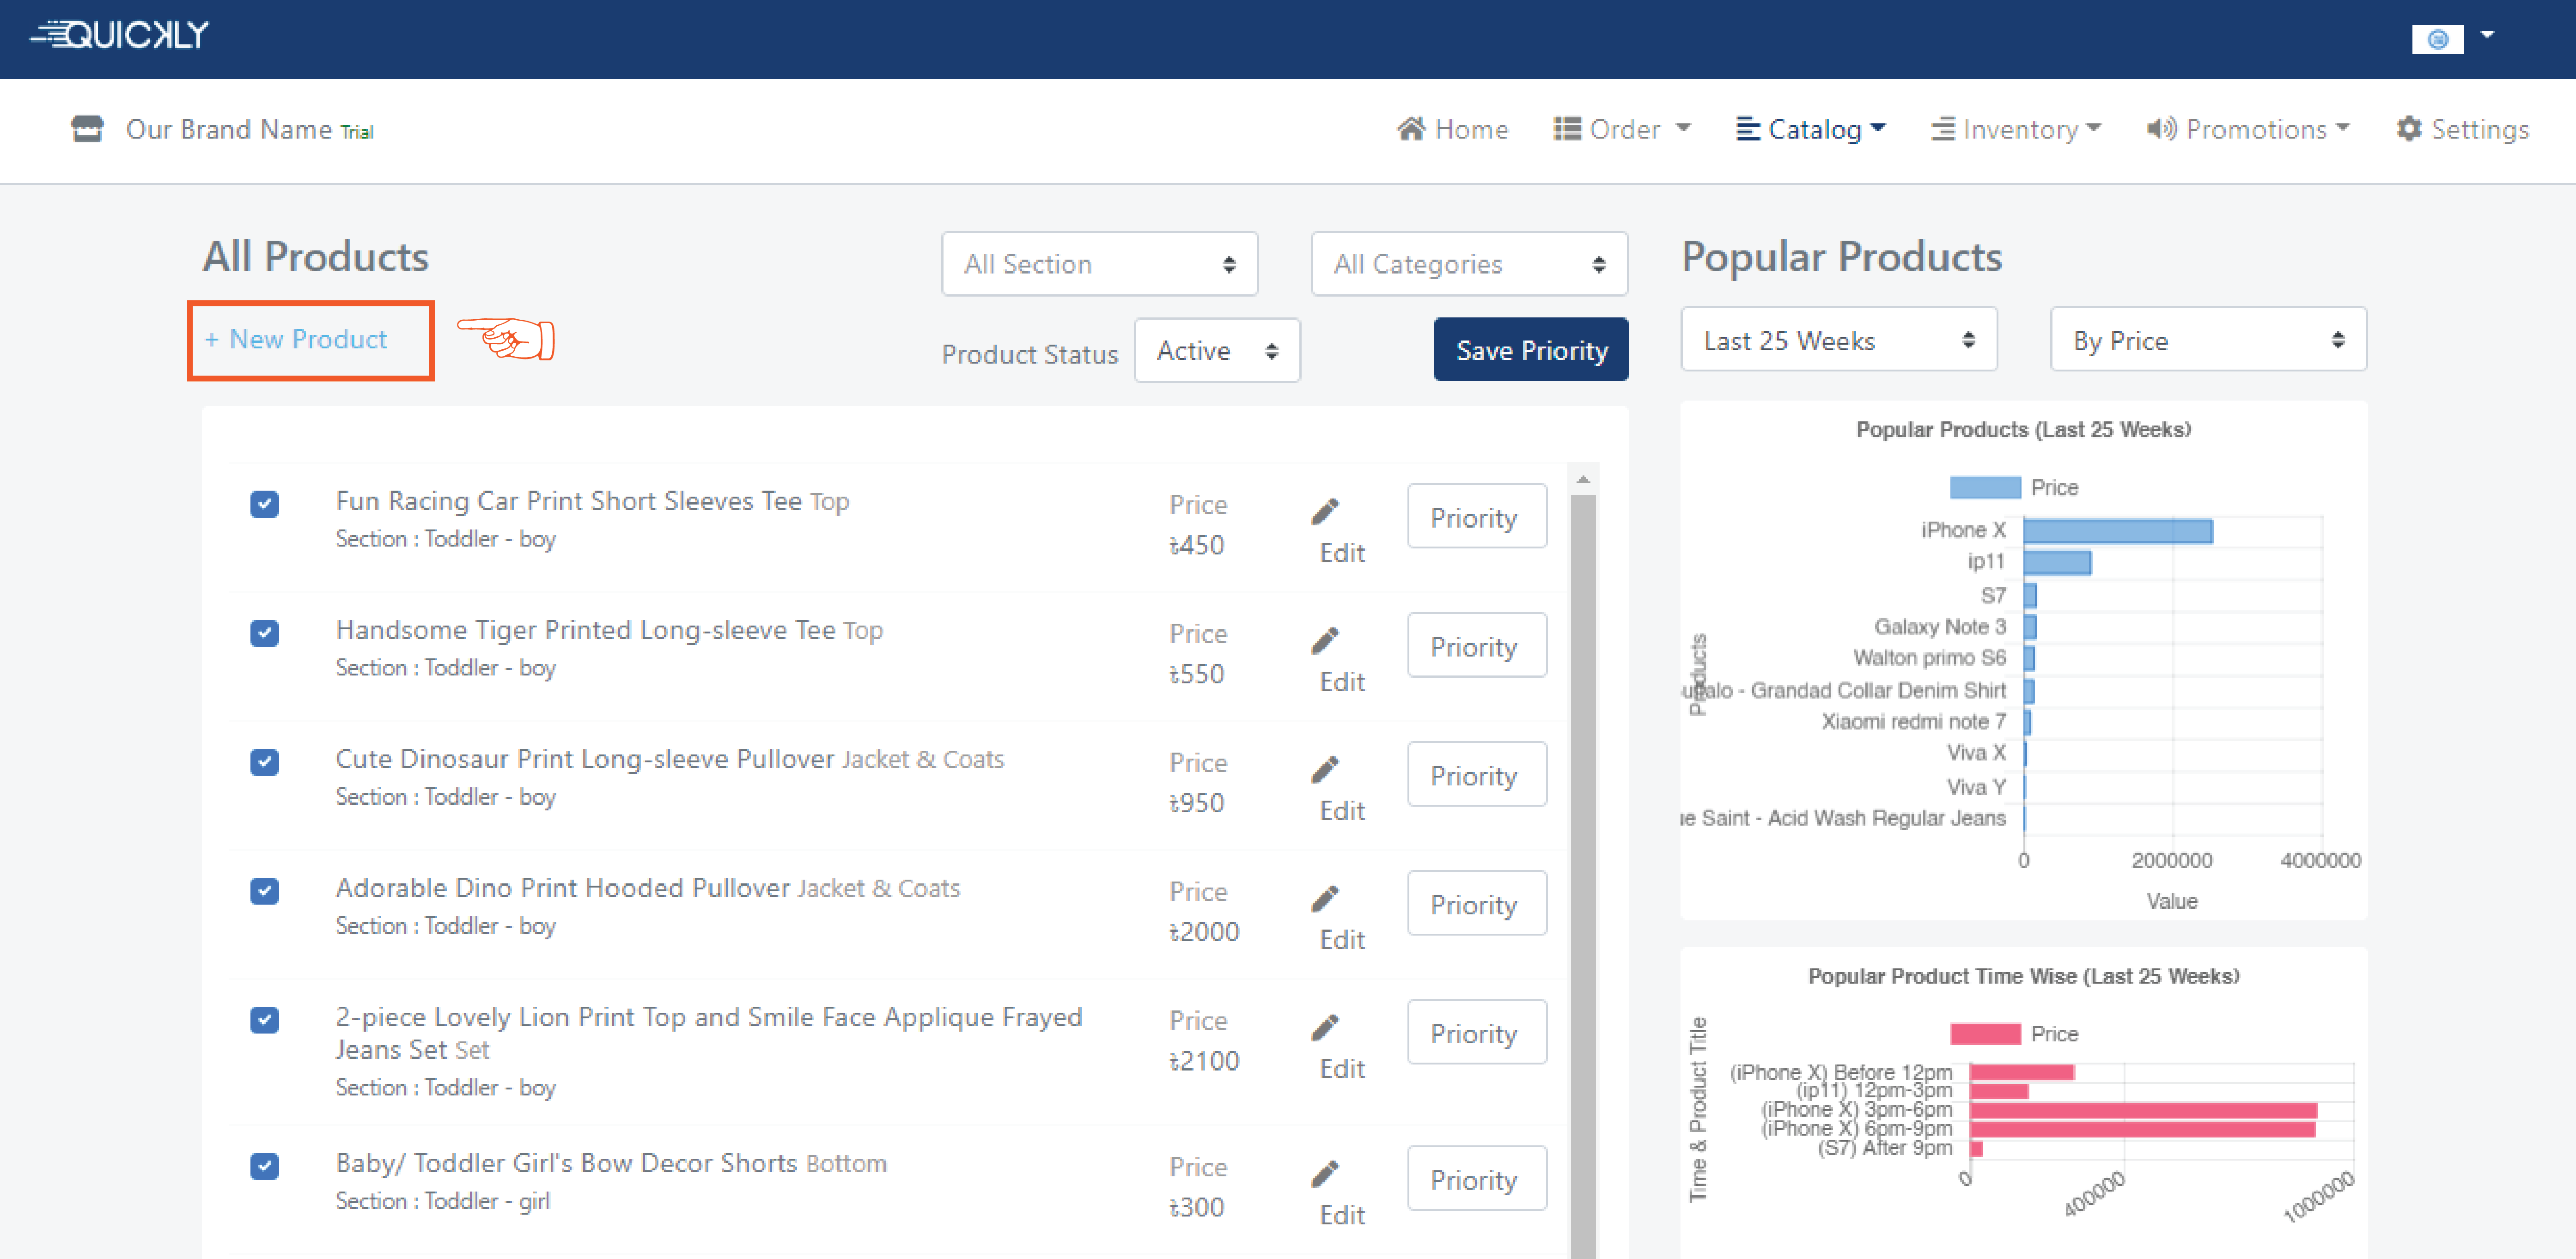
👉 To create a product, simply navigate to the Catalog option of the portal and click on the Products.
👉 The list of the products you have already created will appear
on this page with an editing option which allows you to make any
change at any time you want. You can also change the order of
the dishes from the portal by setting the priority of the category.
The product with the highest priority value will be shown in the
first place and the lowest priority value will be shown in the
last place in the app.
To create a new product, click on the +New Product button.
👉 Now fill up the form choosing the right Section (i.e Electronics) &
Category (i.e Xiaomi), write down the name of your product in the
Title (Xiaomi Redmi Note 7), add a Description if you want to,
mention your selling price (i.e 18000) of the product.You can also put
different Sizes (i.e 75.2mm) and Colors (i.e Black) of that product.
There is another option where you can wrap things together in a compact
way in case you sell products in a lot. To do that, activate the
Bundle option, a text field will appear where you can write down
the amount of your bundles. You can Override price based on size
and color.
Lastly, check on the active checkbox and click on the create button.
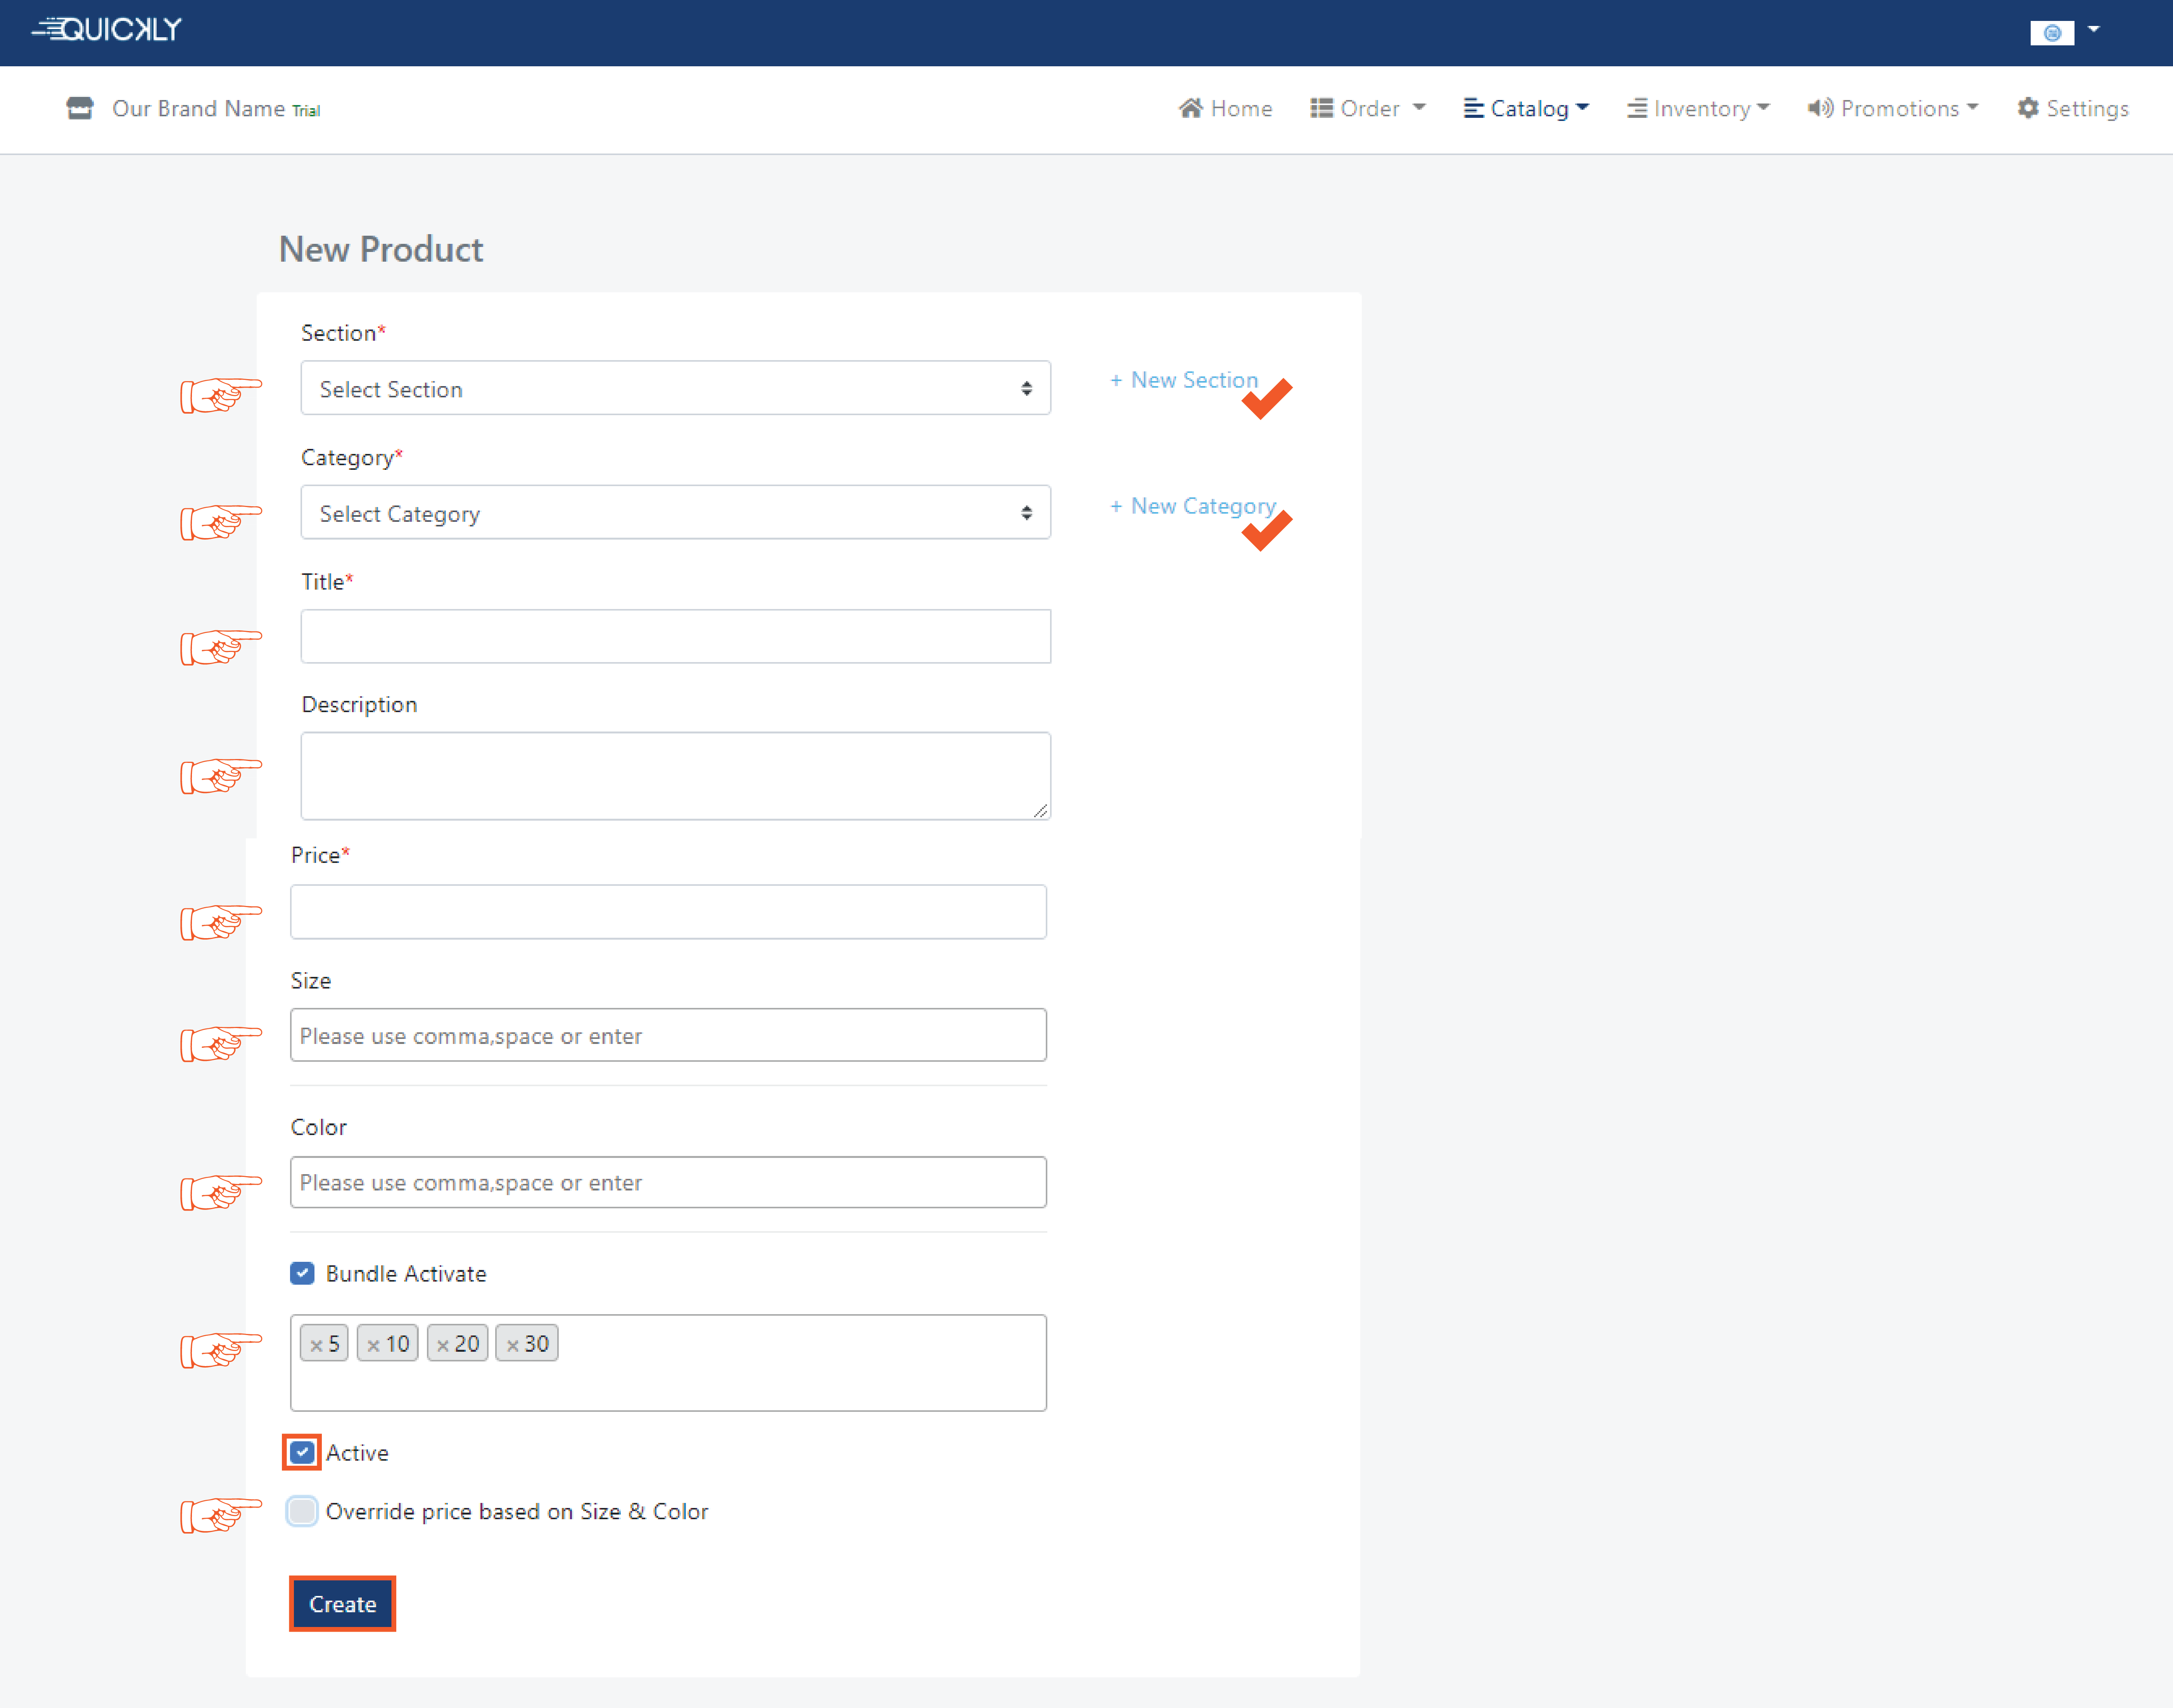

👉 You will also find some handy charts on the right side of this page to help you understand your business growth and analytics. They become more accurate and insightful as you start using more. Depending on the time, quality and price the graphs will be changed.

Related Video Support
How to upload catalog, take orders & generate bills
In this video, we have shown in detail how to upload your shop catalog to RetailGo, how to initial stock of products, how to place orders from your customers and generate bills for them using RetailGo - Sales & Billing App.
How to Manage offers, discounts, and promotions for your valued customers?
Admin
2 months ago
Promotional activities are a great way to attract customer attention. For
retail businesses, in order to stimulate your potential customers,
offers (i.e discounts, buy1 get1 free etc.) for a limited time
works the best.
In our software, you will see three types of promotions- offer, membership,
promo.
👉 Simply navigate to the Promotions option of the portal and click on
the one you want to provide for your customers.
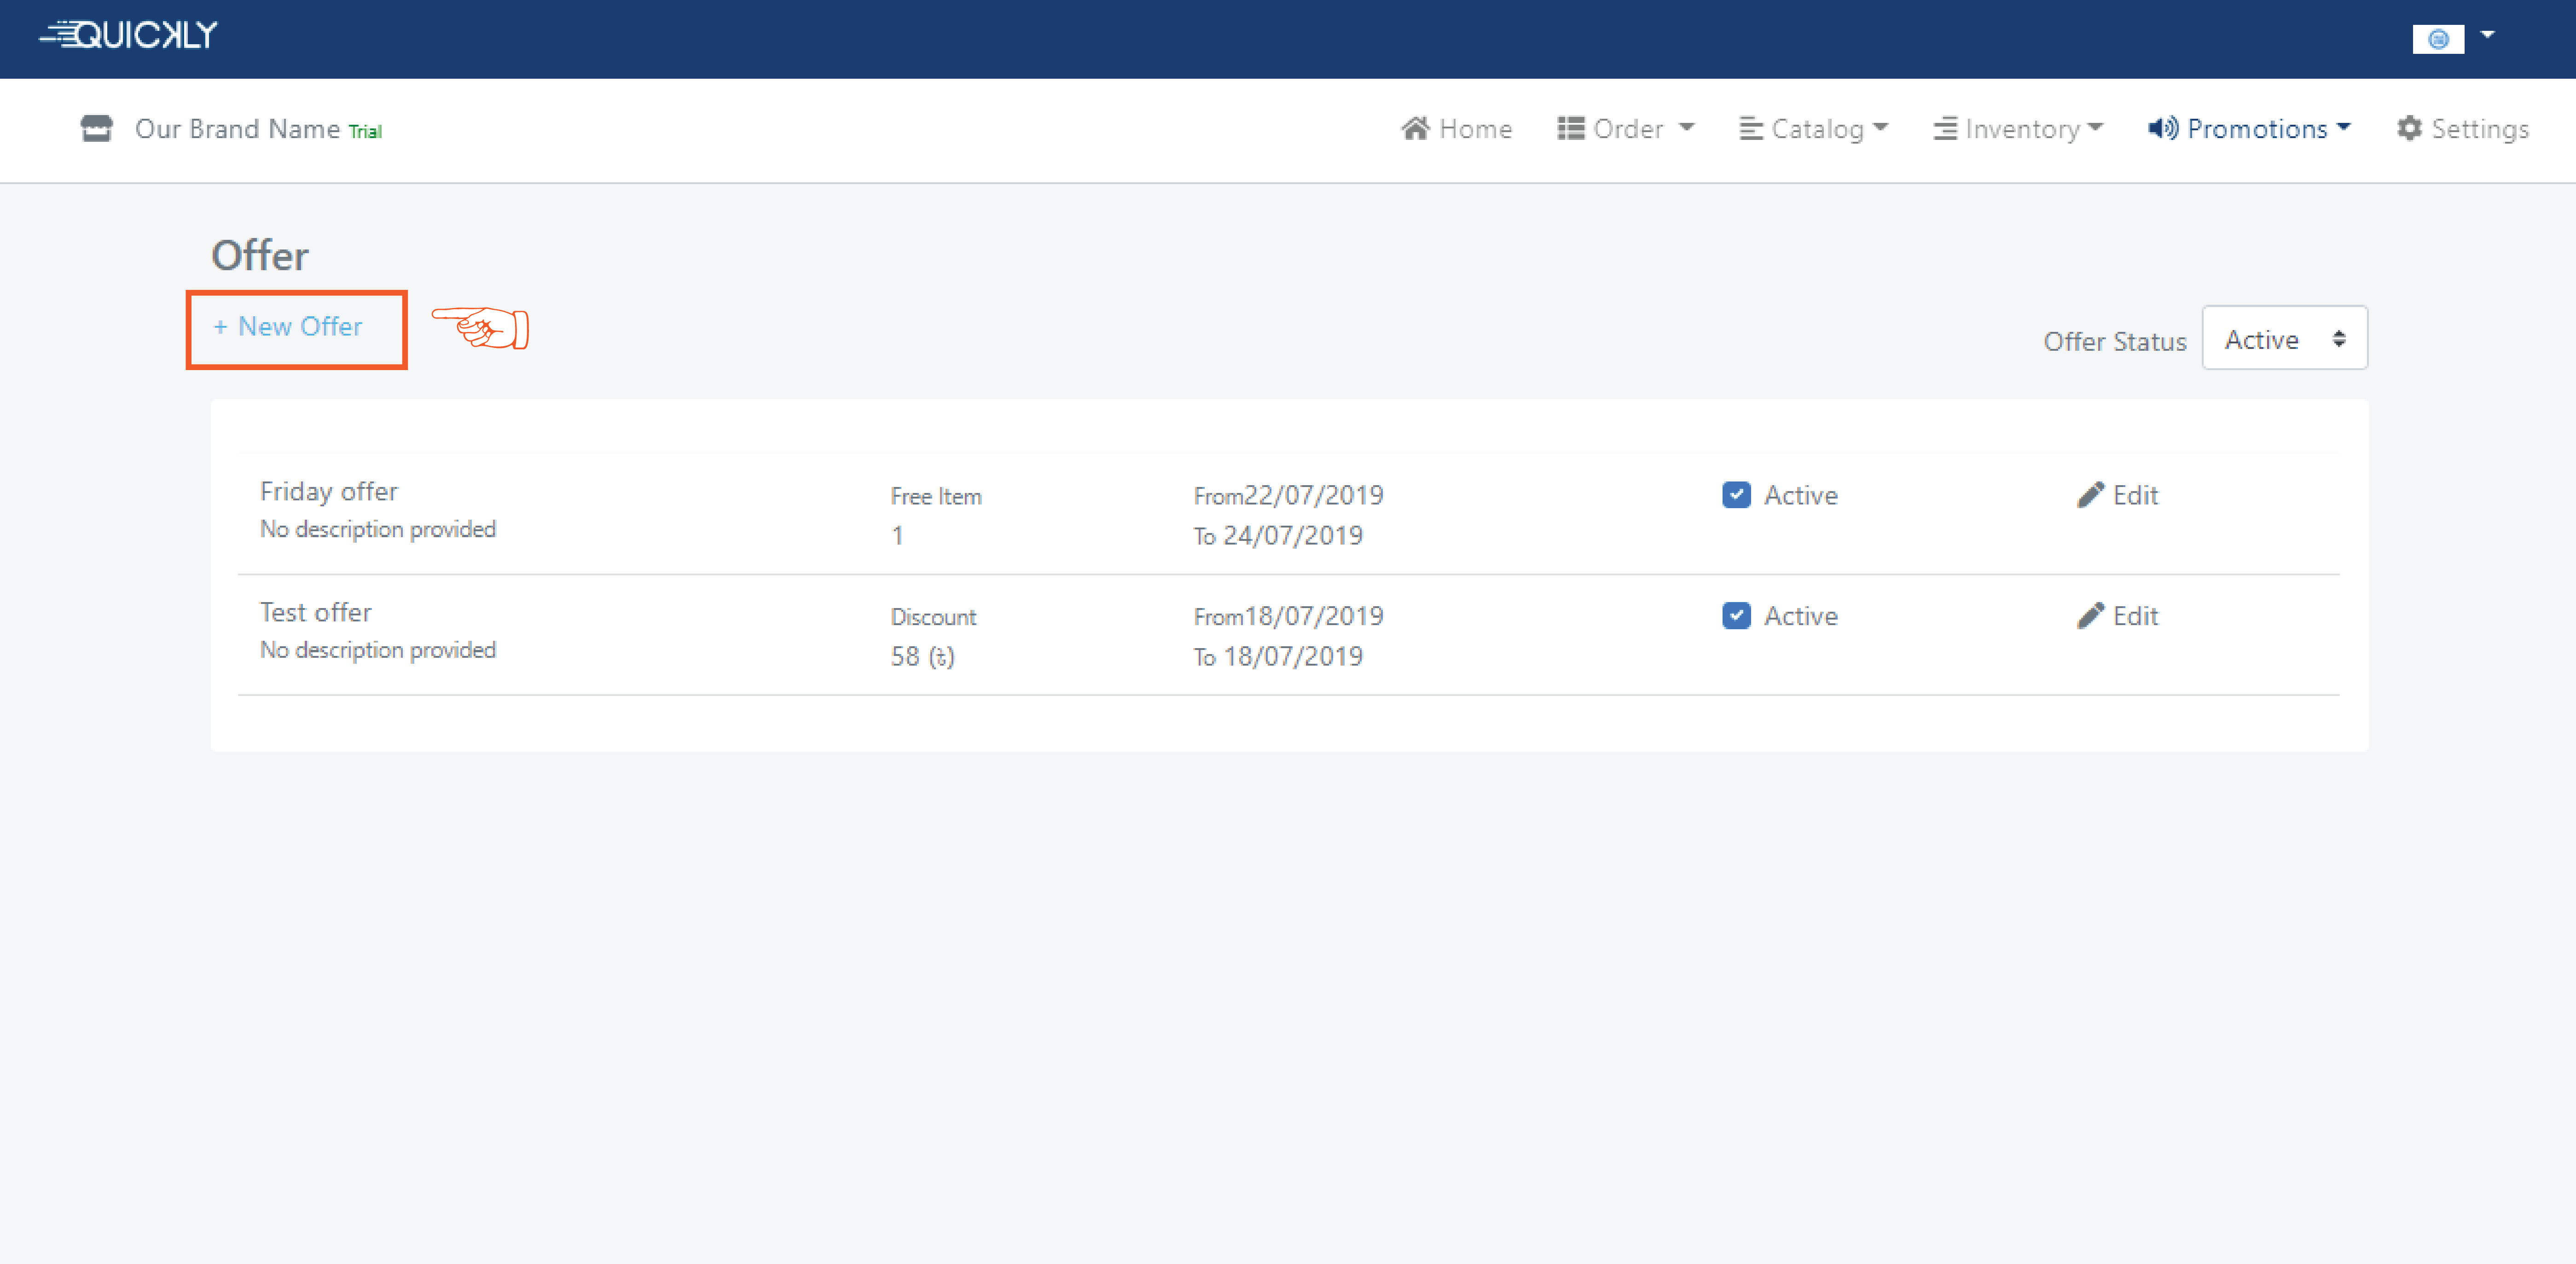
Set up offer
In the offer page, you’ll find all the offers you have created. You can
also edit the offer as you want and create new ones. If you don’t want
to keep any of the offers available then simply make that offer inactive
and it won’t show anymore in the app.
👉 To create an offer, go to the offer page and click on the +New Offer
button.
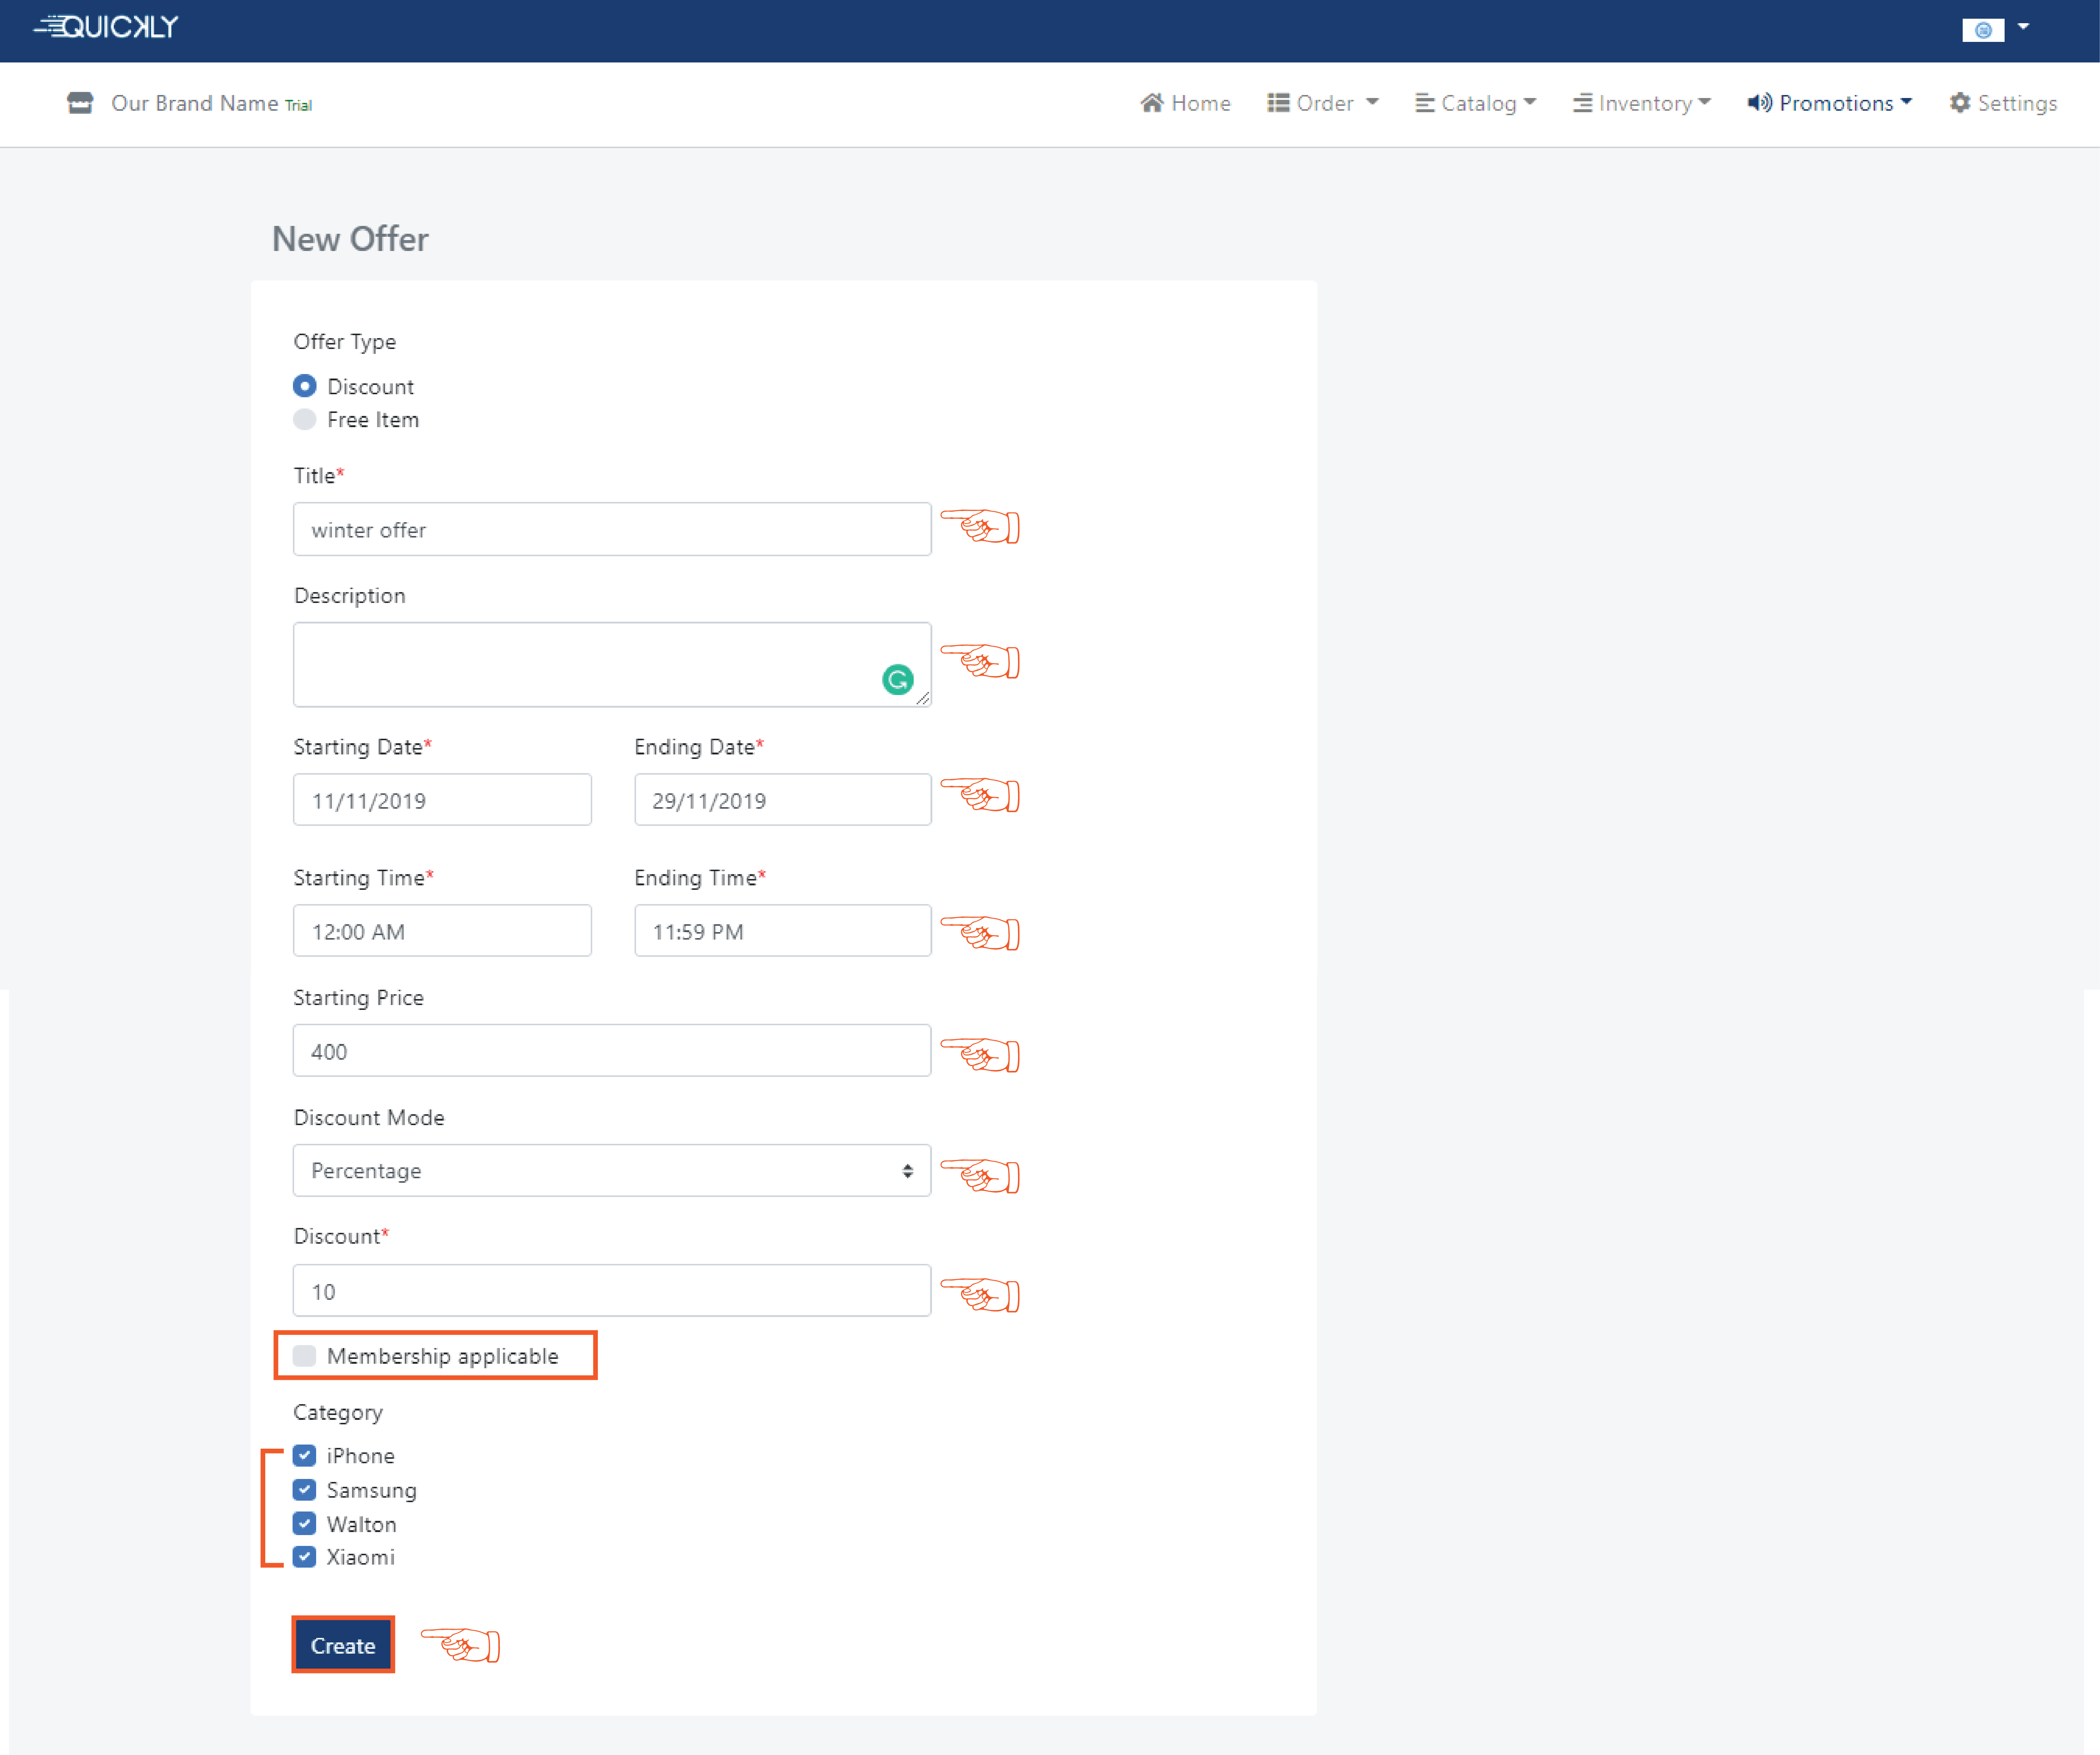
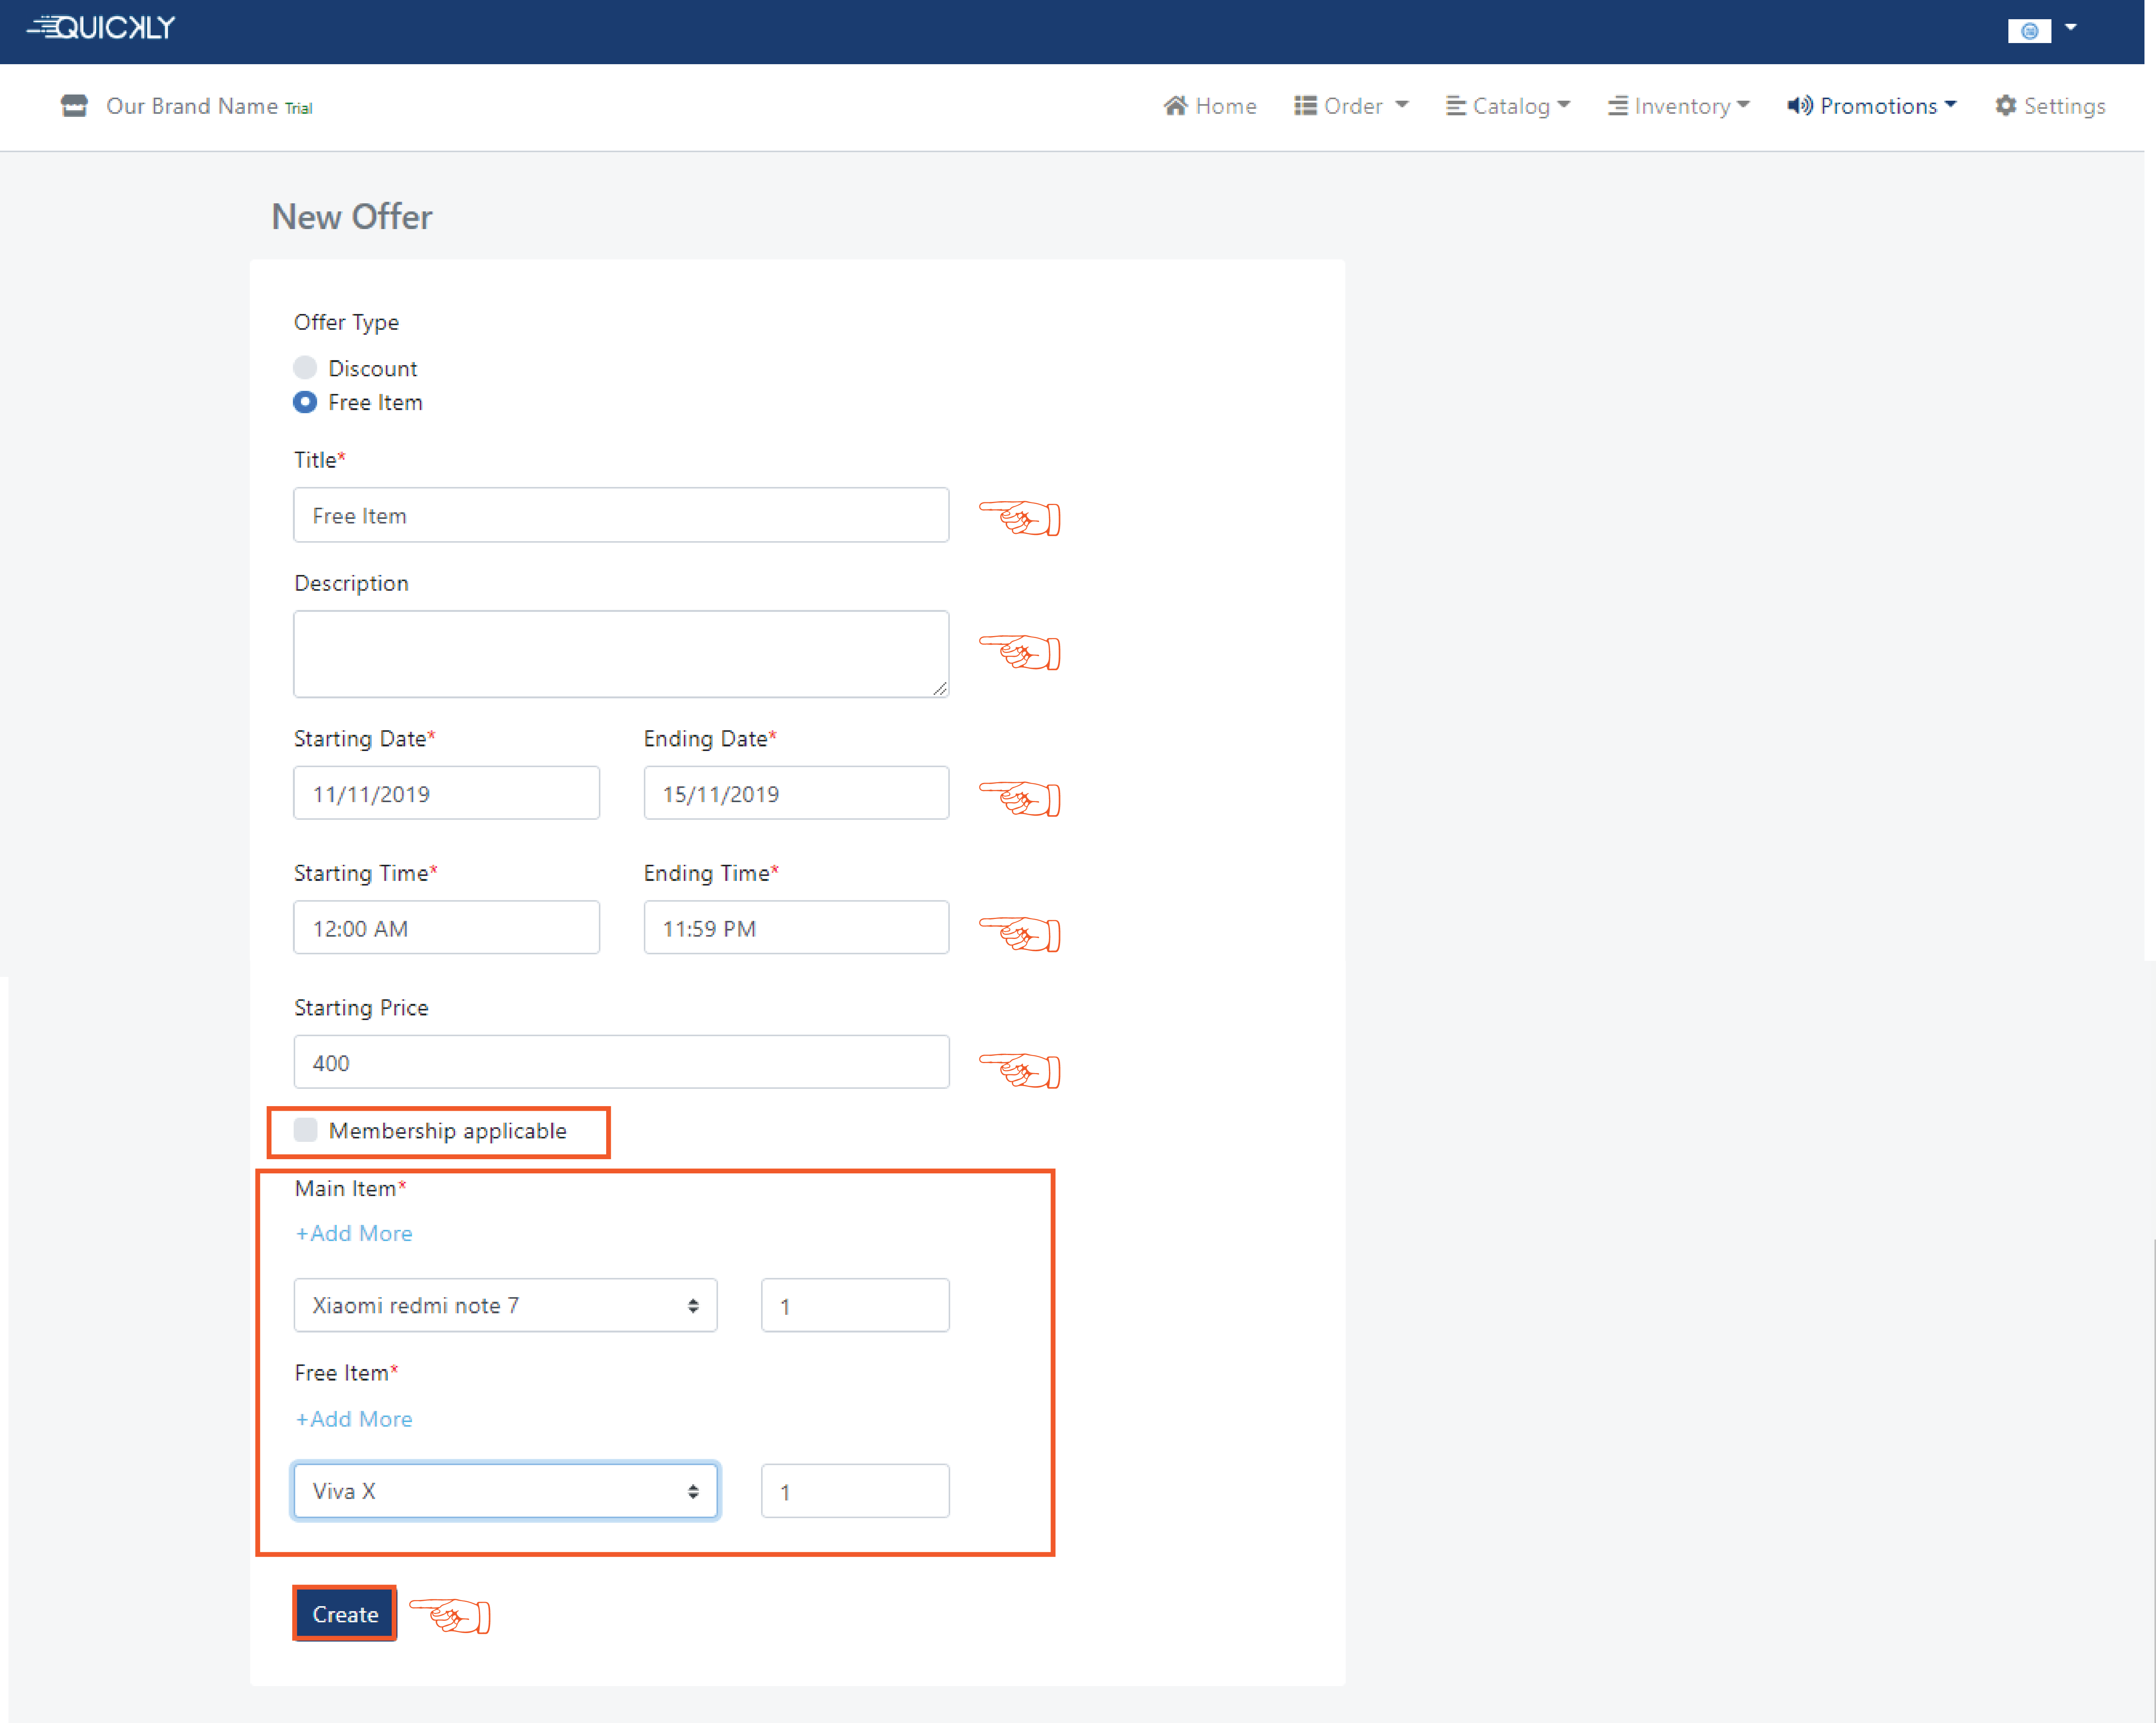
👉 A new page will appear where you will find two Offer Types- Discount and
Free Items, choose the one you want to offer to your customers.
Give an interesting name to this offer and write it down in the Title
section.
You may put a little Description (i.e rules or terms & conditions of the
offer).
Set the time period for the offer providing the Starting Date and Ending
Date along with the Starting Time and Ending Time. If you have a minimum
order value to avail the offer then write it down the Starting Price
section.
In case of a discount, you will get two Discount Modes- Amount and
Percentage. Choose the one you want to and write down the discount
rate (i.e how much discount you want to give to your customers) In the
Discount section. Select one or more Categories on which the
offer will be applicable.
In case of Free Item, add one or more Main Item with which you will give the same or another item free. Add the Free Item you want to offer.
If you want to avail this offer on top of the membership offer to the
customers who have the membership promotional offer available for
them then check on the membership applicable checkbox and the
discount will be applicable with the membership offer.
Lastly, click on the create button.
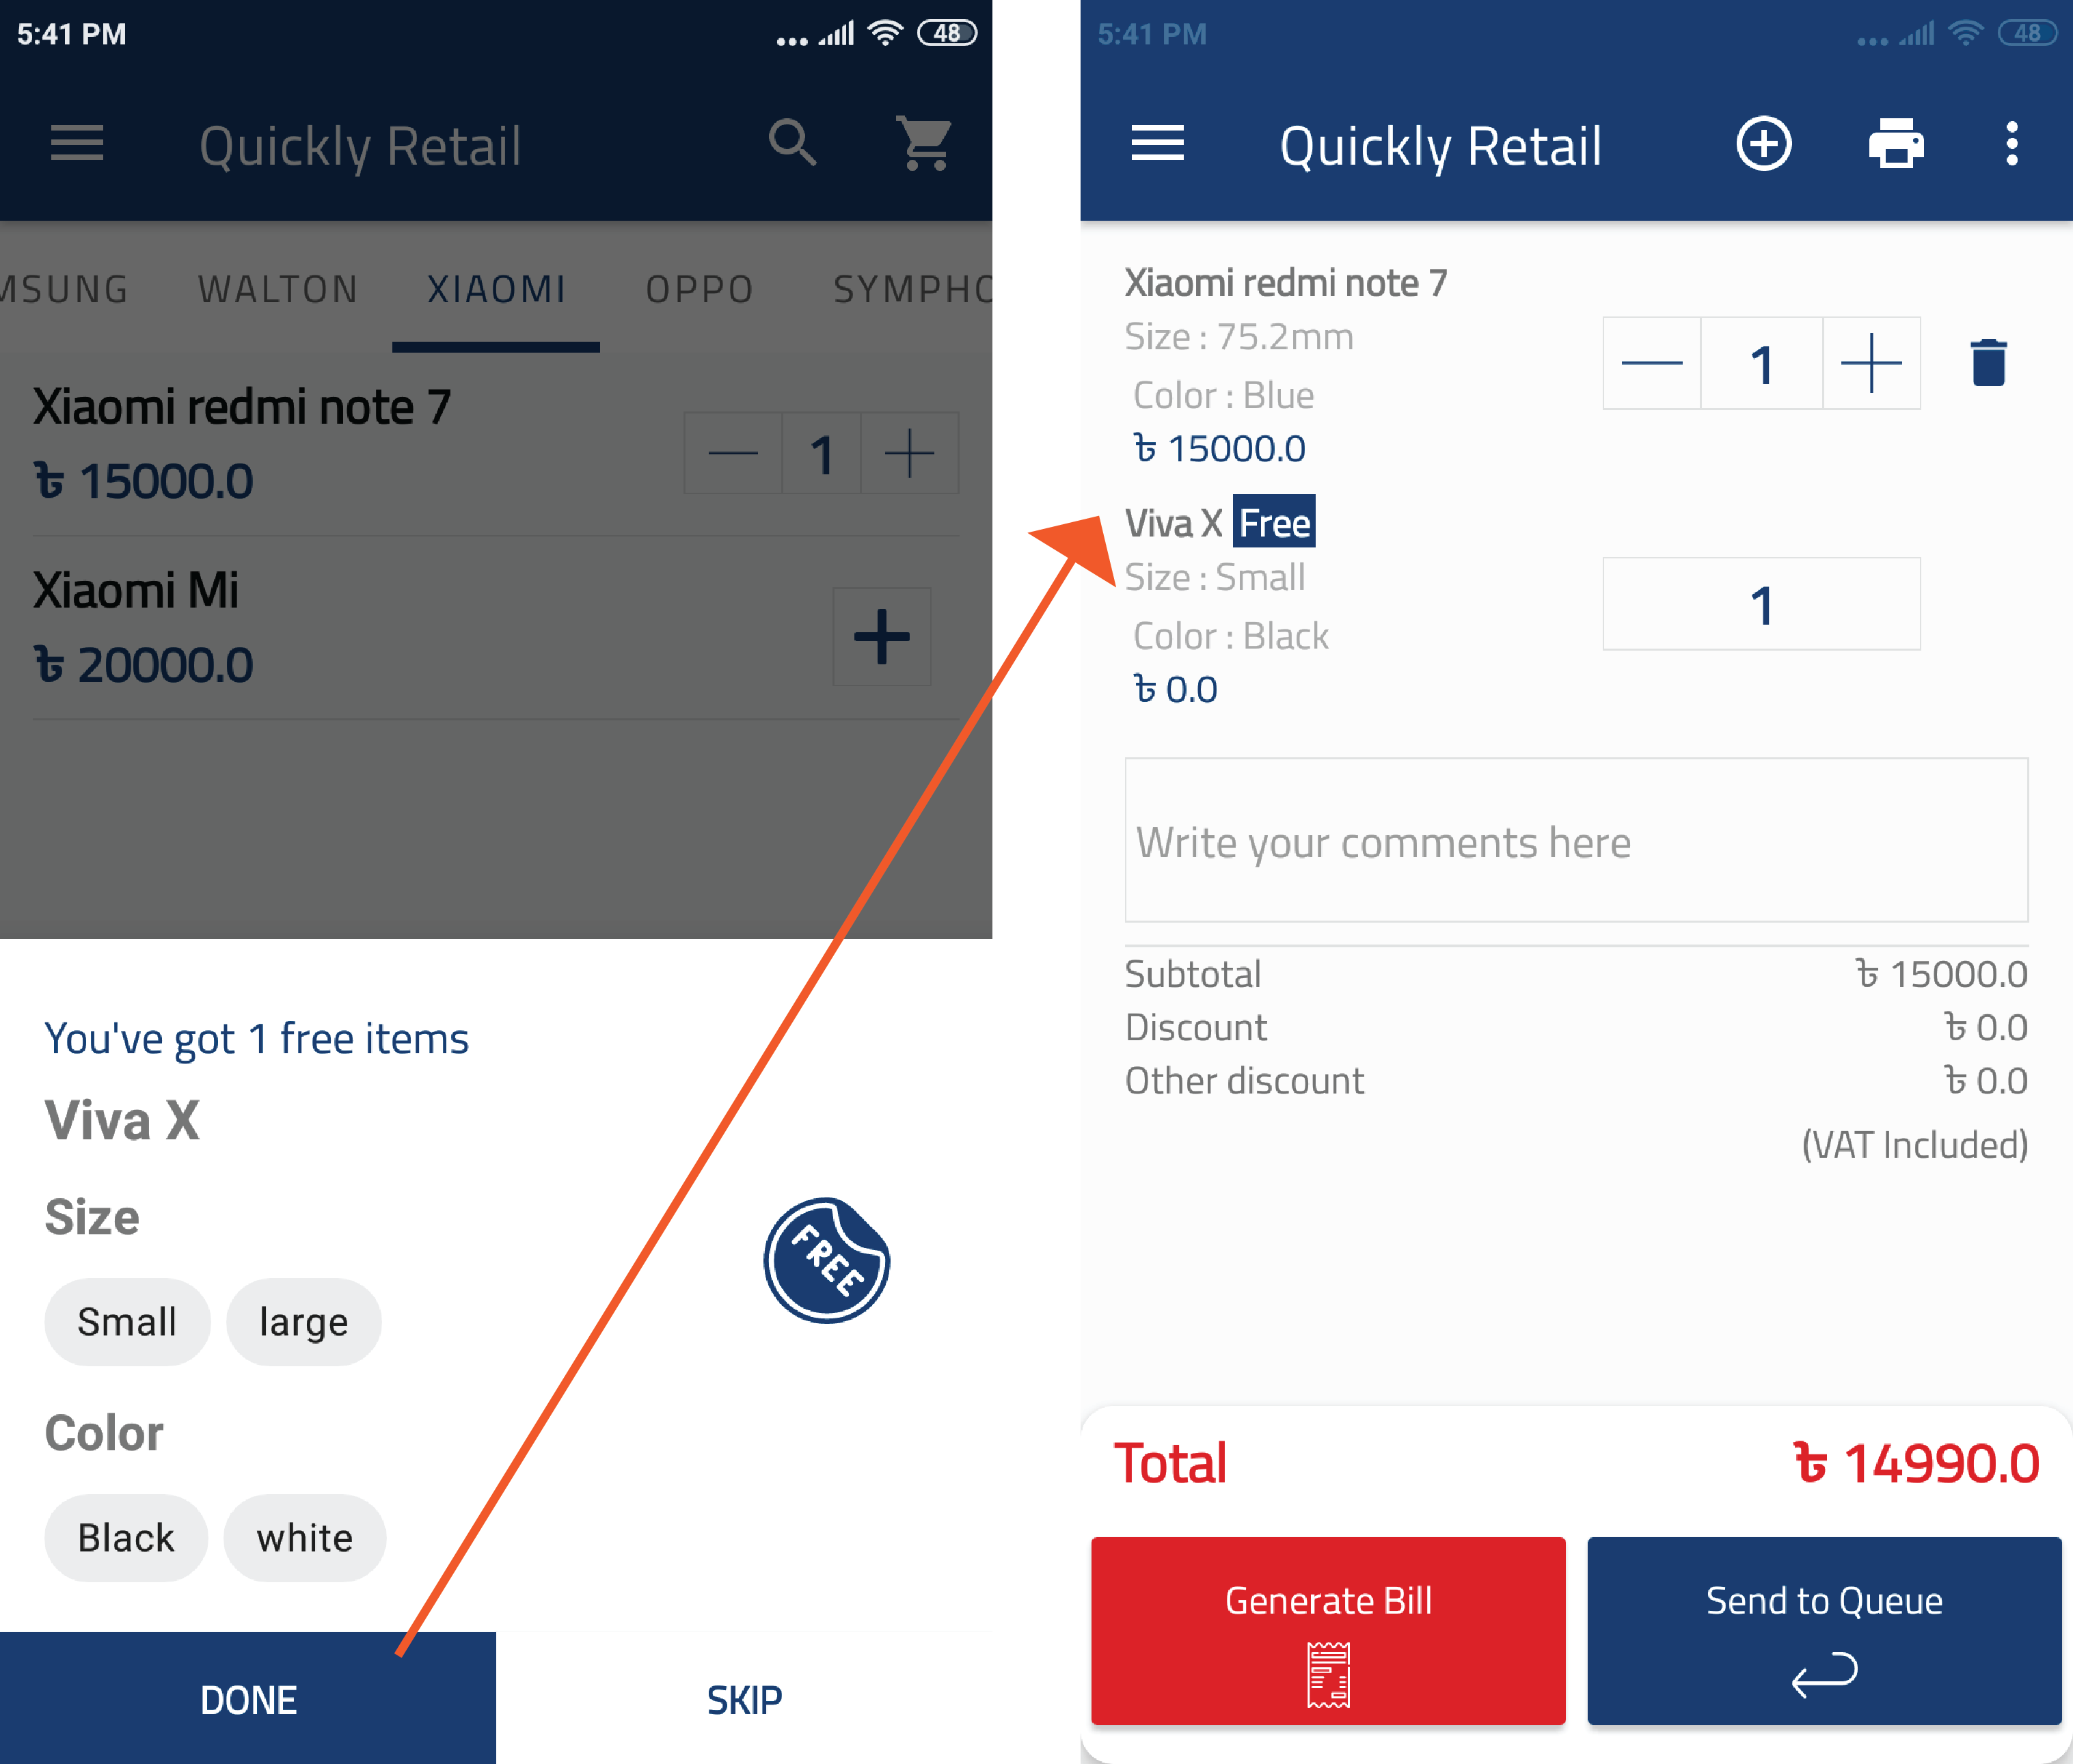
👉 After setting an offer in the merchant portal, this offer will
automatically be added to the app. For example, in cart when you
add ‘Xiaomi redmi note 7’ a pop-up window will create where you
have to choose the size and color of that free item.
After choosing the size and color it will be added to
the cart as a free item.
Set up membership
Loyal customers are an asset for your business. They tend to spend more
and refer to more people. So you may honor them by giving them
discounts and other offers.
In the membership page, you’ll find all the membership offers you have
created.
You can also edit the membership offers as you want and create new ones.
If you don’t want to keep any of the membership offers available then simply
make that offer inactive and it won’t show anymore in the app.
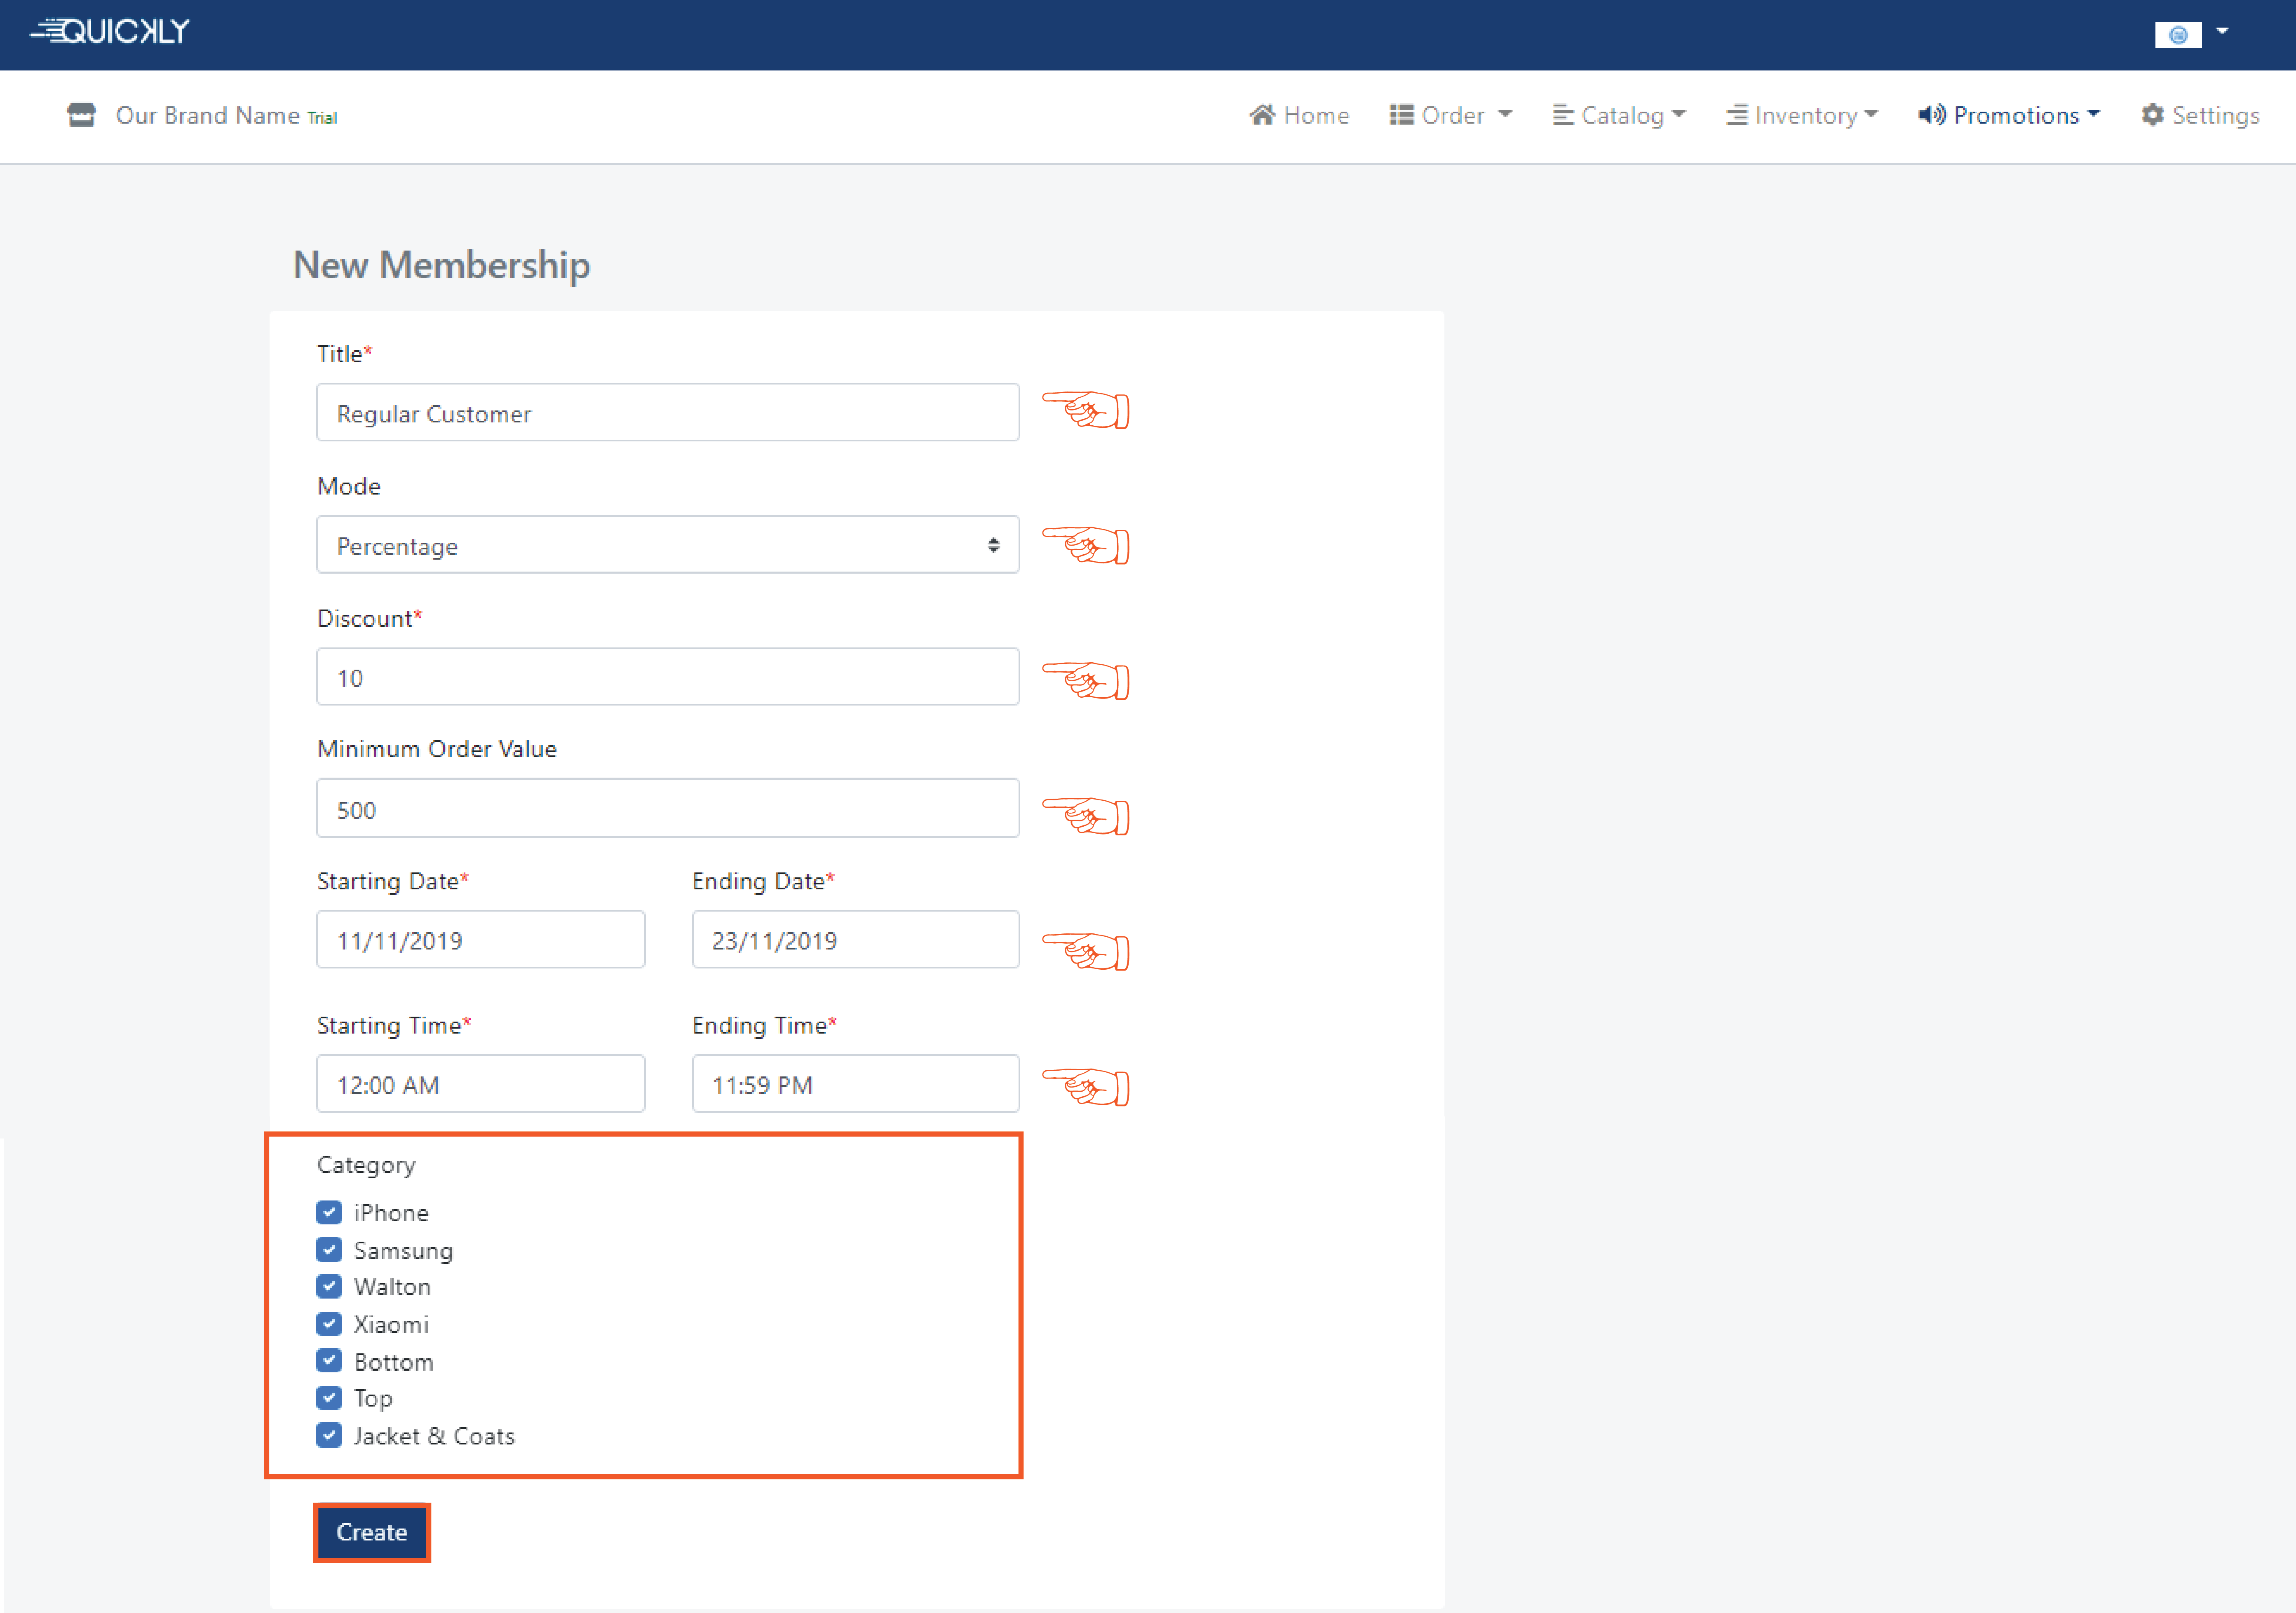
👉 To create a membership offer, go to the membership page and click on the
+New membership button.
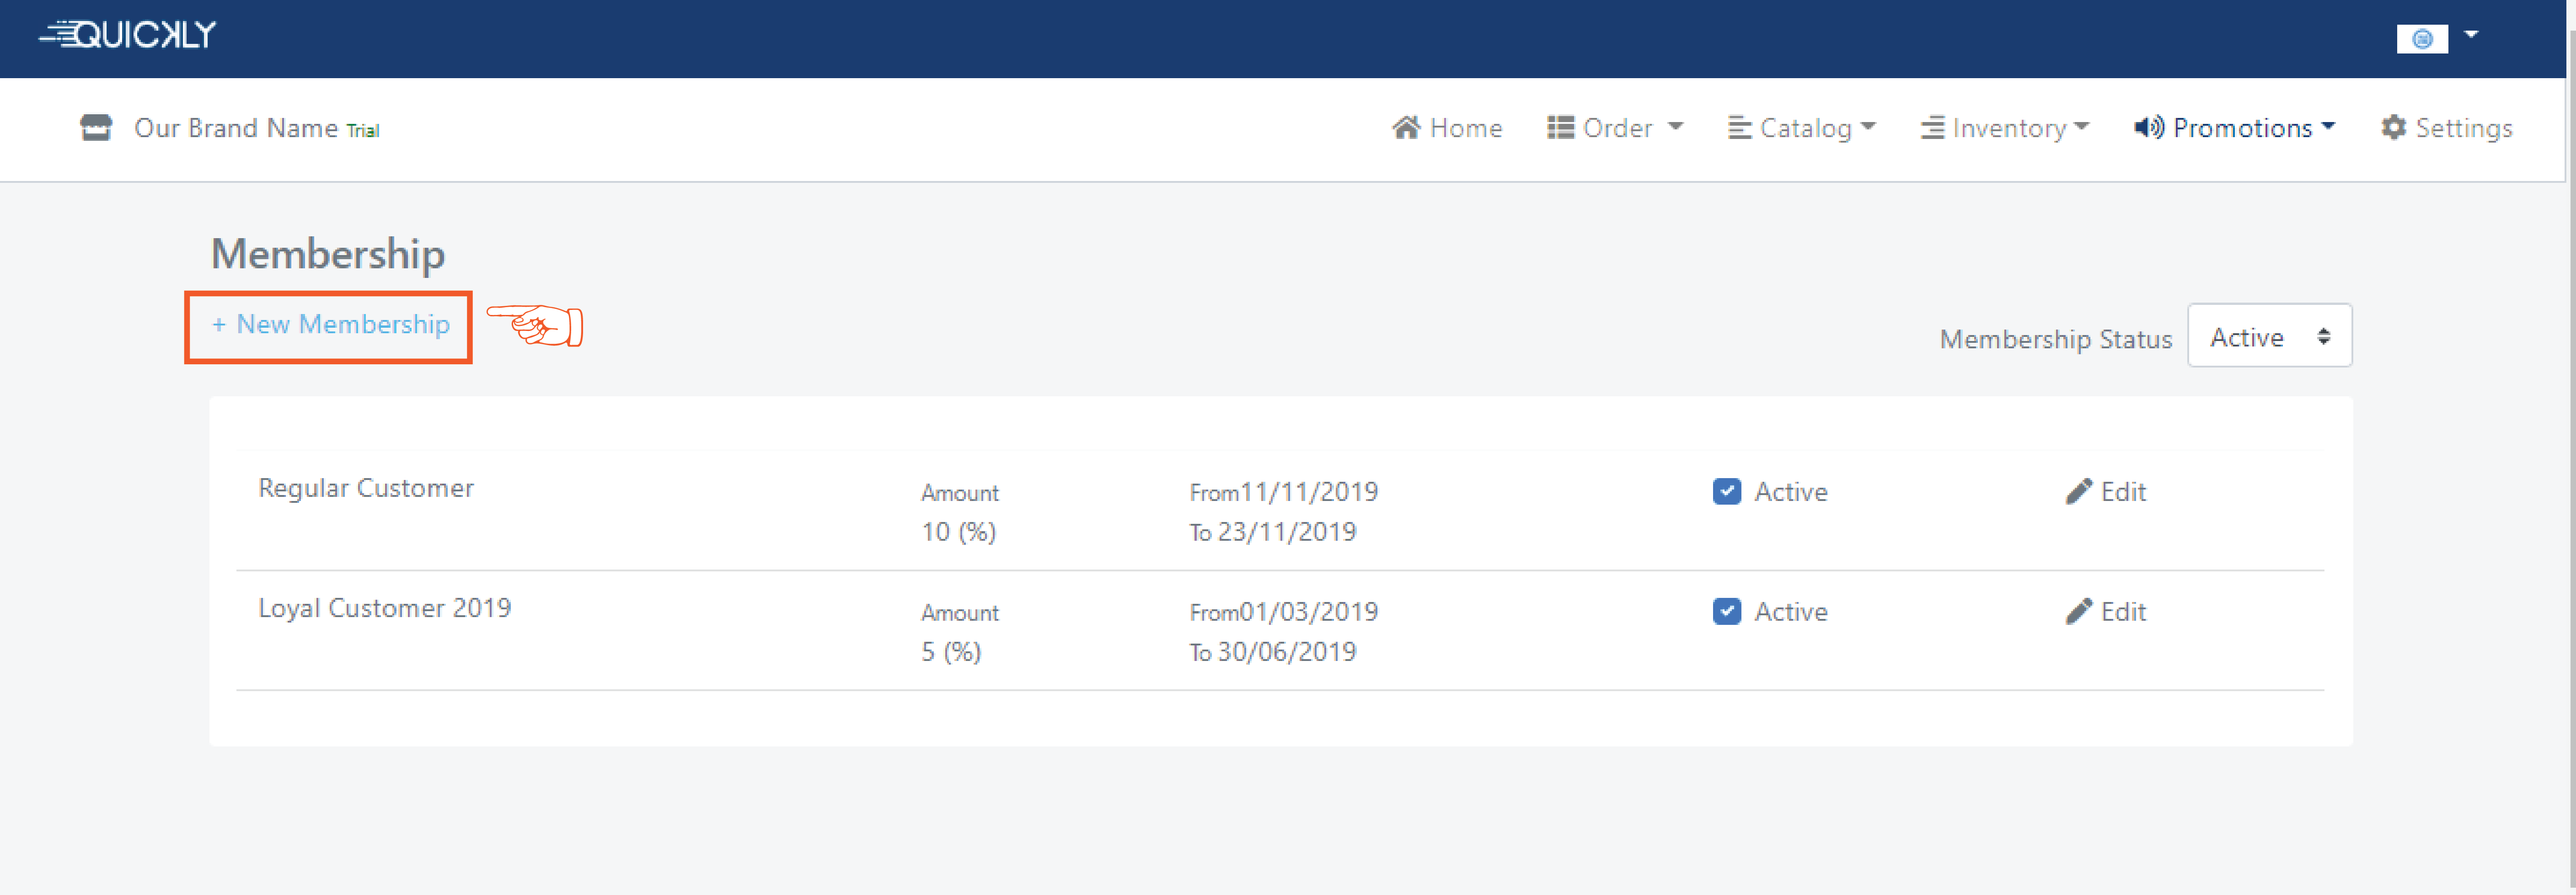
👉 Give an interesting name to this offer and write it down in the Title
section.
Choose one of the two Discount Mode- Amount & Percentage according to your
preference and write down the discount rate (i.e how much discount you want
to give to your customers) in the Discount section. If you have a Minimum
Order Value to avail the offer then write it down that section.
Set the time period for the offer providing the Starting Date and Ending
Date along with the Starting Time and Ending Time. Then select one or
more Categories on which the offer will be applicable and click
on the Create button.
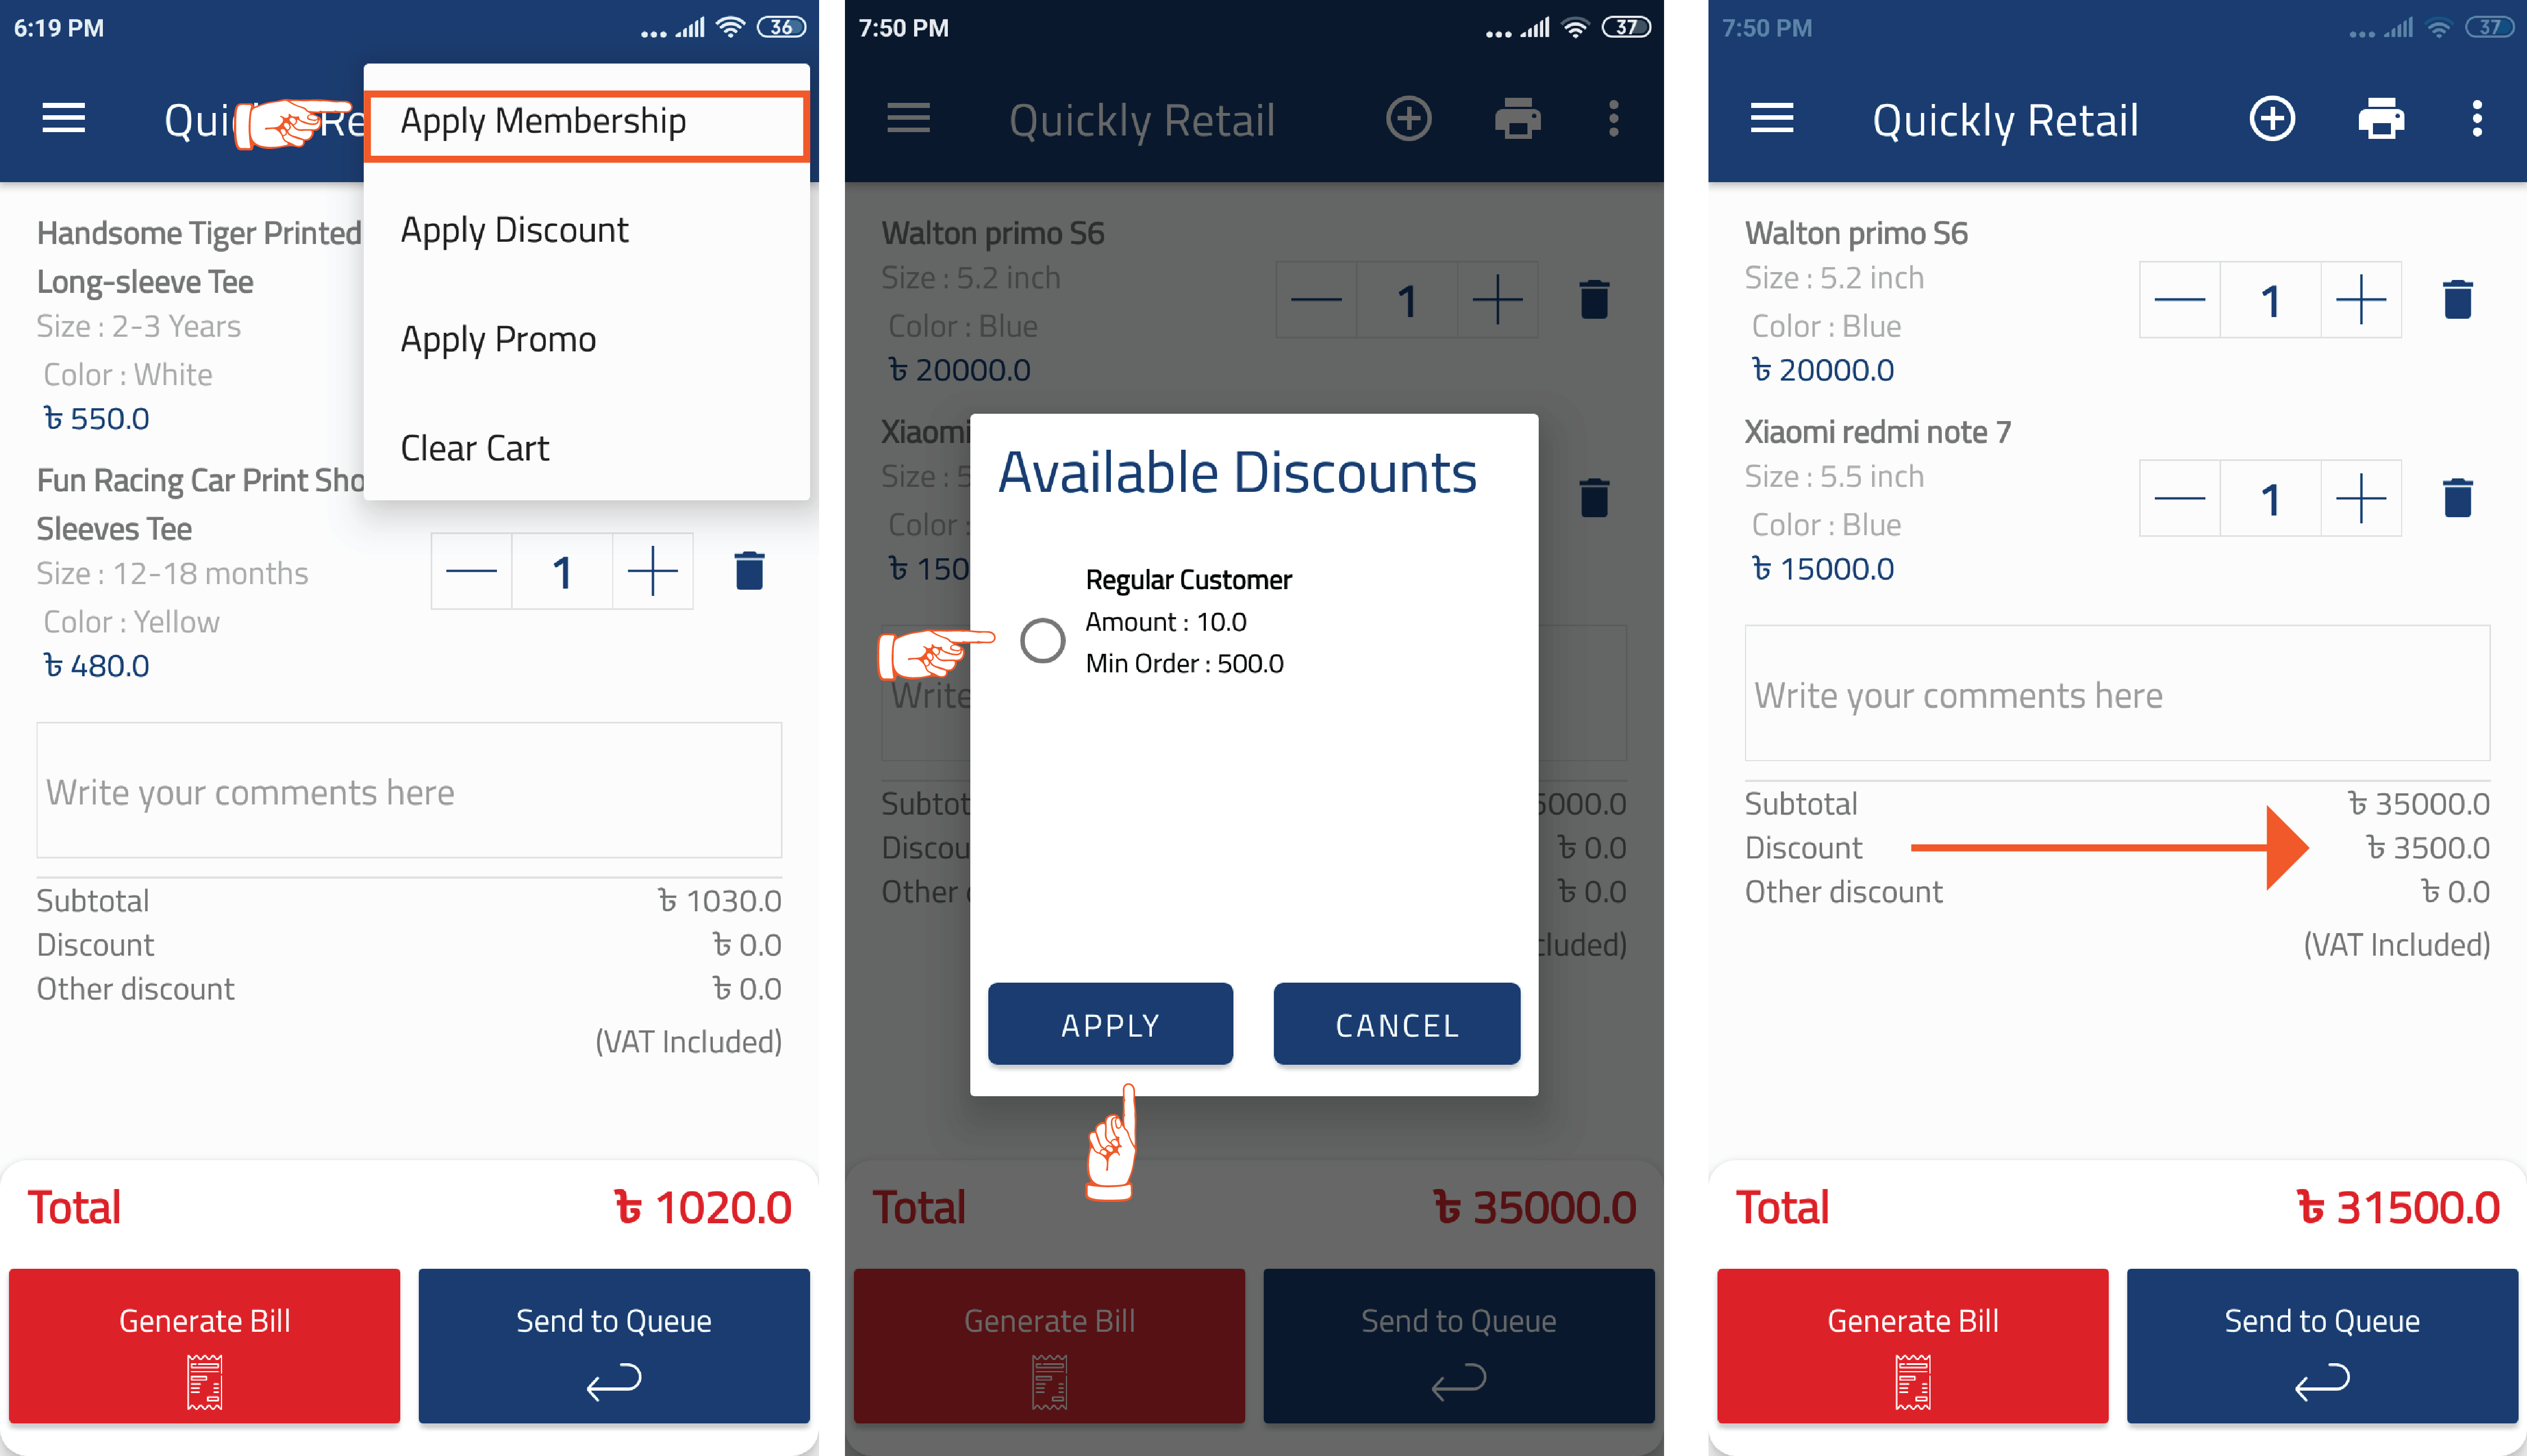
👉 After setting up the membership in the merchant portal, that membership will show in the app. In app from the header by clicking on the 3 dots you can Apply Membership. After navigating the ‘Apply membership’ from the cart, if membership is available then a pop-up window will appear, there will be an option to add membership in the cart. To add membership discount in the cart you have to choose the available discount and click the apply button. After that membership discount will be added to the cart. On the other hand if membership is not available at that moment then membership won't be applicable in the app.
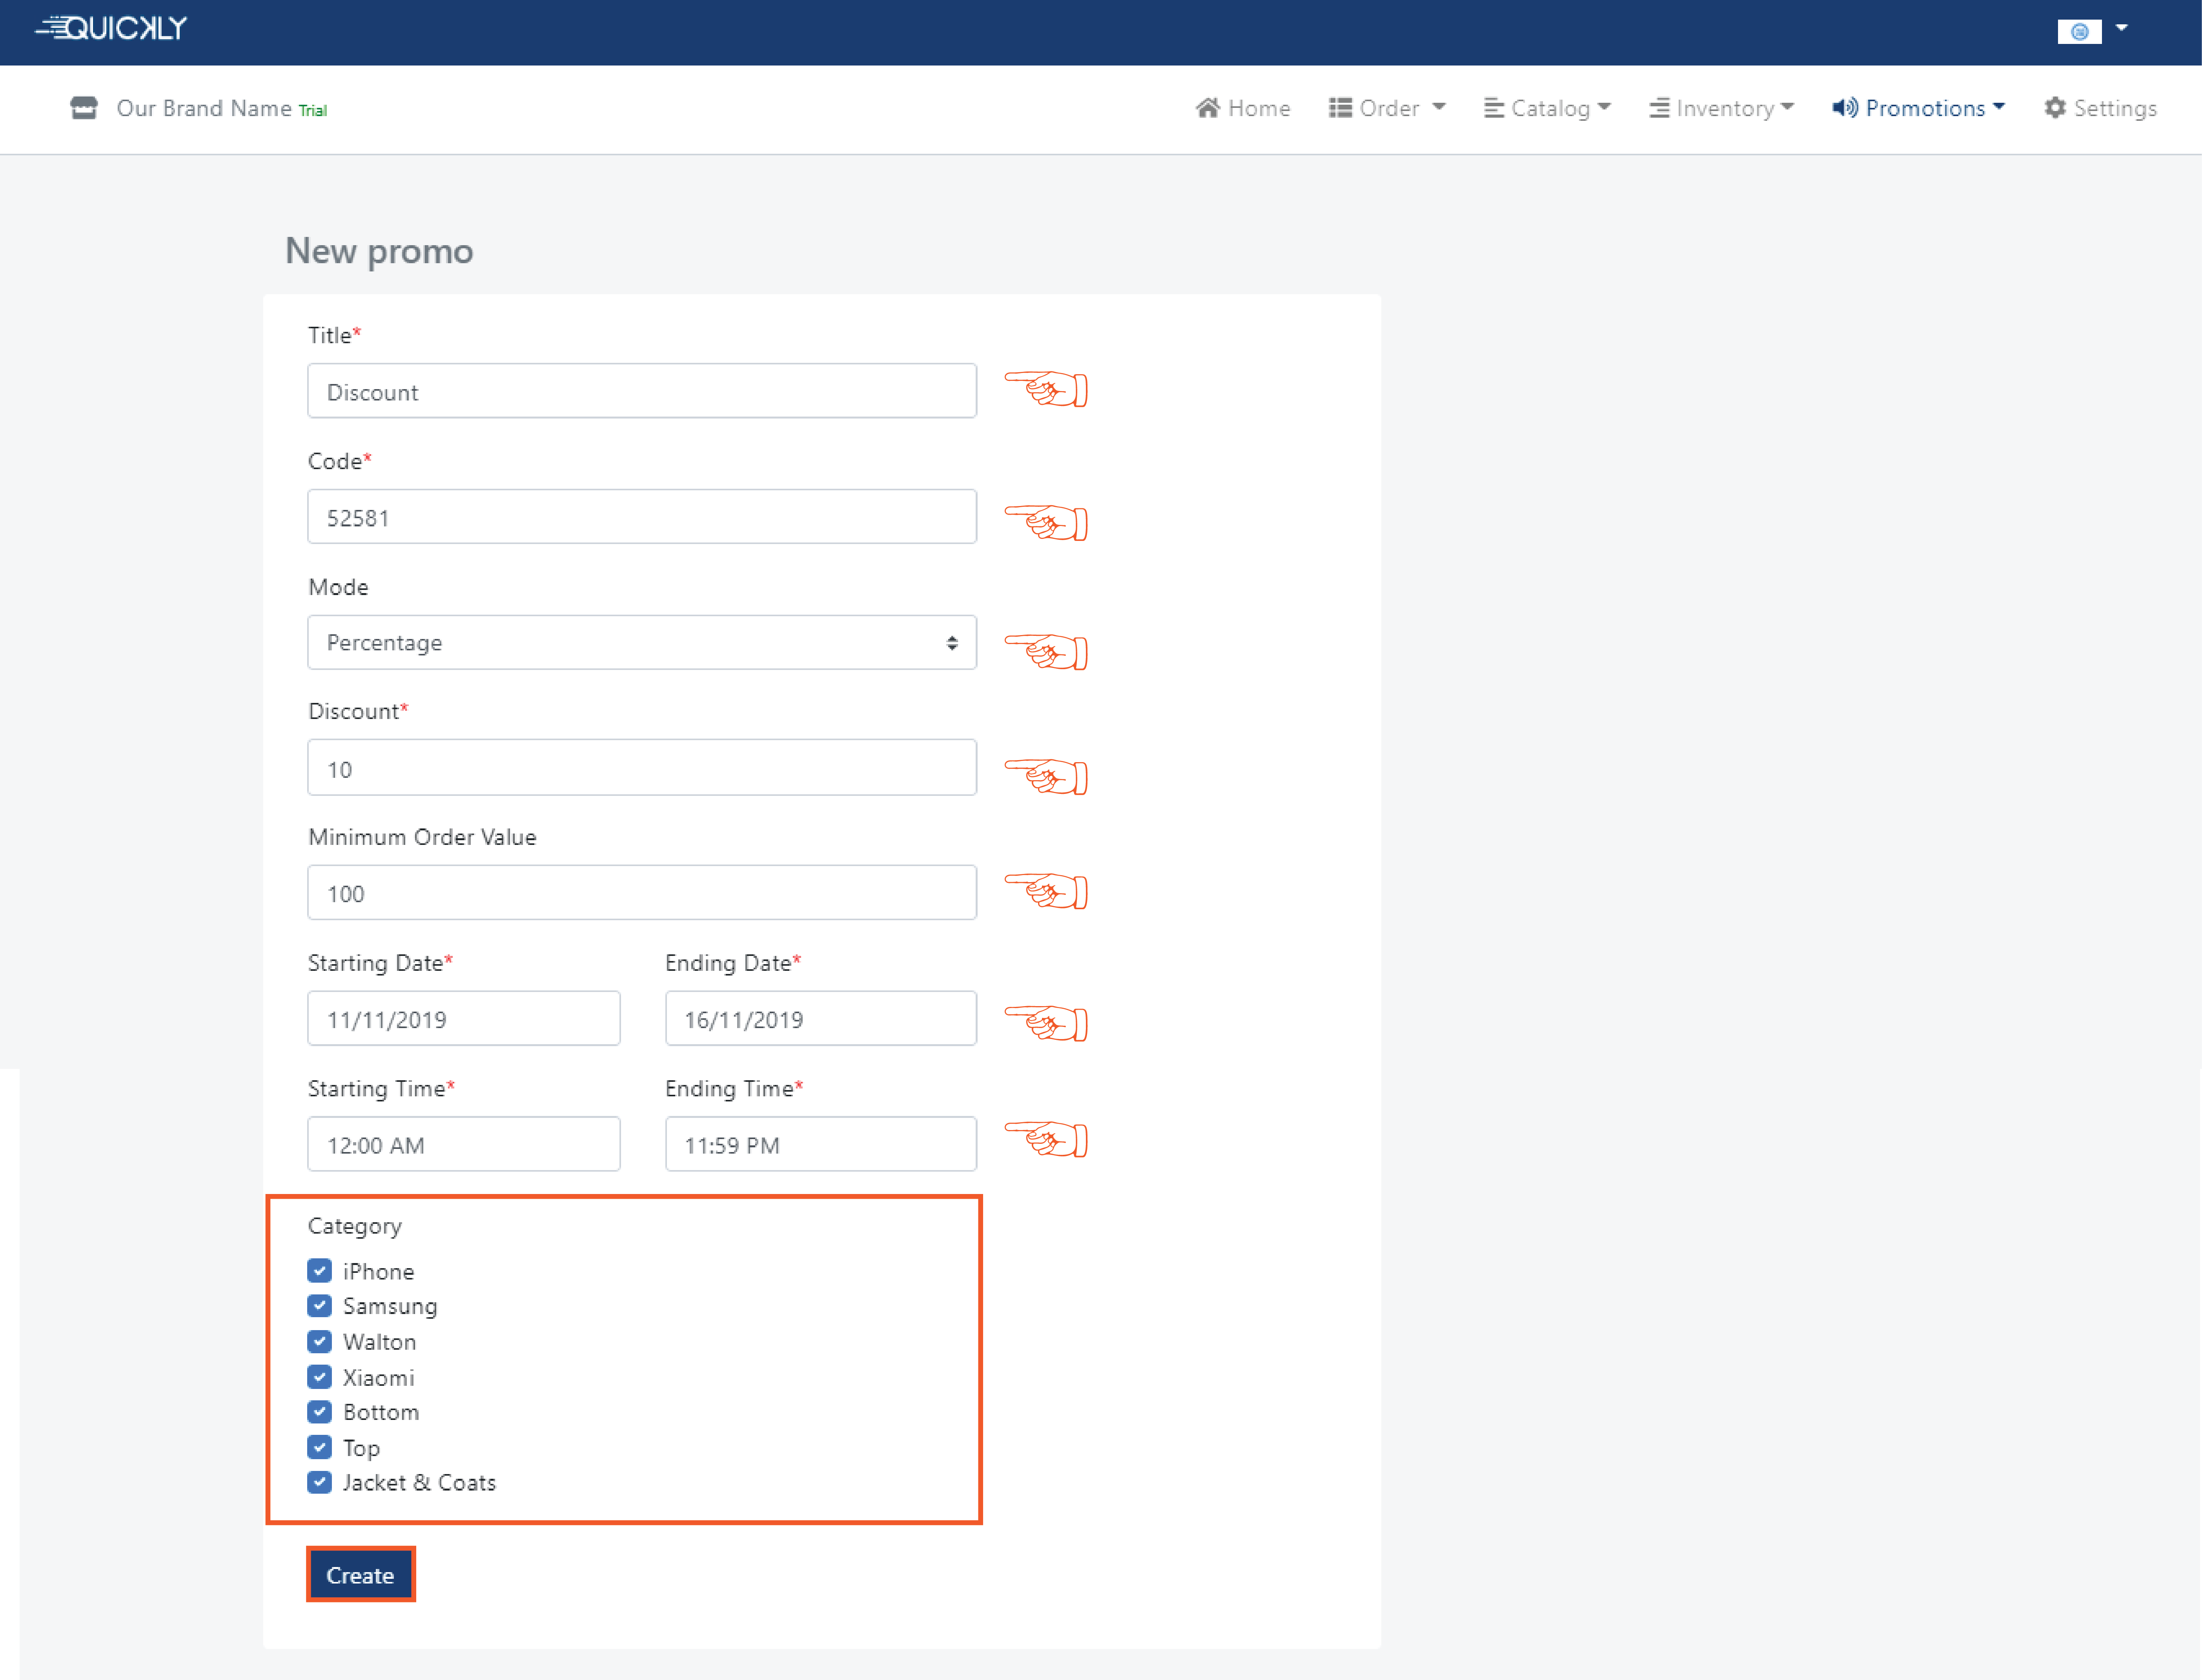
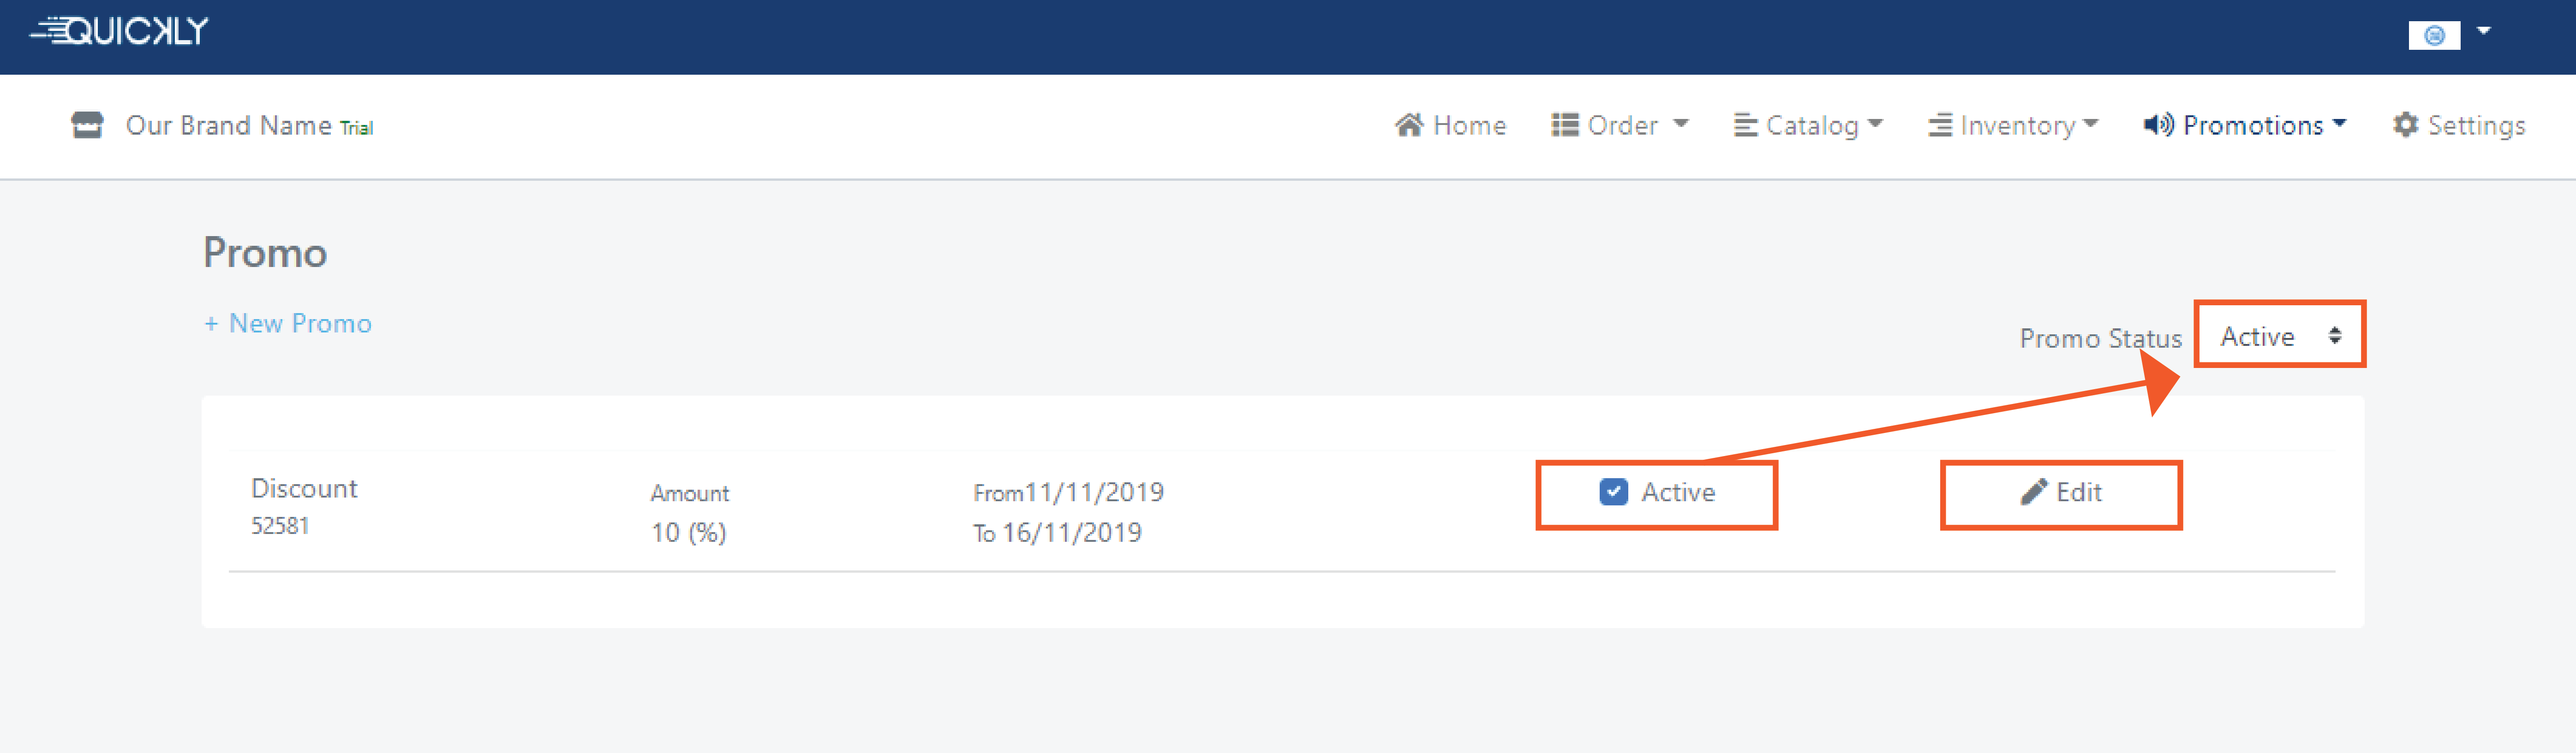
Set up promo
In the promo page, you’ll find all the promo offers you have created. You
can
also edit the promo offers as you want and create new ones.
If you don’t want to keep any of the promo offers available then
simply make that offer inactive and it won’t show anymore in the app.
👉 To create a promo offer, go to the promo page and click on the +New promo
button.
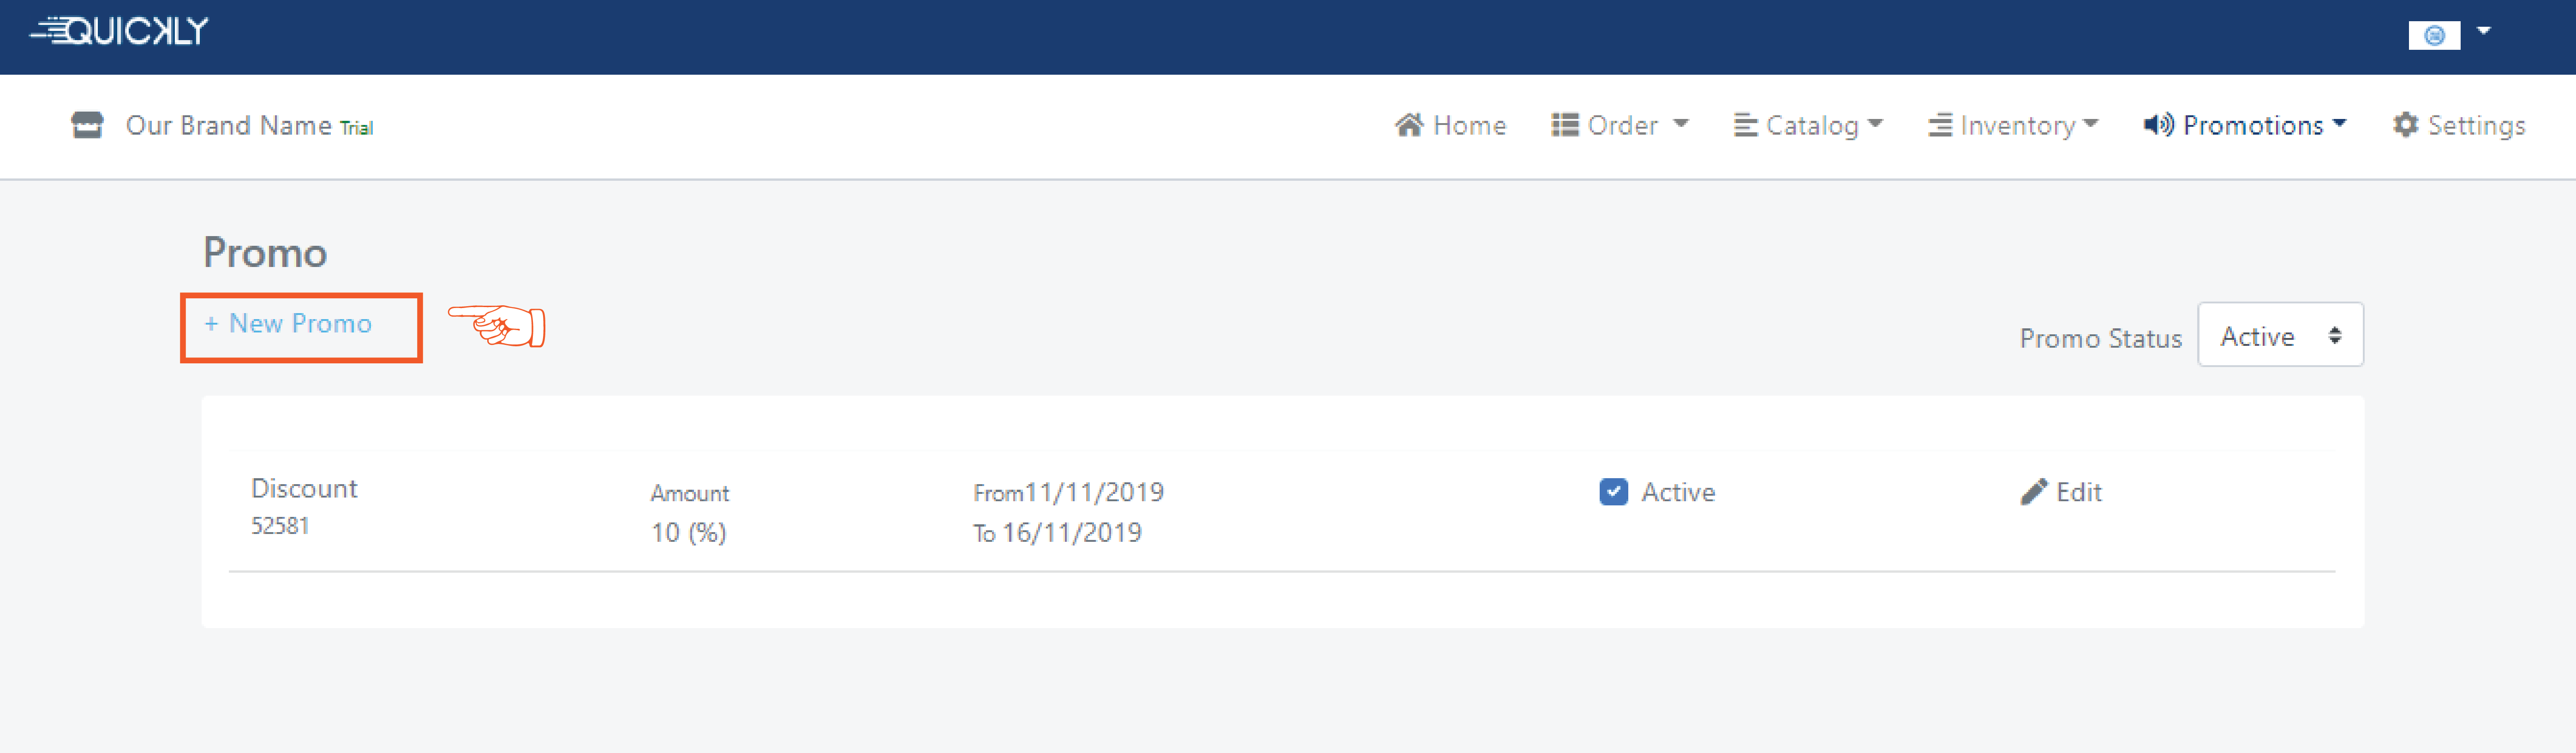
👉 Give an interesting name to this offer and write it down in the Title
section.
Provide a promo Code using which your customers will be able to avail the
offer for them. Now, choose one of the Two Modes- amount & percentage
according
to your preference and write down the discount rate (i.e how much discount
you want to give to your customers) in the Discount section.
If you have a Minimum Order Value to avail the offer then write it down that
section.
Set the time period for the offer providing the Starting Date and Ending
Date
along with the Starting Time and Ending Time. Then select one or more
Categories
on which the offer will be applicable and click on the Create button.
👉 In the promo page, you’ll find every customizable option for your promo and create new ones as well. You can also edit the promo as you want. If you think that any of the promo you don’t want to keep to your menu app then you can simply make that promo inactive so that it won’t show in the app anymore.
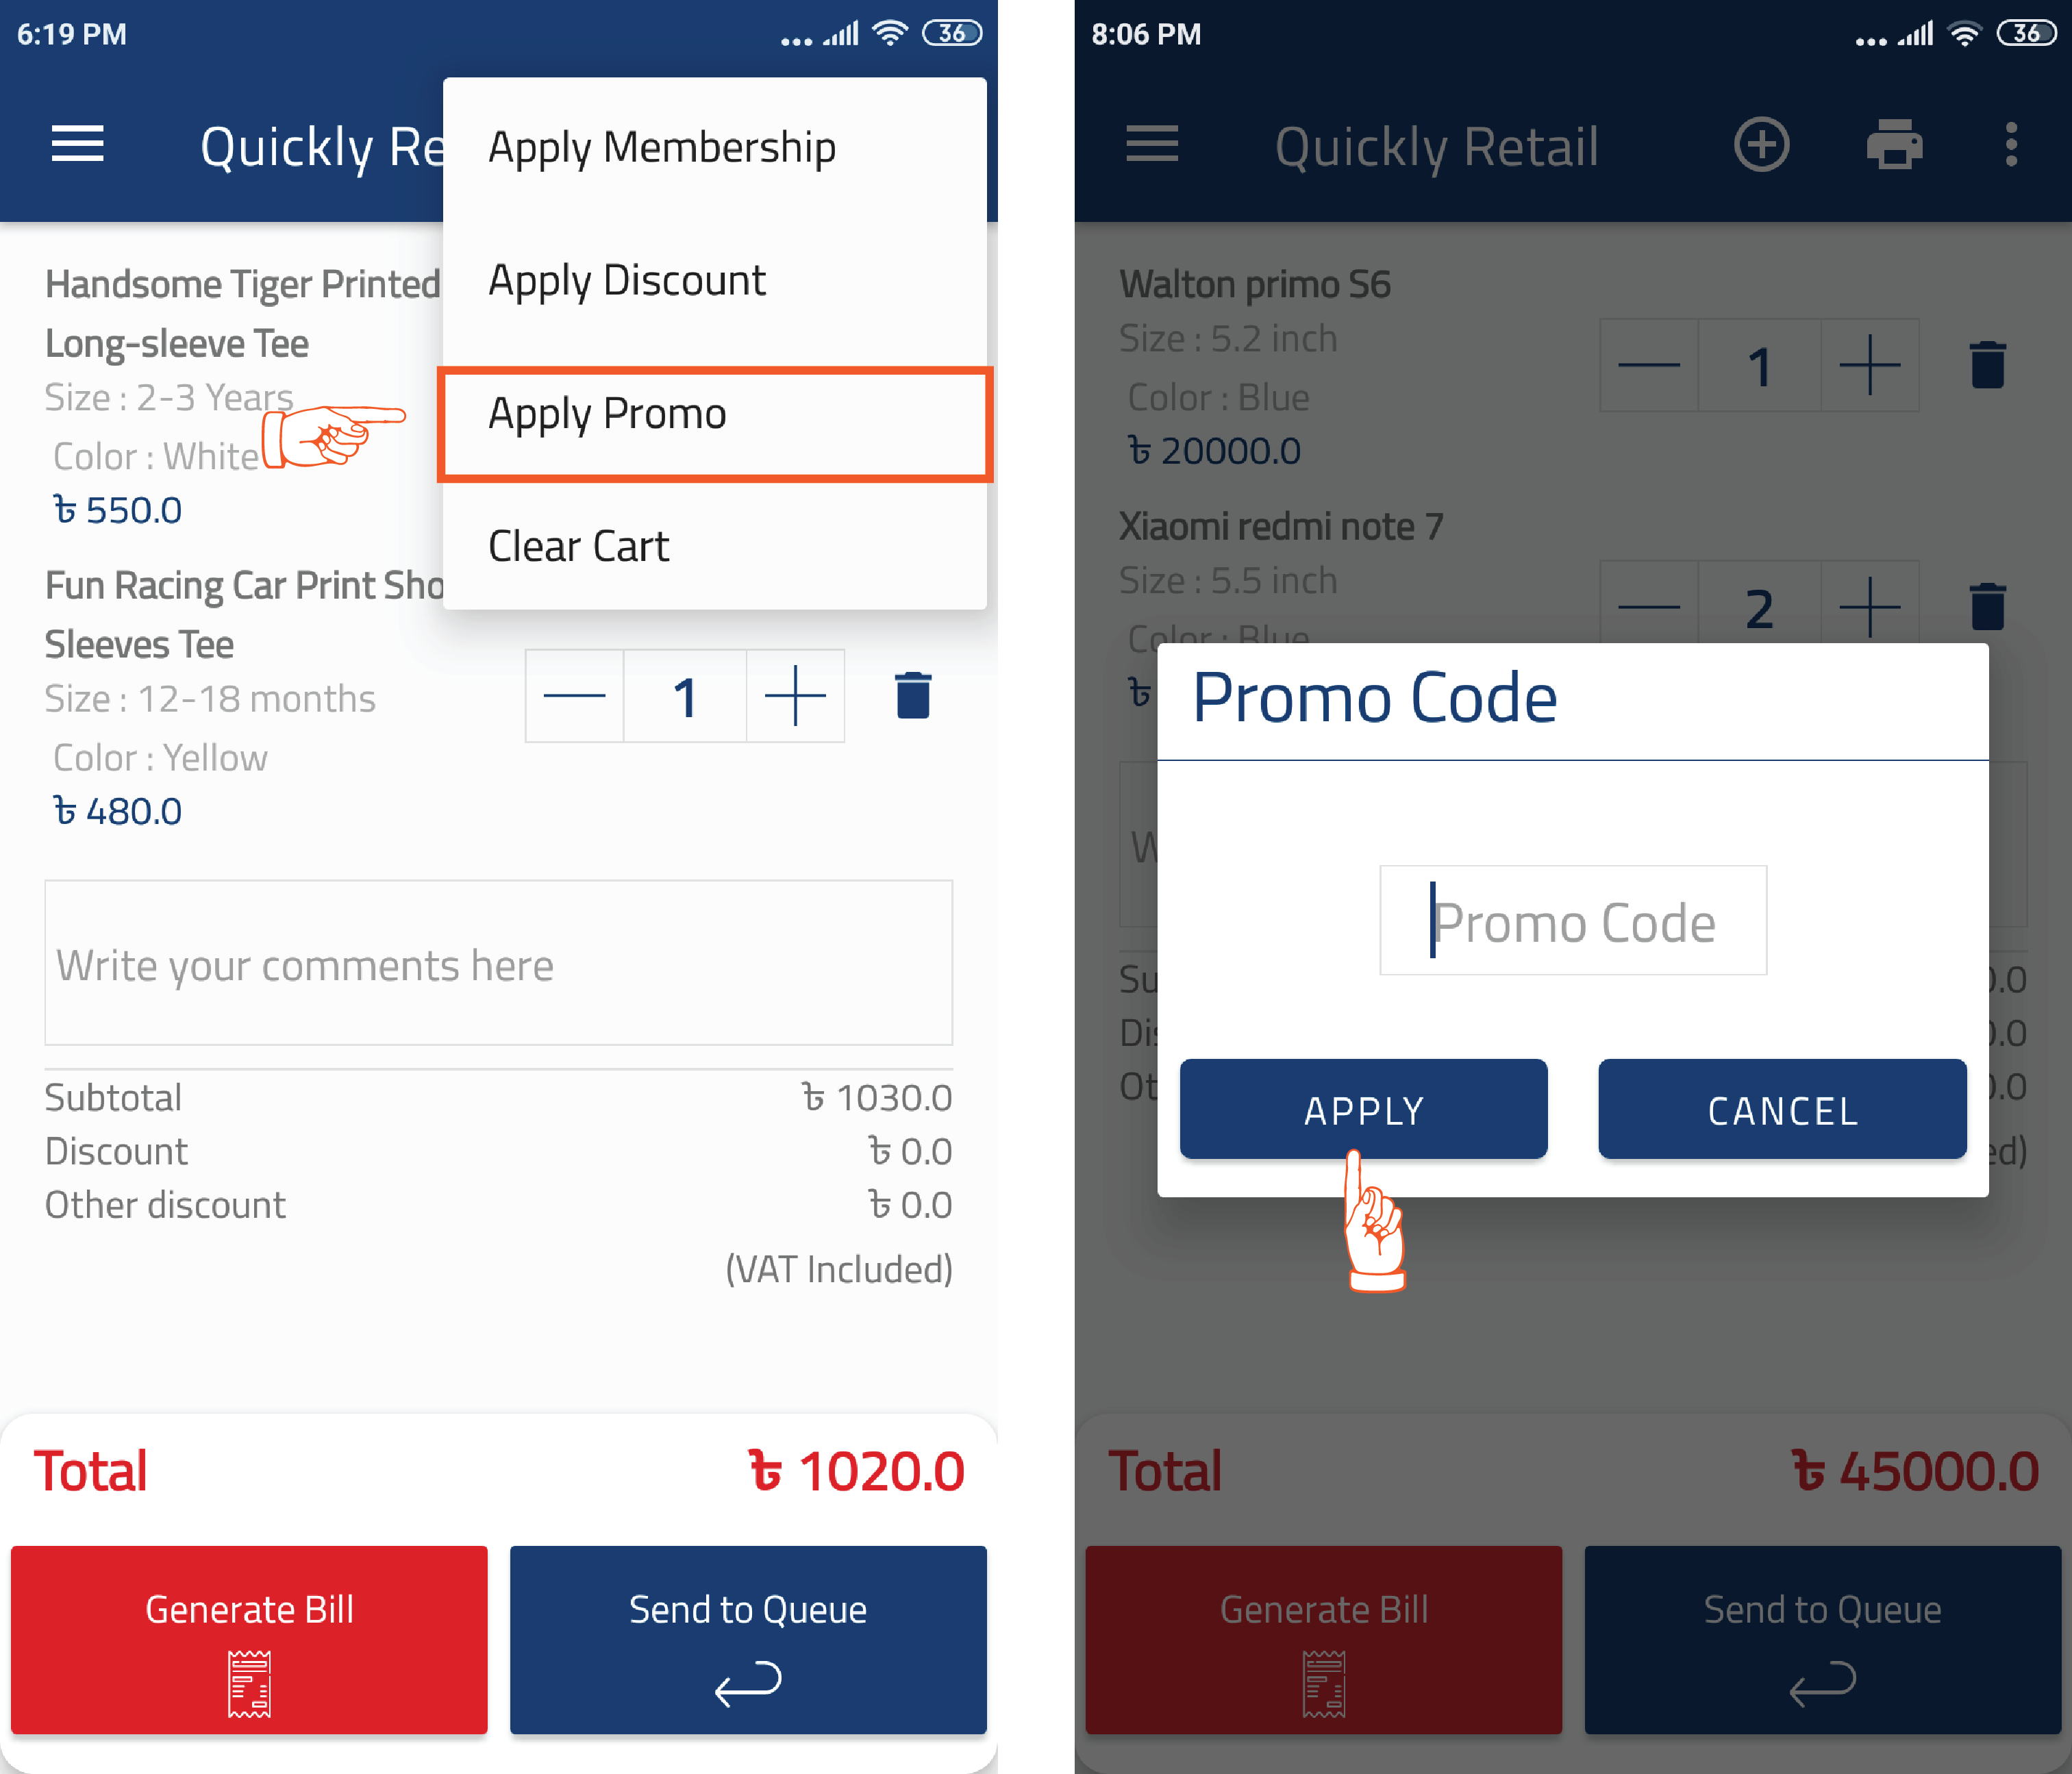
👉 After setting up the promo in the merchant portal,that promo will show in the app. In app form the header by clicking on the 3 dots you can apply promo. If promo is available at that moment then promo will be applicable in the app,on the other hand if promo is not available at that moment then promo won't be applicable in the app. After navigating the apply promo a pop-up window came out where you have to write down the promo code and click the apply button.
Related Video Support
How to upload catalog, take orders & generate bills
In this video, we have shown in detail how to upload your shop catalog to RetailGo, how to initial stock of products, how to place orders from your customers and generate bills for them using RetailGo - Sales & Billing App.
How to Set Sales-Tax/Vat based on different categories?
Admin
2 months ago
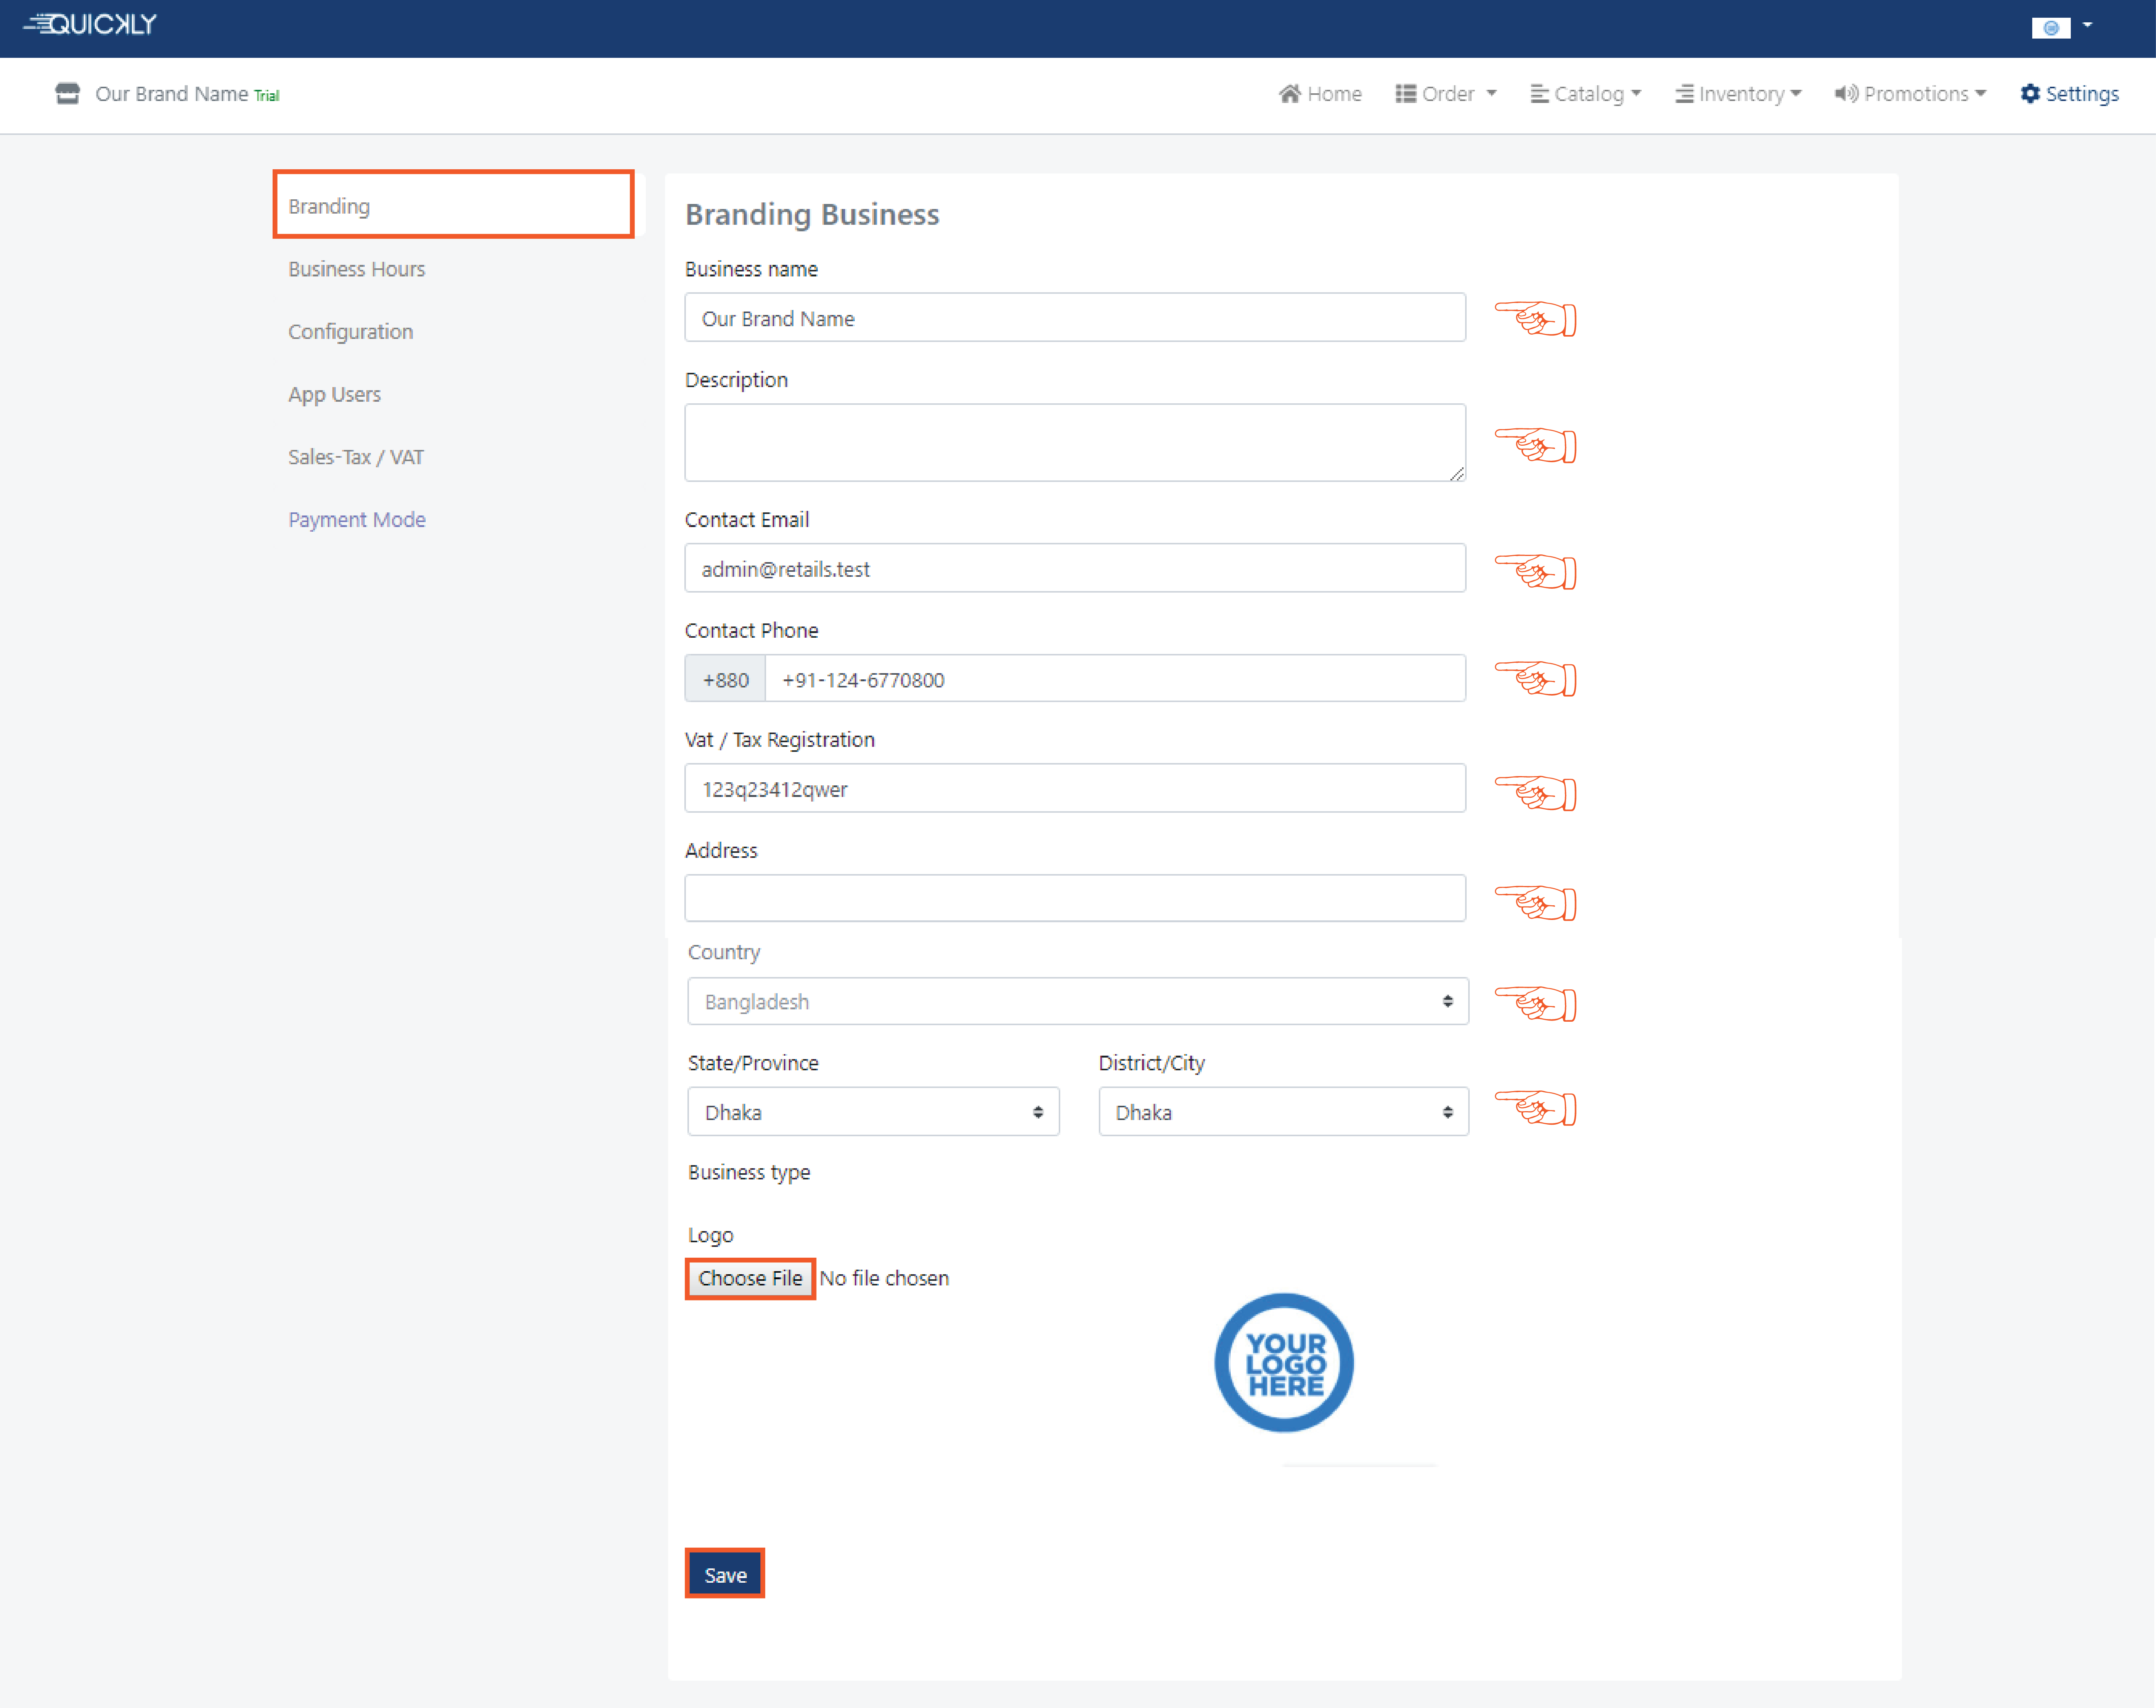
👉 Go to the Settings option of the business portal. In the settings option, you will get some sections like- “branding”, “business hours”, “configuration”, “app users”, “sales tax/vat” and “payment mode”. Fill up these information about your Retail.
👉 In the Branding page, Retail name, email address and phone no is filled up as you sign up on our portal. You can put down some related descriptions and address details if you want but you must specify the country, state/ division, district/ city of your business. You can also upload your Retail's image or logo and click the save button.
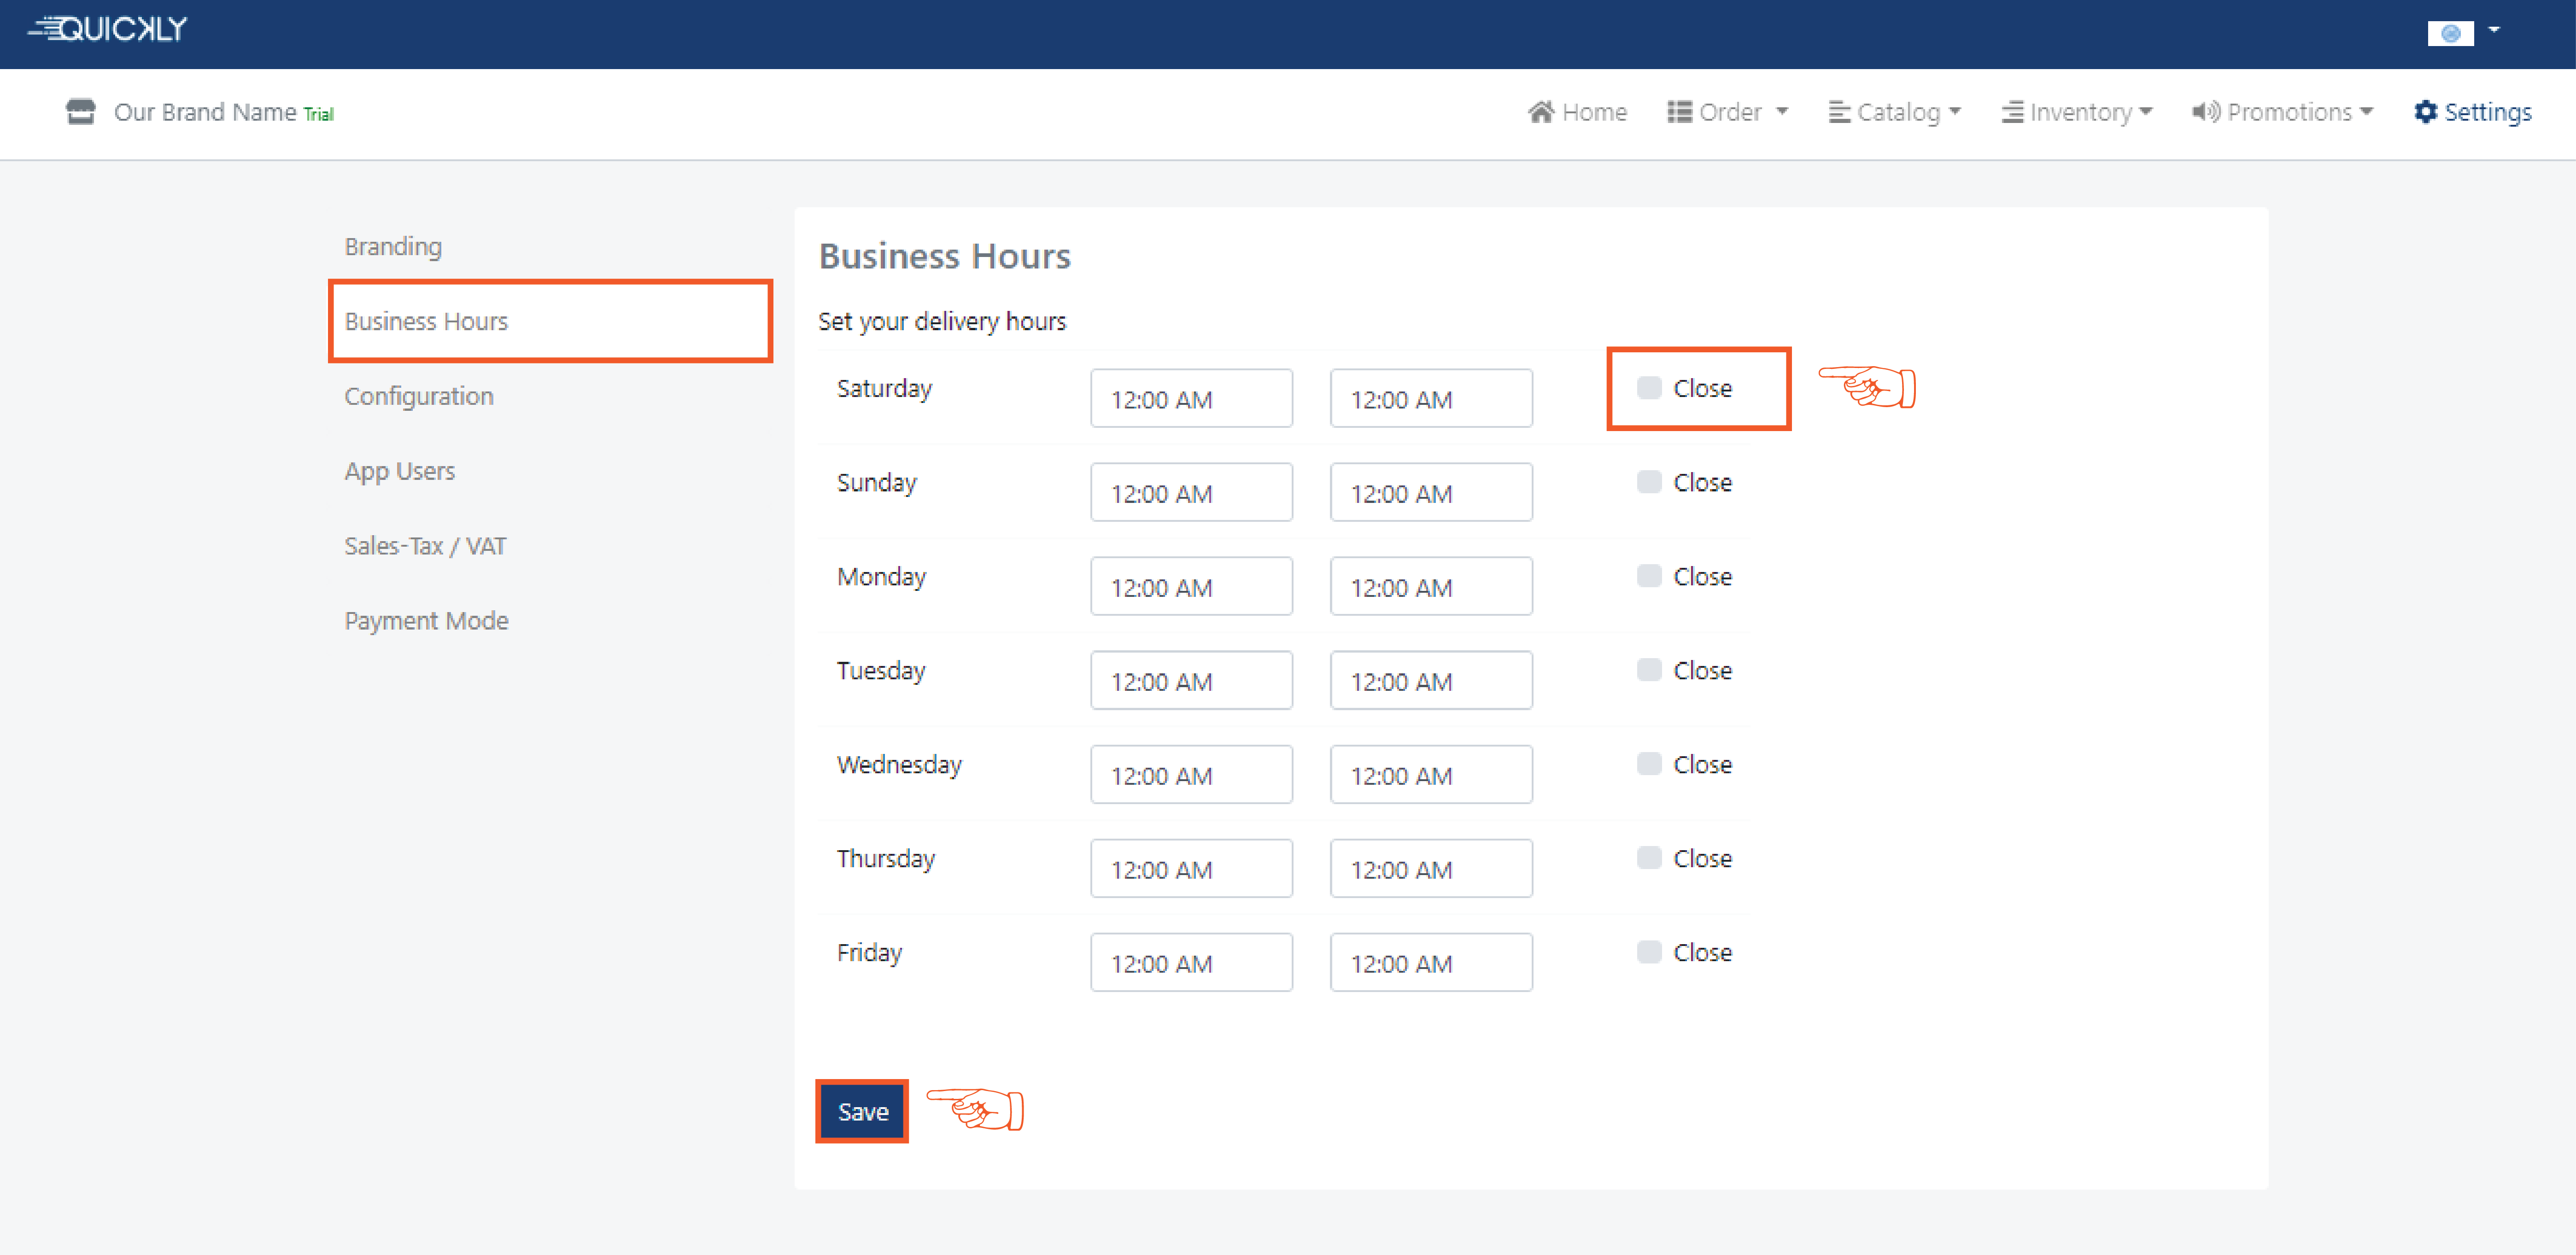
👉 Setting up Business Hours is very important because you will
have your everyday revenue summary according to the business hours.
Just like the staff members you hire, the equipment you buy and
the location you choose, your hours can be an asset or can be
an obstacle for your business.
So, in the business hours page, you have to set up your business
hours according to your business active hours. Tick on the
close button if your business is closed for a certain period
of time and click the save button.
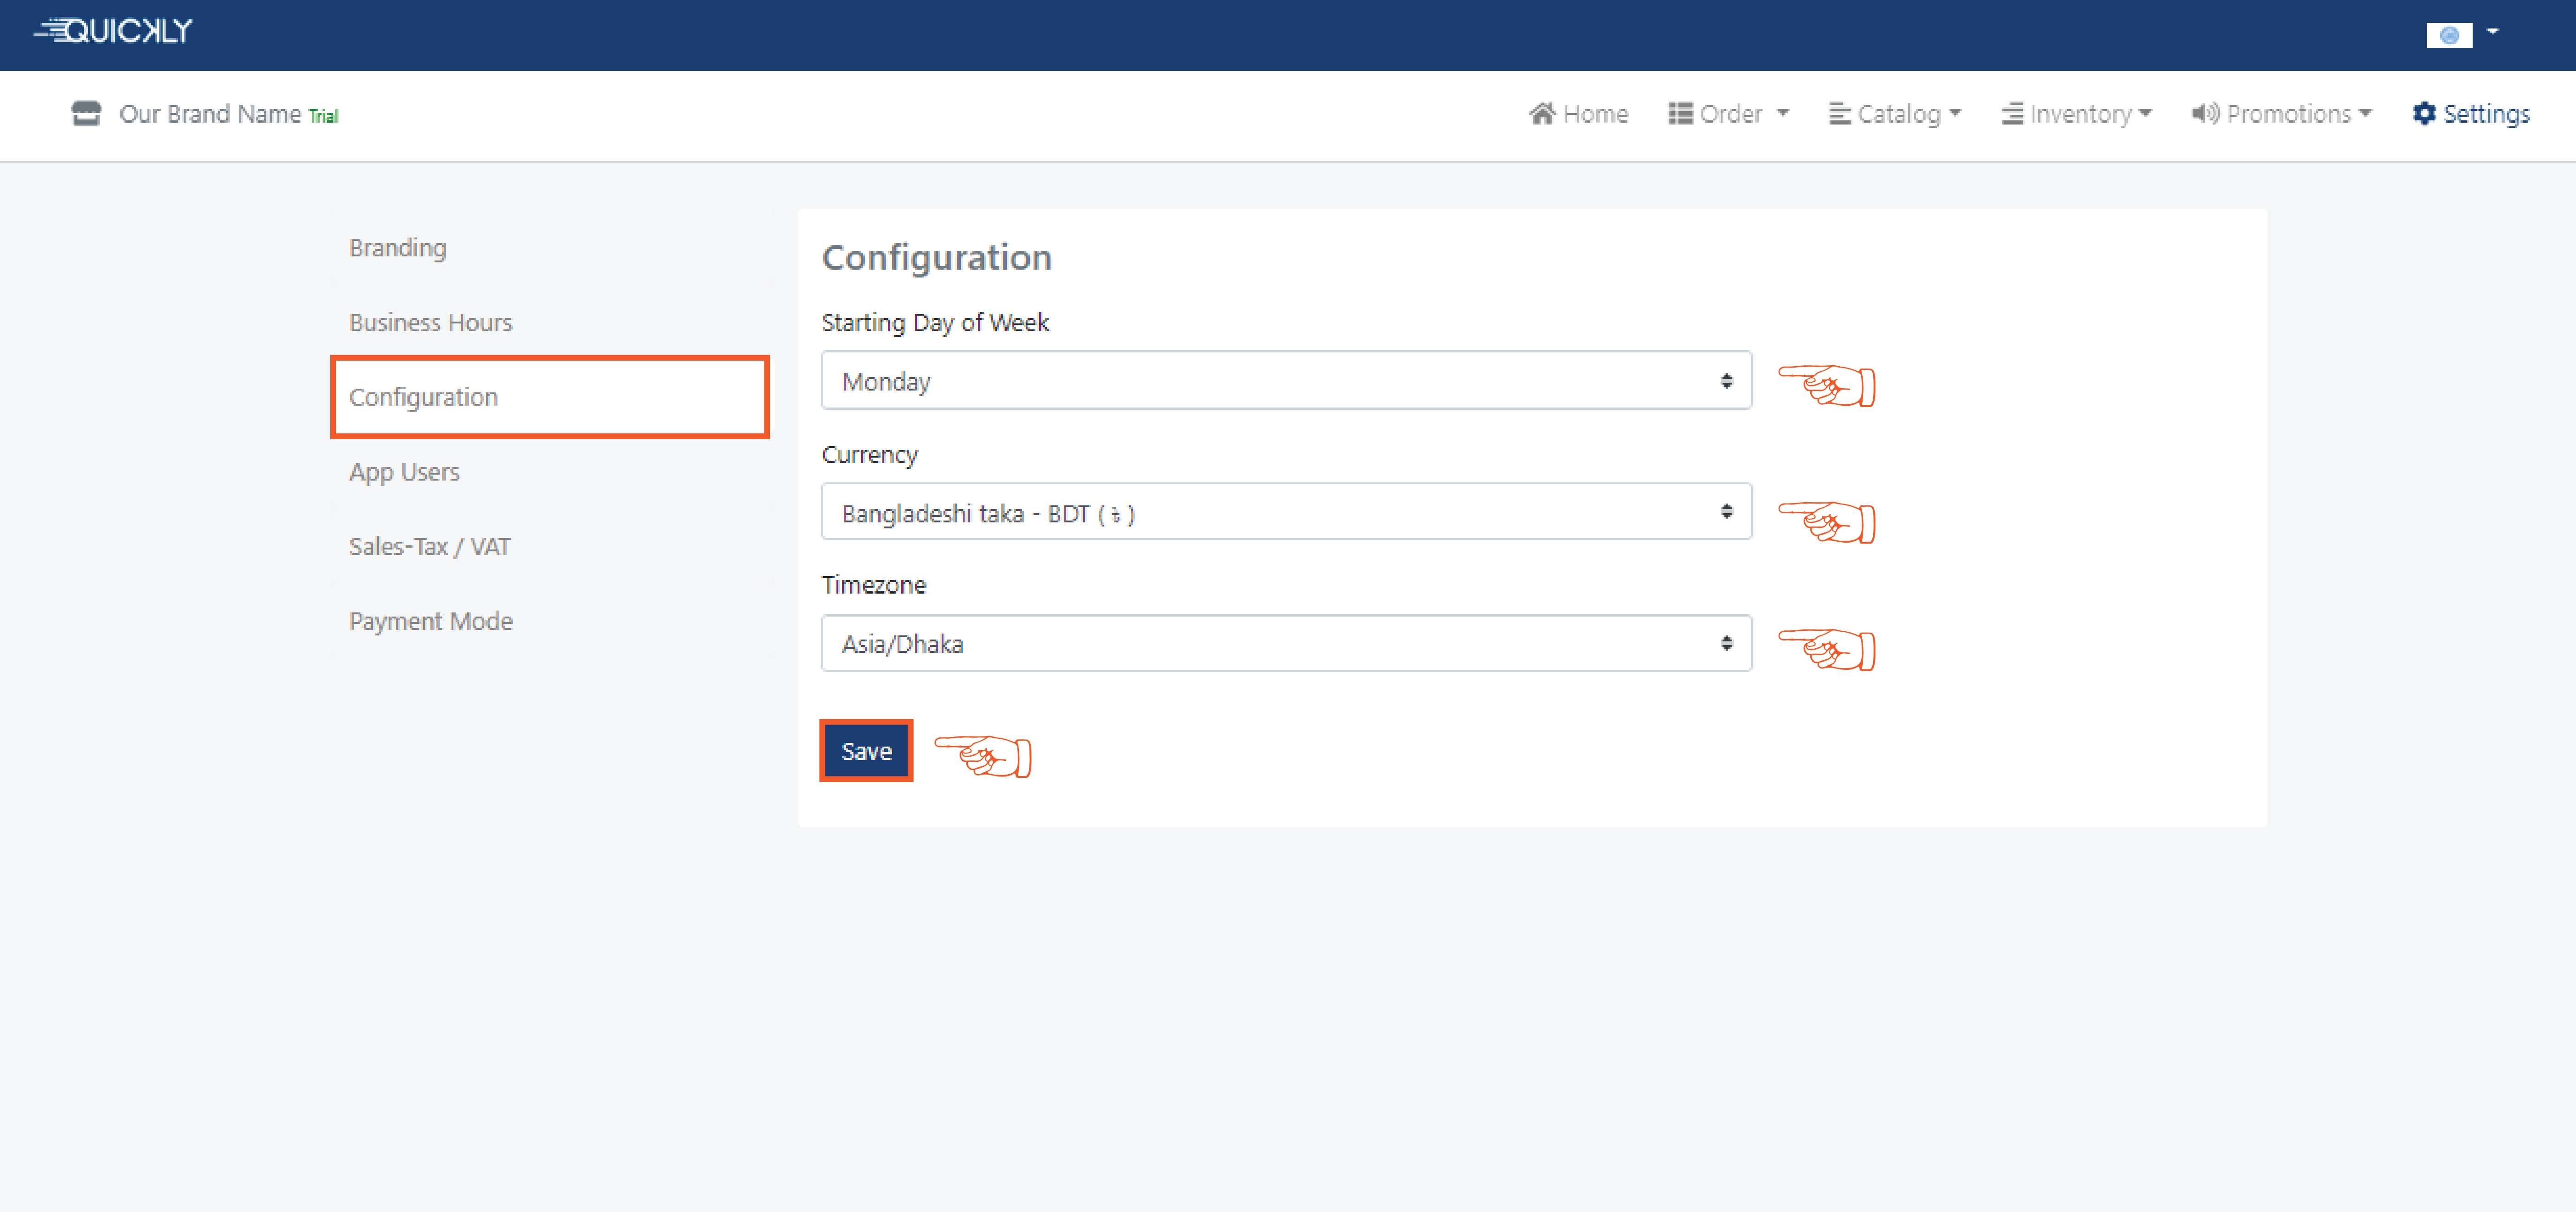
👉 In the Configuration page, you have to select the starting day of the week. Then you can set currency from any of the given Four - BDT, EUR, USD or INR. You can also set your timezone based on your location.
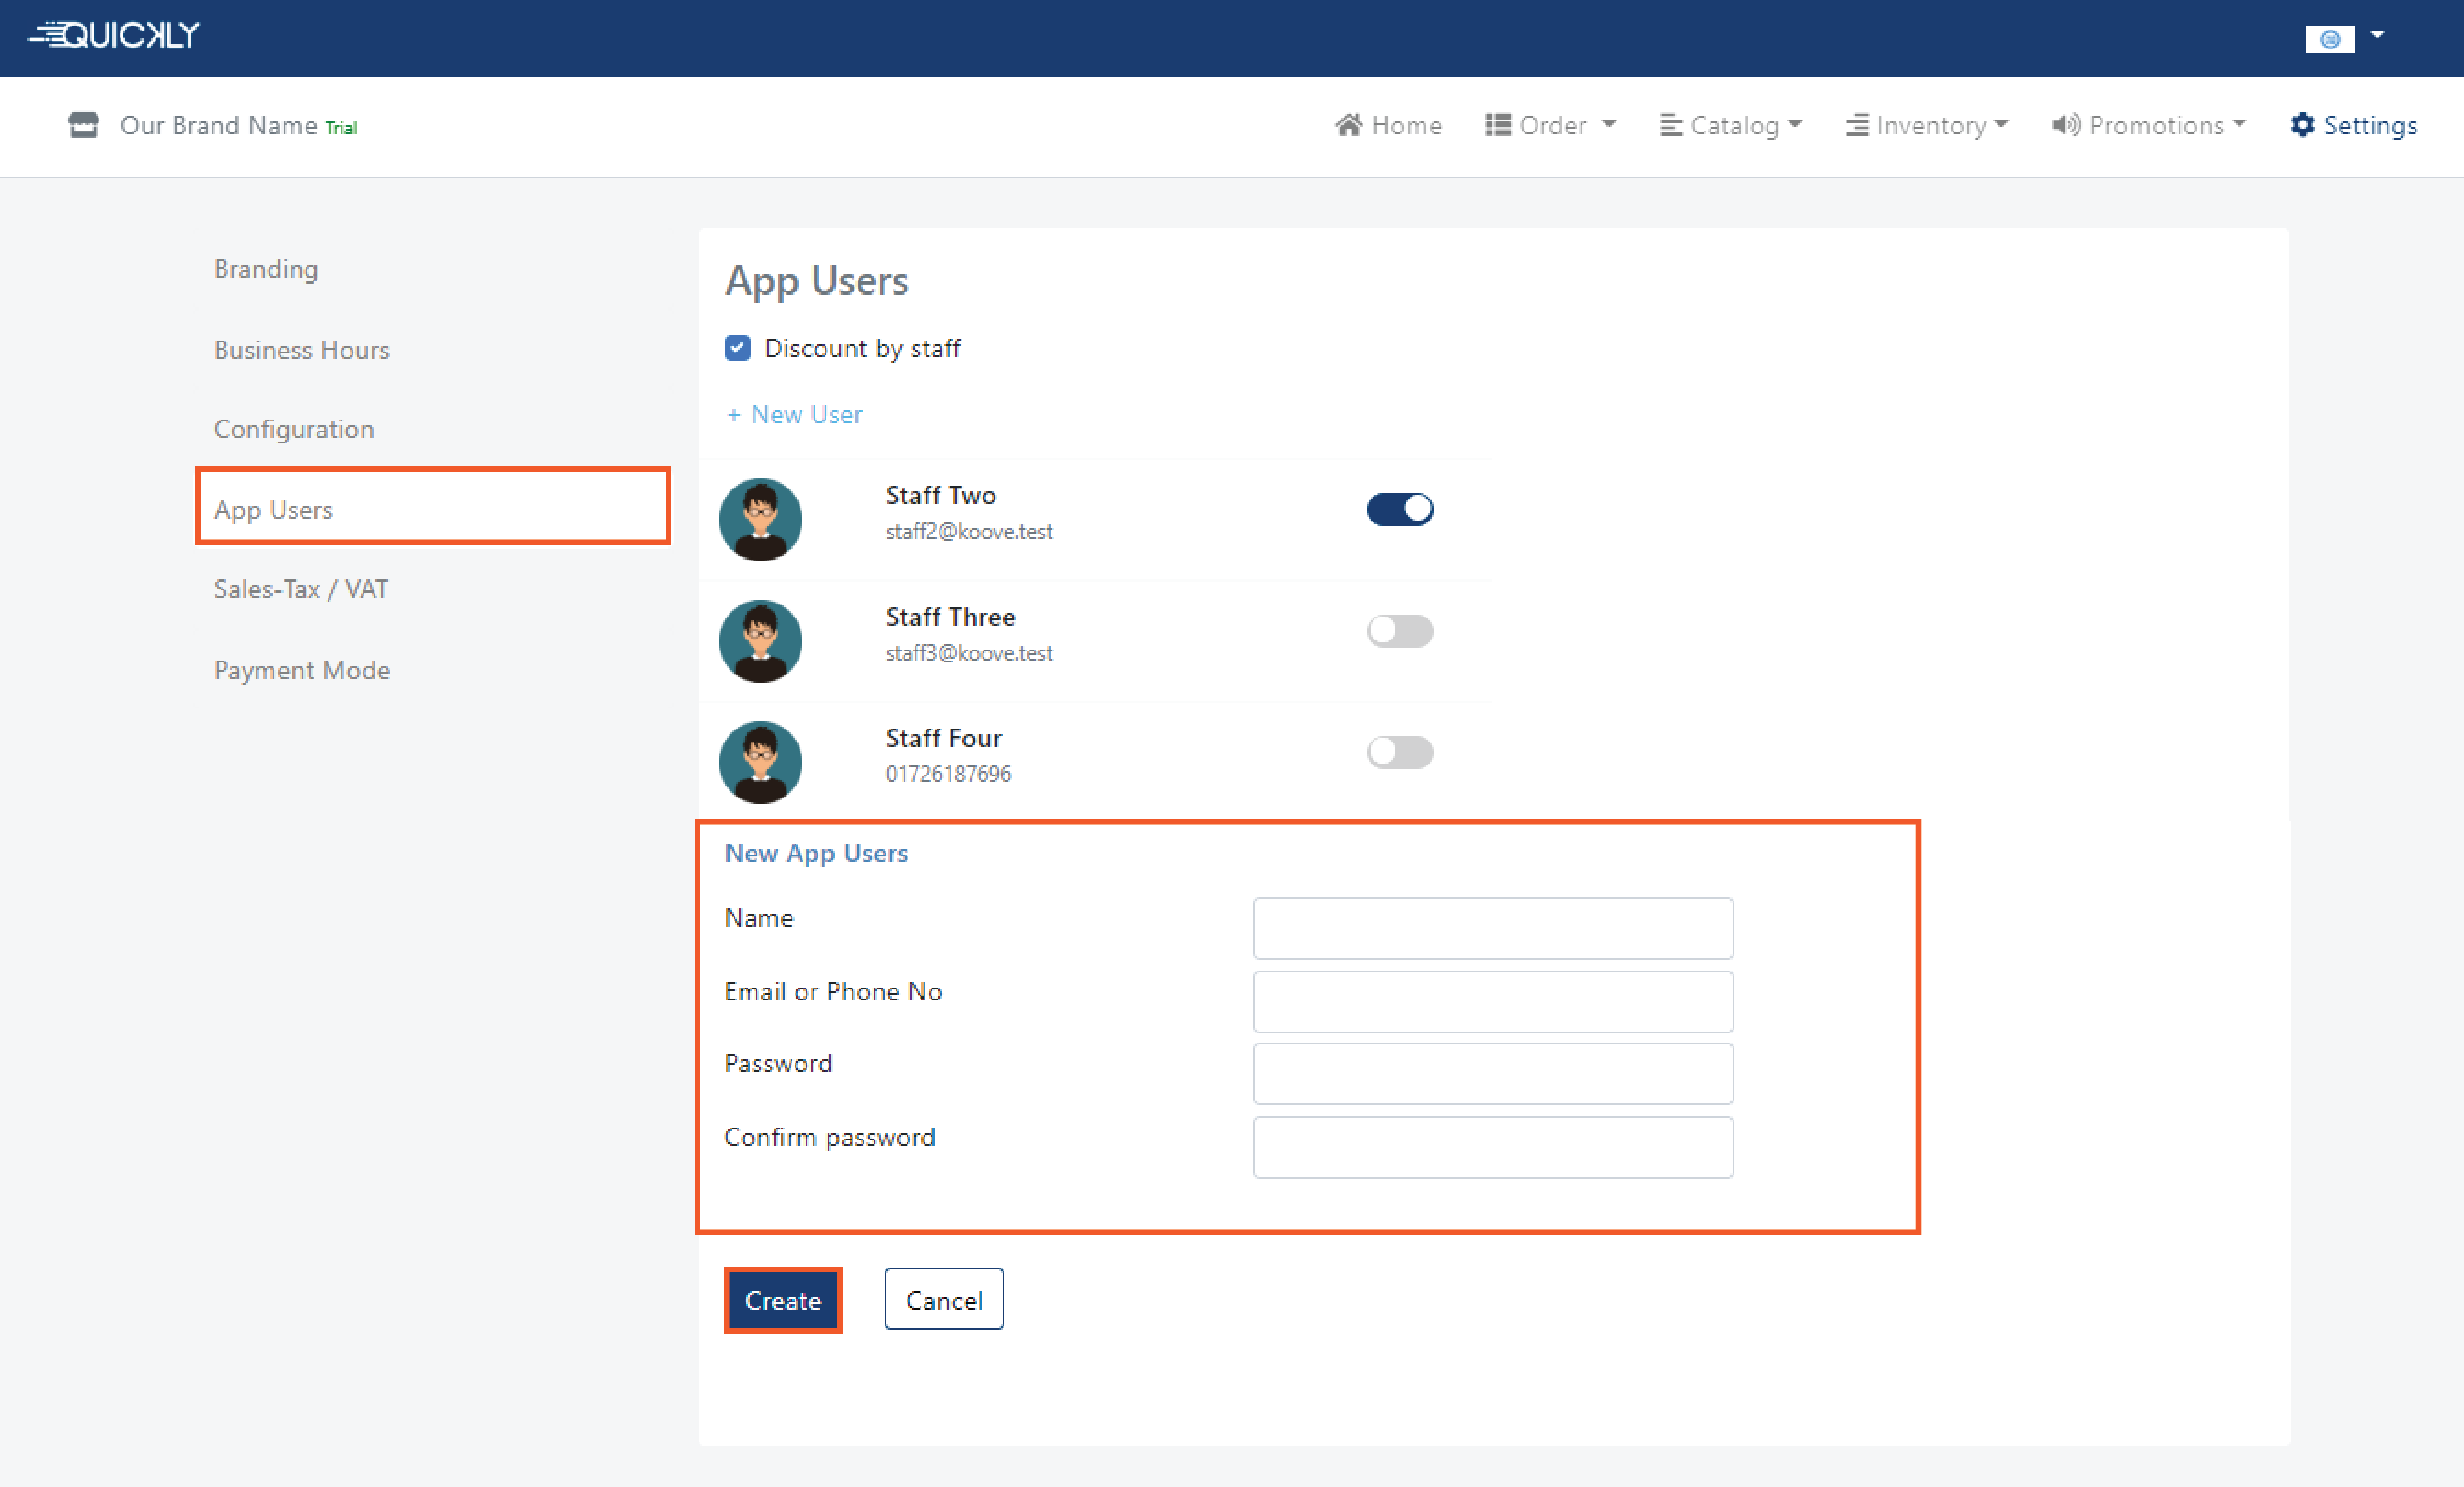
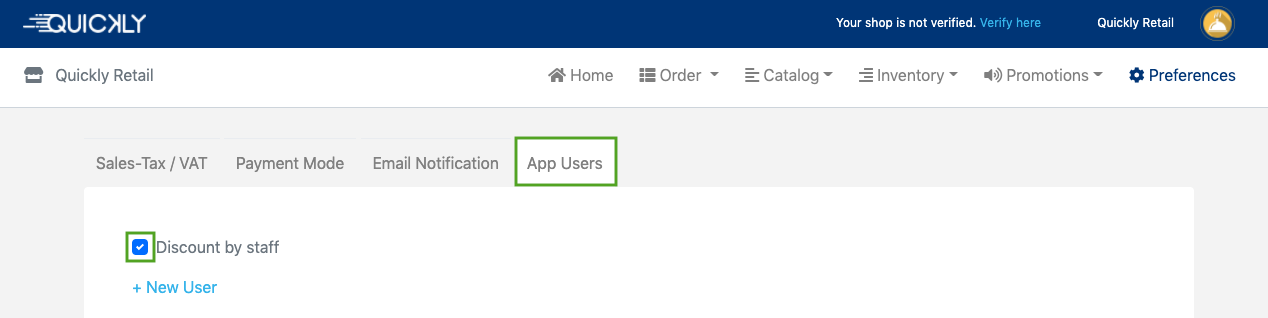
👉 You can give access to the mobile app to your staff(s) for placing
orders and to generate bills. To activate this feature, you'll find a
+New User button in the app users page, if you click this button you'll
find a form. Fill up the form to create an app user.
Discount by staff option gives your staff access to give discounts to
any of your preferred customers, only if you turn the option on in
the portal. Discount will be applied if your staff member(s) click
on the “apply discount” in the app. After clicking on this button
a pop-up window will appear and your staff member needs to fill up
the amount as he wants and click the apply button.
You can switch on or off the option anytime you want.
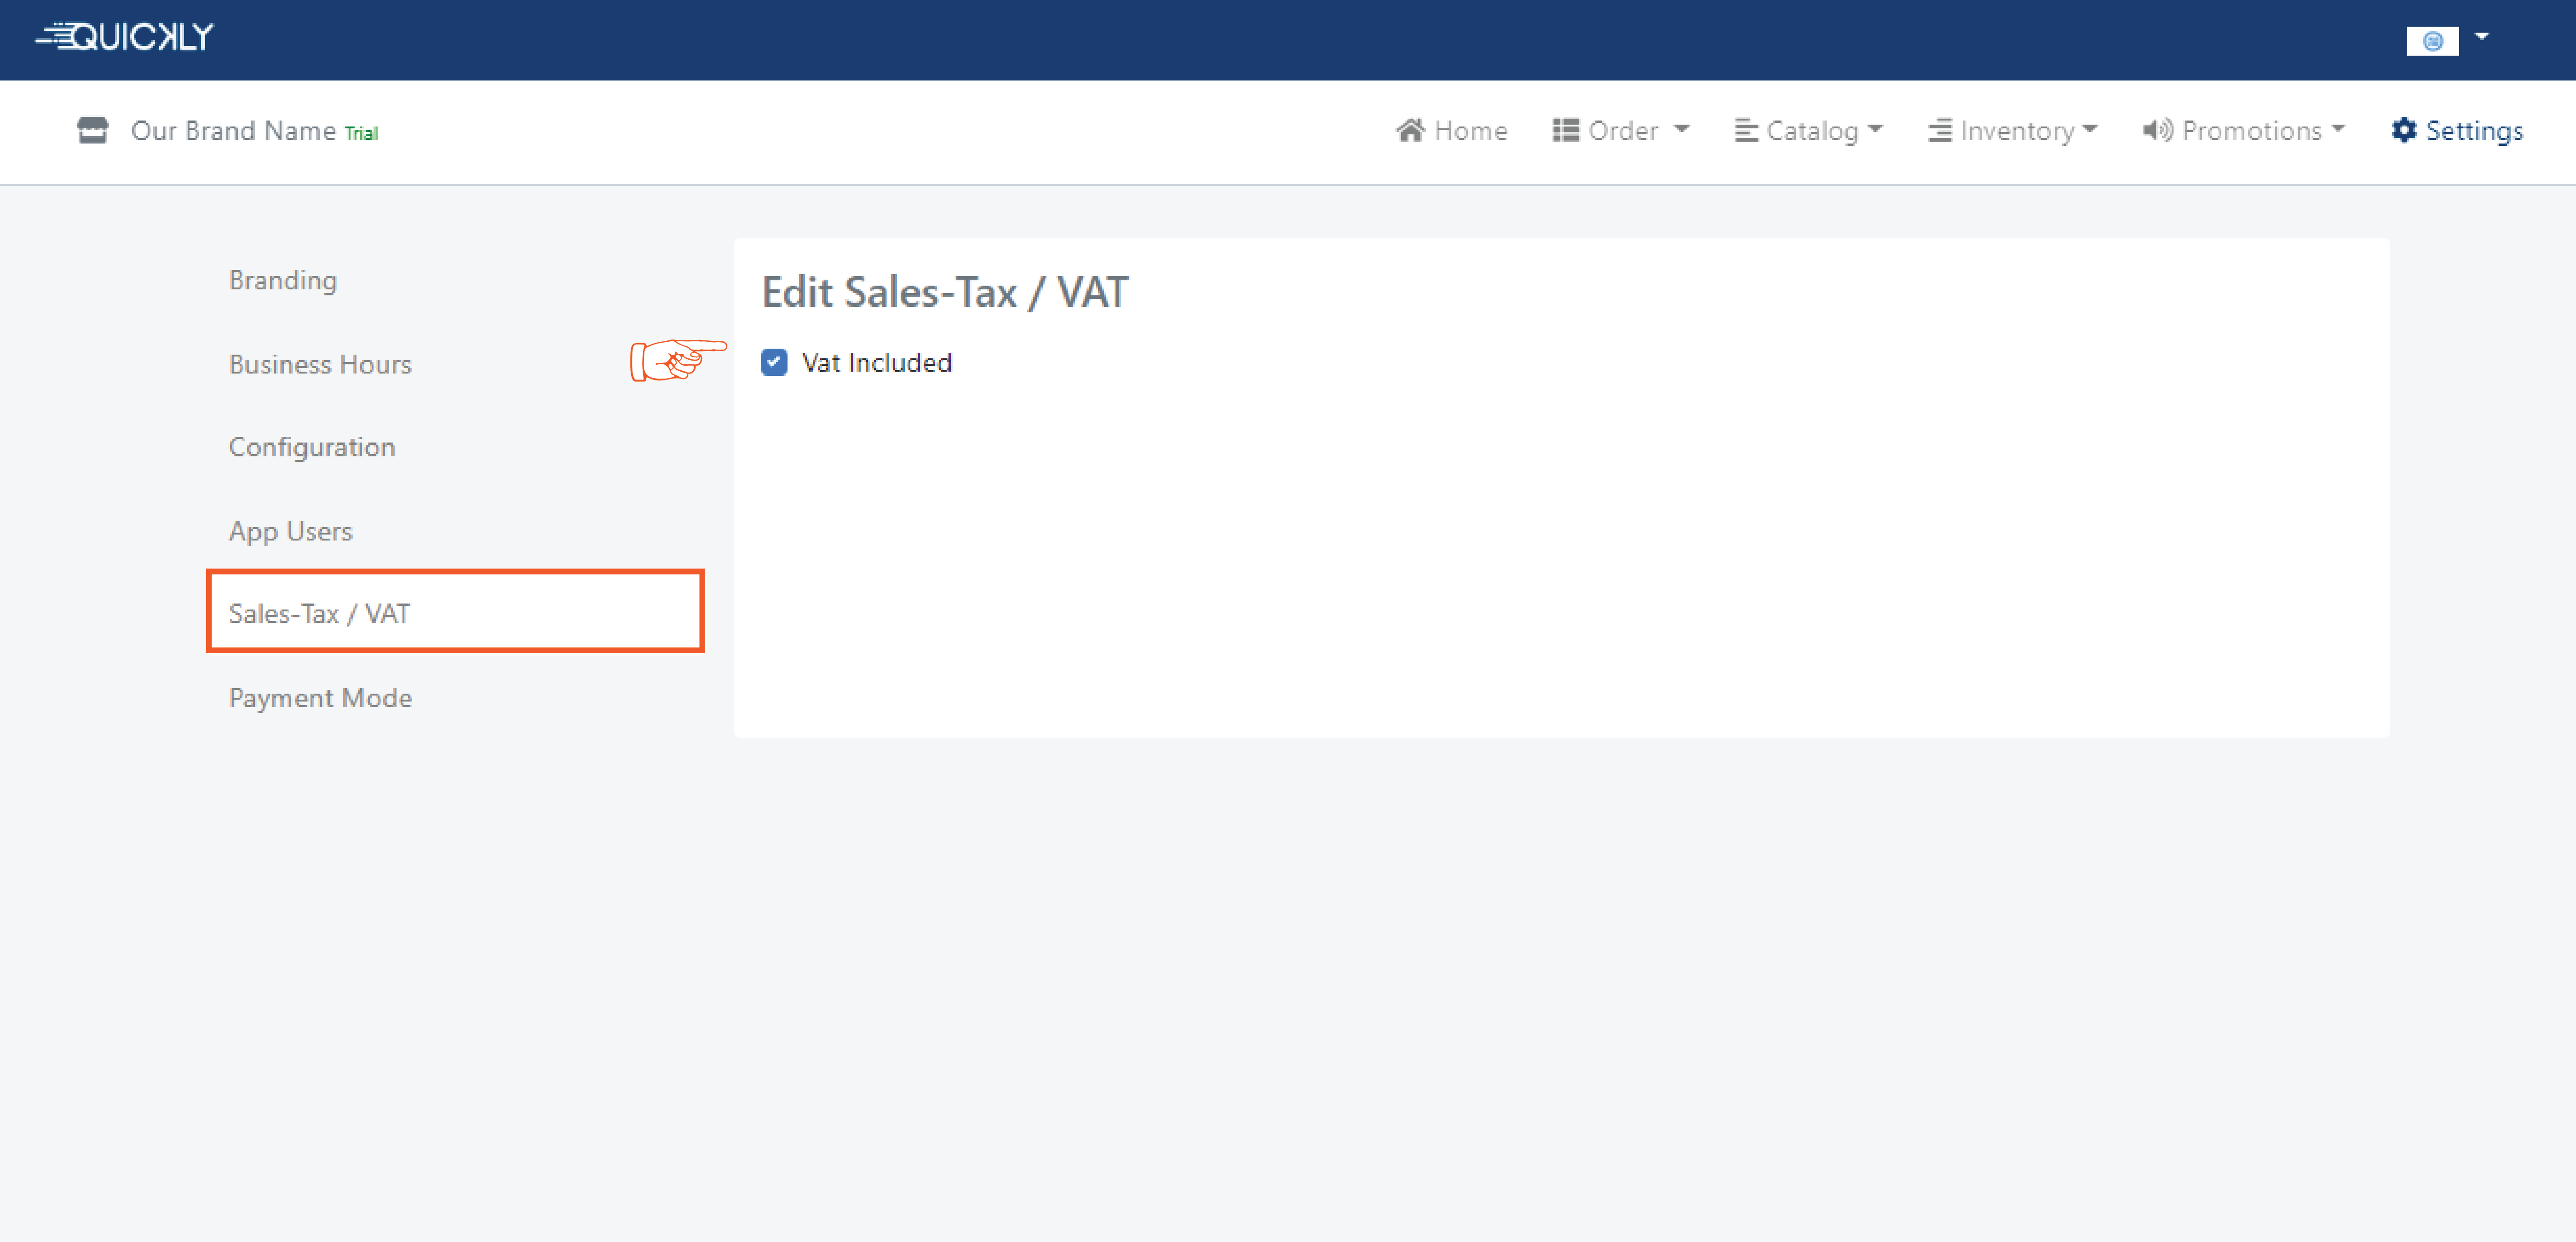
👉 In the Sales-Tax/Vat Page, a list of categories will appear where you
can add/edit sales-tax/vat as you want and click the save button.
If you check the category from the business portal, the vat of that
category will be applicable in the app.
Vats for different foods can be different and so, you can set tax according
to each category (i.e tax of set menu can be 10% but tax of beverage
can be 0%). By clicking in the checkbox you can active or inactive the
vat in your products. If you check on the vat included button, it means
that vat is included in the price you have given and will show vat included
in the bill for all of your products.
For example, when you set 20% sales-tax/VAT for ‘Xiaomi’ in the portal,
it will automatically be applied in the app.
Related Video Support
How to upload catalog, take orders & generate bills
In this video, we have shown in detail how to upload your shop catalog to RetailGo, how to initial stock of products, how to place orders from your customers and generate bills for them using RetailGo - Sales & Billing App.
How to Set multiple Payment Modes?
Admin
2 months ago
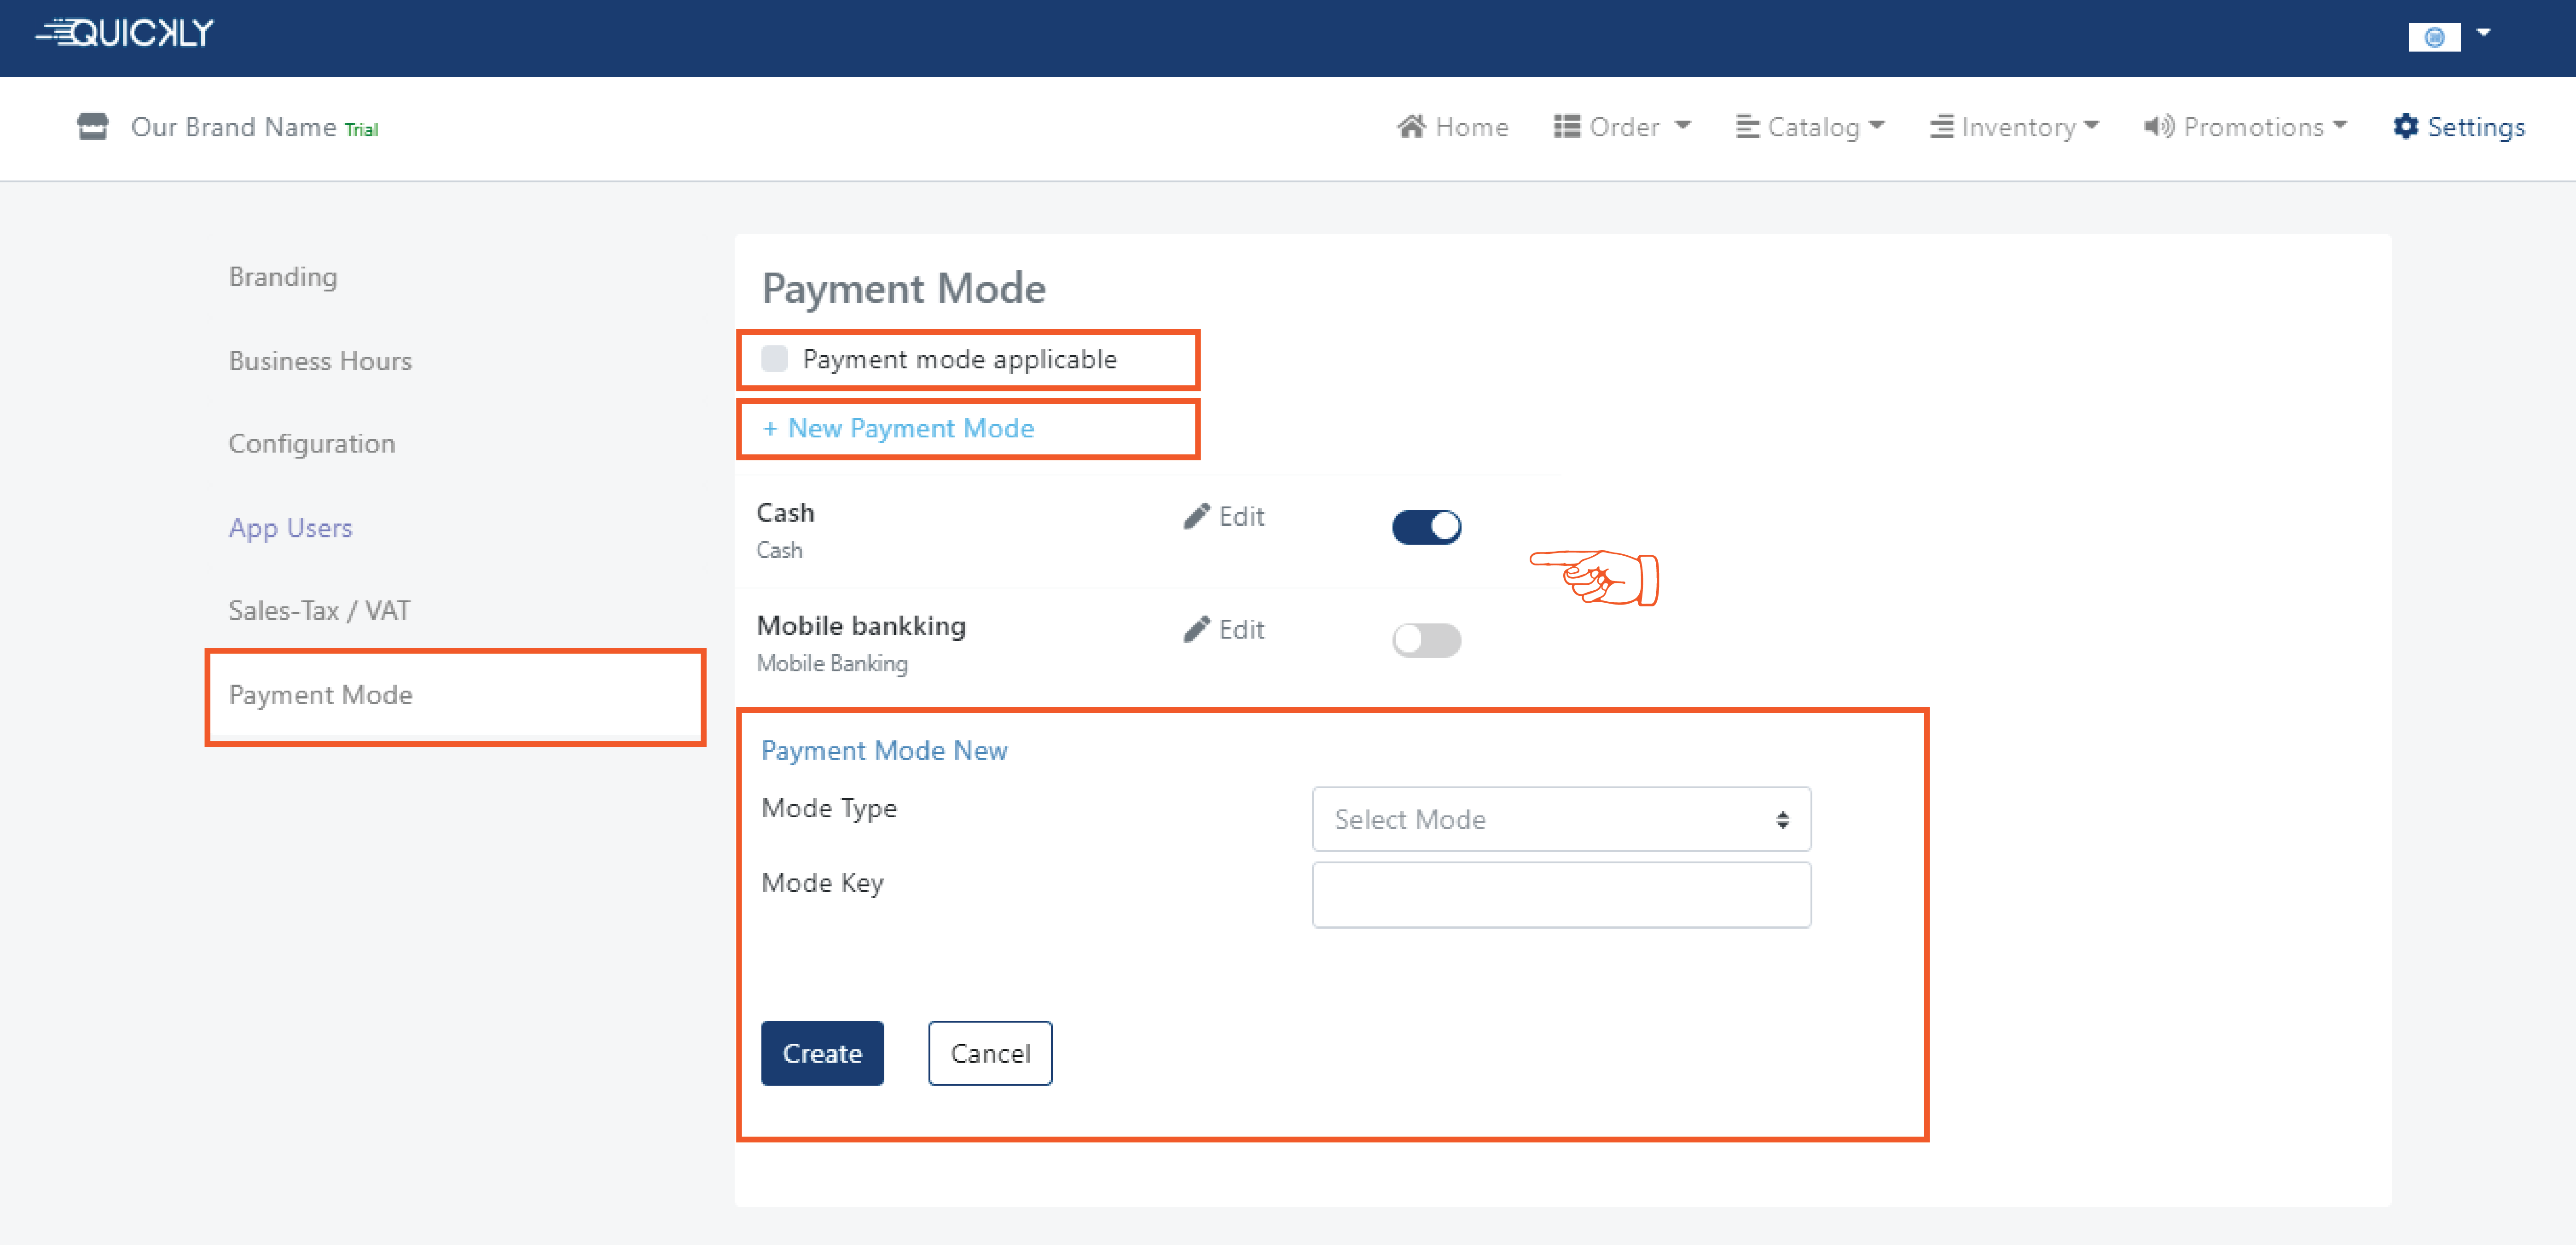
👉 In the Payment Mode page, you can create different payment modes to
provide flexibility and convenience to your customers while they are making
payment. Click on +New Payment mode button and simply select the mode
type (i.e mobile banking) and write down the mode key (i.e bkash) and
click the save button. You can activate/deactivate each payment mode
whenever you want to.
Payments made with active payment mode will be shown in the app and
inactive mode payments will not be shown in the app.
If you want to see the payment mode option in the app then you have
to click the Payment Mode Applicable checkbox. If you don’t want to
see the payment mode option in the app then you should uncheck the
checkbox.
Related Video Support
How to upload catalog, take orders & generate bills
In this video, we have shown in detail how to upload your shop catalog to RetailGo, how to initial stock of products, how to place orders from your customers and generate bills for them using RetailGo - Sales & Billing App.
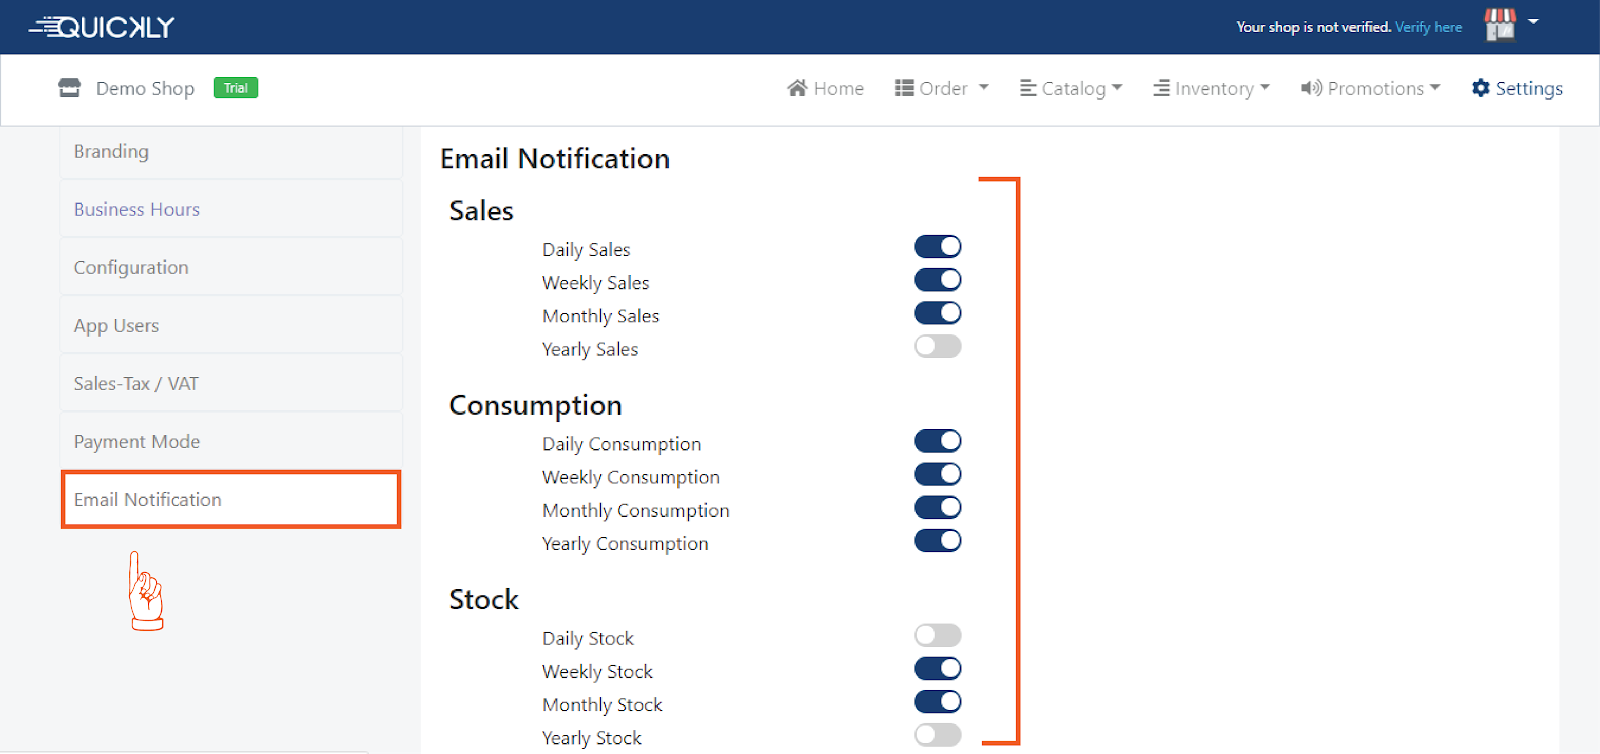
Set up your preferences to get notified by email about your Sales Report
Admin
2 months ago
👉 To help you trace your business’s data in a more convenient way we will send you the daily, weekly and/or monthly stock, consumption and/or sales reports to your mailbox. Simply go to the email notification page and select the reports you want to get via email.
Related Video Support
How to upload catalog, take orders & generate bills
In this video, we have shown in detail how to upload your shop catalog to RetailGo, how to initial stock of products, how to place orders from your customers and generate bills for them using RetailGo - Sales & Billing App.
How to enable instant discount on App?
Admin
2 months ago
Discount by staff option gives your staff access to give discounts to any
of your preferred customers, only if you turn the option on in the portal.
Discount will be applied if your staff member(s) click on the “apply
discount”
in the app. After clicking on this button a pop-up window will appear and
your staff
member needs to fill up the amount as he wants and click the apply button.
You can switch on or off the option anytime you want.
Related Video Support
How to upload catalog, take orders & generate bills
In this video, we have shown in detail how to upload your shop catalog to RetailGo, how to initial stock of products, how to place orders from your customers and generate bills for them using RetailGo - Sales & Billing App.
Sales & Billing App
Admin
2 months ago
You will need a smartphone or tablet to use the Quickly Sales & Billing app. No need to be a tech person to use this app. Simply install the app on your device and use the credentials authorised at your business portal to explore this app.
Related Video Support
How to upload catalog, take orders & generate bills
In this video, we have shown in detail how to upload your shop catalog to RetailGo, how to initial stock of products, how to place orders from your customers and generate bills for them using RetailGo - Sales & Billing App.
How to Download and install the Sales & Billing App?
Admin
2 months ago
👉 You can simply download the RetailGo app from the Play Store and install it on your mobile phone or tablet to manage the order placing process of your restaurant.
Related Video Support
How to upload catalog, take orders & generate bills
In this video, we have shown in detail how to upload your shop catalog to RetailGo, how to initial stock of products, how to place orders from your customers and generate bills for them using RetailGo - Sales & Billing App.
How to use RetailGo App?
Admin
2 months ago
👉 Quickly app is embedded with a merchant portal. You can use a
merchant portal to organize your Retail Business. You can also add and
customize your catalog the way you like from your merchant portal so
that you can easily take orders by using an app. As the name of the app
is Quickly retail, it helps our customers with managing their very own
retails more quickly and more sophisticatedly.
To take orders from the app, earlier you have to set up a catalog in the
portal. After downloading the RetailGo App from the play store.
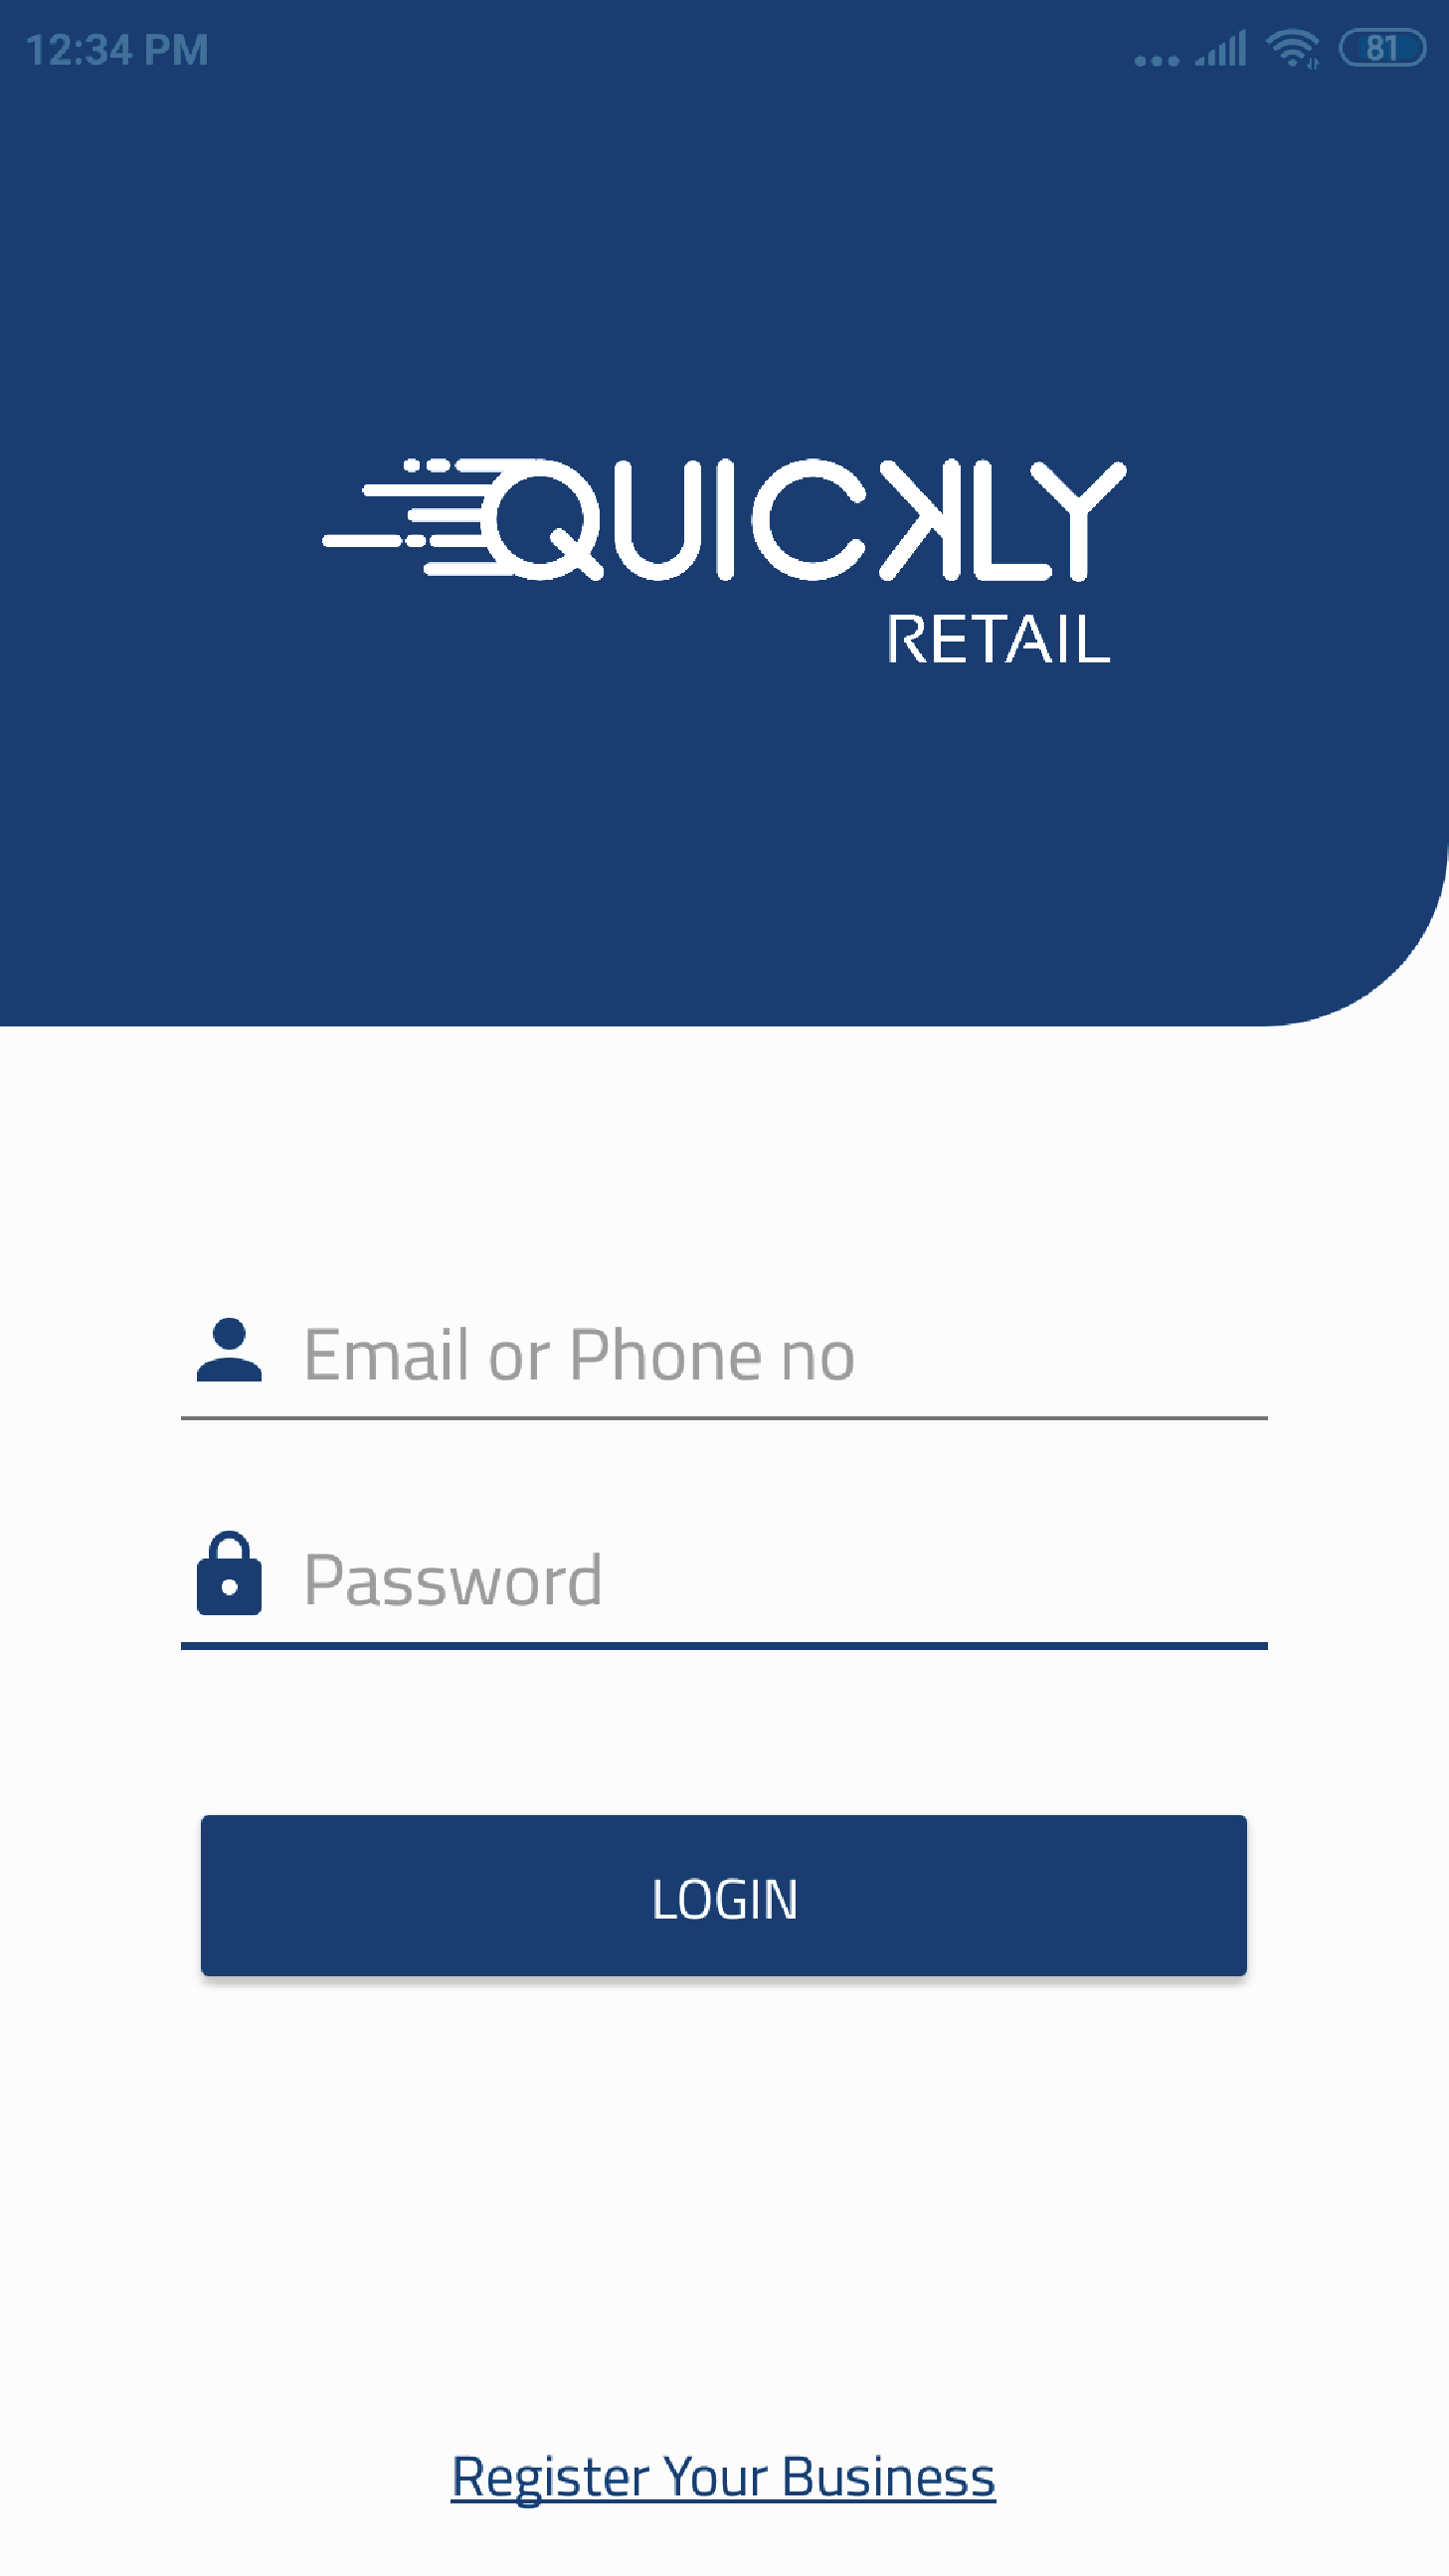
First you have to login in the RetailGo app. You can login using
your email address/phone no and password or the created app users
email and password.
Related Video Support
How to upload catalog, take orders & generate bills
In this video, we have shown in detail how to upload your shop catalog to RetailGo, how to initial stock of products, how to place orders from your customers and generate bills for them using RetailGo - Sales & Billing App.
How to place a new order?
Admin
2 months ago
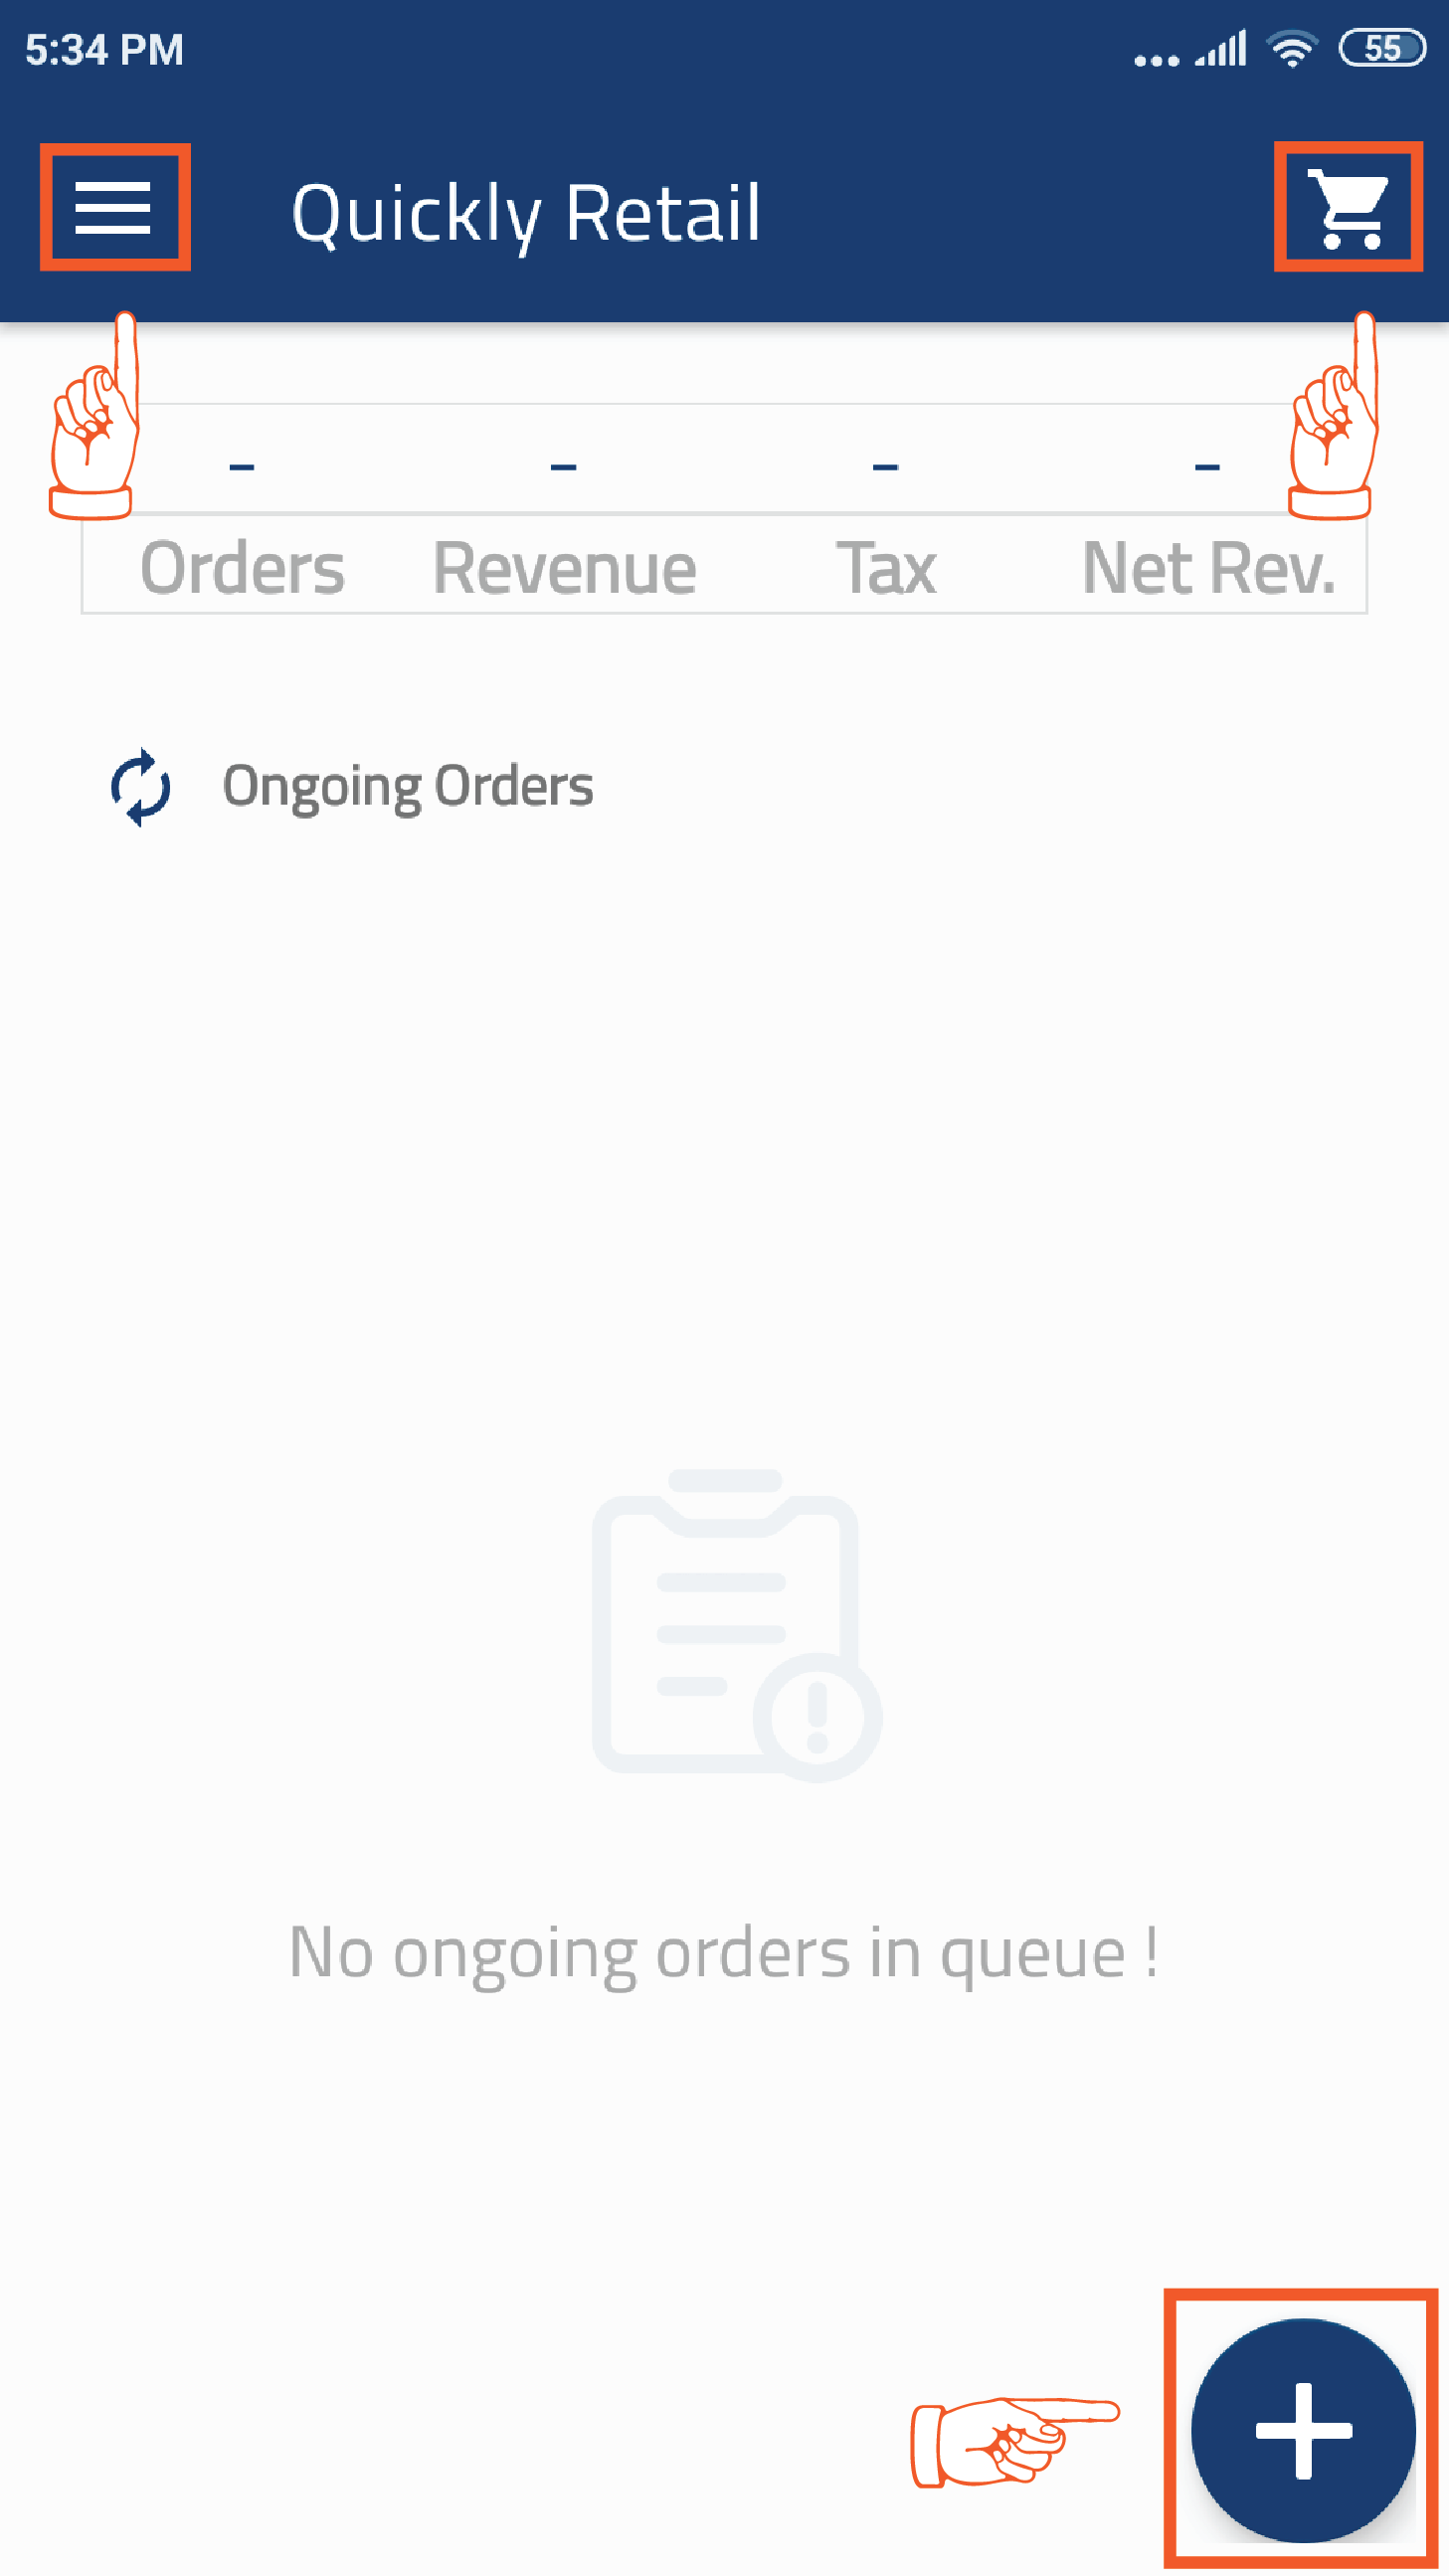
👉 After logging in quickly, the retail app. You get an ongoing orders screen there will show the ongoing order if there remain any ongoing orders also shows a blue plus button, on the top left shows a sidebar and on the top right shows ‘check shop icon’.
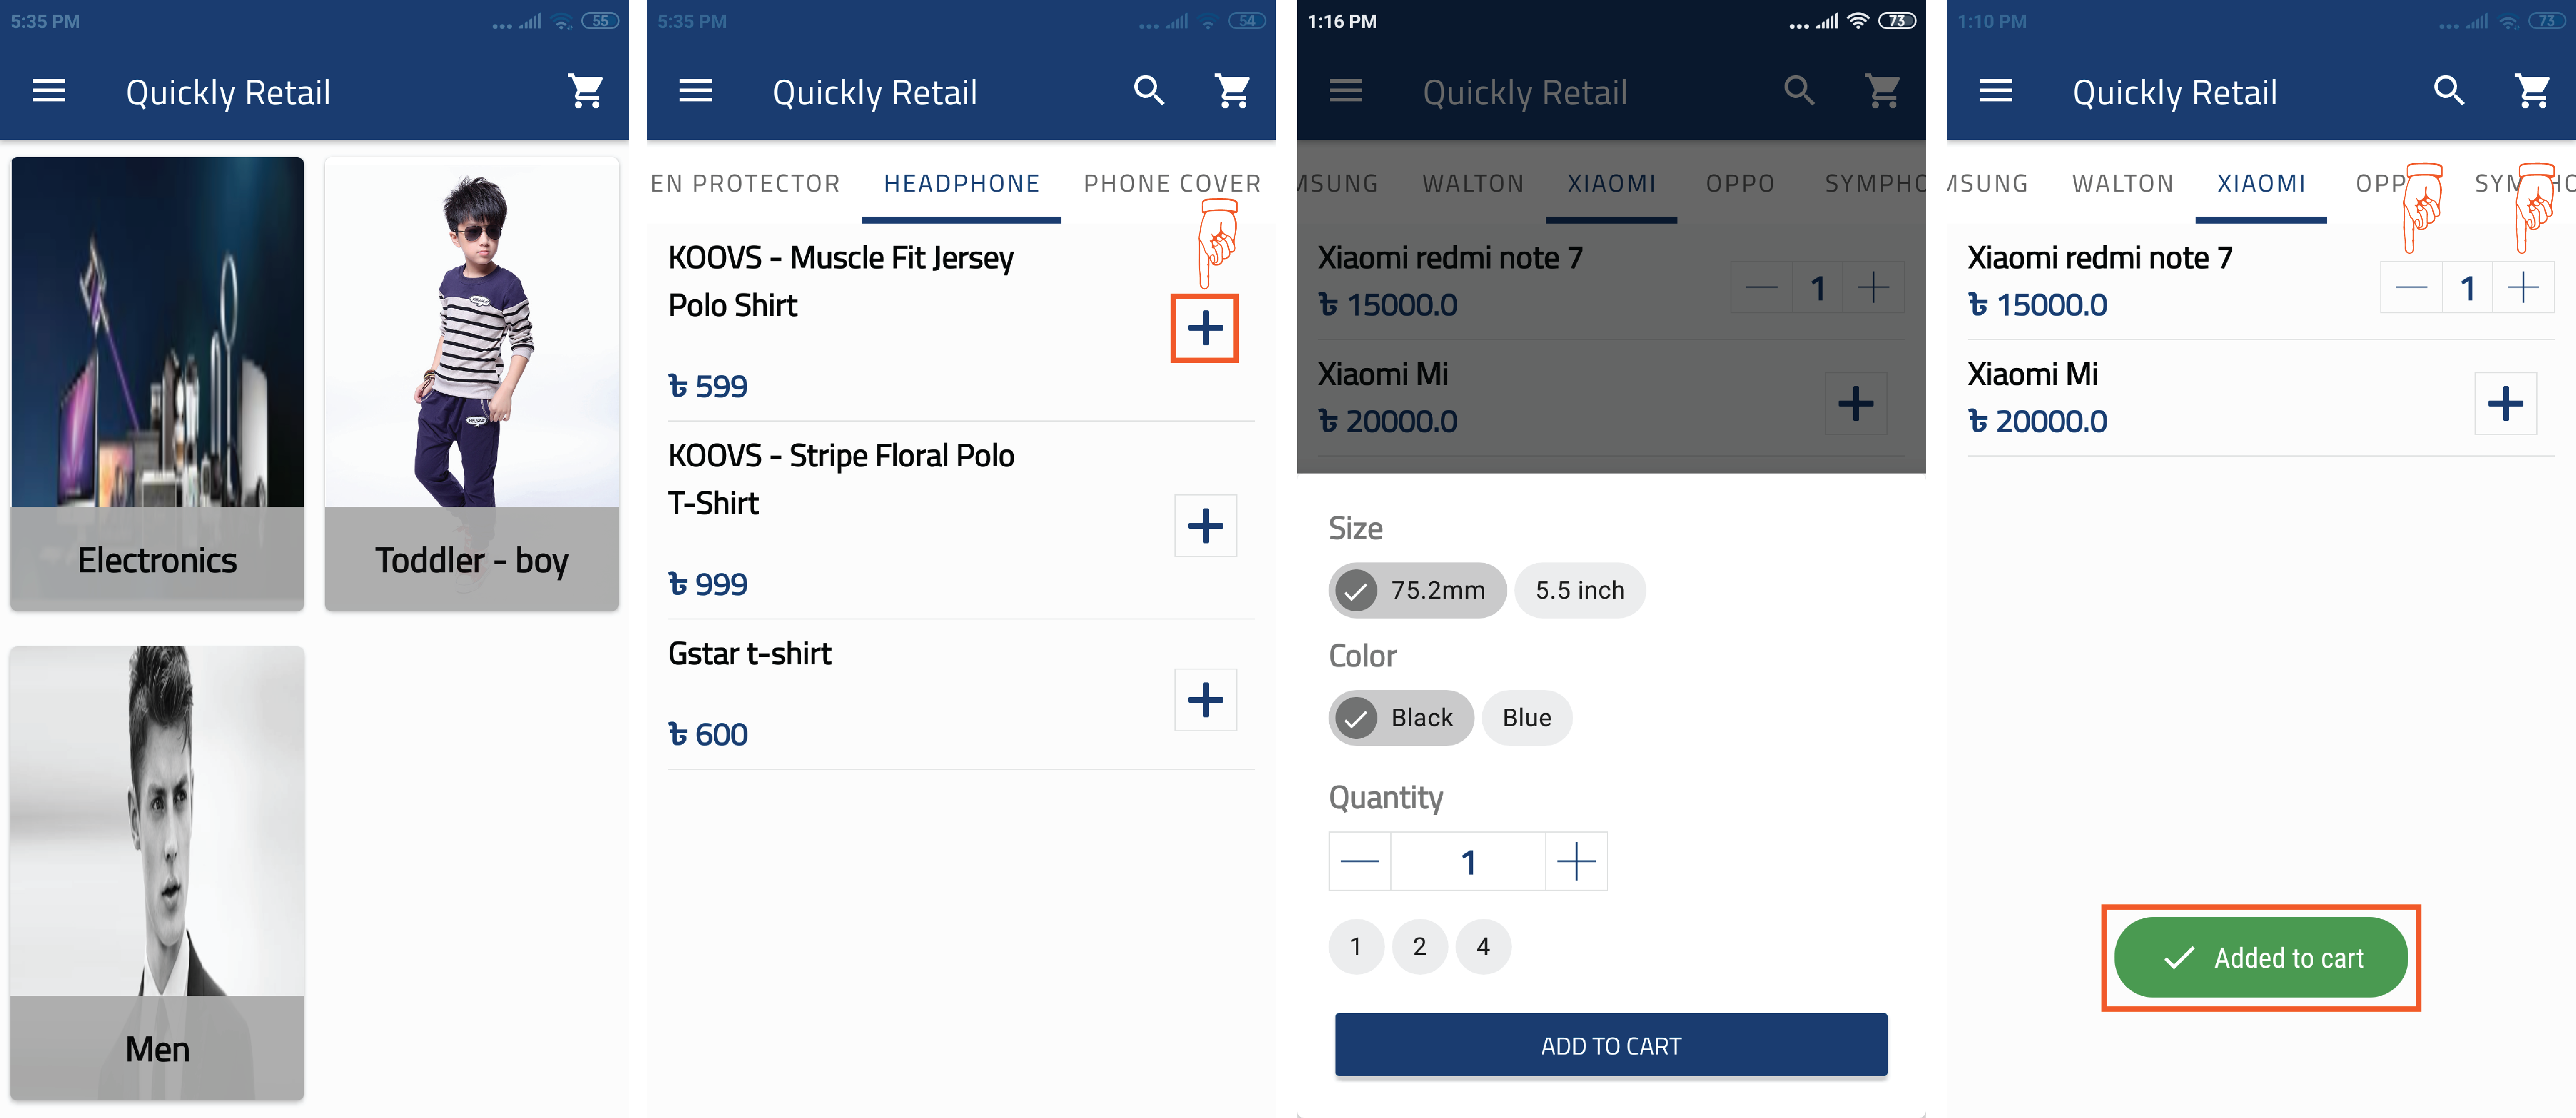
👉 After navigating the blue plus button from the homepage, a list of
sections
'Electronics’ and ‘Men’ will appear.
For example, you can choose the ‘Electronics’ section. After clicking on the
‘electronics’ section, in the catalog it’ll show different types of products
under category. You can click on the (+) plus button of ‘Xiaomi redmi note
7’
from the catalog, a pop-up window will create because ‘Xiaomi redmi note 7’
has two different sizes and colors. After choosing the 72.5mm size and black
color of the product and click the ‘Add to cart’ button then your order will
be added on the cart. After adding products in the cart, the app will show
an
alert message that says, “Added to cart”. You can easily increase or
decrease
the quantity of the products. You can add products by clicking on the
plus(+)
button and also subtract products by clicking on the minus(-) button.
Related Video Support
How to upload catalog, take orders & generate bills
In this video, we have shown in detail how to upload your shop catalog to RetailGo, how to initial stock of products, how to place orders from your customers and generate bills for them using RetailGo - Sales & Billing App.
How to search any product from the app?
Admin
2 months ago
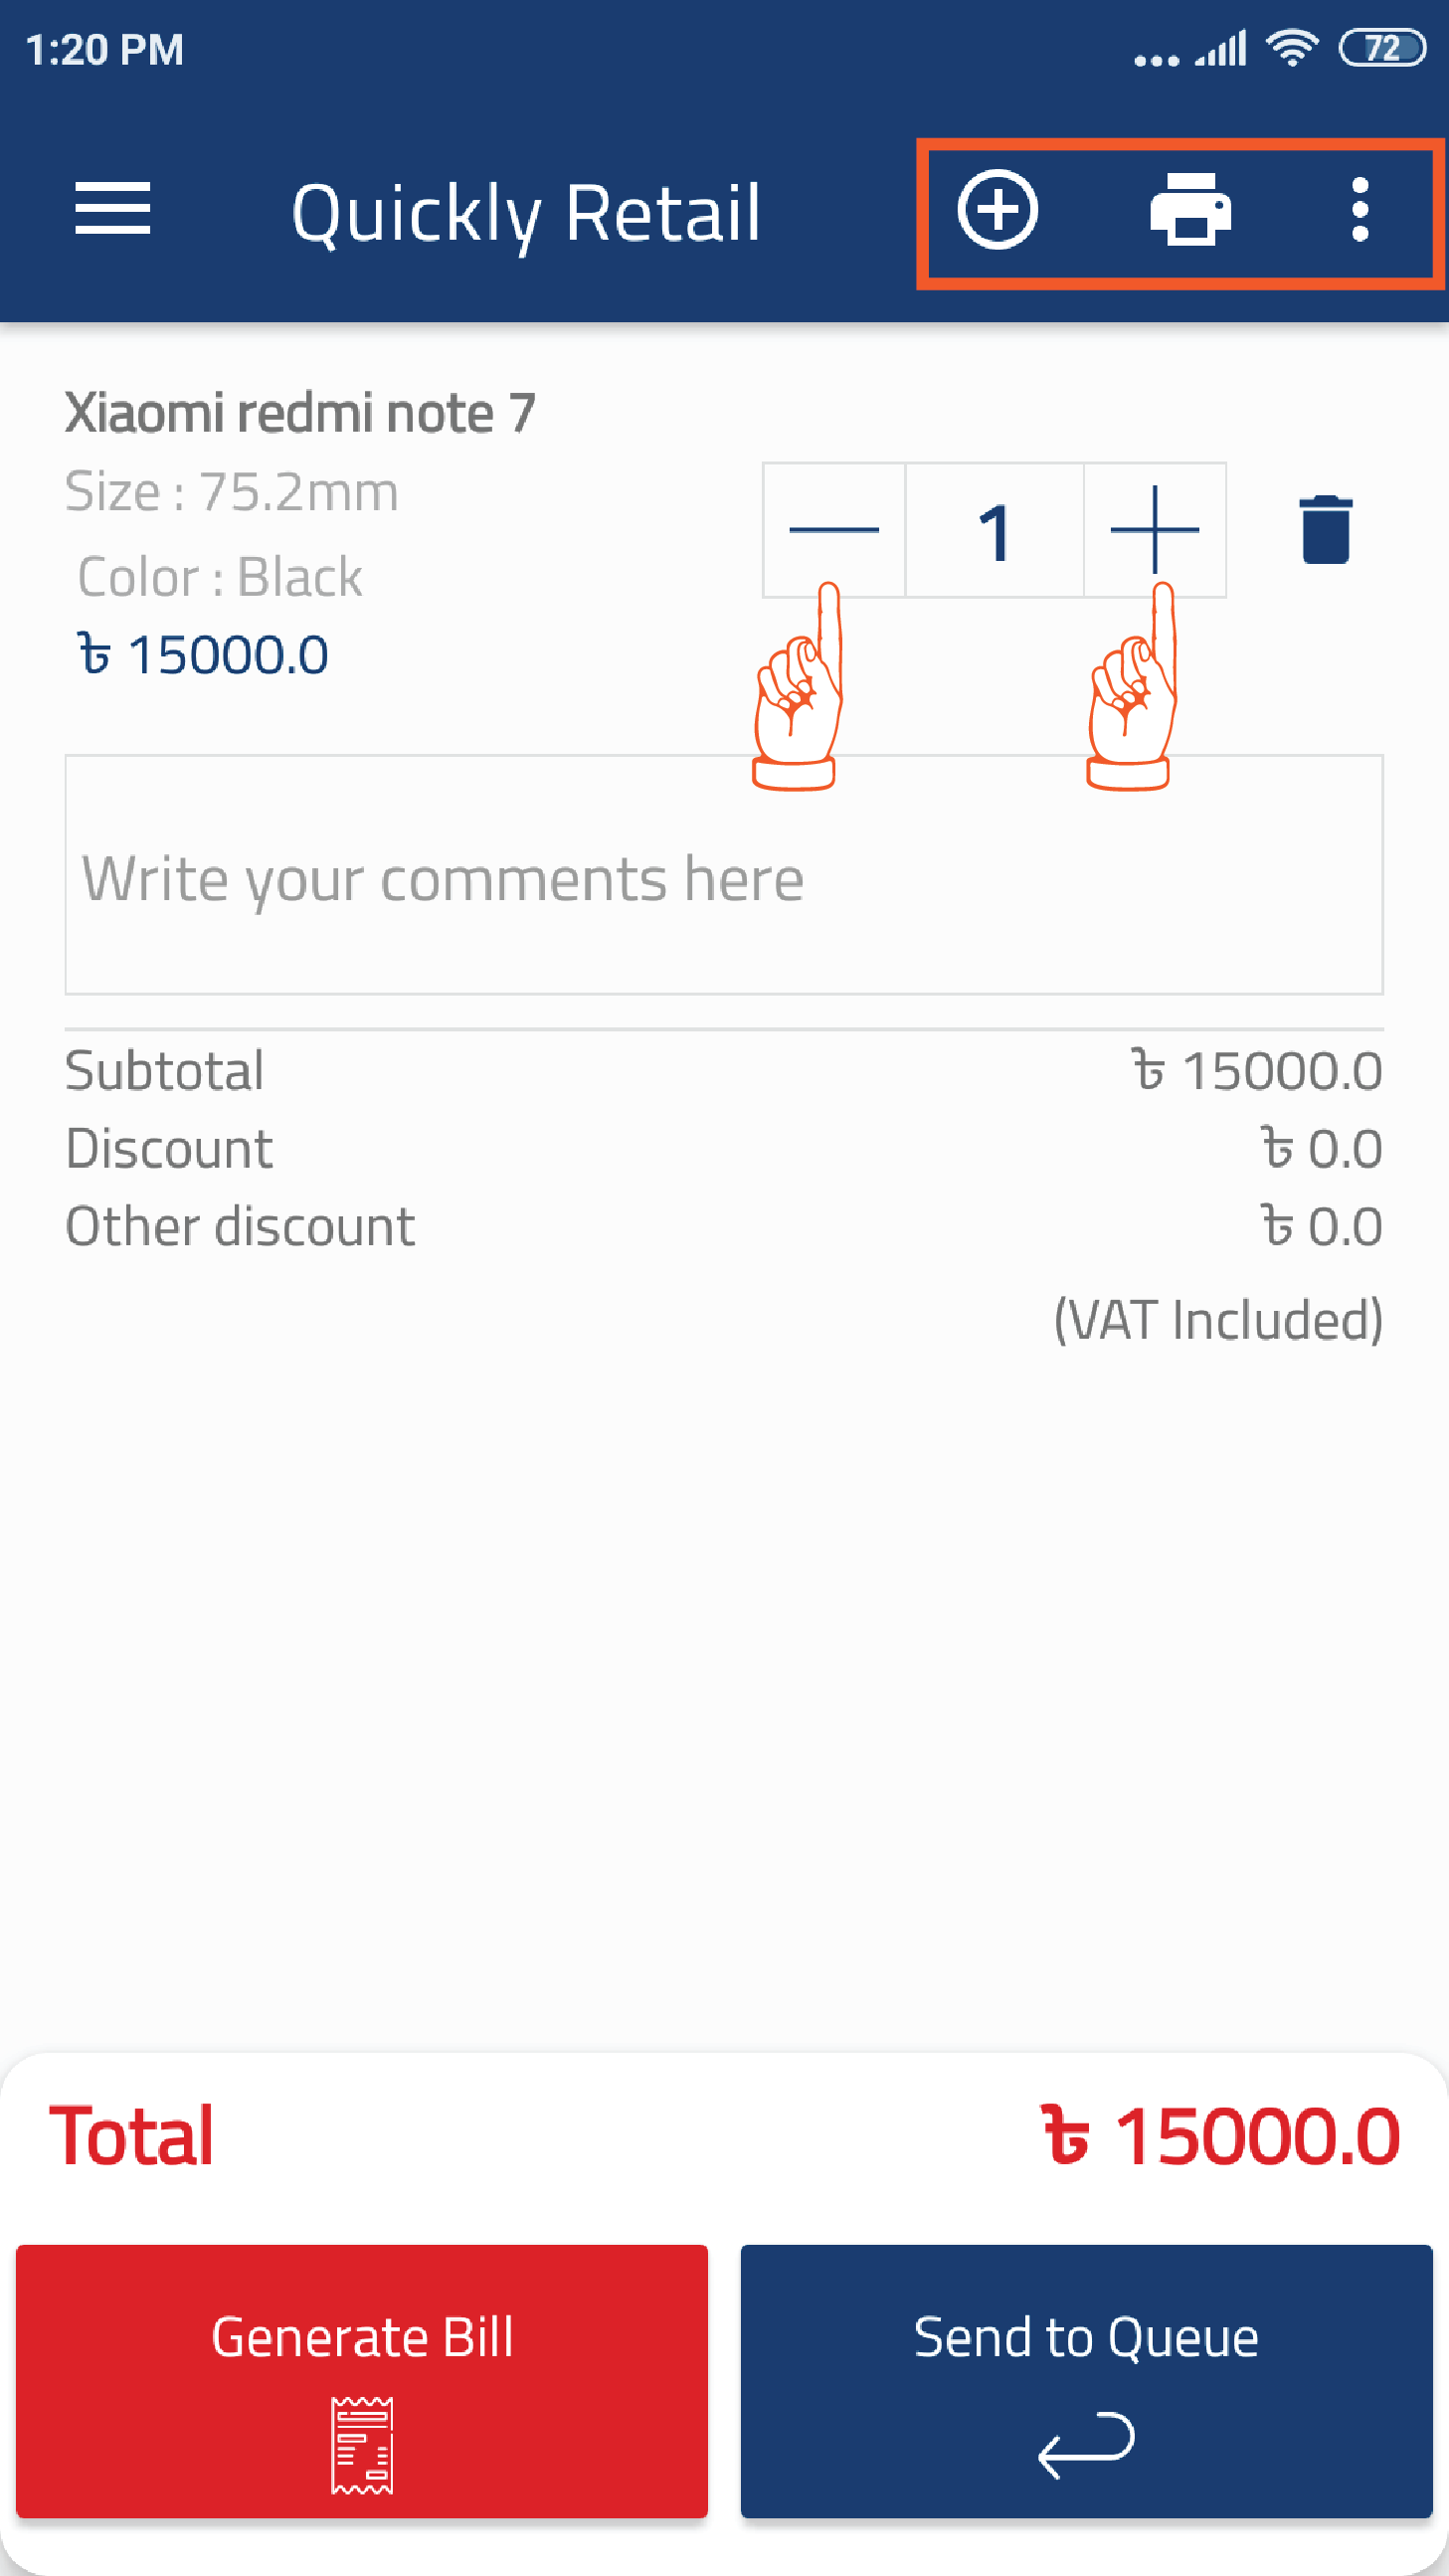
On the top right of the screen there are two options, one is to search and another is the check shop icon, clicking on the top right check shop icon you can see the cart.
👉 After clicking on the check shop icon, a list of products will appear in the cart. From the cart, you can add items by clicking on the plus(+) button and also subtract items by clicking on the minus(-) button. You can also delete an item by clicking on the delete option. In the cart, shows the order detail with vat, discount and other details if any vat, discount and other discount is available. You can go to the menu without any hassle by clicking on the plus(+) button from the header. After taking your order for print you have to click the printer icon from the header. In the cart, you have the option to write some comments if necessary. Form the header by clicking on the 3 dots you can apply membership, discounts, promo and also can clear cart. When you click the process order order will be placed. If you want to take multiple orders at the same time you can order one and move that in process order then take another order. If you want to end the order you have to click the generate bill button. After clicking on the generate bill button order will be locked and you can not change your order.
Related Video Support
How to upload catalog, take orders & generate bills
In this video, we have shown in detail how to upload your shop catalog to RetailGo, how to initial stock of products, how to place orders from your customers and generate bills for them using RetailGo - Sales & Billing App.
How to apply Membership and Promo offers?
Admin
2 months ago
Related Video Support
How to upload catalog, take orders & generate bills
In this video, we have shown in detail how to upload your shop catalog to RetailGo, how to initial stock of products, how to place orders from your customers and generate bills for them using RetailGo - Sales & Billing App.
How to give a discount from the app?
Admin
2 months ago
👉 If you click ‘discount by staff’ from the merchant portal, staff will get access to give discounts to preferred customers in-app. Discount will be applied if your staff member clicks the “Apply Discount” from the header of the app. After clicking on the ‘Apply Discount’ button, where a pop-up window will appear and your staff member needs to write down the amount he wants and click the apply button.
Related Video Support
How to upload catalog, take orders & generate bills
In this video, we have shown in detail how to upload your shop catalog to RetailGo, how to initial stock of products, how to place orders from your customers and generate bills for them using RetailGo - Sales & Billing App.
How to connect with a printer?
Admin
2 months ago
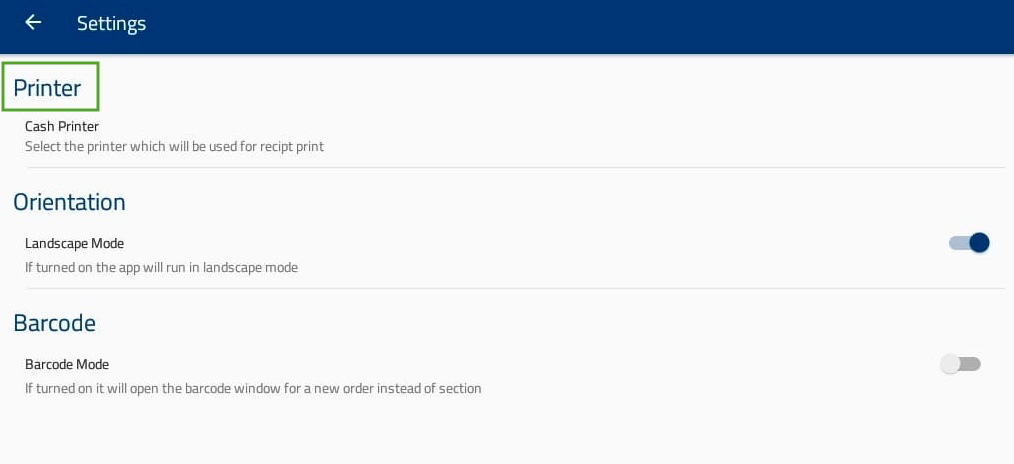
👉 To pair your device with your printer, click on the sidebar of the app and go to settings. You will see printer options named as cash printer.
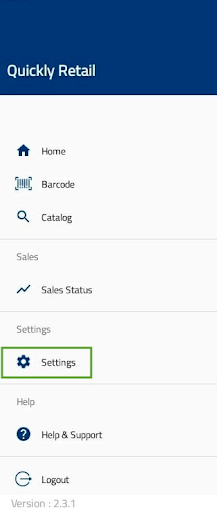
To connect with a printer click on Cash Printer under the Printer section.
Related Video Support
How to upload catalog, take orders & generate bills
In this video, we have shown in detail how to upload your shop catalog to RetailGo, how to initial stock of products, how to place orders from your customers and generate bills for them using RetailGo - Sales & Billing App.
How to use the Barcode Scanner?
Admin
2 months ago
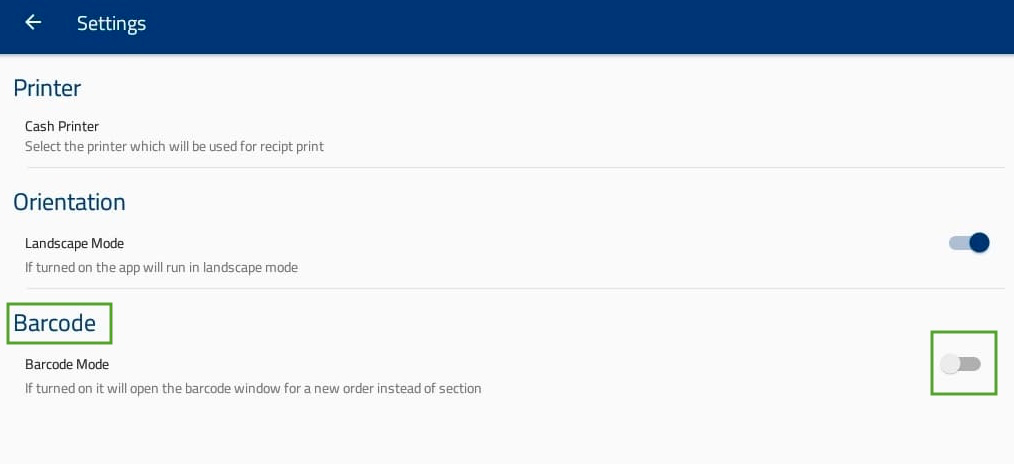
👉 Tap on the sidebar of the app and go to settings. On this page, you will see an option called Barcode.
If you turn on the barcode mode, it will open the barcode window for a new order instead of section.
Related Video Support
How to upload catalog, take orders & generate bills
In this video, we have shown in detail how to upload your shop catalog to RetailGo, how to initial stock of products, how to place orders from your customers and generate bills for them using RetailGo - Sales & Billing App.
How to generate and print bills for your customers?
Admin
2 months ago
Then you have to click the end order button and the order will be finished. You can also print with this icon.

👉 You can check the order history with breakdown along with all the details.
Related Video Support
How to upload catalog, take orders & generate bills
In this video, we have shown in detail how to upload your shop catalog to RetailGo, how to initial stock of products, how to place orders from your customers and generate bills for them using RetailGo - Sales & Billing App.
Keep an eye on your Sales status
Admin
2 months ago
👉 From the sidebar, you can click on the sales status and be able to see all the sales details. Your app users can also see your business sales history and daily sales.
Related Video Support
How to upload catalog, take orders & generate bills
In this video, we have shown in detail how to upload your shop catalog to RetailGo, how to initial stock of products, how to place orders from your customers and generate bills for them using RetailGo - Sales & Billing App.
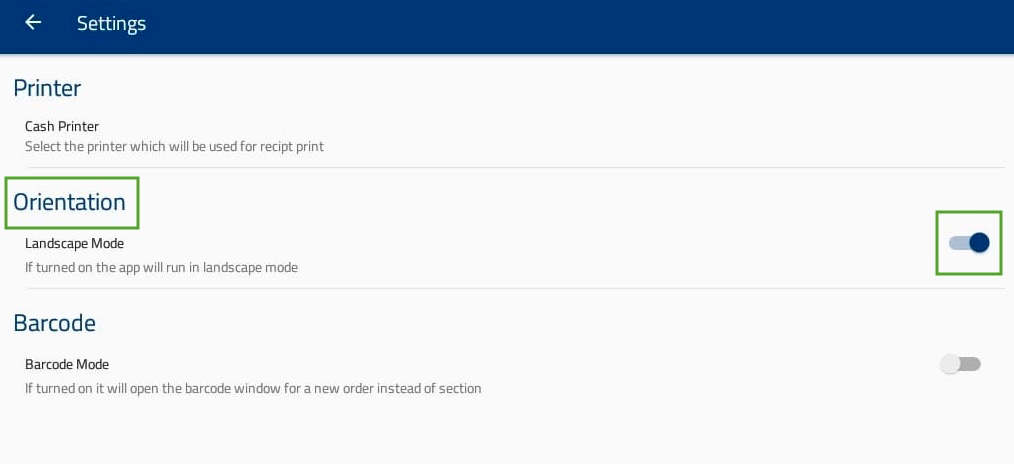
How to change the orientation for a tablet?
Admin
2 months ago
👉 Tap on the sidebar of the app and go to settings. On this page, you will see an option called orientation.
If you want to use the app in Tablet mode, turn the switch on.
Related Video Support
How to upload catalog, take orders & generate bills
In this video, we have shown in detail how to upload your shop catalog to RetailGo, how to initial stock of products, how to place orders from your customers and generate bills for them using RetailGo - Sales & Billing App.
How to get a real time stock update?
Admin
2 months ago
Inventory system is very important for retail business. You can easily
track your specific product. Without an inventory system, it's
impossible to know if you're being ripped off by customers or employees
until it's too late.
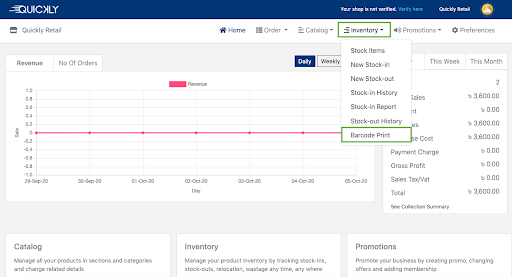
There are three major parts in inventory- Stock-in, Stock- out & Barcode
Print.
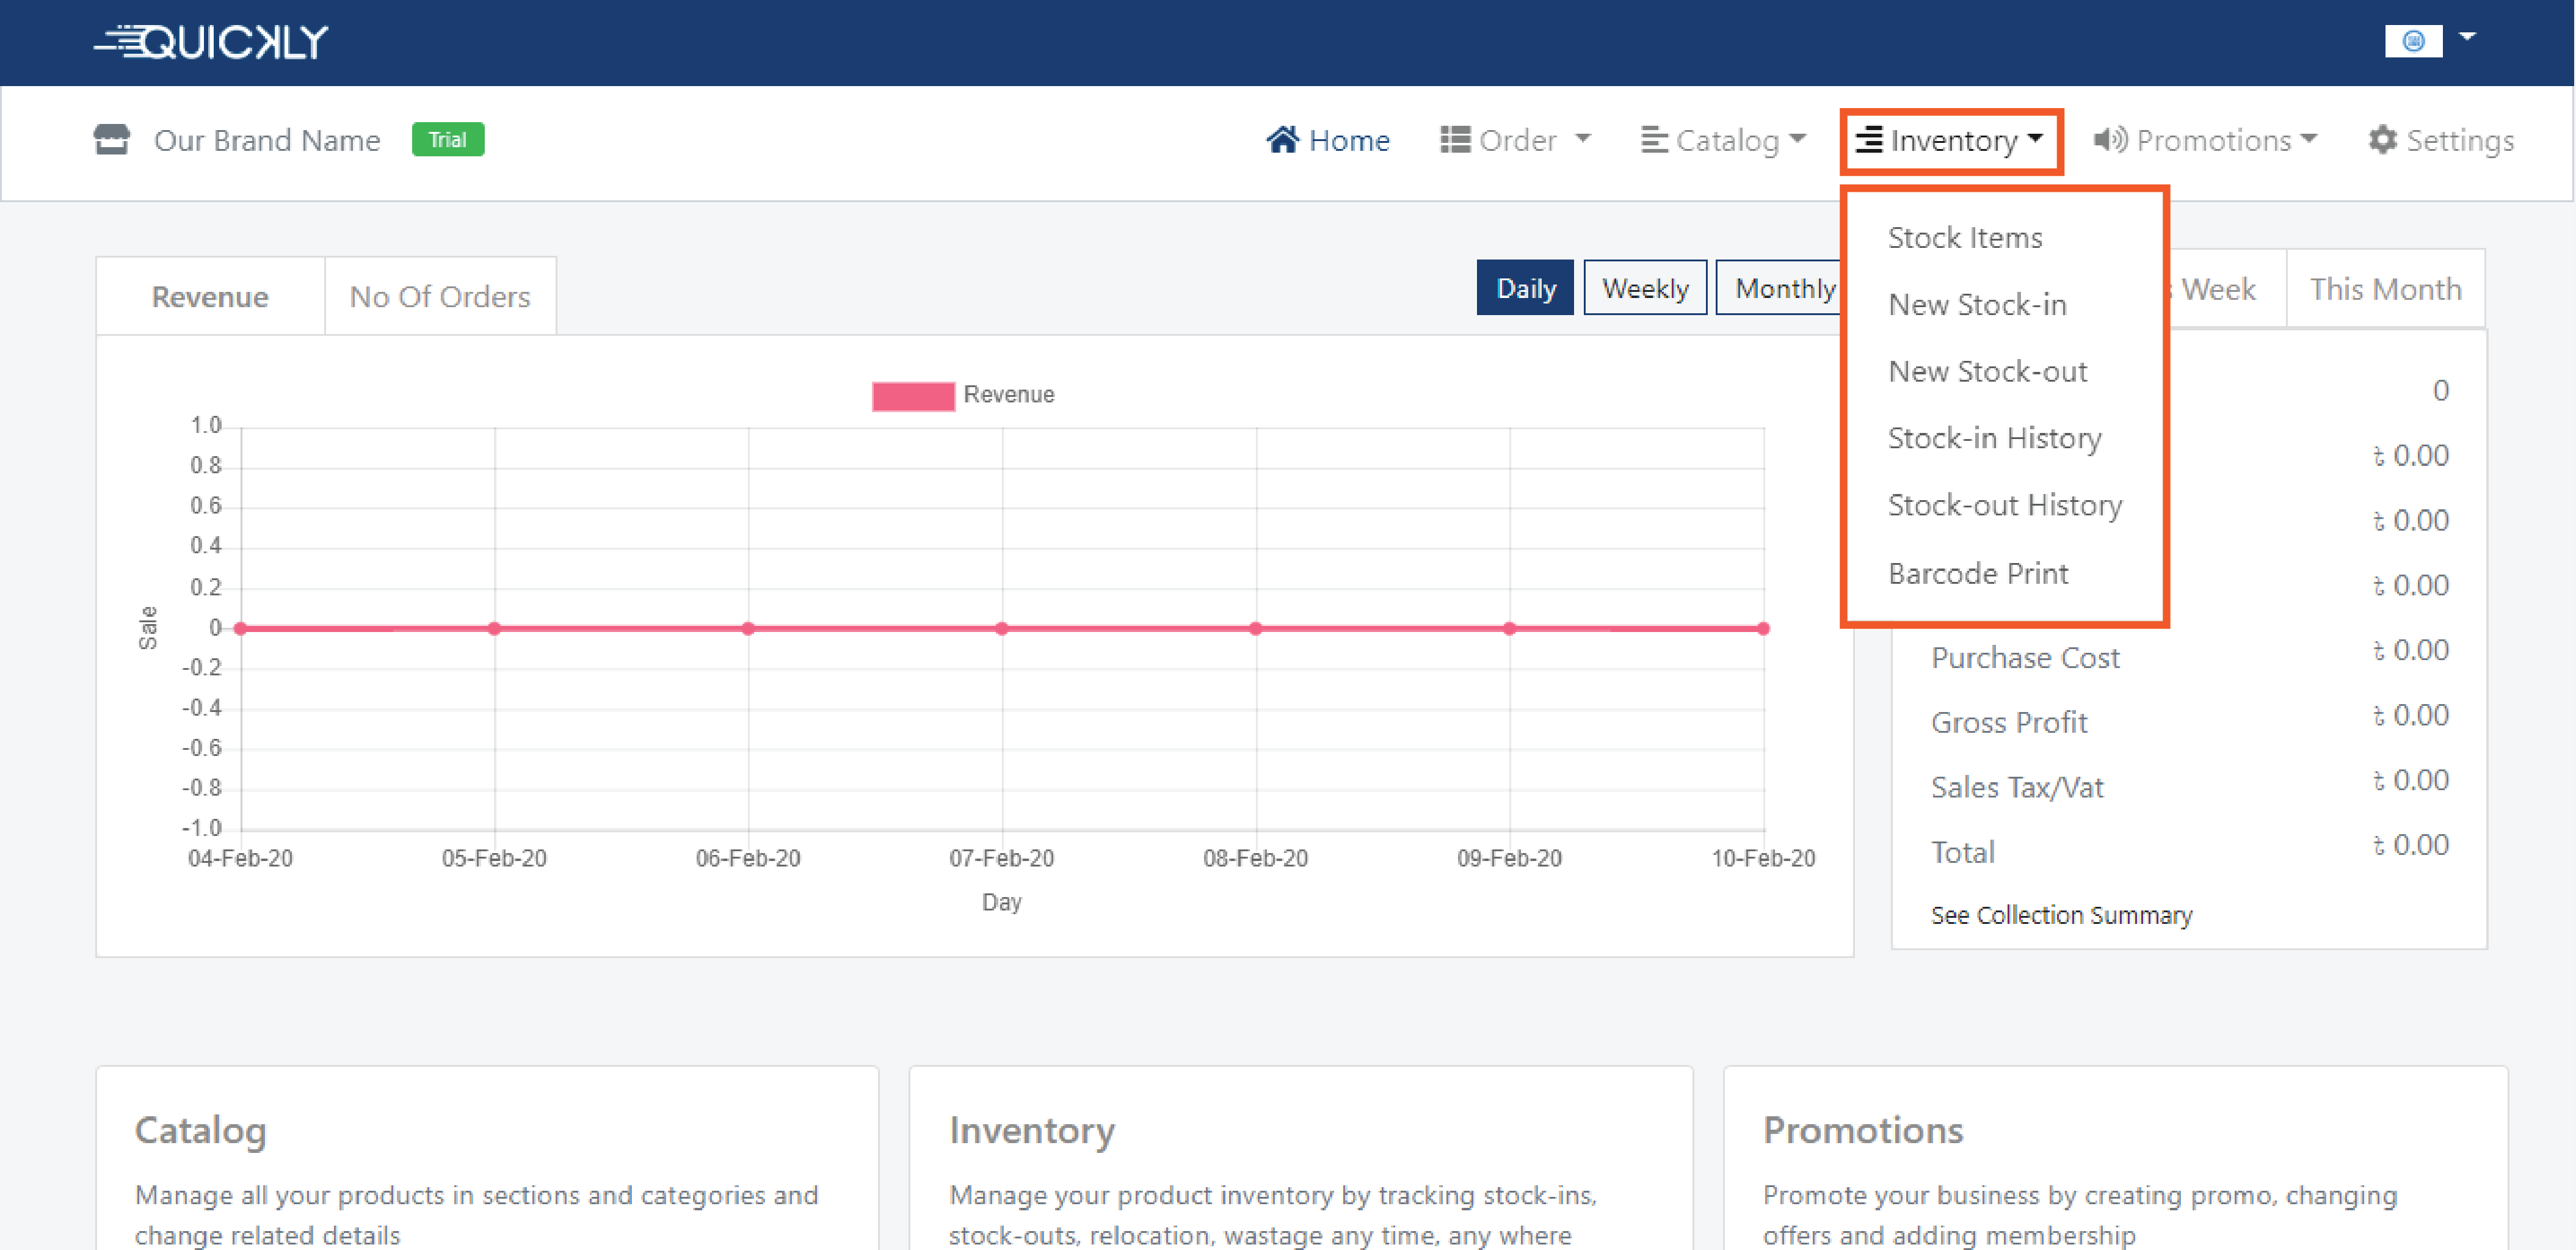
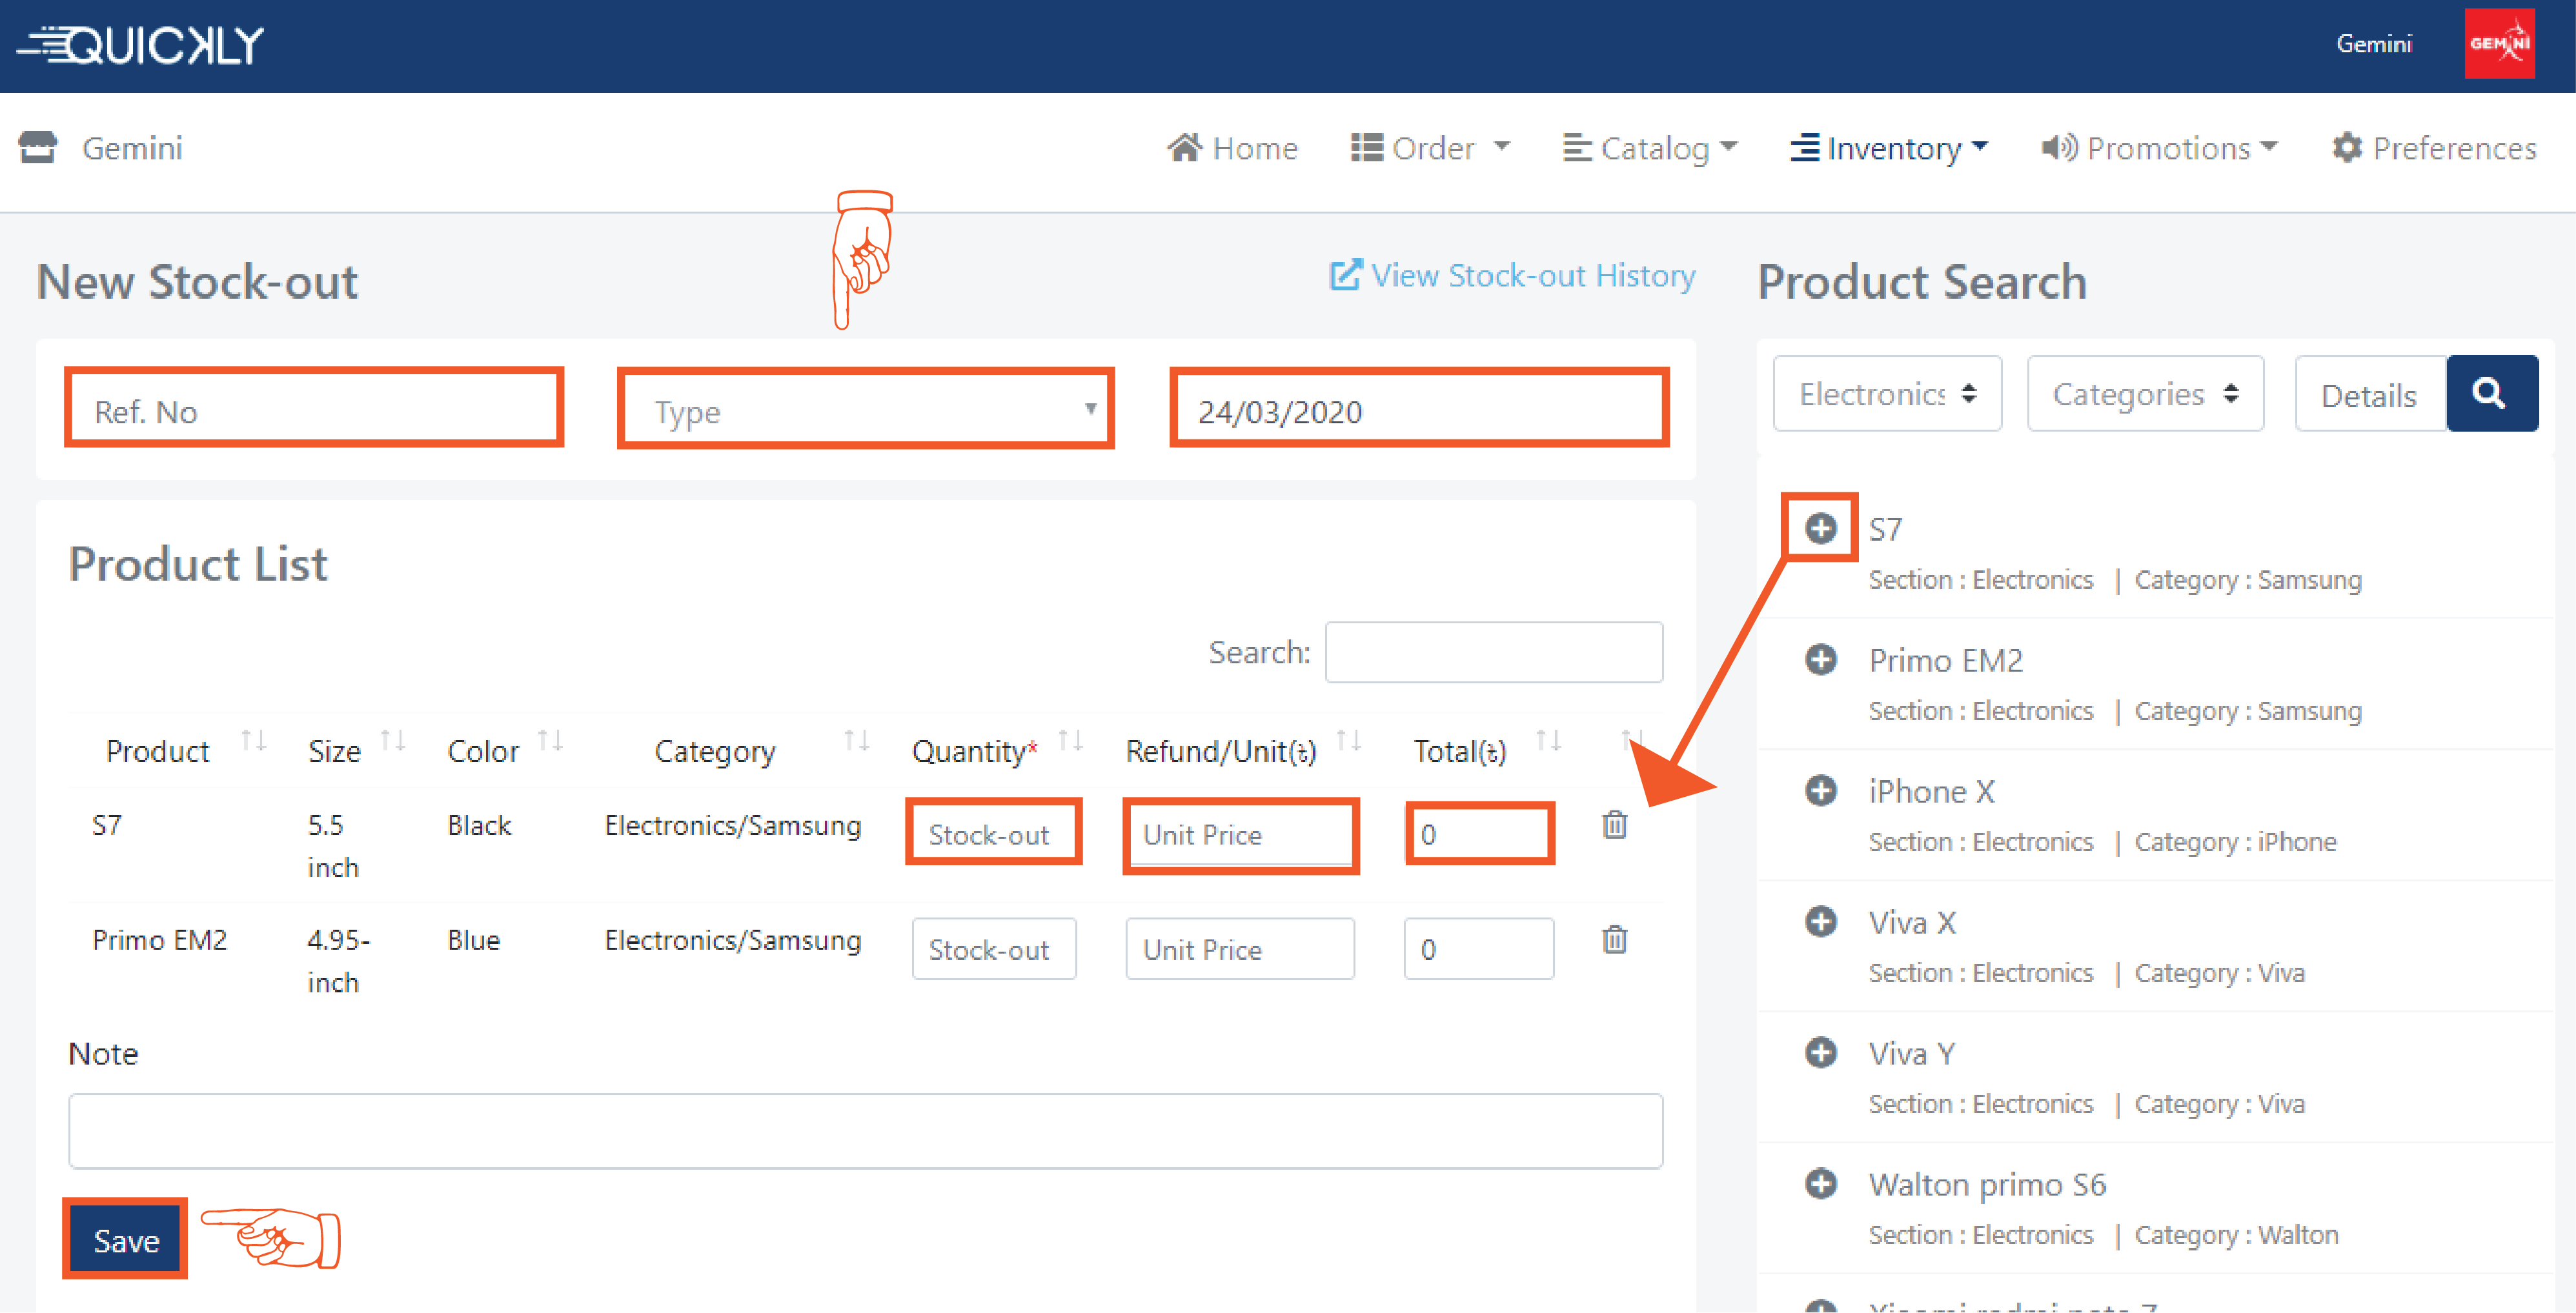
Stock-out New Items
👉 If you want to manually input your stock- out items then simply navigate
to the Inventory option of the portal and click on New Stock-out to go to
the page.
On the New Stock-out page, write down a Ref. no. you can write any code
or number in this section which will help you to find the item in the
stock-out
history page. Also select a Type and the date when you are adding the
item(s).
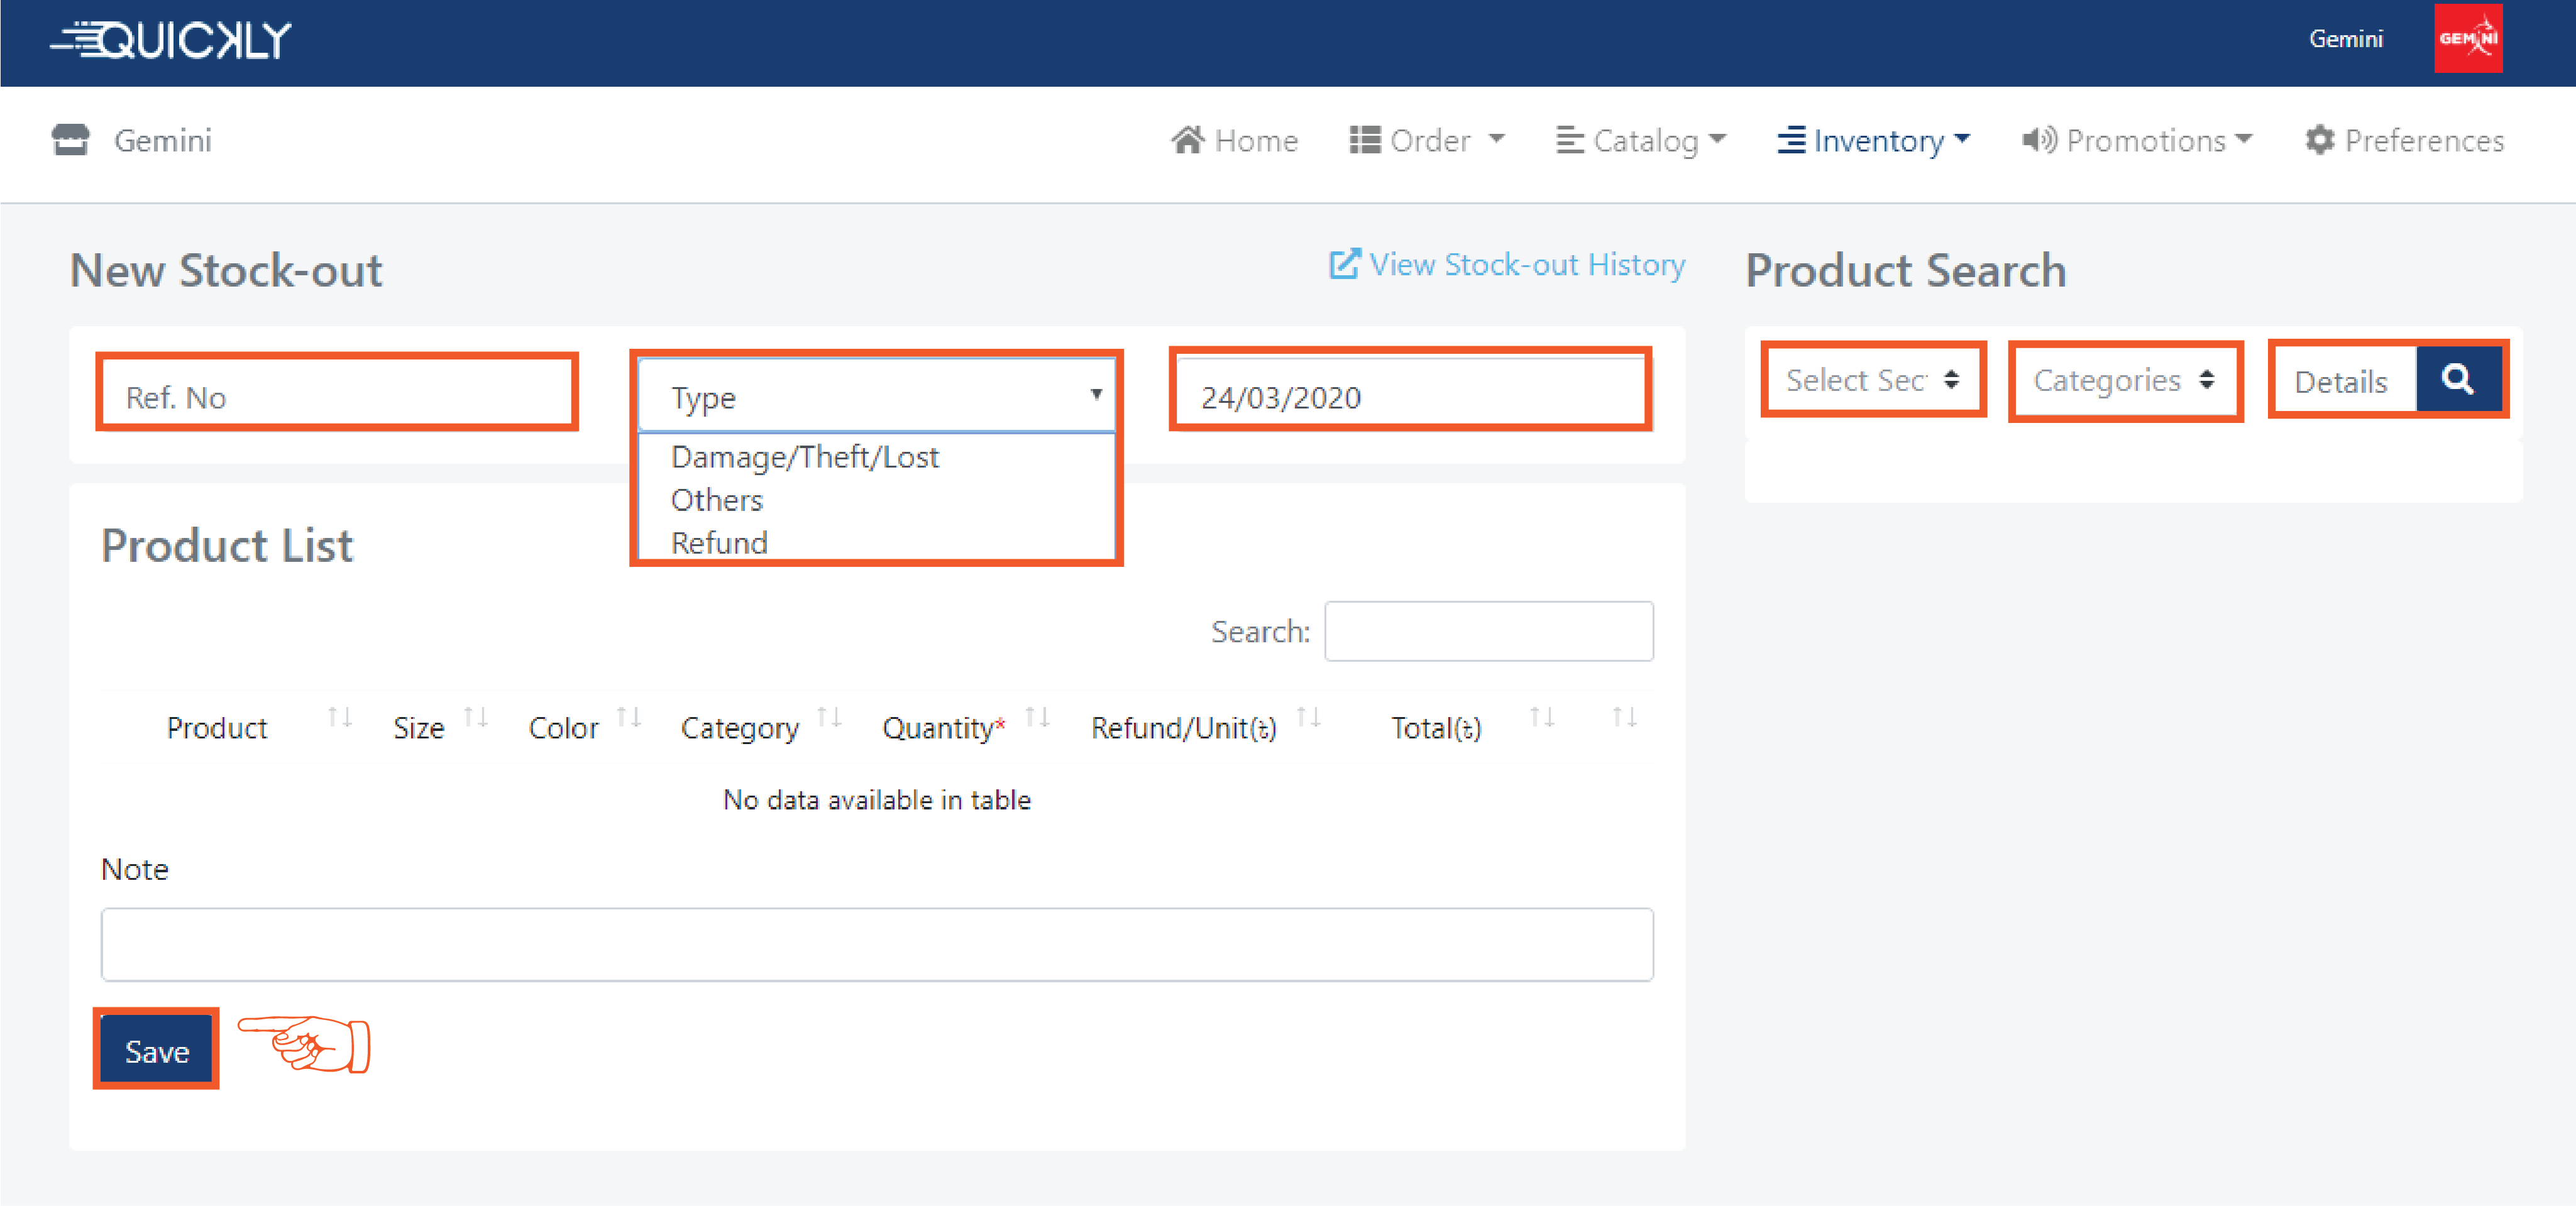
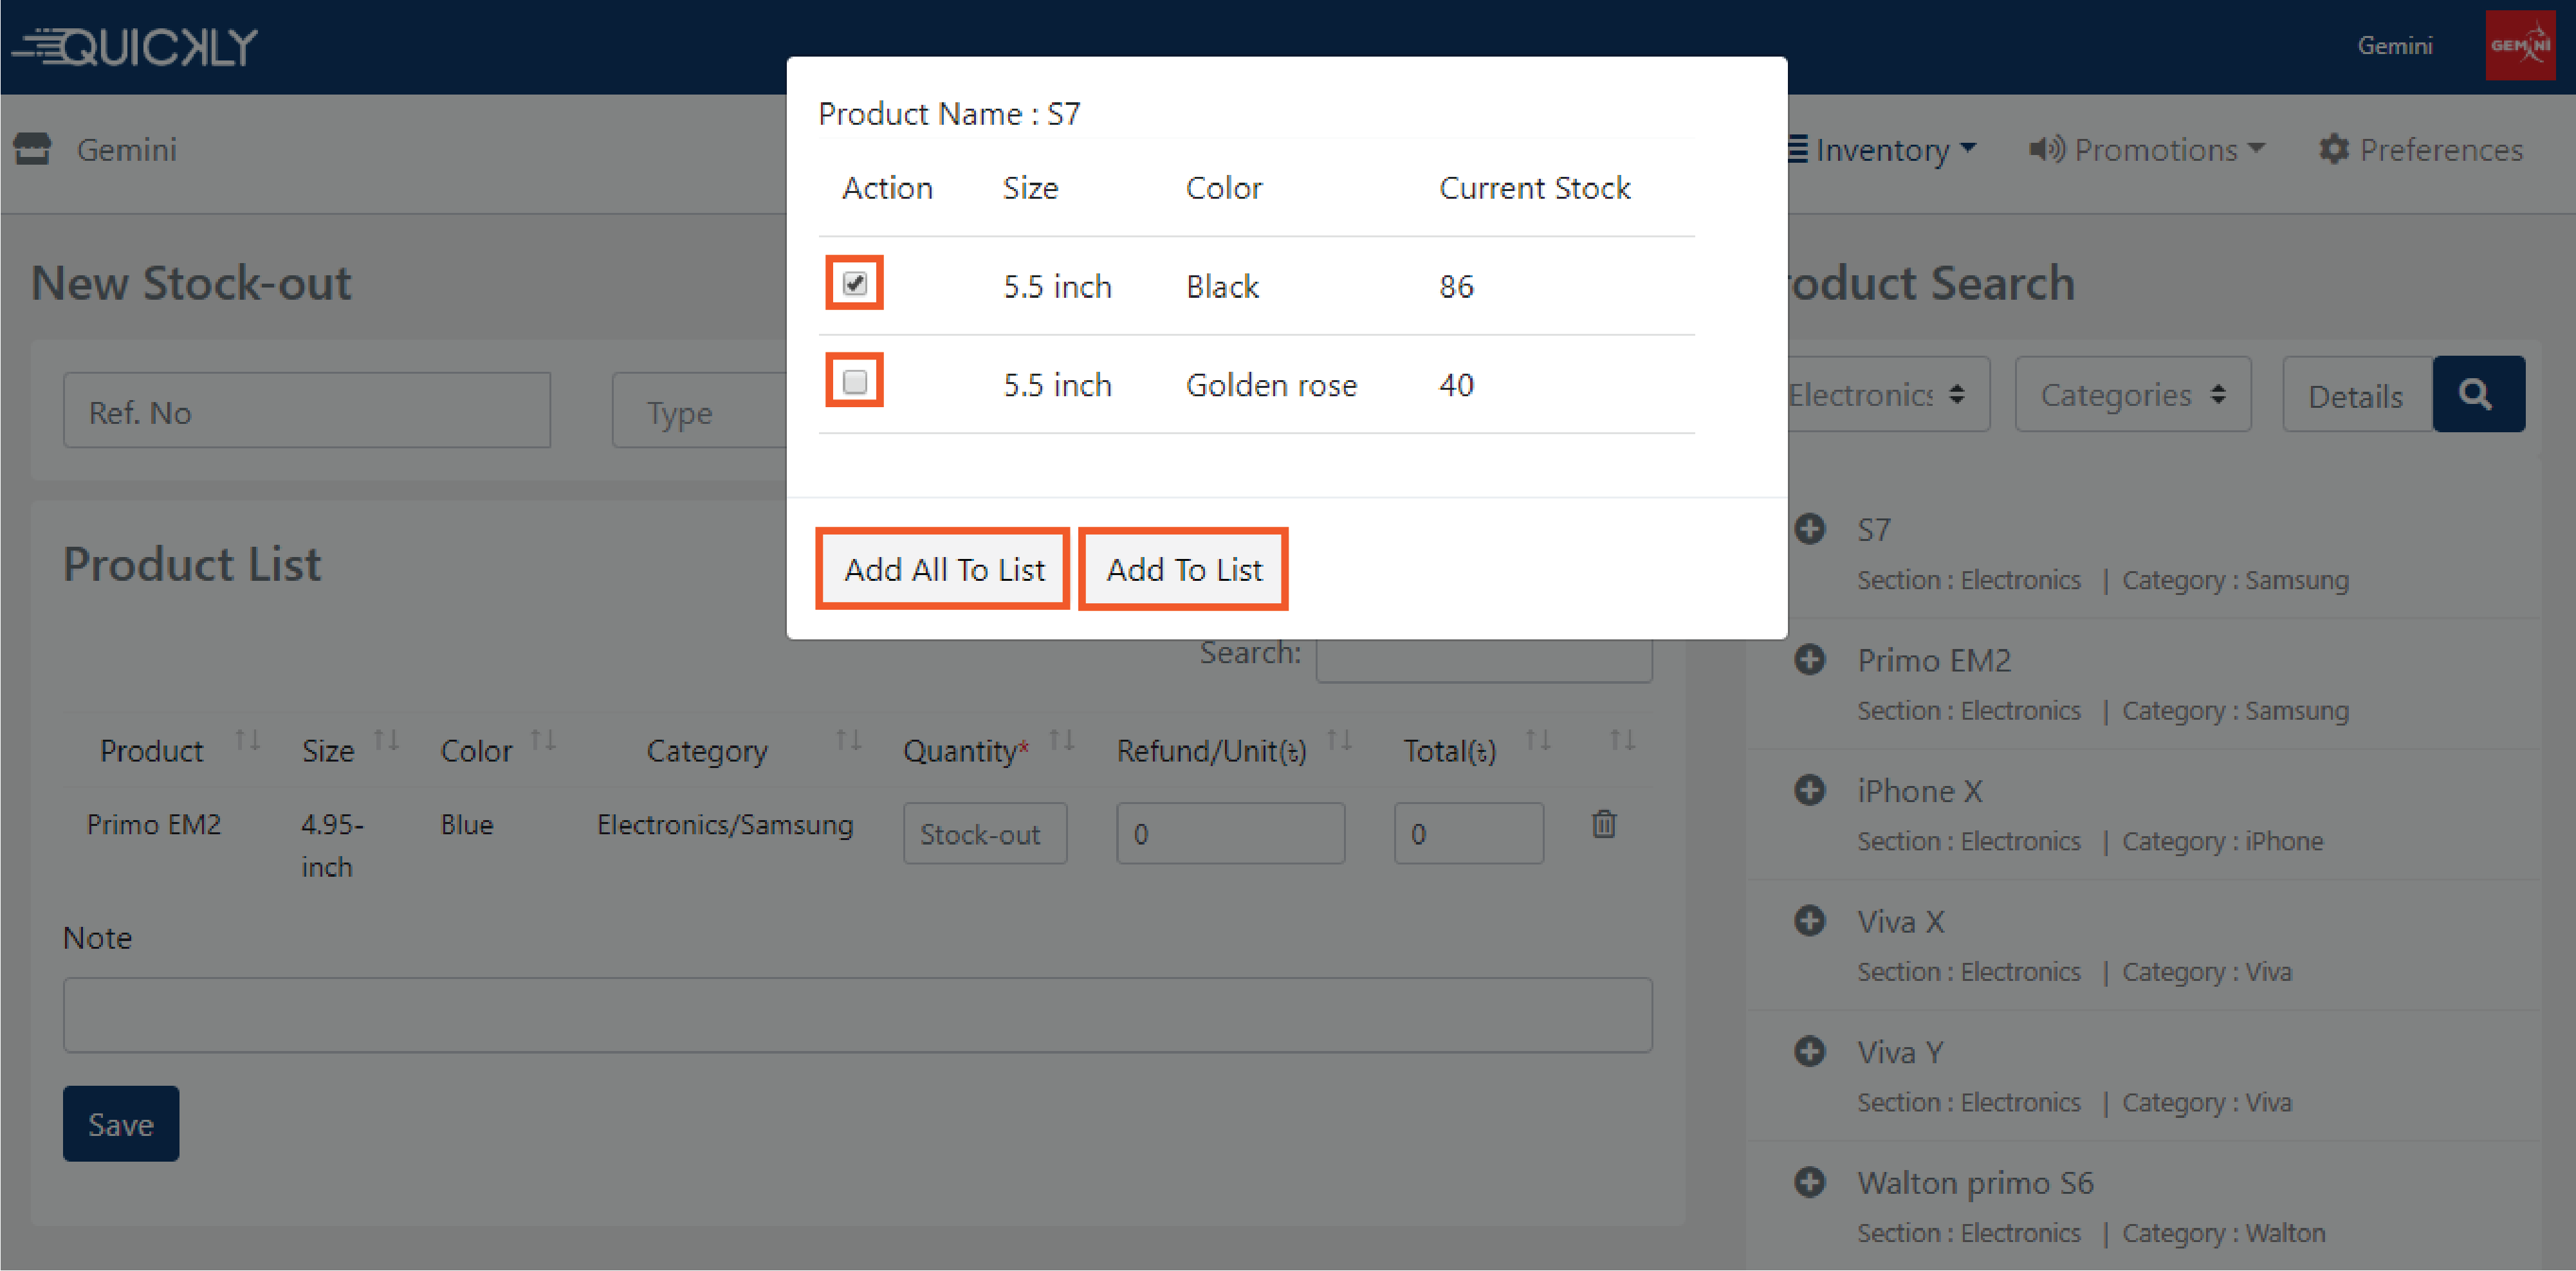
👉 On the right side of the page, there is a section called Product
Search. You can Select Section and Category from the dropdown and
click on the (+)plus button to add on the item list section.
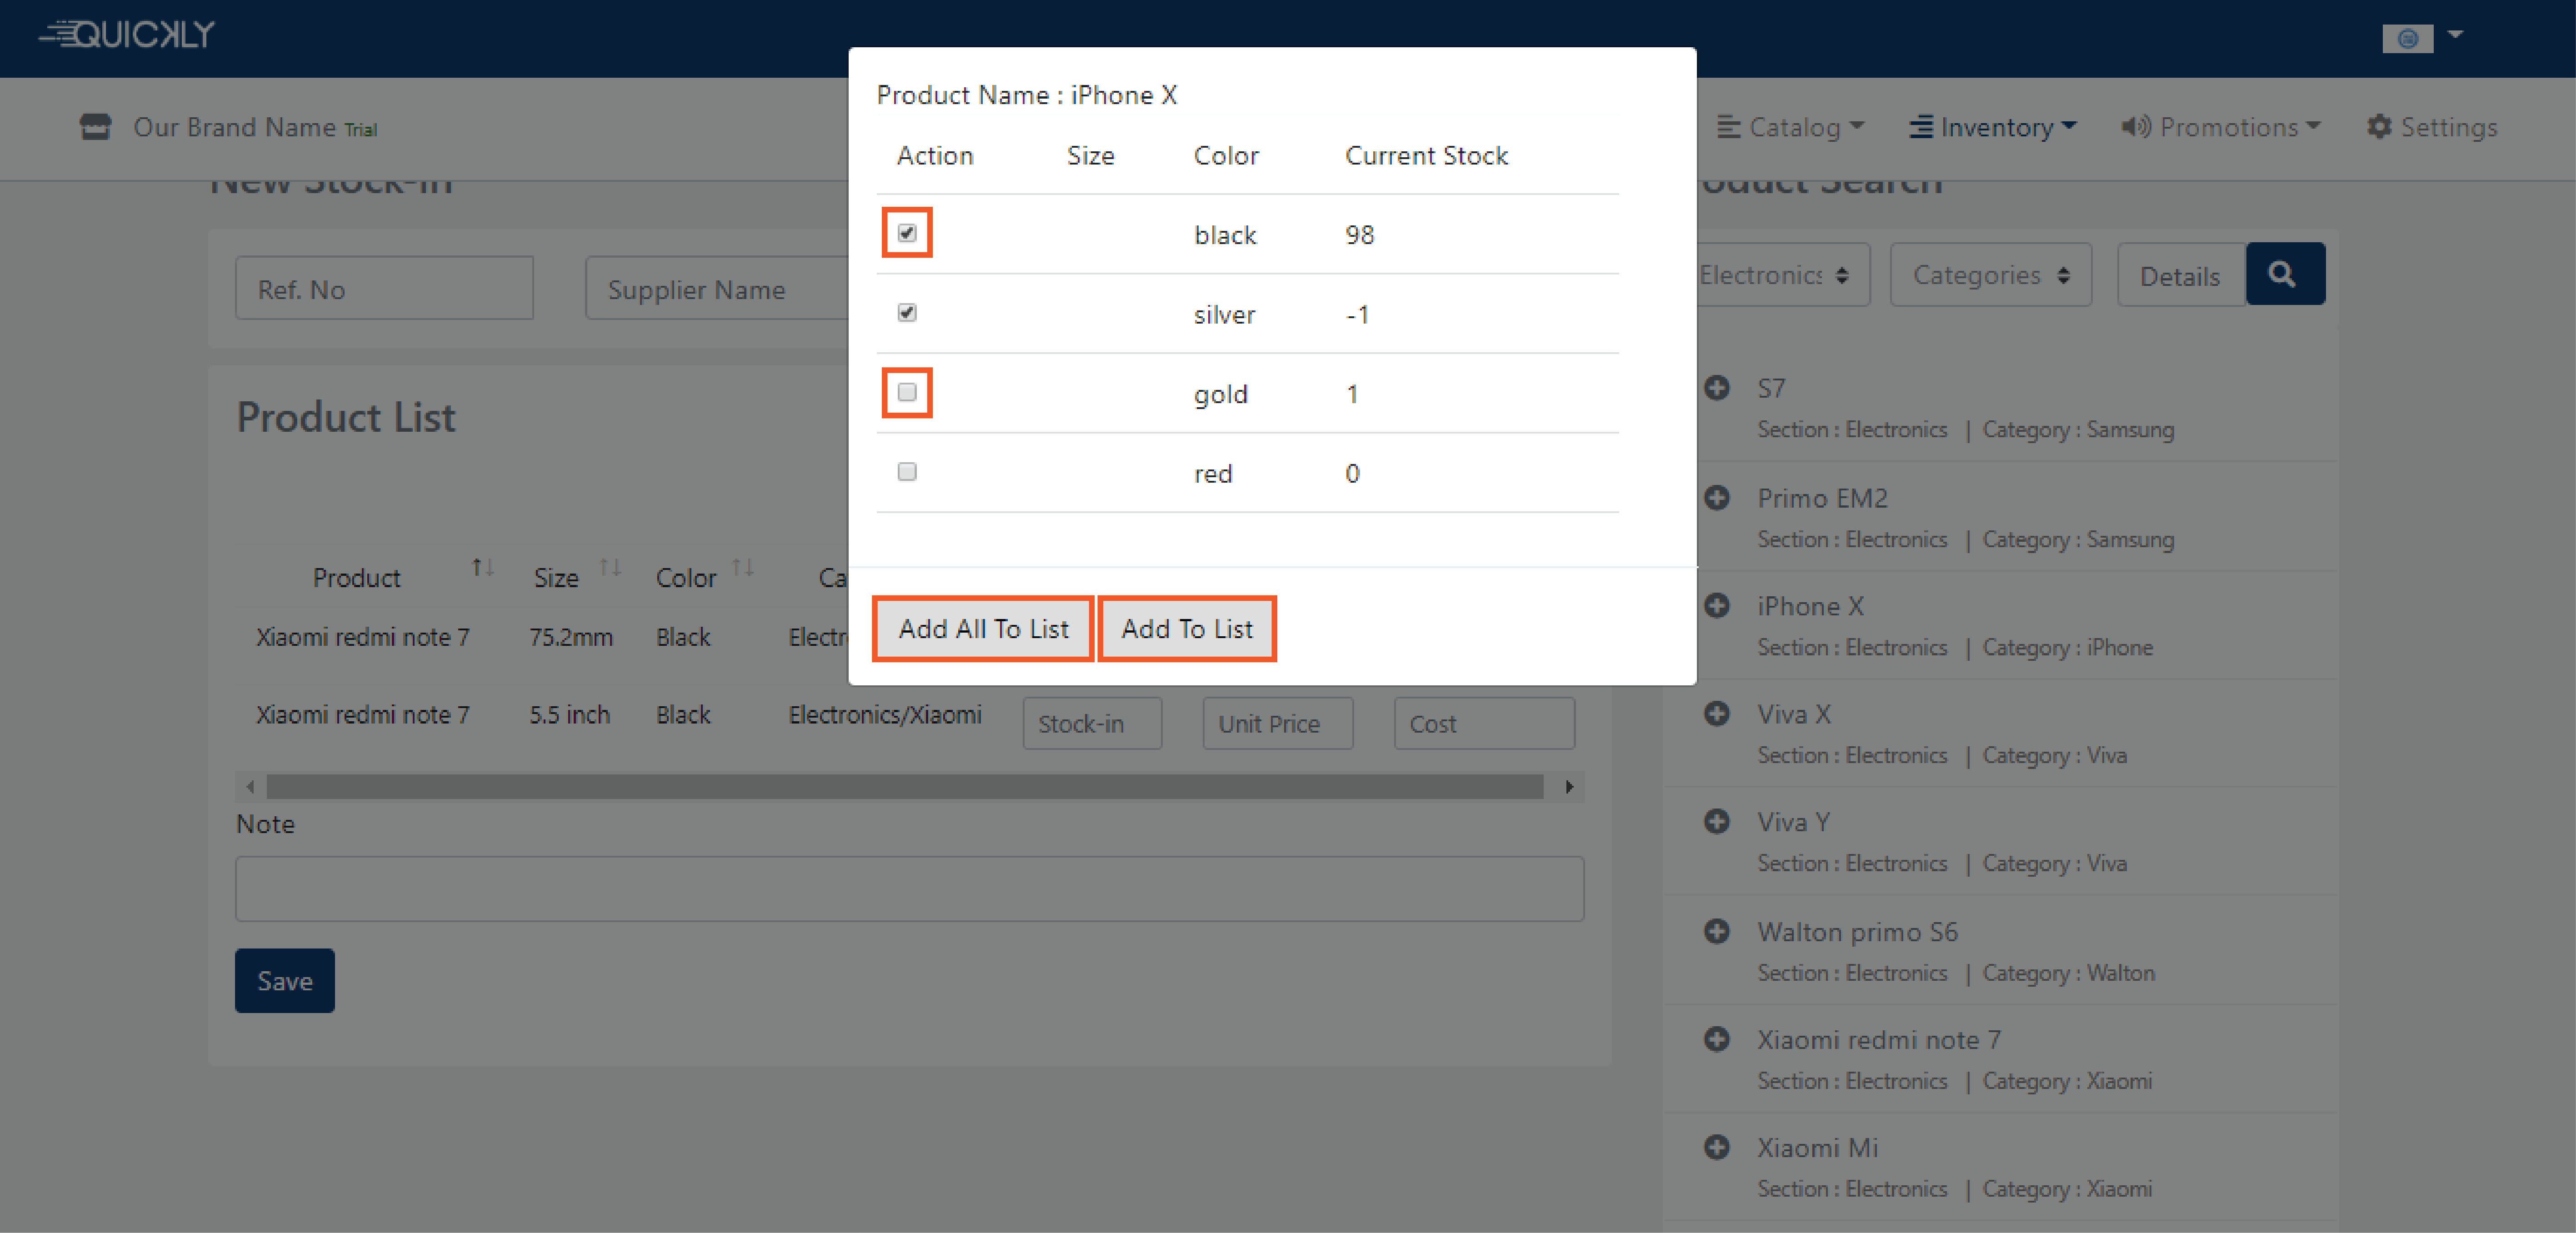
A pop-up window will open if there are sizes and colors available for
the product and if you want to stock-out all of the products then
you can click the ‘Add All to Product List’ button but if you
want to add specific product then you can choose ‘Add To
Product List’ button. If there is no variation no pop up window
will appear and will be added to the product list automatically.
👉 Then write down the Quantity as much as you want to stock-out selecting the Refund/Unit. Our software will automatically calculate the total cost of the product and if you write down the total cost, it will automatically calculate the unit price of the product. You can also write a note if you want to. At last, click on the save button to finish this step
See your Stock-out history
👉 On this page, you can see the details of all the items you have stocked-out for your shop. Simply navigate to the Inventory option of the portal and click on the Stock-out History to see your stock out list. By clicking on the reference no. you will get to see the details.

How to add new items to your stock?
Admin
2 months ago
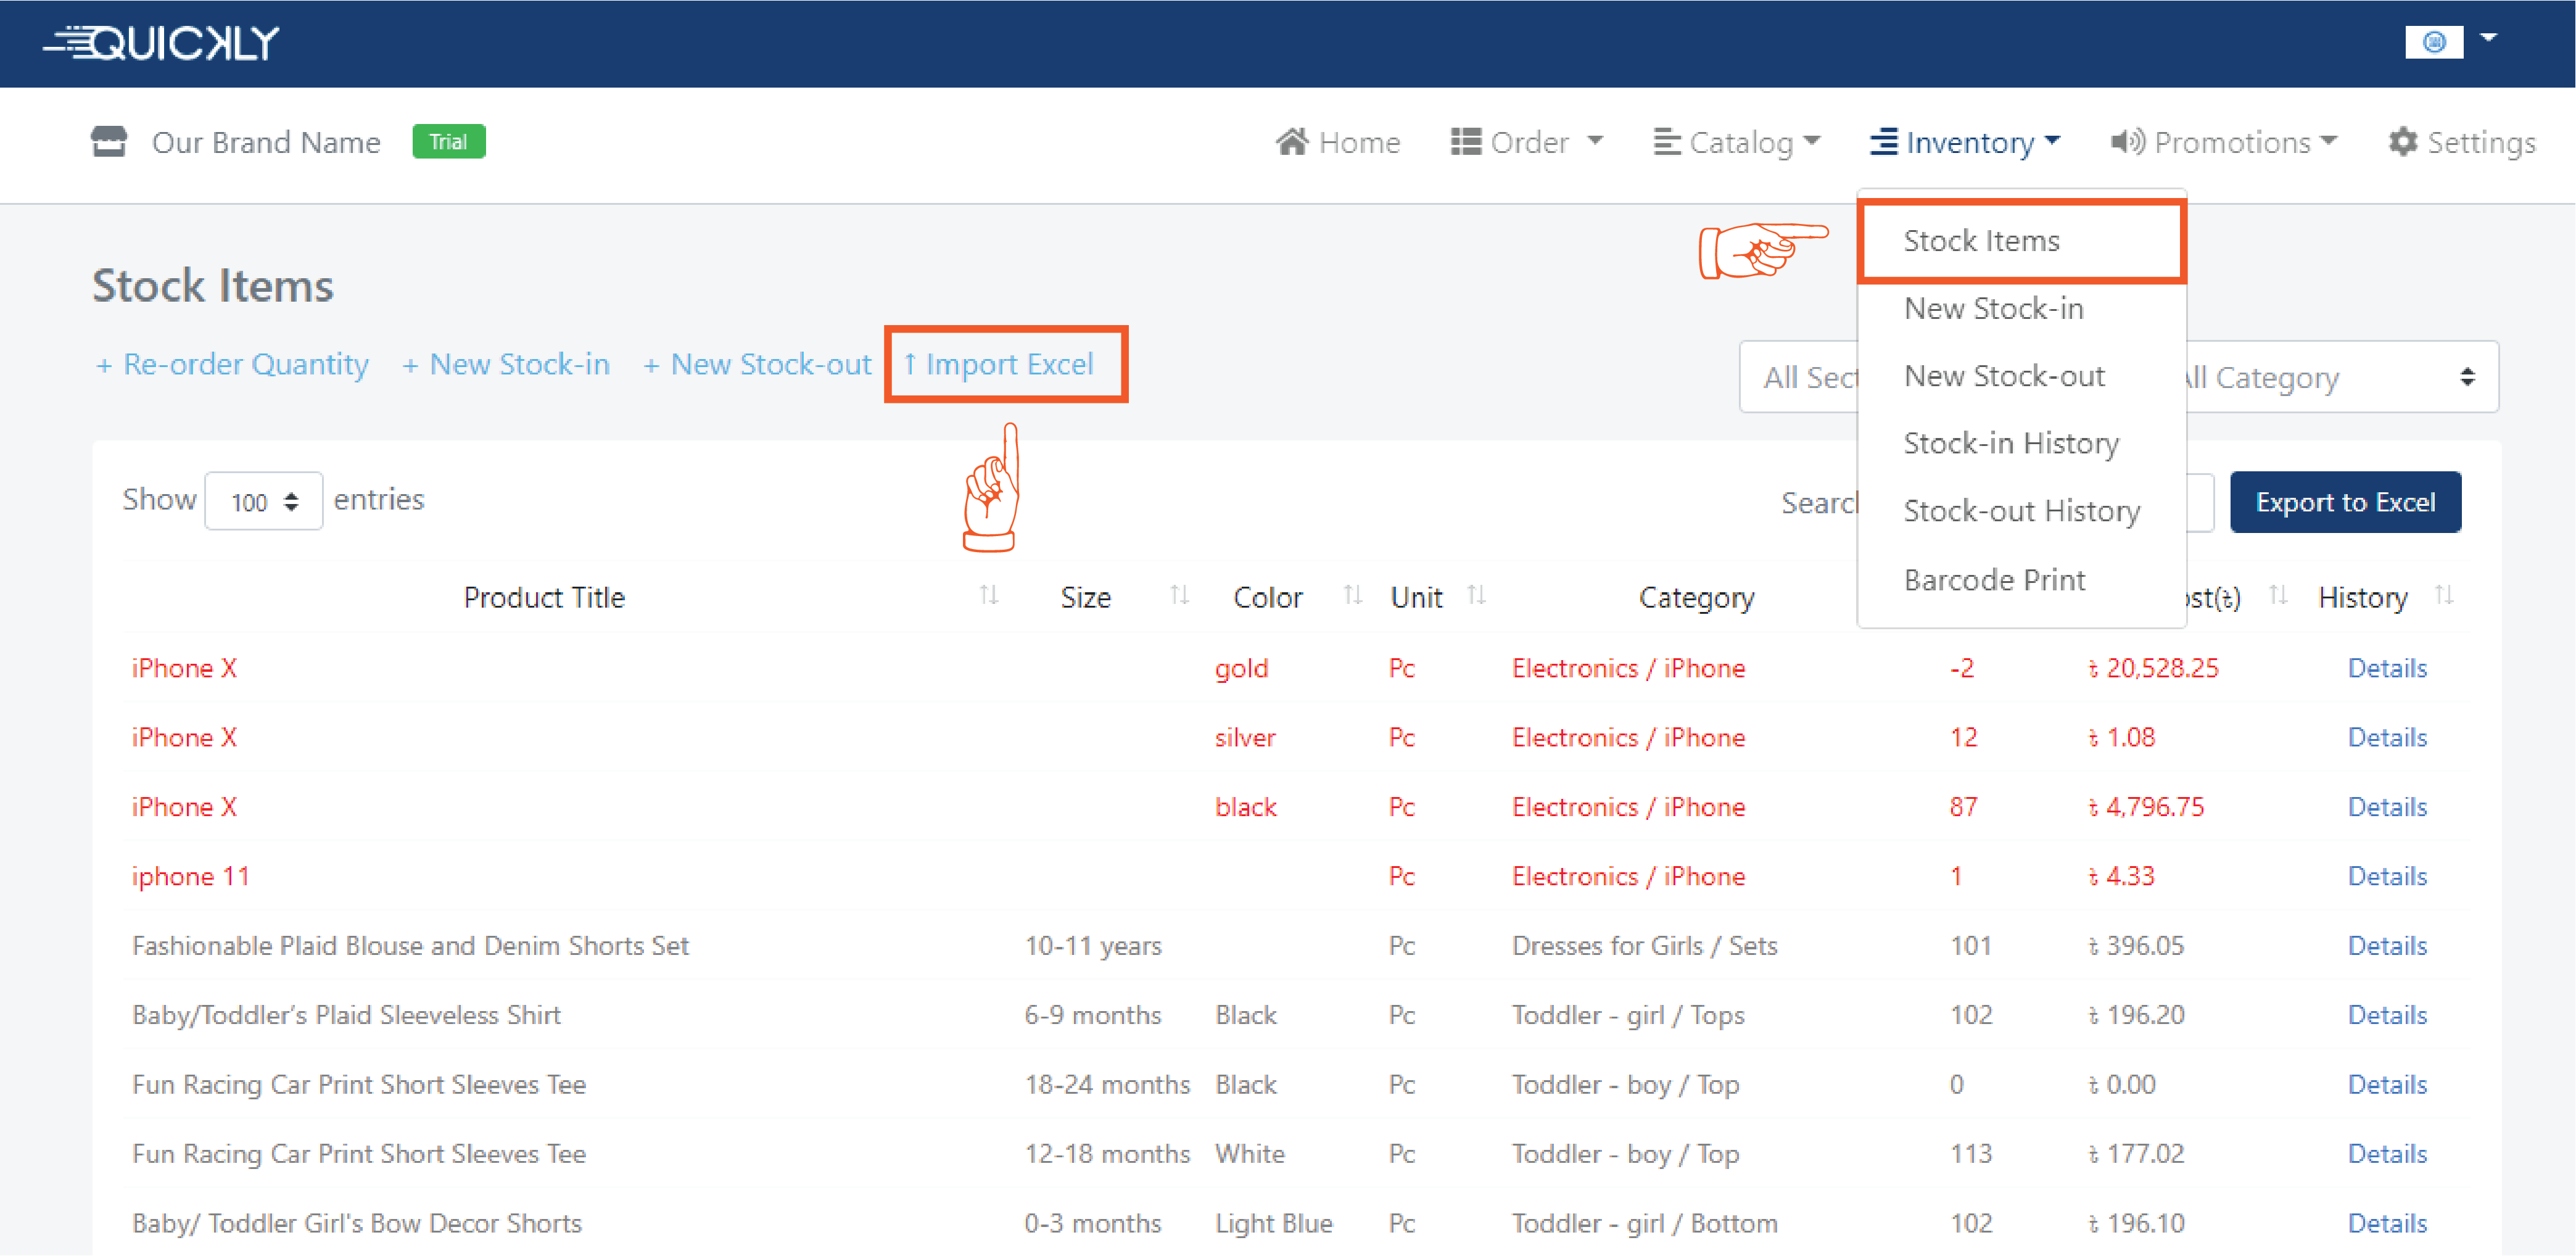
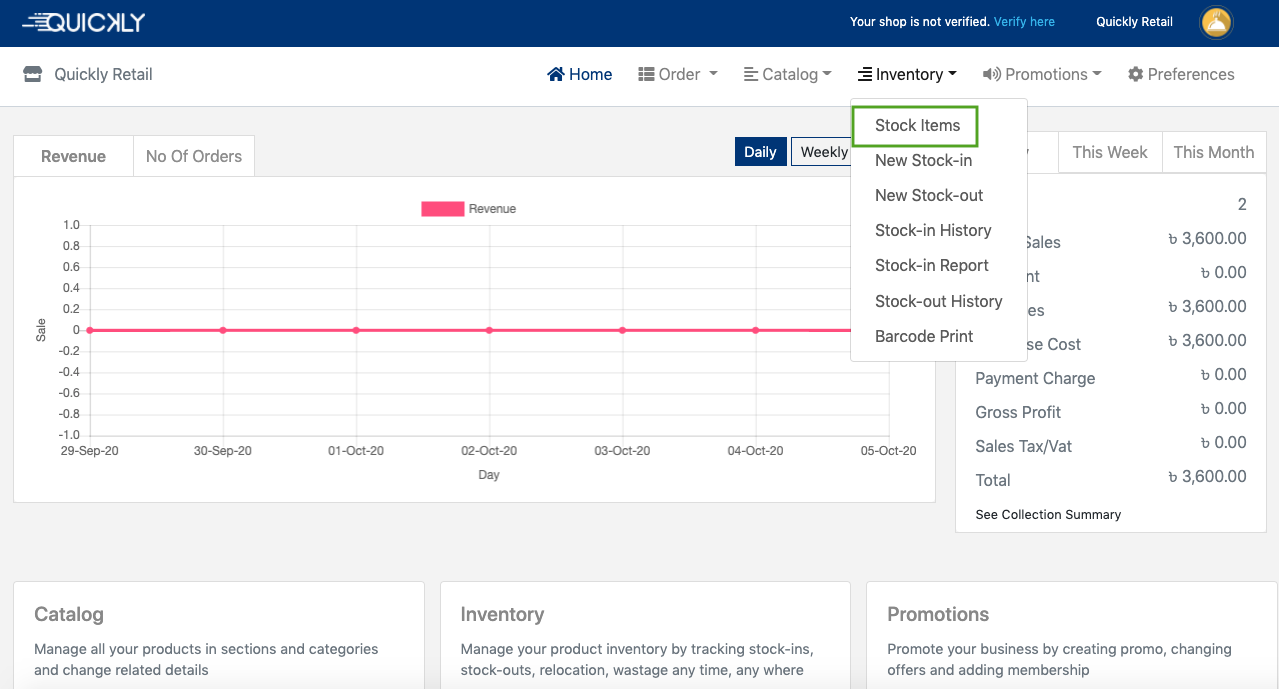
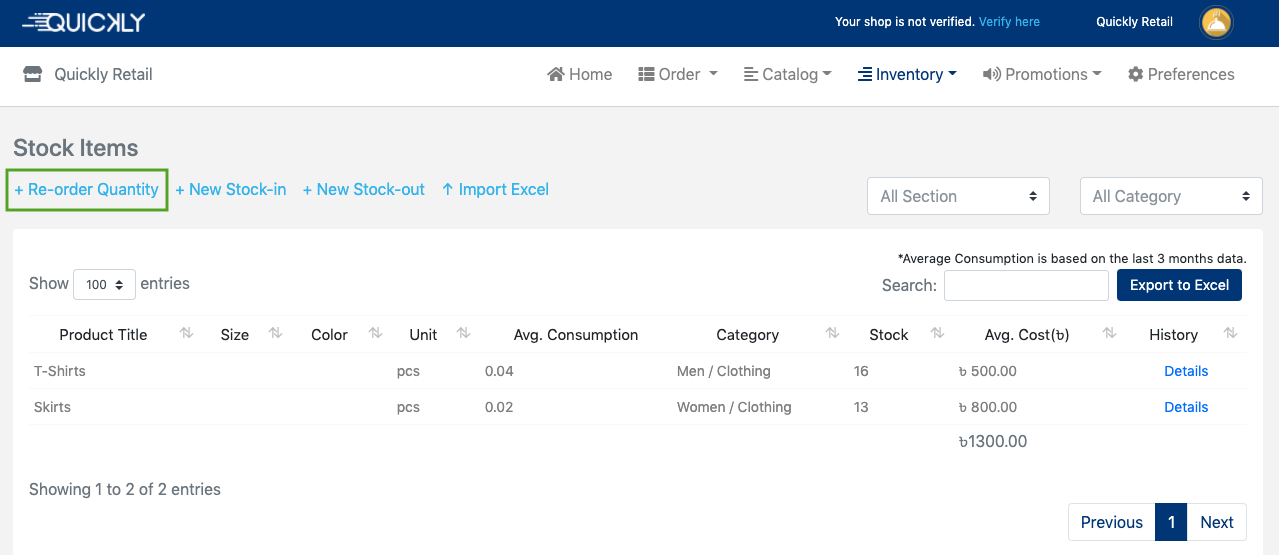
👉 Simply navigate to the Inventory option of the portal and click on Stock
Items. On this page, you will see all the items that you currently have in
your stock.
After going to the page, you will see some options like- Reorder Quantity,
New Stock-in, New Stock-out and Import Excel.
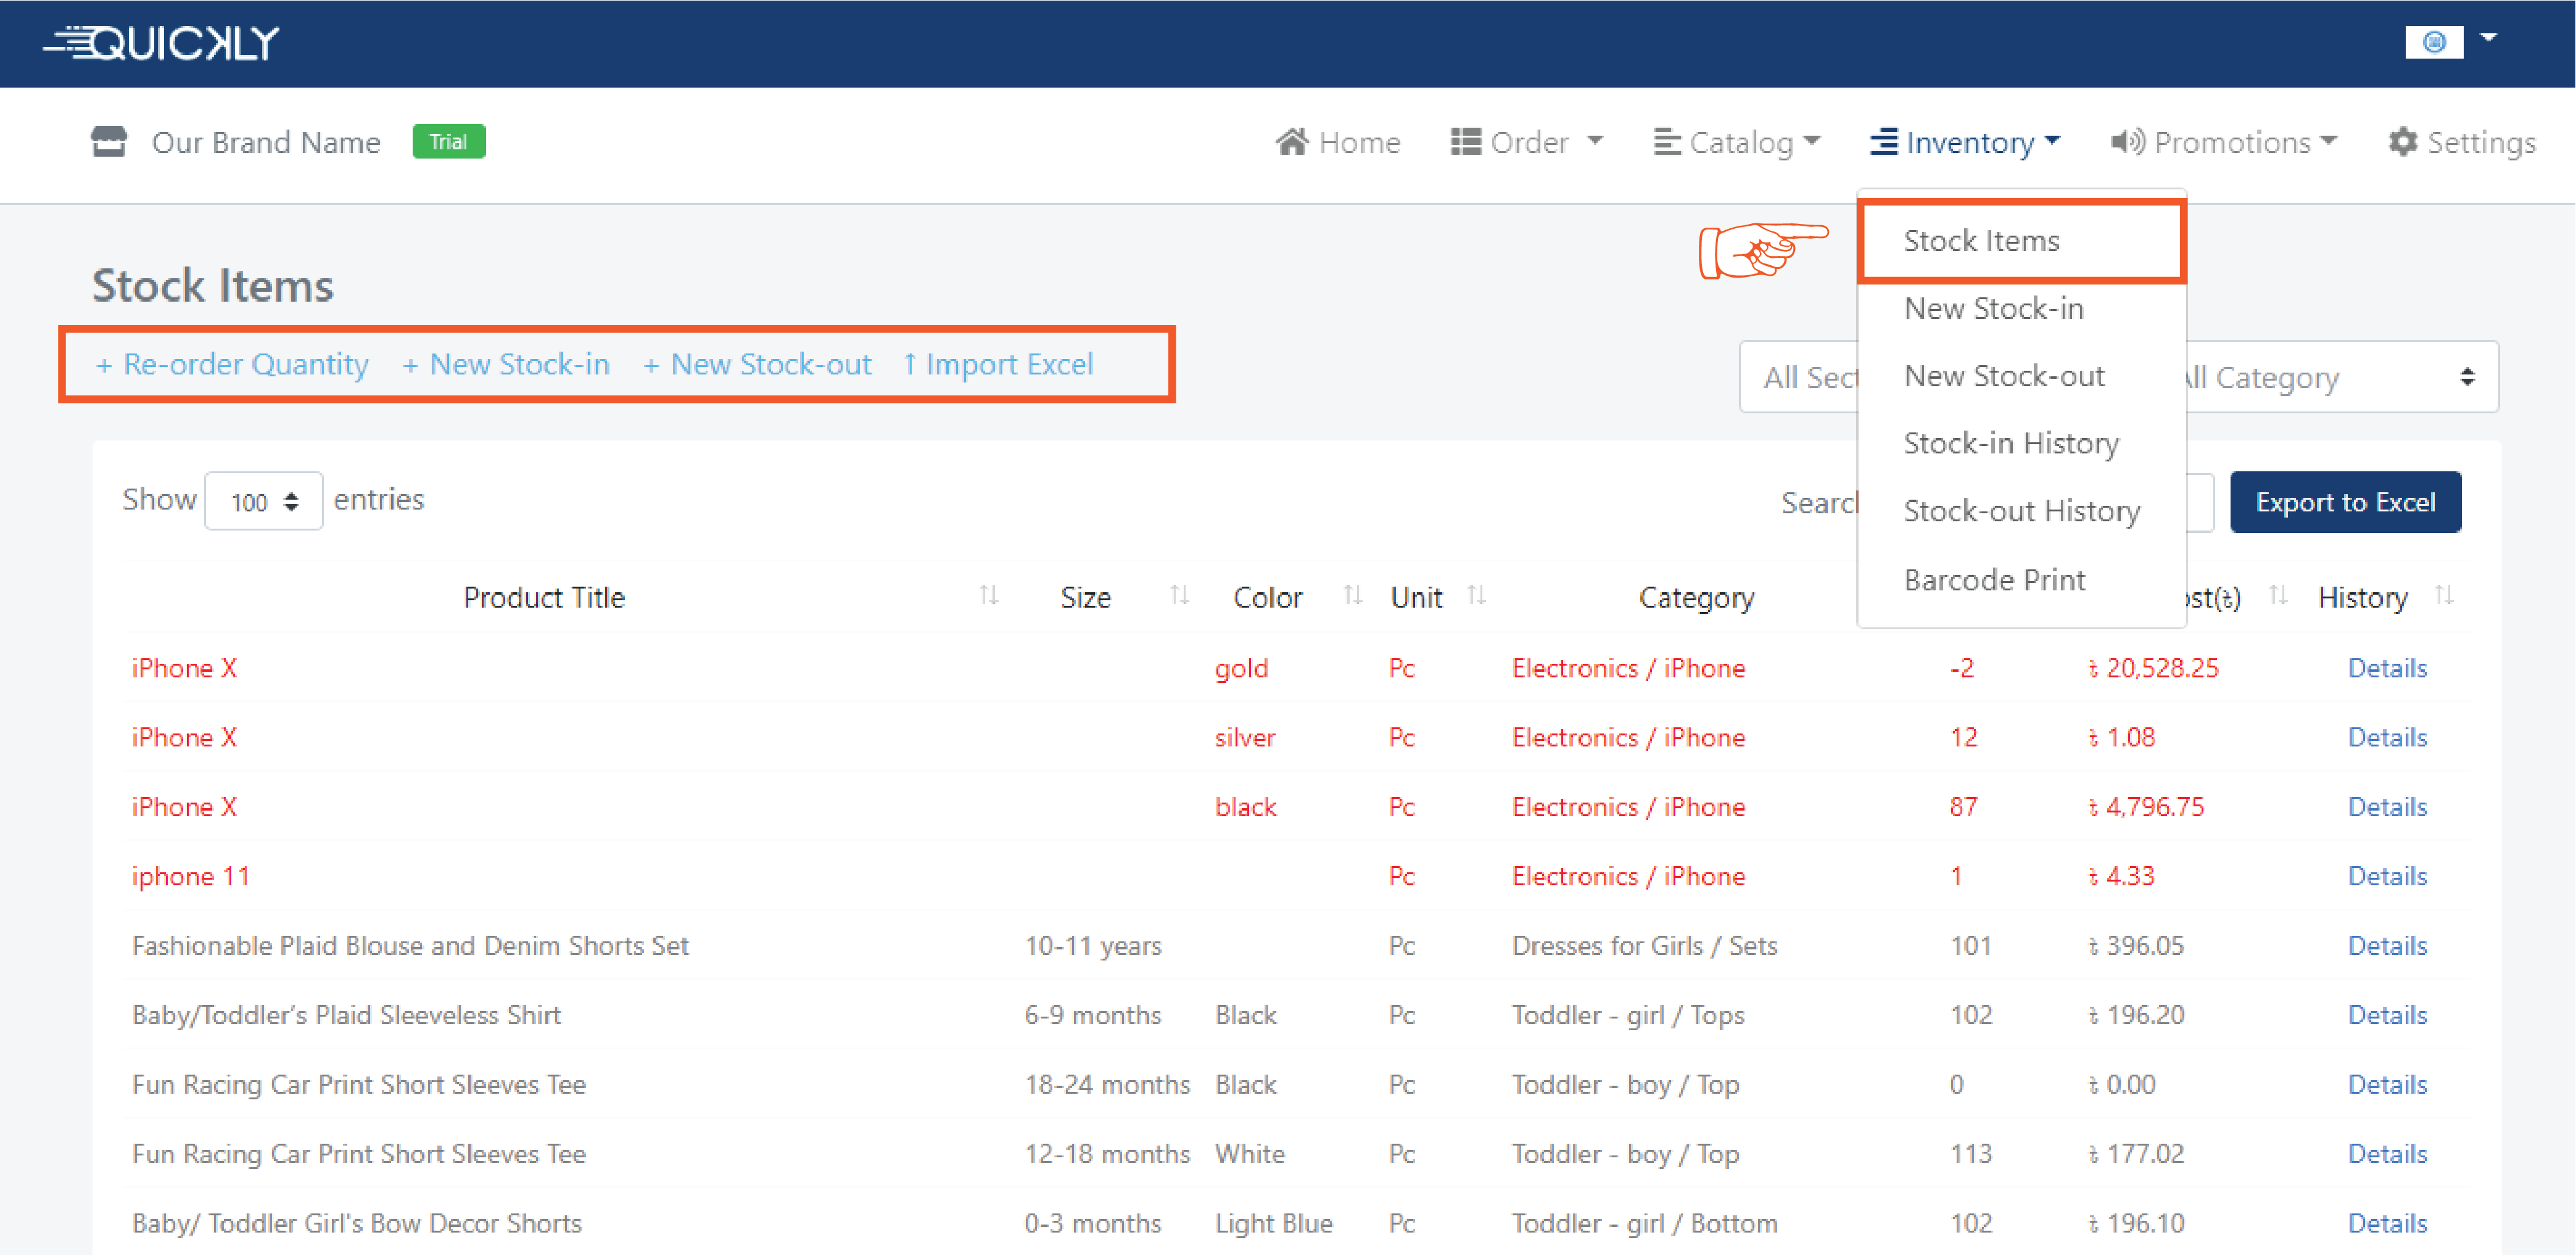
👉 Don’t want to stock items manually in the software? Or you already have your stock items in an excel sheet? Then go to the stock item page and you can simply upload that excel file [Following a specific format click here]. Click on the import excel button and upload the file. the software will automatically generate the information.
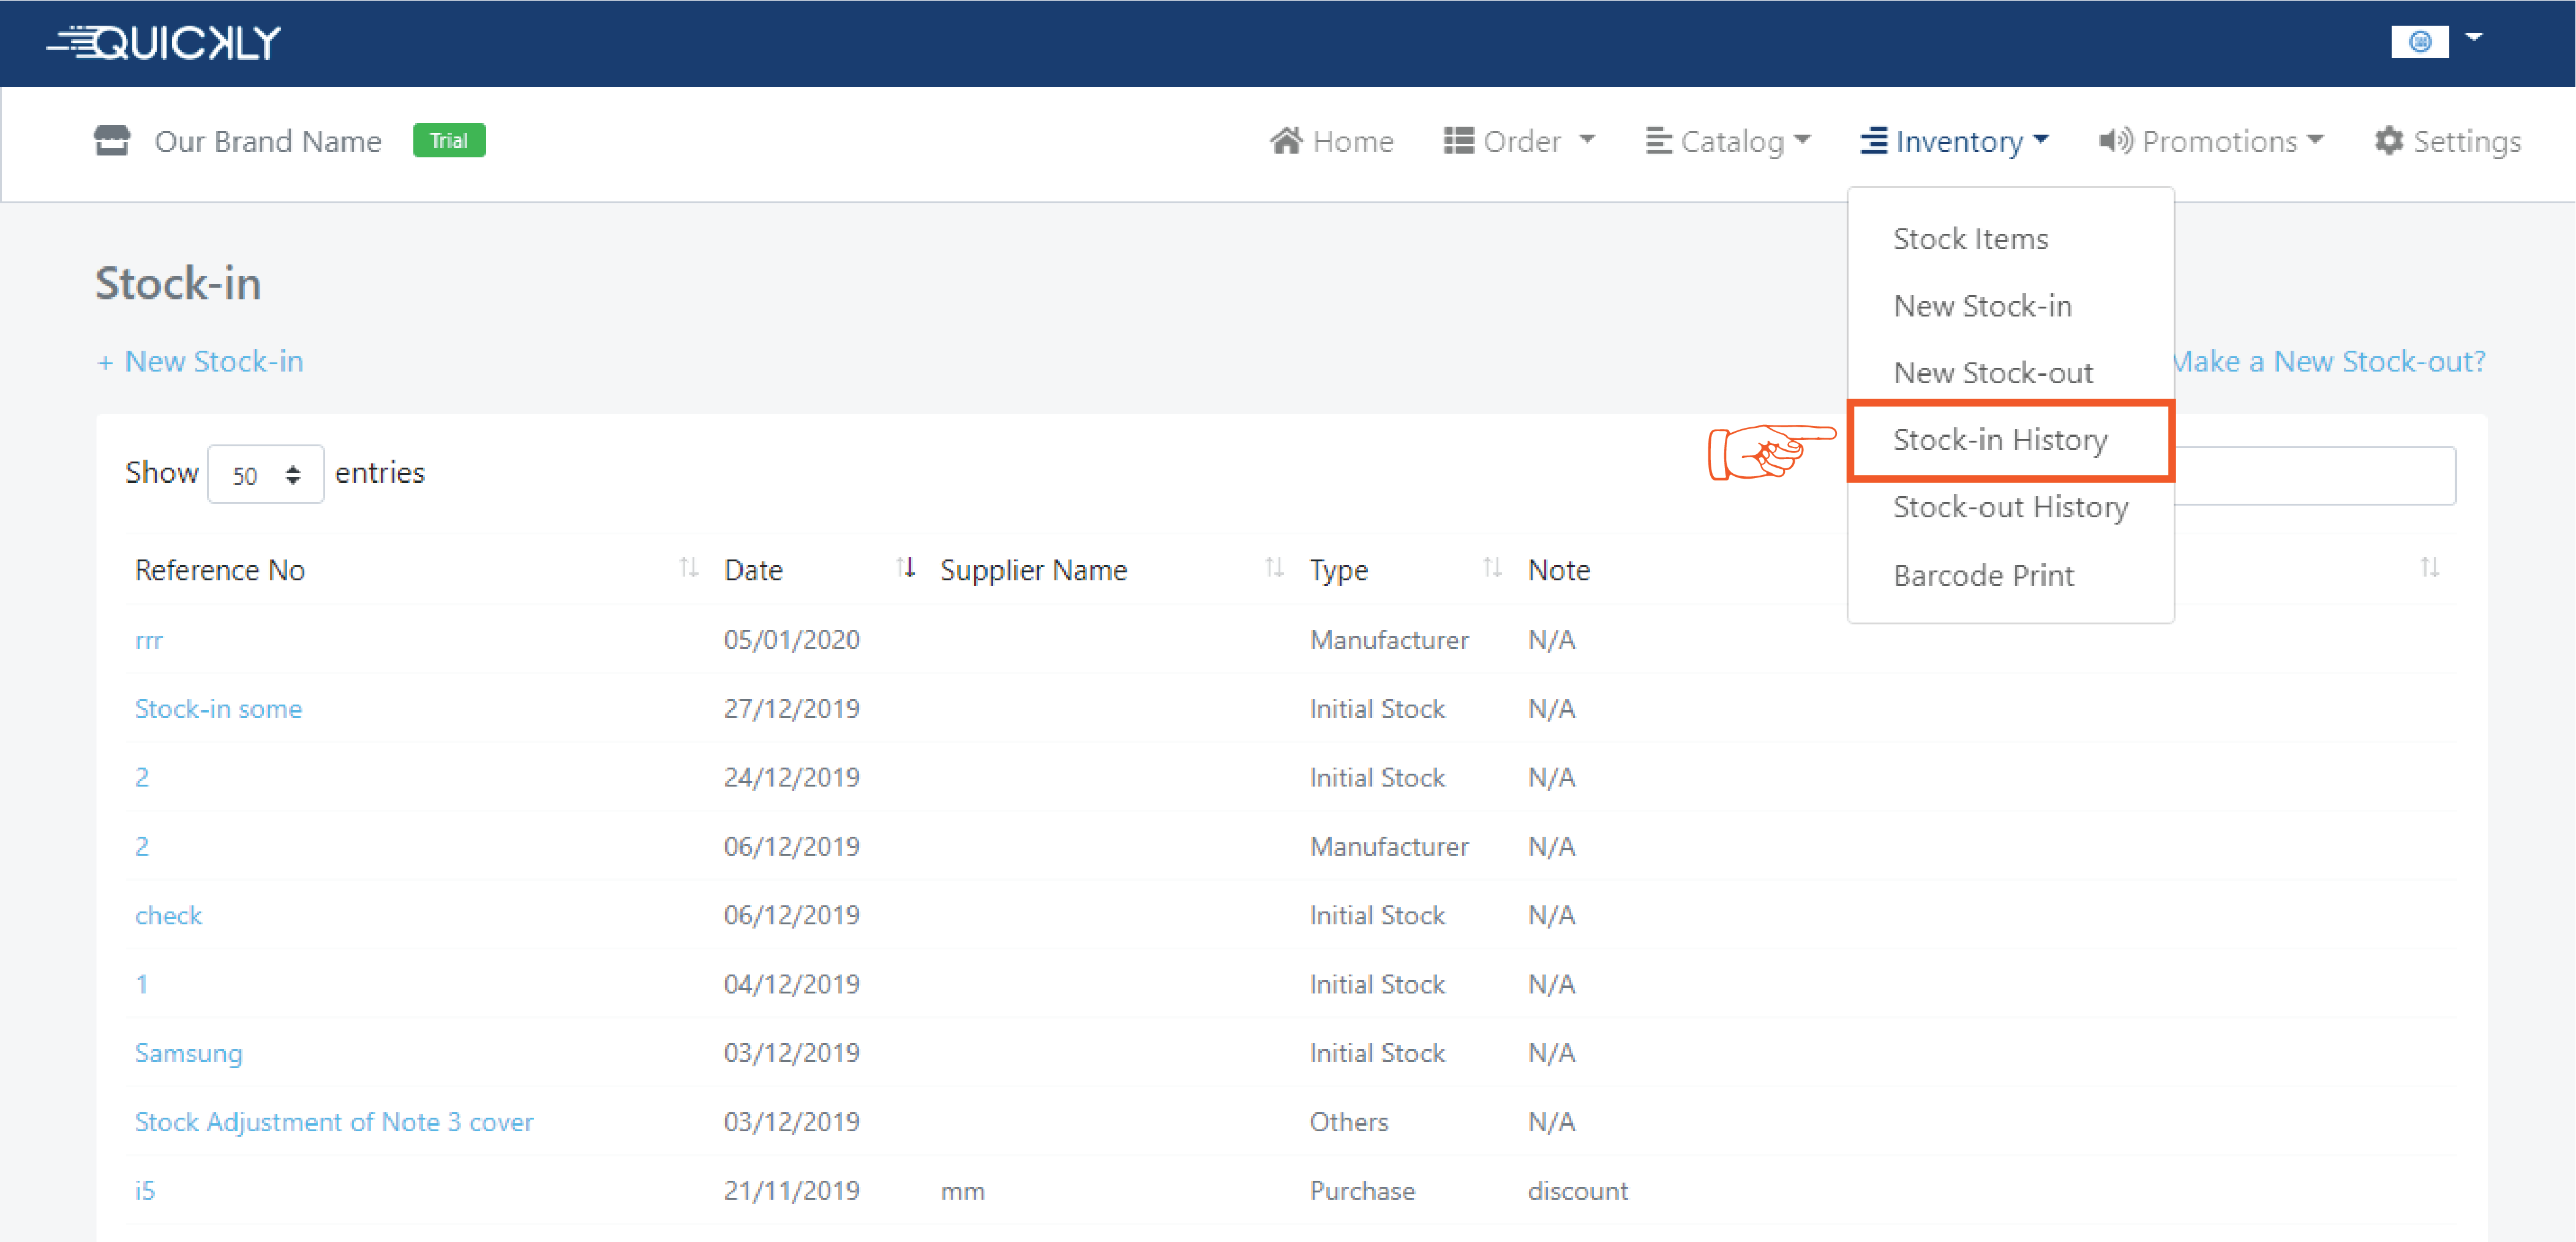
👉 On this page, you can see the details of all the items you have stocked-in for your shop. Simply navigate to the Inventory option of the portal and click on the Stock-in History to see your stock list. By clicking on the reference no. you will get to see the details.
How to set reorder stock value?
Admin
2 months ago
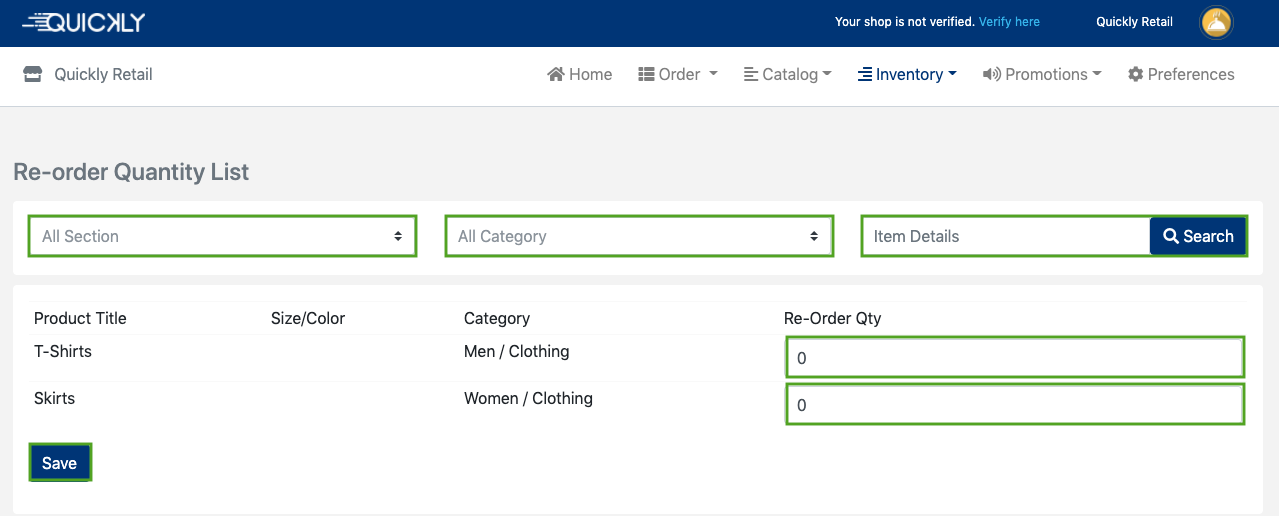
Select Stock Items from the Inventory dropdown menu which will bring up the Stock Items page.
Click on +Re-order Quantity from the Stock Items page and a form will appear.
Fill out the form by selecting the section and category,type the reorder quantity to the respective field and click on the save button.
How to stock-in items to the inventory?
Admin
2 months ago
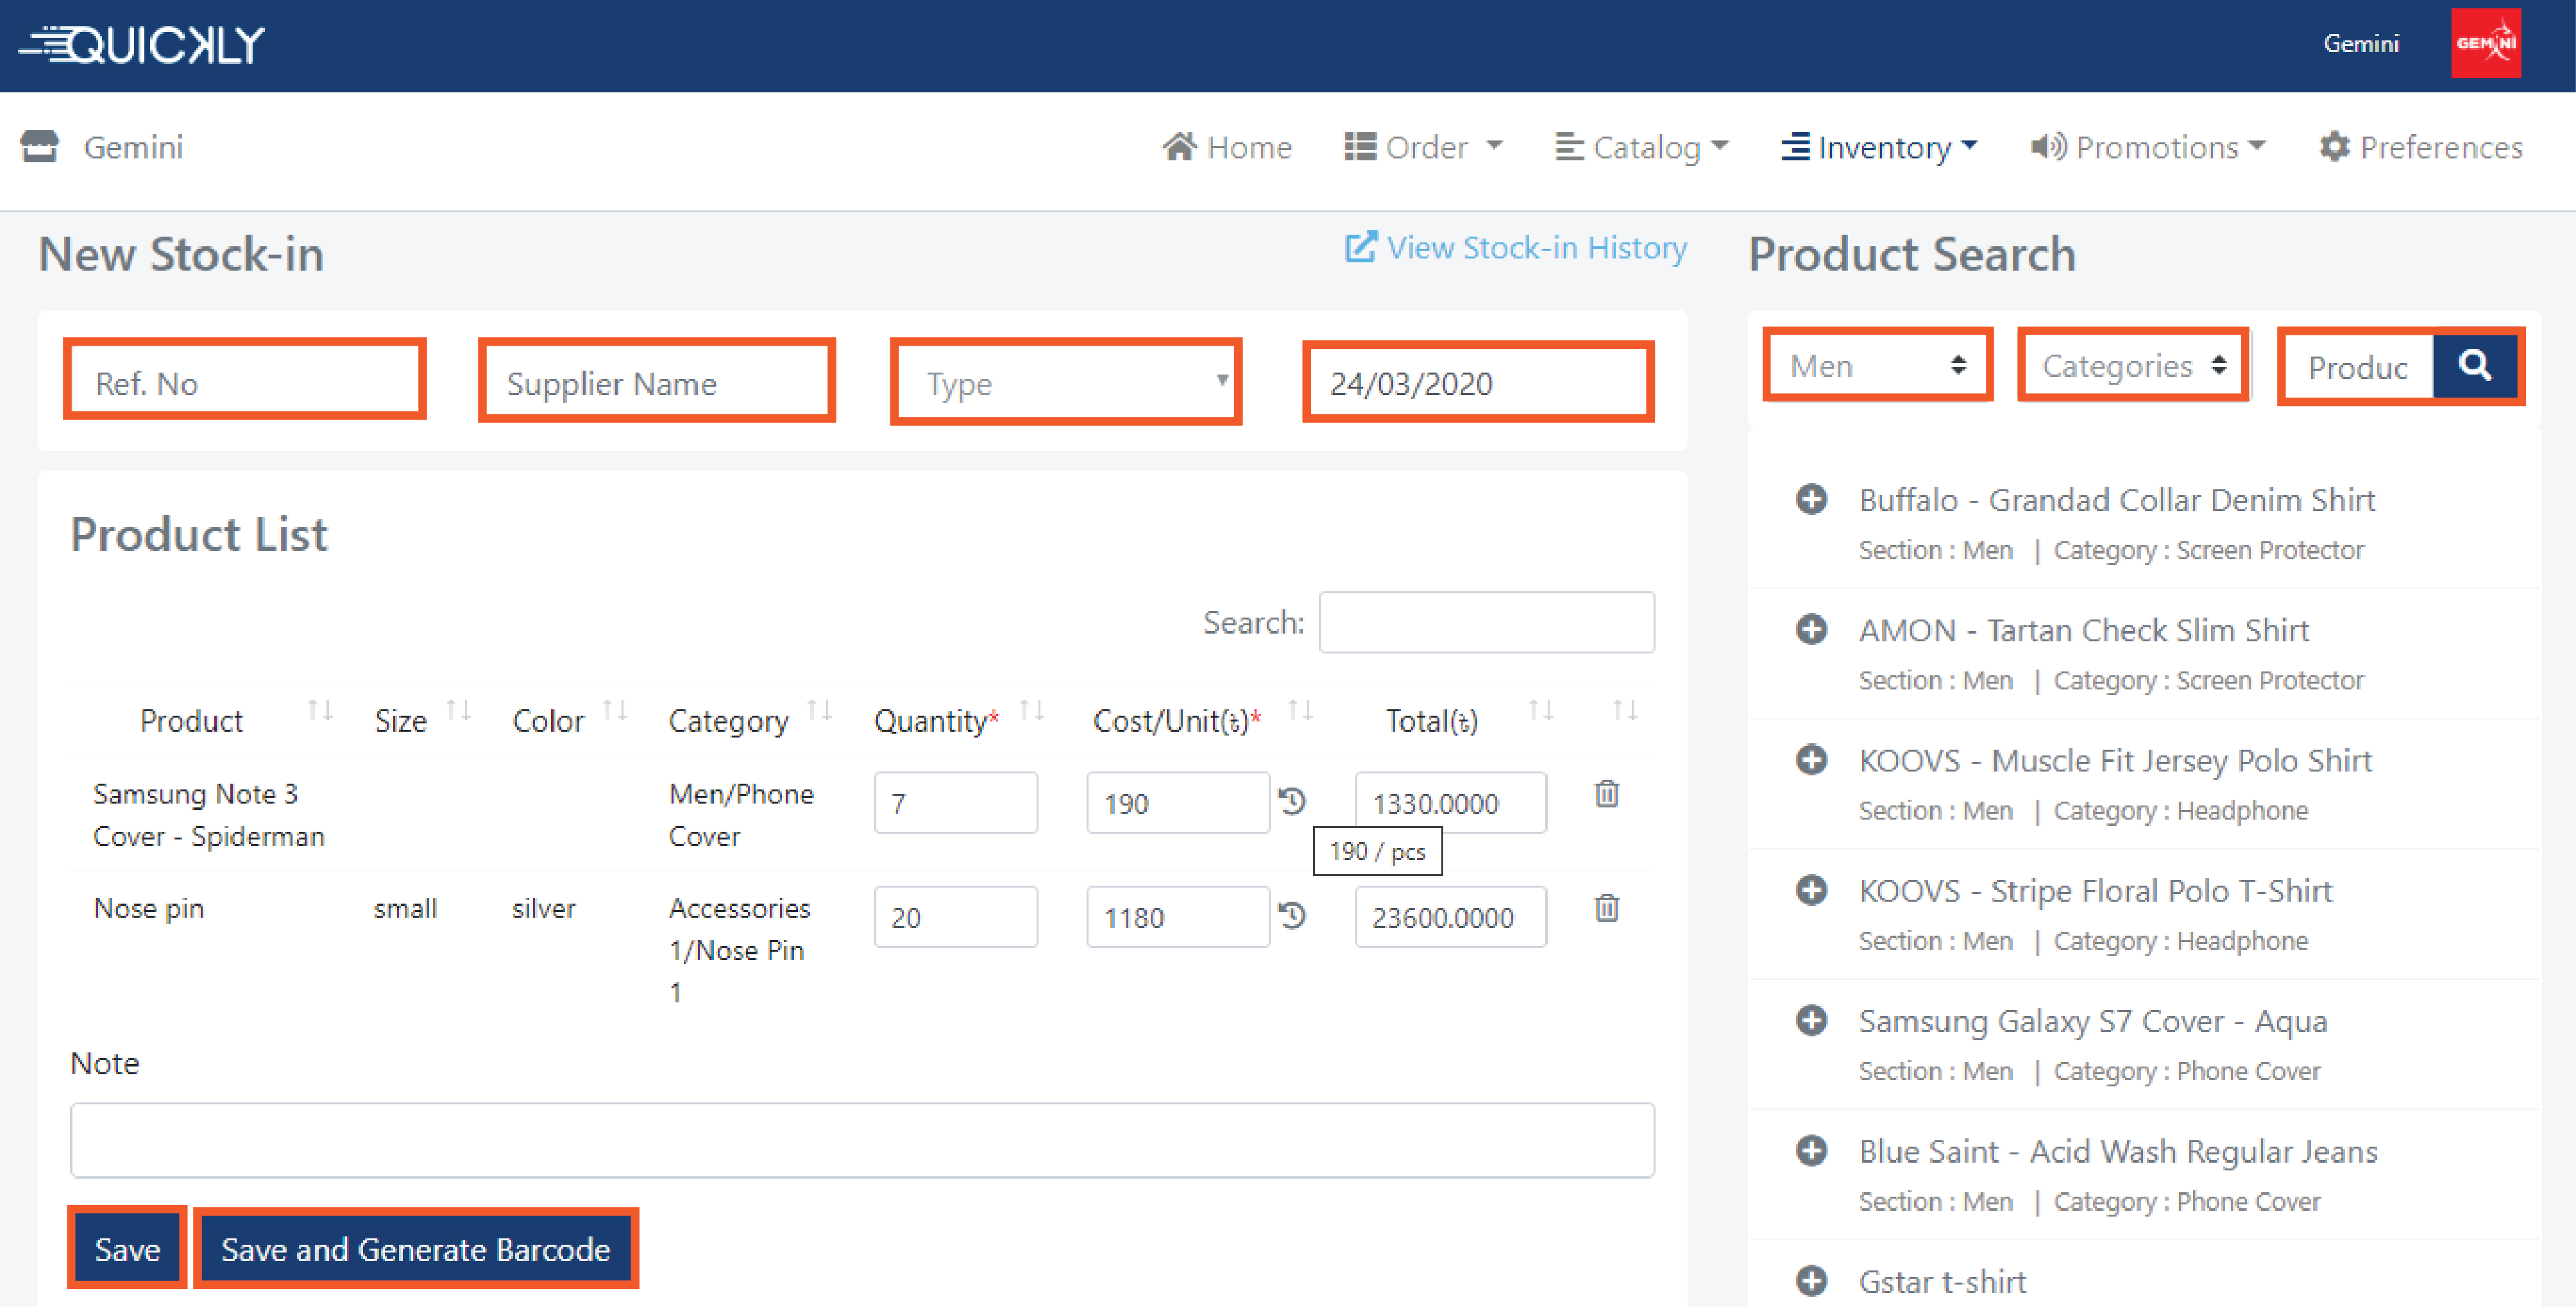
👉 Simply navigate to the Inventory option of the portal and click on the
New
Stock-in to start creating your stock list.
On this page, write down a Ref. No. You can write any code or number
(i.e invoice number) in this section which will help you to find the item in
the stock-in history page. Then write down the Supplier Name if you want to.
After that, you need to choose a stock-in Type which suits you the best
according to you.
For example, when you stock-in for the first time you can choose initial
stock,
you can choose the manufacturer option if you want to enter the
manufacturer's name.
You may also choose to purchase or other option if you want.
Select the date when you are stocking-in the item(s)
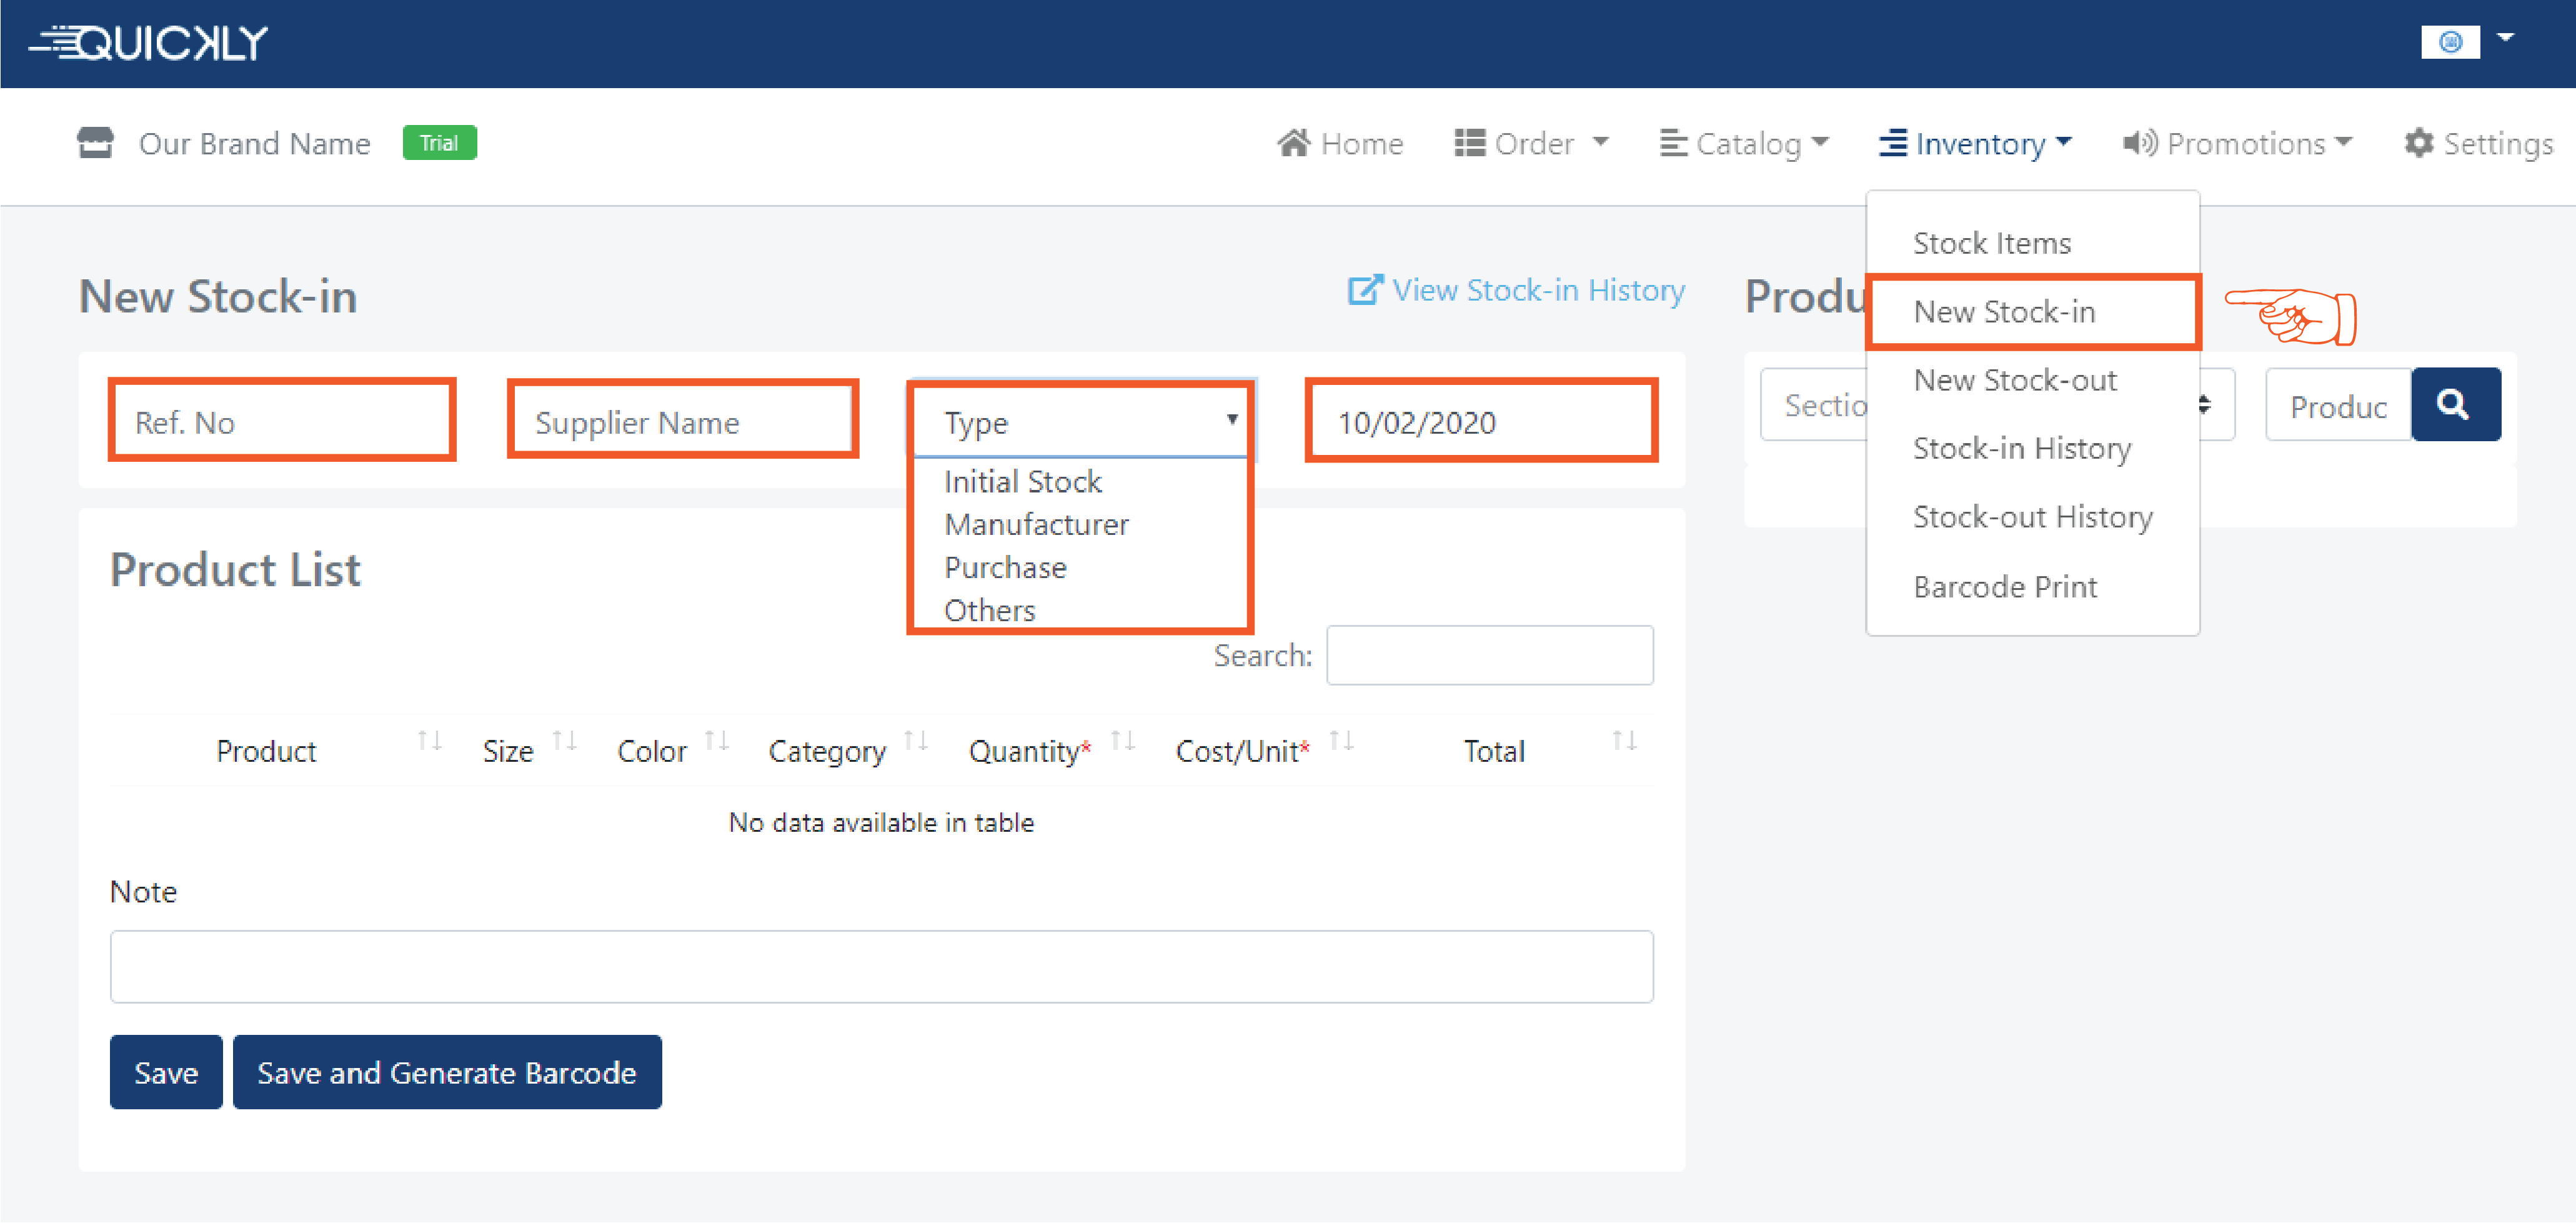
👉 On the right side of the page, there is a section called Product Search.
You can
Select Section and Category from the dropdown and click on the (+)plus
button to
add on the item list section.
A pop-up window will open if there are sizes and colors available for the
product and
if you want to stock-in all of the products then you can click the
‘Add All to Product List’ button but if you want to add specific products
then you can
choose the ‘Add To Product List’ button. If there is no variation no pop up
window will appear
and will be added to the product list automatically.
👉 Then write down the Quantity as much as you want to stock-in selecting the unit and unit price. If you hover your mouse over the icon beside the unit price box, you will find the previous price per unit for that item. Our software will automatically calculate the total cost of the product and if you write down the total cost, it will automatically calculate the unit price of the product. You can also write a note if you want to. At last, click on the save button to finish this step.
How to manage label and barcode printing?
Admin
2 months ago
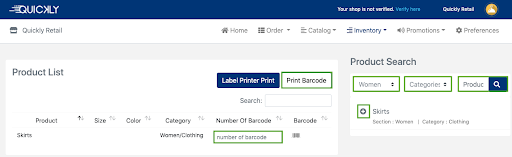
Simply select Barcode Print from the Inventory dropdown menu which will bring up a page to add products for printing barcode.
Search the product from the Product Search section and add the products by clicking on the + button which will add the products under Product List. Now, type the number of barcodes you want to print and click on the Print Barcode button.
How to set up your business details?
Admin
2 months ago
👉 Go to the Settings option of the business portal. In the settings option, you will get some sections like- “branding”, “business hours”, “configuration”, “app users”, “sales tax/vat” and “payment mode”. Fill up these information about your Retail.
👉 In the Branding page, Retail name, email address and phone no is filled up as you sign up on our portal. You can put down some related descriptions and address details if you want but you must specify the country, state/ division, district/ city of your business. You can also upload your Retail's image or logo and click the save button.
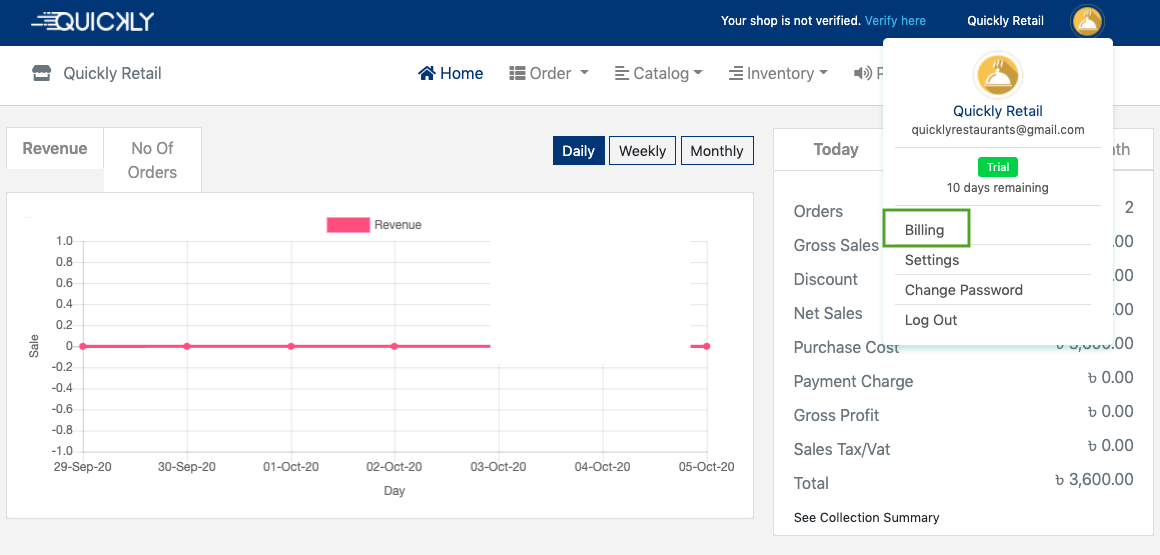
How to pay your bills?
Admin
2 months ago
Select Billing from the user manual for paying your bills.
How to set up your business hours?
Admin
2 months ago
👉 Setting up Business Hours is very important because you will
have your everyday revenue summary according to the business hours.
Just like the staff members you hire, the equipment you buy and
the location you choose, your hours can be an asset or can be
an obstacle for your business.
So, in the business hours page, you have to set up your business
hours according to your business active hours. Tick on the
close button if your business is closed for a certain period
of time and click the save button.
How to change your time zone and currency?
Admin
2 months ago
👉 In the Configuration page, you have to select the starting day of the week. Then you can set currency from any of the given Four - BDT, EUR, USD or INR. You can also set your timezone based on your location.
e-Shop
Admin
2 months ago
Quickly e-Shop creates an e-commerce platform for you, providing a complete sales channel for your store. This means you can have your website and use it to better organize and run your business online.
Right after enabling the module, you’ll get a customizable URL for your website or map a custom domain and smartly manage your online orders.
Give your website a personal touch by changing its theme color, contents, and banner - all by yourself. No technical knowledge or design skill is needed.
Your e-shop is always in sync with your Business portal and linked to the Sales & Billing module. So any changes to store information (e.g. location, contact details, business hours, social media links, etc.) and products will automatically reflect on the website.
Gain control of your business, start your delivery fleet, and have it delivered to your customers’ doorstep right away!